![]()
Ozone Generators  Poseidon 200
Installation & Service Manual
Welcome to OZOTECH, Inc.
Thank you for purchasing an OZOTECH Poseidon 200 Ozone Generator for your reef tank.
For nearly 40 years, we’ve pioneered the use of ozone (O3) to achieve the highest possible water (and air) quality and clarity across the aquarium and water treatment sectors throughout the United States and around the world. Designed and manufactured in Yreka, California, we take great pride in offering you ozone solutions built to last.
As reef keepers ourselves, we understand the obsession associated with chasing the clearest and cleanest water ossible. Our Poseidon Series continues to be the preferred and most trusted ozone generator on the market for reefers who value consistent clarity, quality, and American made raftsmanship.
We hope your Poseidon 200 will offer you years of enjoyment. Thank you again for choosing an OZOTECH Ozone Generator.
Safety First
![]() Read the following safety guidelines thoroughly before attempting to operate or install your equipment.
Read the following safety guidelines thoroughly before attempting to operate or install your equipment.![]() As with all electrical devices, this equipment should never be allowed to come in contact with water.
As with all electrical devices, this equipment should never be allowed to come in contact with water.![]() Only qualified personnel should be allowed to set up, maintain and operate this equipment.
Only qualified personnel should be allowed to set up, maintain and operate this equipment.![]() The equipment must be operated using a properly grounded electrical circuit that is protected by either a fuse or circuit breaker.
The equipment must be operated using a properly grounded electrical circuit that is protected by either a fuse or circuit breaker.
Do not use an extension cord to supply power to this equipment.
OZOTECH, Inc., assumes no liability for damages or injuries incurred by misuse of this product.
3.0 Brief Overview of Ozone
Unlike atmospheric (naturally occurring) ozone caused during
a thunderstorm, your Poseidon 200 uses a Pulse Modulated Corona discharge (PMCD) to create ozone.
This occurs when an oxygen molecule (O2) passes across the corona gap air space. During this time, some of the O2 molecules are split, resulting in free” oxygen atoms. These free, unstable oxygen atoms quickly attach to themselves to create ozone (O3). It is the extra oxygen atom that gives ozone its superior oxidation capabilities in water and air.
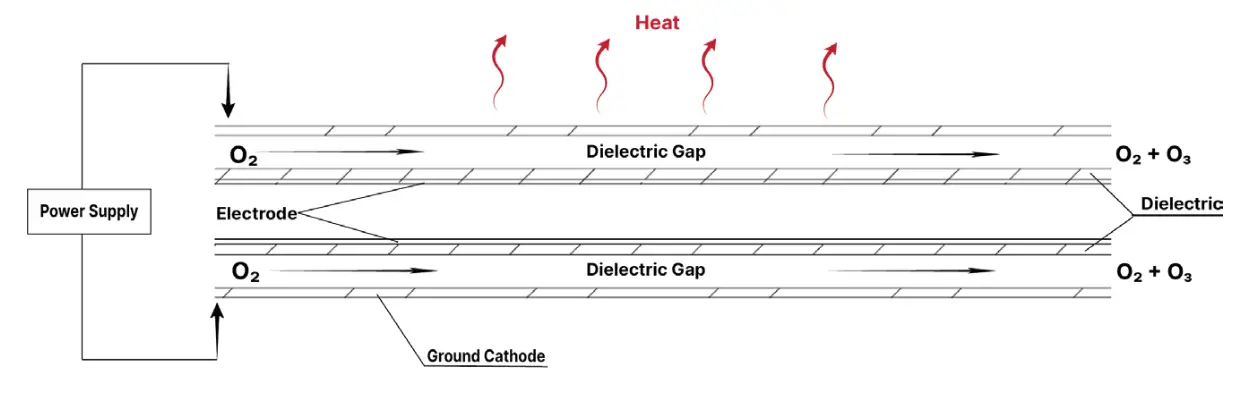
3.1 Ozone Generation from a Corona Discharge (CD) Cell
Setup, Installation & Maintenance
With a firm understanding of how ozone is made using a Corona Discharge (CD) cell, we will now provide an overview of your new Poseidon 200 with a description of what’s inside, common installations, and how it should be routinely cared for to operate effectively.
4.1. Poseidon 200 Setup
Operating Requirements
- Voltage = (Specified) 11.7 VDC to 13.9 VDC
- Power Consumption = 600 ma @12vdc (7.2 watts) nominal
- Maximum pressure of 5 PSI
- Ideal airflow rate 2-10 Standard Cubic Feet per Hour (SCFH) External Mounting
Mount your Poseidon 200 Ozone Generator in an area free of airborne dust and moisture. The ideal location is inside of a utility/ electrical cabinet, or the dry side of your aquarium stand to remain cool, dry, and clean.
In Service Date Field
Before mounting, please fill in the “In Service Date” field on the back of the Poseidon 200 with the date you first placed the Poseidon into service. This date will serve as the maintainence service reference date.
Internal Considerations
For optimal performance keep the inside of the generator chas is clean and dry. Dust particles and condensation (salt creep) can pose a significant challenge to the consistent operation of the ozone generator. Three, bi-directional keyholes are available in the chassis base for mounting
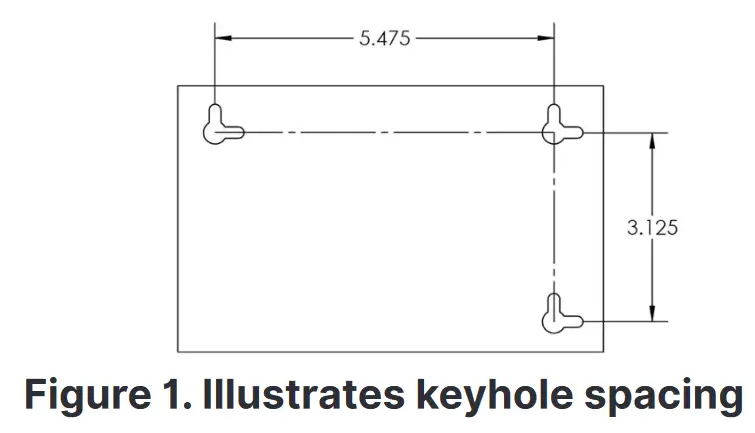
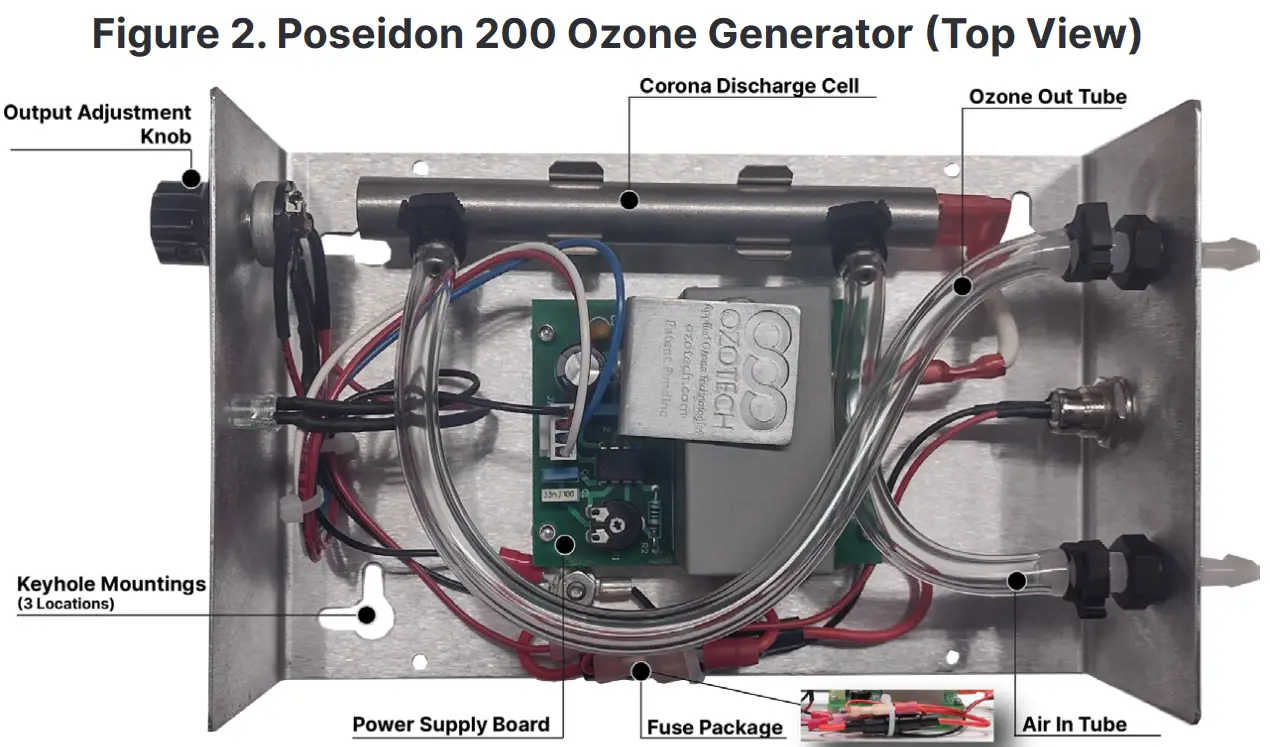
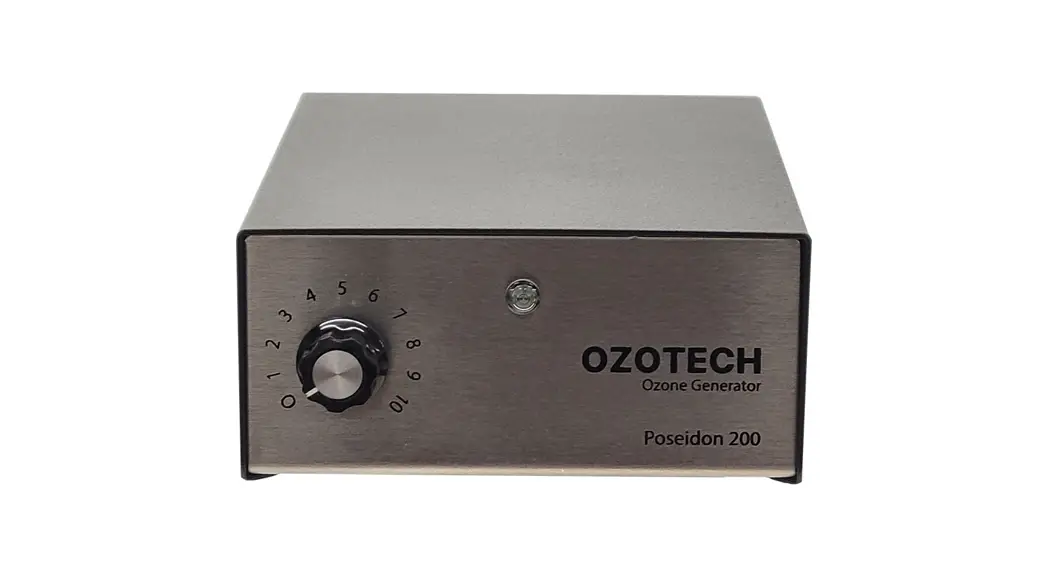
Figure 3. Poseidon 200 Ozone Generator (Front View)
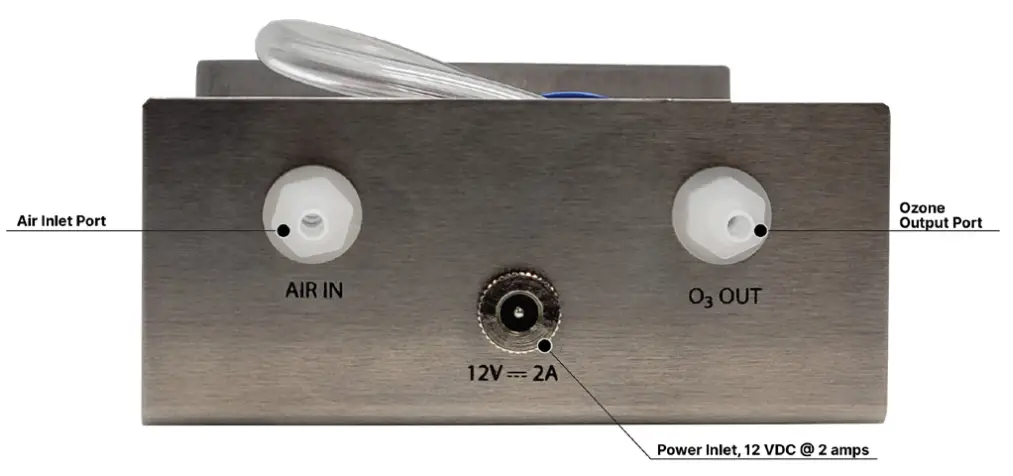
Figure 4. Poseidon 200 Ozone Generator (Back View)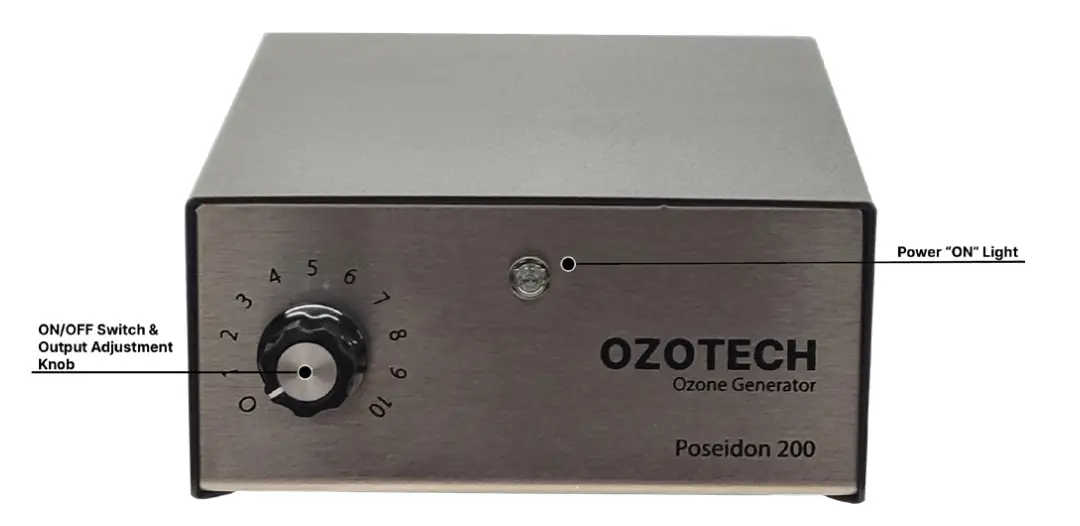
Figure 4. Poseidon 200 Ozone Generator (Back View)
4.2. Poseidon Installation
Basic Ozone Operative Ecosystem
Ideal Ozone Operative Ecosyste
GEO Reactor Operative Ecosystem

4.2a. Complementary Poseidon Products
Air Dryer Series
Incredible quality and value in an ozone feed air treatment line that provides flawless service and performance. The air dryer line removes moisture from the air going into the ozone generator while dry air reduces the buildup of nitric acid in the ozone generator to increase ozone production.
DI Dryer 2.0
IQ-20 Dryer
IQ-40 Dryer
For more information on these products, click here to visit the OZOTECH website
4.3. How to Properly Power up and Tune the Poseidon 200
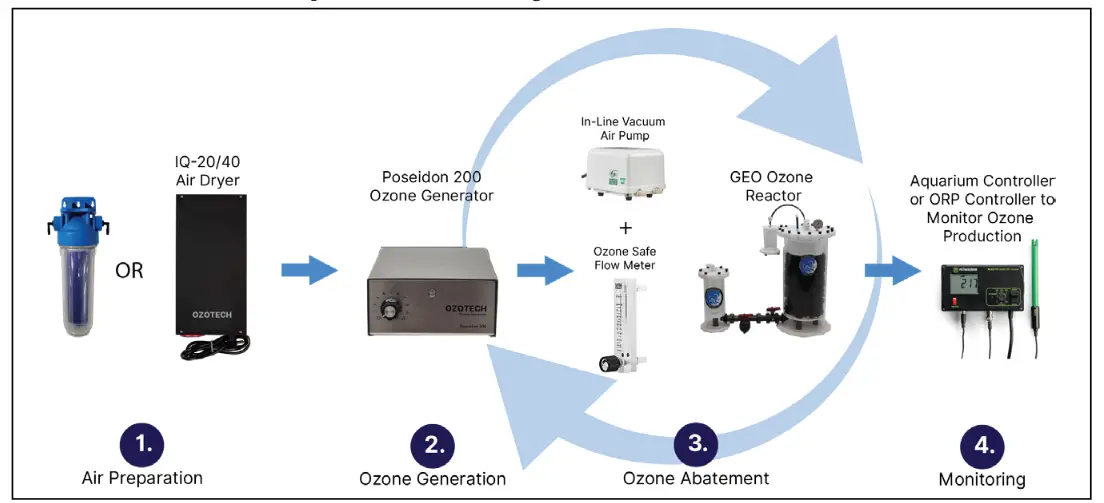
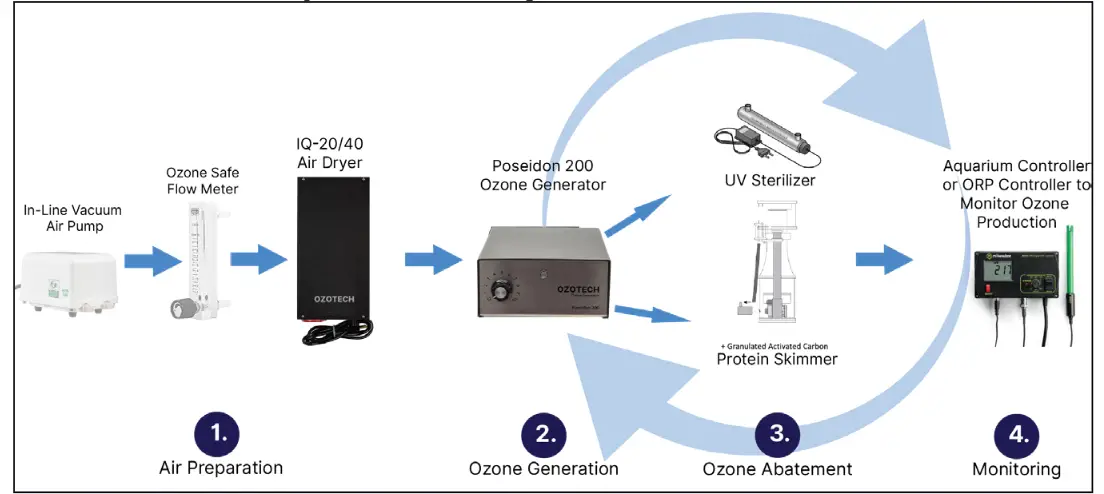
- Connect an air preparation device (such as the OZOTECH DI air dryer 2.0, IQ-20, or IQ-40) outlet tubing to the air input tubing of the Poseidon 200 Ozone Generator.
- Connect ozone output tubing, with in line check valve, to appropriate ozone injection device – i.e., skimmer or reactor.
- Connect power to the DC jack at the back of the unit and turn the power adjustment knob to the right turning the power on. The light will turn on and power is flowing.
- Start low (1-3) and use a redox (ORP) probe to determine the value pre-ozone and post-ozone. To achieve your desired ORP range, (~350-385) slowly adjust the knob to the right until the desired redox value is achieved.
Noteworthy:
- Outside the safe ORP range (~350-385) could cause respiratory damage to your fish due to heightened levels of ozone, and equipment that is not ozone resistant. It is best practice to run ozone for short periods of time on a controller.
- An ozone abatement solution such as the use of granulated active carbon (GAC) or similar is advised to reduce residual ozone.
4.4. Poseidon Servicing & Maintenance
A visual inspection of your Poseidon 200 should be done monthly to ensure there’s been no salt creep or damage due to it being around a reef tank. Should the cell become plugged with nitric byproducts or if water backs into the cell, it could cause a catastrophic electrical failure. Proper air preparation can usually avoid the build-up of nitrous.![]() CAUTION: Disconnect ozone generator from power supply before performing any maintenance.
CAUTION: Disconnect ozone generator from power supply before performing any maintenance.
To service the Poseidon 200, the following steps can be taken:
- Disconnect unit from power source (back of the unit).
- Remove top cover by removing four press-in rivets (bottom of unit).
- Inspect the inside of the generator for dust and/or moisture.
- Thoroughly clean and dry the inside of the generator.
- Replace any ozone-resistant check valves on the air-in or ozone gas outlet lines as necessary or at least once a year.
- Place the lid back onto the unit by installing the four press-in clips and reconnect power.
Poseidon 200 Frequency of Corona discharge Maintenance
OZOTECH recommends cleaning the Corona discharge cell once a quarter and replacing the cell at least once a year. A new Corona discharge cleaning kit or replacement cell may be purchased from your preferred distributor or by visiting the OZOTECH website for a list of distributors. The cleaning kit part number can be found in the Spare/Replacement Parts section.
Corona Discharge Cleaning Guide
Poseidon 200 Corona discharge Replacement Procedure
- Disconnect the unit from its DC power source (back of the unit).
- Remove top cover by removing four press-in rivets (bottom of the unit).
- Disconnect electrical connection from cell to the power supply board.
- Pull Corona discharge cell out of the holding clips, then disconnect all tubing from the Corona discharge cell.
- Discard Corona discharge cell.
- Reverse steps to install replacement Corona discharge cell.
4.5 Spare/Replacement Parts
| Part # | Description |
| 33218-R | Replacement Cell & Adapter Kit |
| 47035 | 3/16” Barbed Check Valve |
| 40080-01 | Wall Transformer, 230/115VAC regulated to 12VDC, 2A |
| 47044-1 | Corona discharge cell Cleaning Kit |
Fusing
There is only one fuse connected to the 12 VDC source. It is located inside of the inline fuse holder. Fuse size and value is listed below:
| Part Number | Fuse Size | Fuse Value |
| 43223 | Type IEC 127 | .800-amp, fast blow |
Troubleshooting Guide
| Symptom | Possible Cause | Remedy |
| Unit does not turn on | Unit is not connected to a power source or is connected to improper power source. | Refer to silk screened text on the back of chassis for voltage requirements. Connect unit to proper power source. |
| ON/OFF switch not rotated to a mbered position 1-10. | Turn the output adjustment knob clockwise to tum unit ‘ON: | |
| Blown Fuse | Replace fuse with an equally rated substitute. Fuse specification can be found in Section 4.5 | |
| Unit keeps blowing fuses | Electrical short circui | Visually inspect unit, and check for loose connections. Inspect printed circuit board for burn marks. Inspect HV wire from printed circuit board to ozone cell for disconnection or bum marks. Repair any and all problems prior to placing unit in service or contact factory for service information. |
| Incorrect fuse value and type are being used. | Replace with appropriate size/type fuse. Refer to Spare/ Replacement Parts for eplacement part information. | |
| Unit is connected to improper power source. | Refer to silk screened text on the back of chassis for voltage requirements. Connect unit to proper |
Troubleshooting Guide
| Symptom | Possible Cause | Remedy |
| Unit is putting out approximately ½ of rated output. | Improper power source. | Refer to silk screened text on the back of chassis for voltage requirements. Connect unit to proper power source. |
| Ozone output adjustment knob not turned up. | Adjust the output adjustment knob clockwise to increaseozone production. | |
| Unit turns on, but no ozone output. | Frequency driver is defective. | Contact your dealer or OZOTECH, Inc. for replacement options. |
| Frequency driver high voltage lead not connected to ozone cell. | Connect lead to Corona discharge cell. | |
| Water has been allowed to back up intthe cell and cause a direct short. | Replace | |
| Cell is plugged with a build-up of nitrous byproducts and particulate matter. Usually caused by the lack of proper air preparation. | Replace | |
| Ozone output adjustment knob is turned to minimum. | Adjust output adjustment knob clockwise. |
Limited Warranty
OZOTECH, Inc., warrants the Poseidon 200 zone generator to be free from defects in parts and workmanship for (12) months from date of invoice, under conditions of normal use. The corona discharge cell is warrantied against catastrophic electrical failure for 3 years from date of invoice. All other parts, repaired or replaced, will be warranted only for the remainder of the original warranty period.
OZOTECH, Incorporated will refund the purchase price, perform repairs or replace equipment, at the option of ZOTECH, Incorporated.
The warranty shall be null, void, and non-binding upon OZOTECH, Incorporated if OZOTECH, Incorporated (or authorized service center) determines the cause of malfunction or defect to be a result of:
- Failure to perform proper maintenance as defined and recommended in this manual.
- Failure to adhere to and provide proper operating conditions, as defined in this manual, including operation outside of temperature range, operating in wet or dirty environment, operation outside of manufacturer’s specifications.
- Adjustments made by user other than product output flow rate within ranges specified by manufacturer.
OZOTECH, Incorporated assumes no liability for damages incurred by deliberate or incidental misuse of this product, or damages incurred in transit.
Service Returns
If the need arises to return your equipment for service, the following procedure must be followed to ensure accurate and timely processing of repairs.
- Obtain the serial number of unit to be returned.
- Obtain model number/name of unit to be returned.
- Contact OZOTECH, Incorporated and request a Return Material Authorization (RMA) form. Make sure to give the factory representative an accurate and current shipping address.
- Enclose a description detailing the problem with the unit. Be as specific as possible.
- After receipt of RMA form, package unit for shipment. Enclose the RMA form with the unit. Use the original packaging materials if possible.
- Clearly write the RMA number on the outside of the shipping package.
- Verify that the address is correct and current.
- Shipments that are not factory authorized will be refused.
It is recommended that you ship with a reputable and reliable shipping company, and that the contents of the package are insured. OZOTECH, Inc., accepts no responsibility for damage or loss of equipment in transit.

ALL FREIGHT TO THE FACTORY MUST BE PREPAID.
If the repair is covered under warranty, the factory will pay return shipping charges (surface rates only) to the address listed on the RMA, within the ontinental United States. If the repair is not covered under warranty, the returning party is responsible for payment of return shipping and handling charges, as well as labor and equipment costs associated
with the repair.
OZOTECH, Inc
1015 South Main Street, Yreka, CA 96097
Ph. 530.842.4189
ozotech.com


