S101 Pro Studio Strobe Light
NEEWER®
S101 Pro Studio Strobe Light
Instruction Manual
Copyright
© 2021 Shenzhen Neewer Technology Co., Ltd. All rights reserved. This document is the sole property of Shenzhen Neewer Technology Co. , Ltd and shall not be reproduced , transmitted , transcribed , stored in a retrieval system or translated in any form, by any means, without prior written permission from Shenzhen Neewer Technology Co. , ltd Shenzhen Neewer Technology Co., Ltd reserves the right to change content in this instruction manual at any time and without prior notice.
Version Control
| dates | Version number | description | Issued by |
| 02/02/2021 | 1.0 | S101 Pro Studio Strobe Light manual | NEWER |
Safety Notes
To ensure the safety of you and others , please ensure you read the following safety advice before using this product. Please pay attention to the precautions highlighted in the manual. Please check the product before use and do not use damaged parts.
![]()
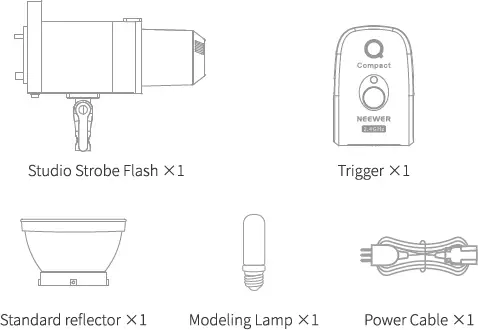
Package Contents
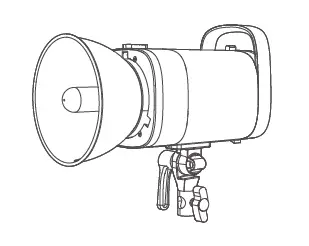
Product illustration
Product illustration
Product illustration
Set-up Instruction
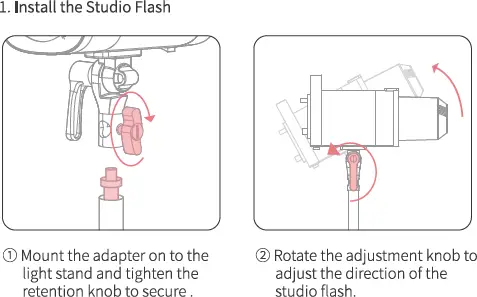
Set-up Instruction
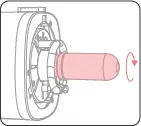
2. Install the modeling lamp
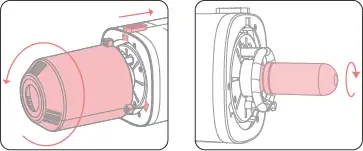
- Pull back the retention latch on the top. Turn the protective cover counterclockwise to align the latch with the hole. remove the protective cover
- Insert the modeling lamp by screwing it clockwise.
3. Replace the flash tube
- Remove the modeling lamp bulb by rotating it counterclockwise.
- Unhook the steel wire on the tube.
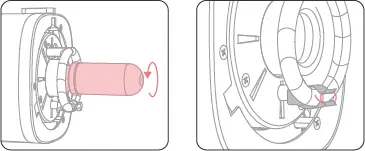
3. Hold the 2 prongs of the flash tube evenly and pull out the tube gently.
4. Remove the prongs cover from the old tube and reuse for the new one.
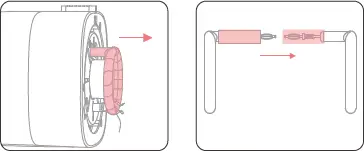
5. Align and push the 2 prongs of the flash tube into the 2 connector holes.
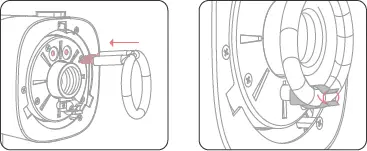
6. Wrap the steel wire around the stainless steel piece until the flash tube is secure.
 The lamp tube is fragile, please handle it gently during operation to avoid damage.
7. Screw the modeling lamp bulb clockwise until it is secure.
4. Install the soft light umbrella
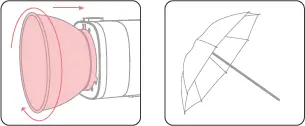
- Align the standard reflector clasp position with the hole, push the standard reflector in and turn clockwise until it locks into place.
- Open the soft light umbrella.
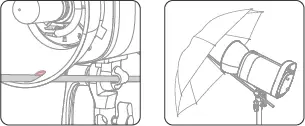
3. Pass the soft light umbrella handle through the standard reflector and the umbrella support.
4. The soft light umbrella is now ready to use.
5. Connect the trigger
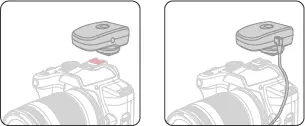
- Attach the trigger to the camera’s hot shoe mount.
- In the absence of a hot shoe, it can also be connected with a sync cord.
Instructions for use
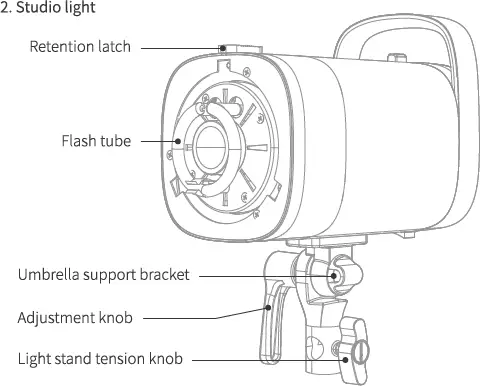
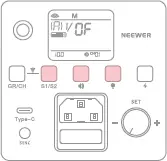
1. Instructions for using the studio light
Connect the cable to power the studio light and turn on the power switch.
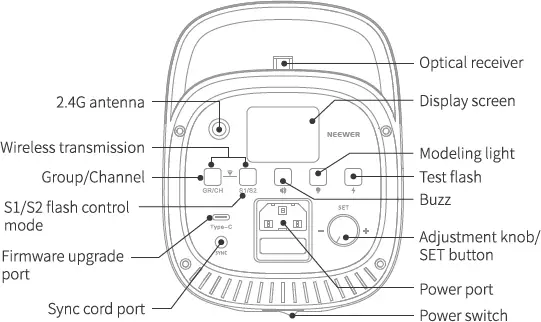
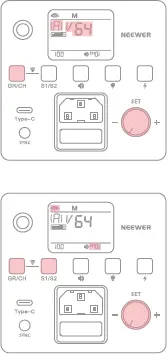 ● To adjust the power Turn the “SET” dial to adjust the power output from “1/64” to “1/1”.
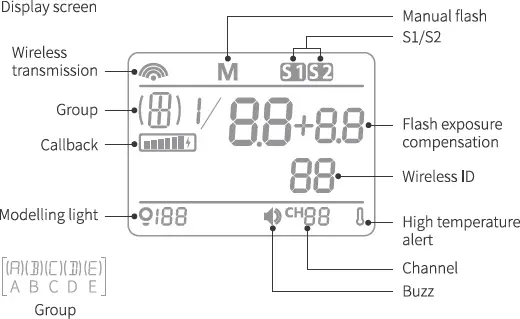
If “OF” shows on the display the function is switched off.
● Group Short press the “GR/CH” button, turn the “SET” dial to switch between groups ABCDE. Press the “SET” dial again to confirm.
● Channel Press and hold the “GR/CH” button for 3 seconds until “CH number” is flashing on the display.
● Wireless function Short press the “S1/S2″ + “GR/CH” buttons combination to turn the “wireless” function on or off,
Note: The wireless function must be turned on prior to adjusting the channel, group and ID settings. In order to do so, please press the “S1/S2″ and “GR/CH” buttons simultaneously.
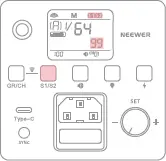 ● Wireless ID Long press the “S1/S2” button for 3 seconds to adjust the ID to 01, 02 – 97, 98, 99, OF.
● S1/S2 flash light control mode Short press the “S1/S2” button to enable Sl or S2 flash light control mode. Press again to disable.
S1 Flash mode: The S101 flash can be used as a secondary light source to create a variety of lighting effects. It is triggered synchronously with the first flash of a main flash unit. This has the same effect as using a wireless flash trigger.
S2 Flash mode: In S2 mode, the light can work in TTL mode and act as a secondary flash With anti-flash function, using a camera with a pre–flash function can use light control to achieve synchronized shooting.lt triggers the flash synchronously with the second flash of the main flash and is known as 2 times light control flash.
The wireless ID is equivalent to the numerical password and the value of the lamp remote ID must be set to the same value when the wireless remote is triggering the flash.
 • Audible alert Short press the “«” button to switch the sound alert on or off.
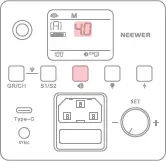
• Basic Mode Long press the ” ” button for 3 seconds, to enter this setting and adjust to OF, 4.0, 4.1-9.9 or 10. Press and hold the button again to exit.
 • Modelling light Short press” “to turn the modelling light on or off, long press | for 3 seconds until “100” flashes on | the display, then rotate the “SET” dial | to adjust the brightness of the modelling light. The adjustment range is 10–100, in stepped increments of 10%).
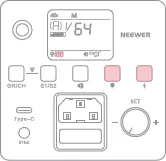
• Test flash Press the ” 4 ” button briefly to trigger i a test flash.
 • To restore factory settings With the device turned on, short press the “$1/$2″+” “button combination to restore to the factory settings.
• To view the version number With the device turned off, long press the “°”or“, “button and turn on the power to view the version.
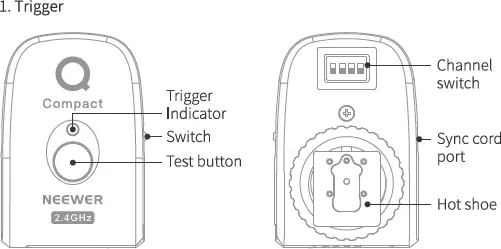
2. Instructions for using the trigger
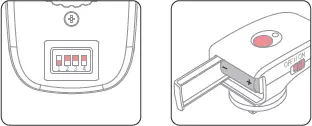
- Set the trigger combination to correspond with the studio light channel.
- Insert batteries in the trigger and turn on the power switch. Press the test button. If the indicator light turns red, the trigger is successfully connected to the studio light.
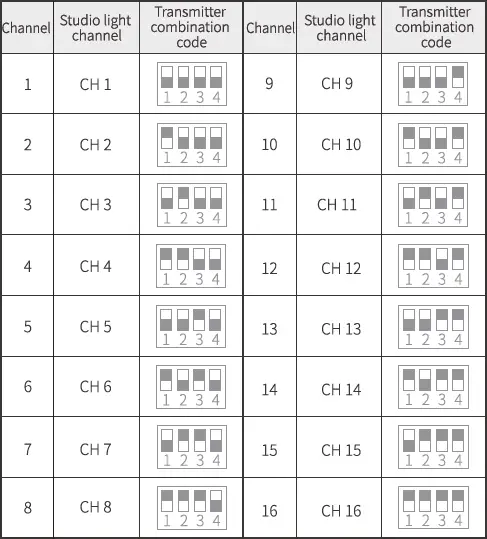
3. Setting the studio light and trigger channel ID
When the ID password of the photo studio lamp is off, the studio light and the transmitter can only trigger the flash when they are set to the same channel, as shown in the table below.
Note
- The camera is used for illustration only and must be purchased separately.
- Do not fire the flash at passing vehicles.
- Do not disassemble or modify the product.
- Do not touch the product with wet hands.
- When flammable substances are present, turn off the modelling light for more than 10 minutes before using it again.
- Do not subject the flash or modelling lamp to any form of physical shock as this may result in intemal damage.
- Do not activate the modelling lamp when the protective cover is fitted.
- Turn off the power when the product is not in use or when moving the flash unit.
- If you notice any abnormal operation when using the flash, turn off the power immediately.
- It is normal for the lamp body to heat up slightly during use. Continuous triggering of the flash should be avoided.
- Please note that flash tubes and modelling lamps are consumables not covered by the warranty.
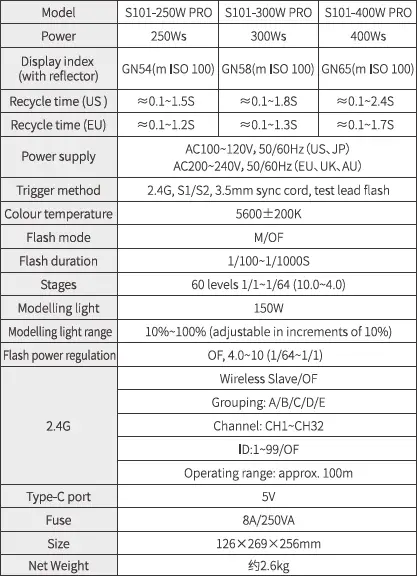
Product Specifications