
![]() CM 4SB2 Cutter
CM 4SB2 Cutter
Instruction Manual
(The diamond wheel is not supplied.)
Keep for future reference
![]() Handling instructions
Handling instructions
GENERAL POWER TOOL SAFETY WARNINGS
![]() WARNING
WARNING
Read all safety warnings and all instructions.
Failure to follow the warnings and instructions may result in electric shock, fire, and/or serious injury.
Save all warnings and instructions for future reference.
The term “power tool” in the warnings refers to your mains-operated (corded) power tool or battery-operated (cordless) power tool.
- Work area safety
a) Keep the work area clean and well-lit.
Cluttered or dark areas invite accidents.
b) Do not operate power tools in explosive atmospheres, such as in the presence of flammable liquids, gases, or dust.
Power tools create sparks that may ignite dust or fumes.
c) Keep children and bystanders away while operating a power tool.
Distractions can cause you to lose control. - Electrical safety
a) Power tool plugs must match the outlet.
Never modify the plug in any way.
Do not use any adapter plugs with earthed (grounded) power tools.
Unmodified plugs and matching outlets will reduce the risk of electric shock.
b) Avoid body contact with earthed or grounded surfaces, such as pipes, radiators, ranges, and refrigerators.
There is an increased risk of electric shock if your body is earthed or grounded.
c) Do not expose power tools to rain or wet conditions.
Water entering a power tool will increase the risk of electric shock.
d) Do not abuse the cord. Never use the cord for carrying, pulling, or unplugging the power tool.
Keep cord away from heat, oil, sharp edges, or moving parts.
Damaged or entangled cords increase the risk of electric shock.
e) When operating a power tool outdoors, use an extension cord suitable for outdoor use.
The use of a cord suitable for outdoor use reduces the risk of electric shock.
f) If operating a power tool in a damp location is unavoidable, use a residual current device (RCD) protected supply.
The use of an RCD reduces the risk of electric shock. - Personal safety
a) Stay alert, watch what you are doing, and use common sense when operating a power tool.
Do not use a power tool while you are tired or under the influence of drugs, alcohol, or medication.
A moment of inattention while operating power tools may result in serious personal injury.
b) Use personal protective equipment. Always wear eye protection.
Protective equipment such as a dust mask, non-skid safety shoes, hard hats, or hearing protection used for appropriate conditions will reduce personal injuries.
c) Prevent unintentional starting. Ensure the switch is in the off position before connecting to a power source and/or battery pack, picking up or carrying the
tool.
Carrying power tools with your finger on the switch or energizing power tools that have the switch on invites accidents.
d) Remove any adjusting key or wrench before turning the power tool on.
A wrench or a key left attached to a rotating part of the power tool may result in personal injury.
e) Do not overreach. Keep proper footing and balance at all times.
This enables better control of the power tool in unexpected situations.
f) Dress properly. Do not wear loose clothing or jewelry. Keep your hair, clothing, and gloves away from moving parts.
Loose clothes, jewelry, or long hair can be caught in moving parts.
g) If devices are provided for the connection of dust extraction and collection facilities, ensure these are connected and properly used.
The use of dust collection can reduce dust-related hazards. - Power tool use and care
a) Do not force the power tool. Use the correct power tool for your application.
The correct power tool will do the job better and safer at the rate for which it was designed.
b) Do not use the power tool if the switch does not turn on and off.
Any power tool that cannot be controlled with the switch is dangerous and must be repaired.
c) Disconnect the plug from the power source and/or the battery pack from the power tool before making any adjustments, changing accessories, or storing power tools.
Such preventive safety measures reduce the risk of starting the power tool accidentally.
d) Store idle power tools out of the reach of children and do not allow persons unfamiliar with the power tool or these instructions to operate the power tool.
Power tools are dangerous in the hands of untrained users.
e) Maintain power tools. Check for misalignment or binding of moving parts, breakage of parts and any other condition that may affect the power tools operation.
If damaged, have the power tool repaired before use.
Many accidents are caused by poorly maintained power tools.
f) Keep cutting tools sharp and clean.
Properly maintained cutting tools with sharp cutting edges are less likely to bind and are easier to control.
g) Use the power tool, accessories and tool bits, etc. in accordance with these instructions, taking into account the working conditions and the work to be performed.
Use of the power tool for operations different from those intended could result in a hazardous situation. - Service
a) Have your power tool serviced by a qualified repair person using only identical replacement parts.
This will ensure that the safety of the power tool is maintained.
CAUTION
Keep children and infi rm persons away.
When not in use, tools should be stored out of reach of children and infi rm persons.
SAFETY INSTRUCTIONS FOR CUTTER
- Do not use a grinding wheel.
- Do not use a diamond saw blade, not in compliance with the regulations of the manufacturer.
- Do not use a damaged, deformed, or cracked cutting wheel.
- Do not operate the cutter without a fixed guard.
- Do not start the cutter when the cutting wheel is in contact with a worker.
- After the cutter is powered off and before the cutting wheel has stopped completely, do not put down the cutter or make the diamond saw blade stop with a forced external force.
- Before replacing the cutting wheel, adjusting the cutting depth or the water pipe, or repairing the cutter, unplug the power plug from the power supply and make the diamond saw blade still.
- If the cutter is designed with a residual current operated protective device, inspect the operation reliability of the residual current operated protective device before operating the cutter.
- When operating the cutter at a place where the diamond saw blade may cut the concealed wire or its own cord, hold the insulating holding surface of the power tool.
The contact between the diamond saw blade and any live wires may make the exposed metal parts of a power tool electrifi ed and the operator suff ers electric shock. - Be extremely careful when “blind cutting” is done in a wall or another dead zone. The diamond saw blade may cut the gas pipe, the water pipe, the cord or other objects that may hereby cause a bounce.
WARNING
a) Always keep your hands from the cutting area and the diamond saw blade.
If you hold the cutter with both hands, you will not be cut by the diamond saw blade.
b) Do not touch the space below a workpiece.
The fixed guard cannot protect the diamond saw blade below the workpiece.
c) Always use a diamond saw blade with a well-matched size and axis shape (diamond-shaped or round).
Poor matching between the diamond saw blade and the clamping part of the cutter may result in an eccentric operation and further loss of control.
d) Do not use any washers or bolts that are damaged or have incorrect sizes.
This may result in loss of control.
PRECAUTIONS ON USING CUTTER
- Do not use any cutting tool other than a diamond wheel.
Use the diamond wheel specifi ed in this manual. - Don’t use it for cutting metallic materials.
The diamond wheel may be broken or its service life may be remarkably reduced when it is used for cutting metallic materials. Be sure not to use the wheel for cutting metals. - Do not start the cutter while the diamond wheel is in contact with the material.
- Keep the motor interior free of water.
- Wear protective glasses to protect your eyes while cutting.
- Prior to use, be sure to check the diamond wheel in such details as crack, broken part, bent part, and the like. Don’t use a diamond wheel if any of the above detect are found on the wheel. Also, confi rm that no abnormality exists by actual test running.
- Proceed with cutting operation when the full speed has been reached.
- Do not apply excessive force.
- When cutting concrete, tile, or stone, the maximum cutting depth should be held to within 20 mm.
- Never touch the diamond wheel while operating.
- Never lay down the cutter while the diamond wheel is revolving.
Also do not stop the cutter with the diamond wheel forcibly depressed against the material. - Exercise care to position the cutter at a safe, stable spot when cutting.
- Take good care of the power tool and keep it clean.
SYMBOLS
WARNING
The following show symbols used for the machine. Be sure that you understand their meaning before use.
| To reduce the risk of injury, users must read the instruction manual. | |
| Always wear eye protection. |
SPECIFICATIONS
| Voltage (by areas)* | (220 V, 230 V)∼ |
| Power Input | 1320 W |
| No-Load Speed | 11500 /min |
| Max. cutting depth | 34 mm (wheel dia. 110 mm) 31.5 mm (wheel dia. 105 mm) |
| Diamond wheel | 110 mm external dia. × 1.0 mm thickness × 20 mm internal dia. |
| Weight (without cord) | 2.8 kg |
* Be sure to check the nameplate on the product as it is subject to change by area.
STANDARD ACCESSORIES
In addition to the main unit (1 unit), the package contains the accessories listed below.
| Box Wrench | 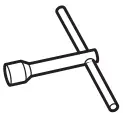 | 1 |
| Wrench | 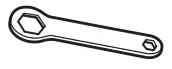 | 1 |
OPTIONAL ACCESSORIES ( sold separately)
○ Diamond Wheel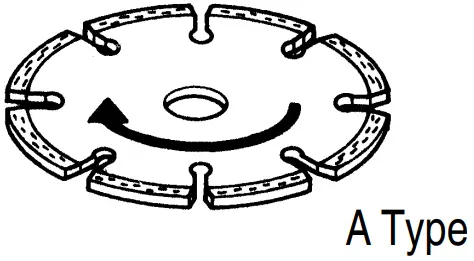
| Diameter (mm) | Hole diameter (mm) | Thick ness (mm) | ||
| Blade type | A (Dry) | 106 | 20 | 1.2 |
APPLICATIONS
- Cutting and scribing of concrete.
- Cutting and scribing various types of stones.
- Cutting and scribing various types of tiles.
PRIOR TO OPERATION
- Power source
Ensure that the power source to be utilized conforms to the power requirements specified on the product nameplate. - Power switch
Ensure that the power switch is in the OFF position. If the plug is connected to a receptacle while the power switch is in the ON position, the power tool will start operating immediately, which could cause a serious accident. - Extension cord
When the work area is removed from the power source, use an extension cord of sufficient thickness and rated capacity. The extension cord should be kept as short as practicable. - Mounting the diamond wheel
For details, refer to the item “Mounting and dismounting the diamond wheel”. - Confi rm that the cutting depth adjusting lever is securely clamped.
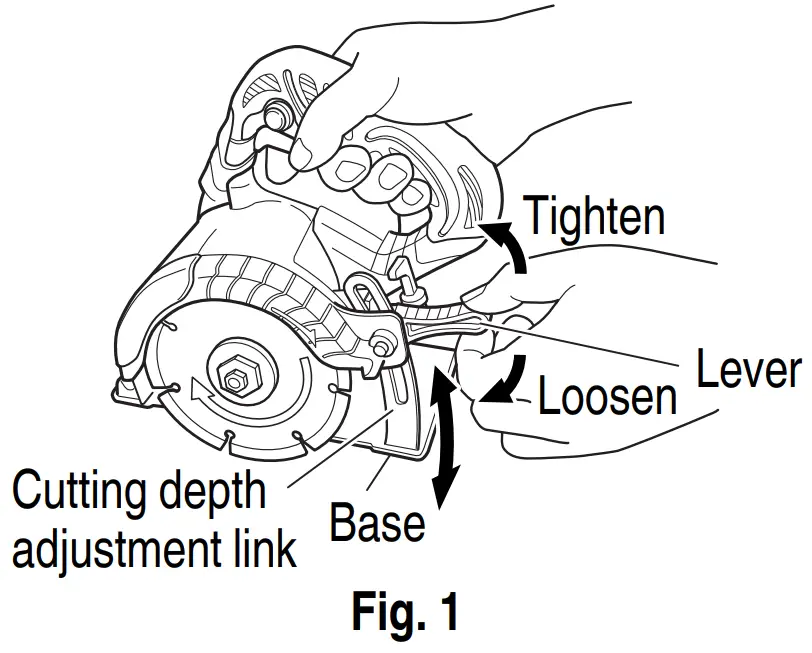
- Cutting depth adjustment (Fig. 1)
Lowering the lever will loosen and raising it will tighten. Loosening the lever and moving the base will allow adjustment of the cutting depth.
CAUTION
- Leaving the lever loosened may result in injury. Securely tighten the lever after adjusting the cutting depth.
- When the cutting depth exceeds 20 mm, concrete, and so on must be cut in two steps. Never try to cut in one step; otherwise, the motor is liable to be overloaded and damage may result. Also, cutting efficiency will be lowered in such an instance.
MOUNTING AND DISMOUNTING THE DIAMOND WHEEL
CAUTION
Be sure to disconnect the attachment plug from the power receptacle to avoid serious trouble.
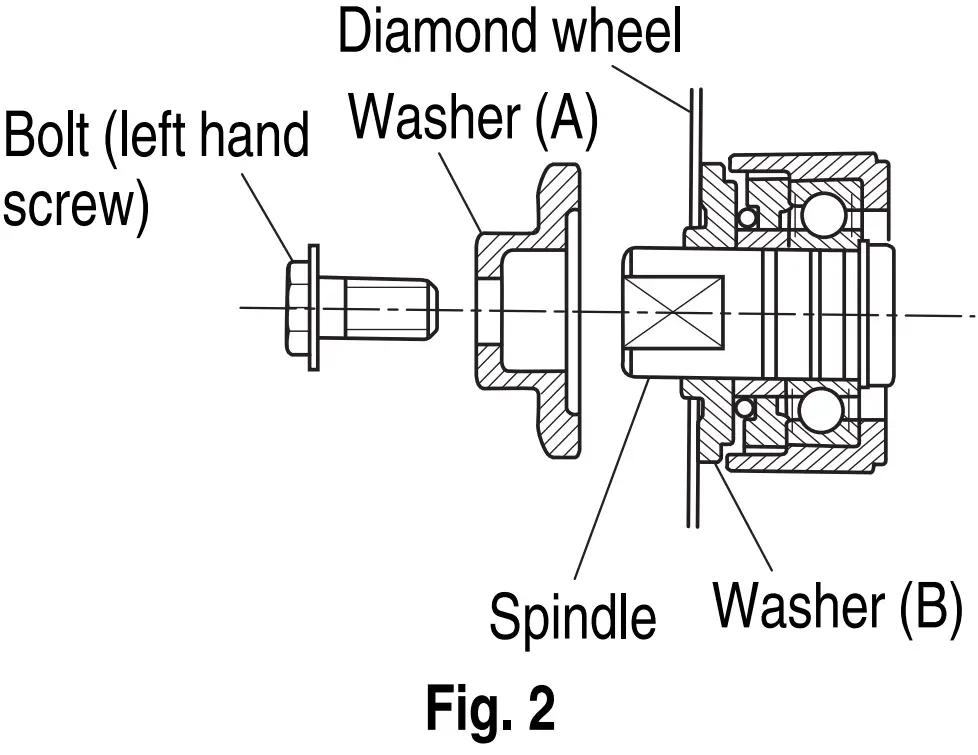
- Mounting the diamond wheel
(1) Thoroughly remove dust accumulated on the spindle and washers.
(2) As shown in Fig. 2, the concave portions of washers (A) and (B) must be on the diamond wheel side. (3) Thoroughly clamp the bolt.
 - Dismounting the diamond wheel
Use the provided wrench and box wrench to remove the bolt. (Fig. 3)
 (3) Thoroughly clamp the bolt.
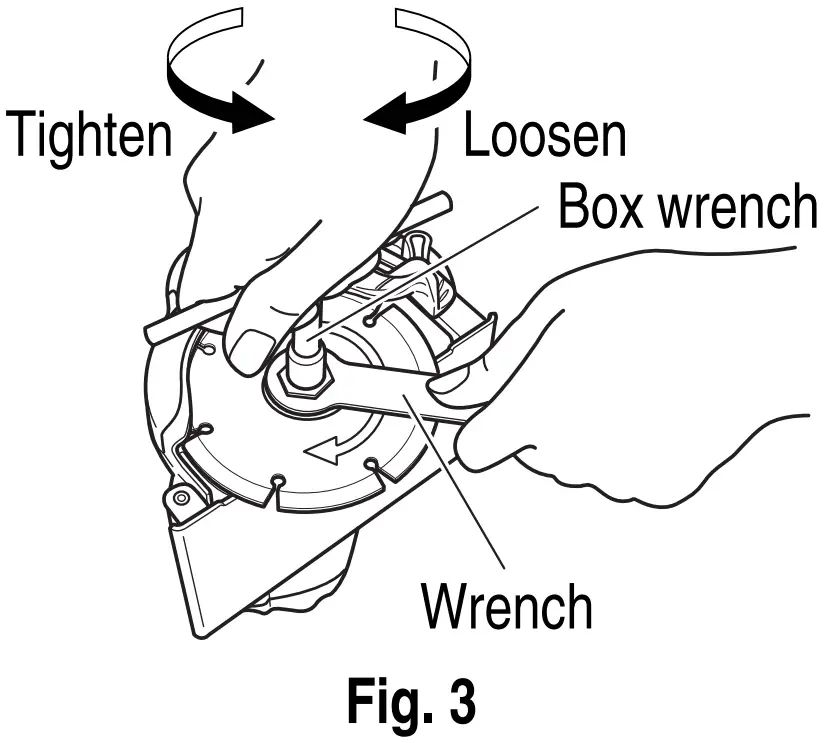
CAUTION
A diamond wheel for mounting on this equipment must have a 20 mm internal diameter. No other sized diamond wheel should be used.
CUTTING PROCEDURES
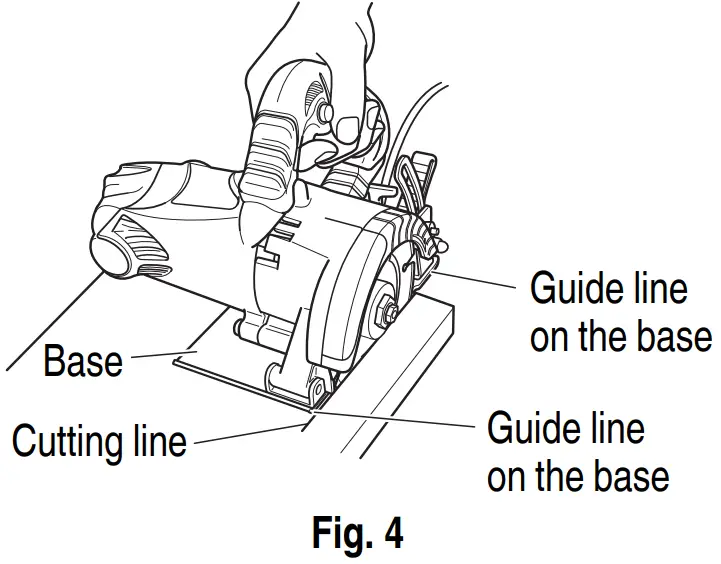
- Set the machine body (base) on the material to be cut; use the side on the base to align the diamond wheel with the cutting line. (Fig. 4)

- Turn the switch ON with the diamond wheel initially kept off the material to be cut.
The power switch is turned ON when the trigger is pulled by one’s finger and is turned OFF when the trigger is released. If the stopper is depressed after the trigger is pulled, the power switch becomes locked, even though the trigger is released, proving particularly convenient for con tin u ous operation. When the power switch is to be turned OFF, the stopper can be released by pulling the trigger, and the power switch is turned OFF upon releasing the trigger.
CAUTION
- Do not use the diamond wheel for cutting along curves or at angles; otherwise, it may be damaged, resulting in an extremely shortened service life.
- Before starting to cut, confi rm that the diamond wheel has attained full-speed revolution.
- Should the diamond wheel stop or make an ab nor mal noise while operating, promptly turn OFF the switch.
- Always take care in preventing the power cord from coming near the revolving diamond wheel.
- When finished with a job, pull out the plug from the power receptacle.
MAINTENANCE AND INSPECTION
- Inspecting the diamond wheel
Since the use of a dull diamond wheel will cause motor malfunctioning and degraded efficiently, replace it with a new one without delay when abrasion is noted. - Inspecting the mounting screws
Regularly inspect all mounting screws and ensure that they are properly tightened. Should any of the screws be loose, retighten them immediately. Failure to do so could result in serious hazards. - Maintenance of the motor
The motor unit winding is the very “heart” of the power tool. Exercise due care to ensure the winding does not become damaged and/or wet with oil or water. - Inspecting the carbon brushes (Fig. 5)
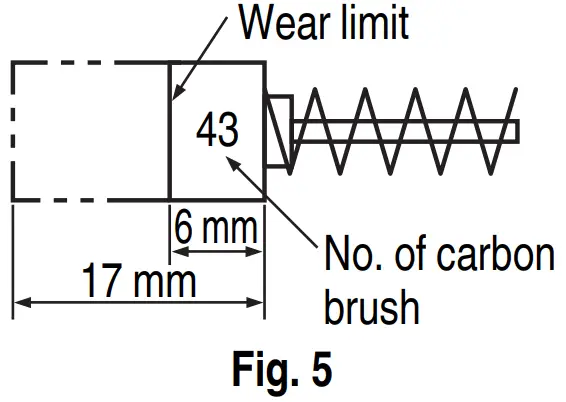
 The motor employs carbon brushes which are consumable parts. Since an excessively worn carbon brush can result in motor trouble, replace the carbon brush with a new one having the same carbon brush No. shown in the figure when it becomes worn to or near the “wear limit”. In addition, always keep carbon brushes clean and ensure that they slide freely within the brush holders.
 - Replacing carbon brushes
Loosen the set screw and remove the tail cover. Remove the brush caps and carbon brushes. After replacing the carbon brushes, do not forget to tighten the brush caps securely and install the tail cover. - Replacing supply cord
If the replacement of the supply cord is necessary, this has to be done by HiKOKI Authorized Service Center in order to avoid a safety hazard.
If the supply cord of this power tool is damaged, it must be replaced by a specially prepared cord available through the service organization. - Service parts list
 The motor employs carbon brushes which are consumable parts. Since an excessively worn carbon brush can result in motor trouble, replace the carbon brush with a new one having the same carbon brush No. shown in the figure when it becomes worn to or near the “wear limit”. In addition, always keep carbon brushes clean and ensure that they slide freely within the brush holders.
CAUTION
Repair, modifi cation, and inspection of HiKOKI Power Tools must be carried out by a HiKOKI Authorized Service Center.
This Parts List will be helpful if presented with the tool to the HiKOKI Authorized Service Center when requesting repair or other maintenance.
In the operation and maintenance of power tools, the safety regulations and standards prescribed in each country must be observed.
SERVICE PARTS LIST
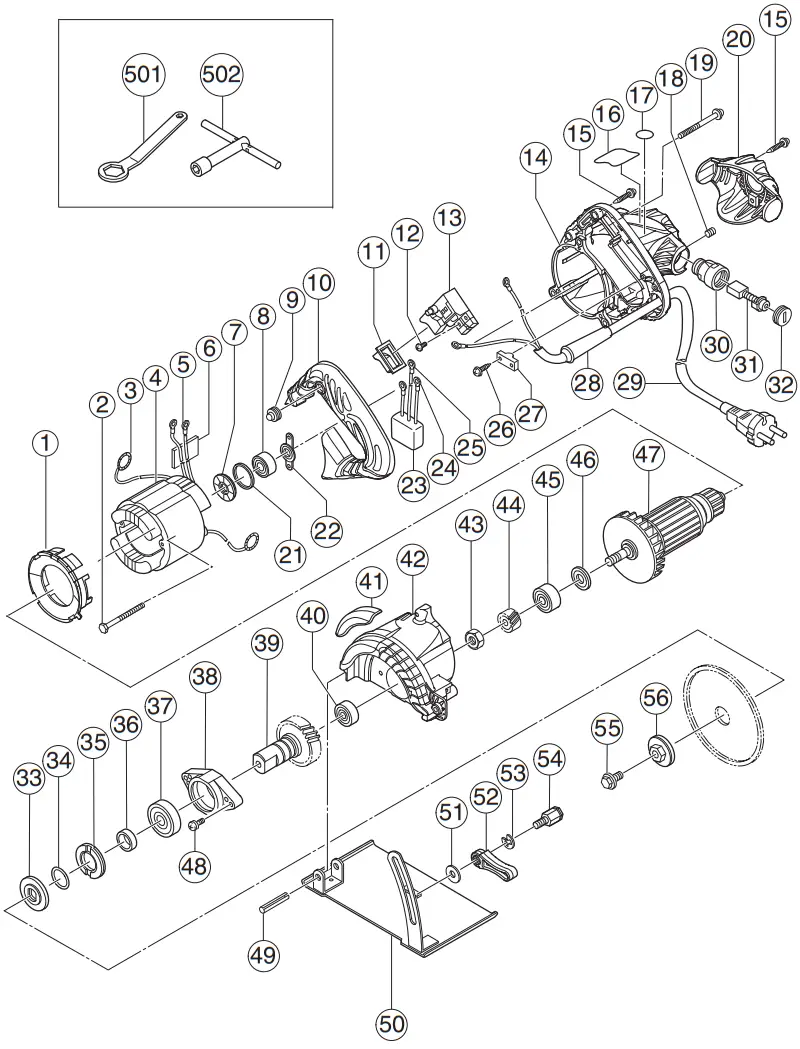
| ITEM NO. | PART NAME | OTY |
| 1 | FAN GUIDE | 1 |
| 2 | HEX. HD. TAPPING SCREW D5 x 65 | 2 |
| 3 | BRUSH TERMINAL | 2 |
| 4 | STATOR ASS’Y | 1 |
| 5 | TERMINAL | 2 |
| 6 | PACKING SEAL | 1 |
| 7 | DUST SEAL | |
| 8 | BALL BEARING 608VVMC2EPS2L | 1 |
| 9 | RUBBER COVER (B) | 1 |
| 10 | HANDLE COVER | 1 |
| 11 | SWITCH RUBBER COVER | 1 |
| 12 | MACHINE SCREW (W/WASHER) M3.5 x 6 | 4 |
| 13 | SWITCH | 1 |
| 14 | HOUSING ASS’Y | 1 |
| 15 | TAPPING SCREW (W/FLANGE) D4 x 20 | 5 |
| 16 | NAMEPLATE | 1 |
| 17 | SEAL | 1 |
| 18 | HEX. SOCKET SET SCREW M5 x 8 | 2 |
| 19 | MACHINE SCRW (W/WASHERS) M5 x 25 | 3 |
| 20 | TAIL COVER | 1 |
| 21 | RUBBER RING | 1 |
| 22 | BEARING BUSHING | 1 |
| 23 | NOISE SUPPRESSOR | 1 |
| 24 | TERMINAL | 2 |
| 25 | TERMINAL | 1 |
| 26 | TAPPING SCREW (W/FLANGE) D4 x 16 | 2 |
| 27 | CORD CLIP | 1 |
| 28 | CORD ARMOR | 1 |
| ITEM NO. | PART NAME | QTY |
| 29 | CORD | 1 |
| 30 | BRUSH HOLDER | 2 |
| 31 | CARBON BRUSH | 2 |
| 32 | BRUSH CAP | 2 |
| 33 | WASHER (B) | 1 |
| 34 | 0-RING (1AP-20) | 1 |
| 35 | BEARING CAP | 1 |
| 36 | DISTANCE PIECE | 1 |
| 37 | BALL BEARING 6002VVCMPS2S | 1 |
| 38 | BEARING HOLDER | 1 |
| 39 | SPINDLE AND GEAR SET | 1 |
| 40 | BALL BEARING 606VVMC3PS2S | 1 |
| 41 | BRAND LABEL | 1 |
| 42 | GEAR COVER | 1 |
| 43 | SPECIAL NUT M7 | 1 |
| 44 | PINION | 1 |
| 45 | BALL BEARING 629VVMC2EPS2L | 1 |
| 46 | WASHER (A) | 1 |
| 47 | ARMATURE | 1 |
| 48 | SEAL LOCK SCREW (W/SP. WASHER) M5 x 25 | 2 |
| 49 | ROLL PIN D6 x 36 | 1 |
| 50 | BASE | 1 |
| 51 | WASHER M6 | 1 |
| 52 | LINK LEVER | 1 |
| 53 | RETAINING RING FOR D8 SHAFT | 1 |
| 54 | SPECIAL BOLT | 1 |
| 55 | BOLT (LEFT HAND) M7 x 15 | 1 |
| 56 | WASHER (A) | 1 |
| 501 | WRENCH | 1 |
| 502 | BOX WRENCH 10MM | 1 |
![]() Koki Holdings Co., Ltd.
Koki Holdings Co., Ltd.
108-C99253822 F
2021


