![]() Product operation manual
Product operation manual
Multimedia projector
In order to use this projector correctly and safely, please read the instructions carefully.![]()
![]() Warning: Never look into the projector lens when the lamp is turned on; the bright light can damage your eyes.
Warning: Never look into the projector lens when the lamp is turned on; the bright light can damage your eyes.
Product operation manual
![]() Warning: Never unplug the power cord to turn off the projector.
Warning: Never unplug the power cord to turn off the projector.
Never attempt to disassemble the projector for your safety.
- Use the type of power source indicated on the projector.
- Do not place the projector where it may be exposed to rain, water, or excessive humidity to avoid the risk of electric shock. This projector should be placed in Aeration-drying, no dust, no shaking area, far away from heat sources or radiation, do not move frequently.
- Please turn off the power supply and unplug the power cord if do not use this projector for a long time.
- Do not insert anything into the gap of the projector to avoid short circuits and electric shock.
- Do not force the lens to avoid damage.
List of accessories included
Open the package, which includes the following items. (The items listed below may be different in your area. Please refer to the actual packaging).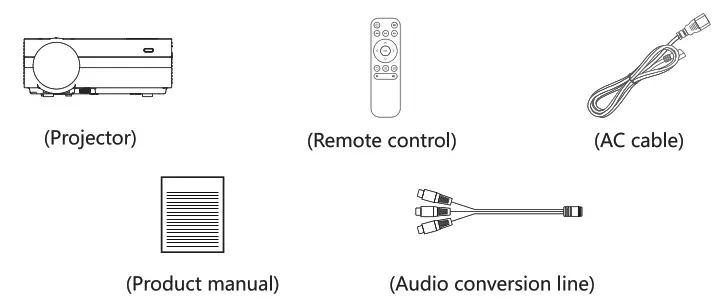
Product operation manual
Remote control
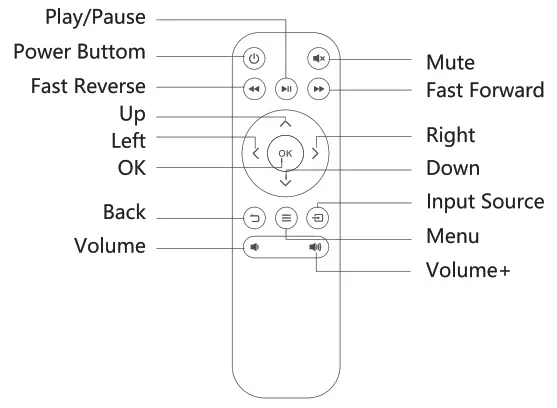
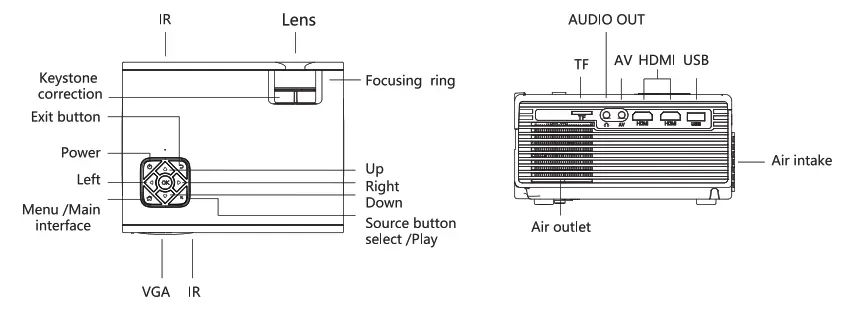
Functional description of keys
Installation and adjustment
Projector Installation You can choose to place the projector on a flat surface or mount it on the suspension bracket.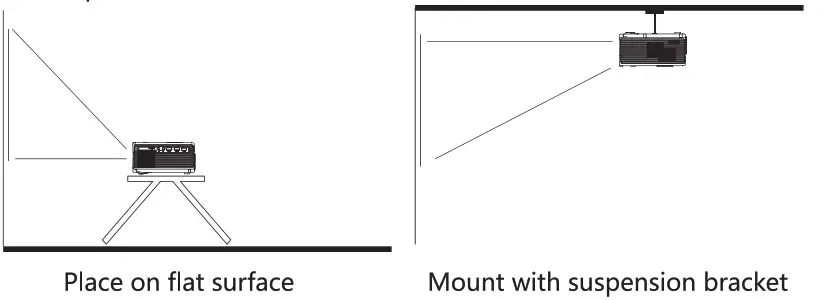 Notice:
- A suspension bracket is not included as an accessory of the projector.
- Pls choose the overturn function on the setting.
Projection size

Pls, refer to the previous page for the Projection distance and screen size, the below data is just for your reference.
Installation and quick start
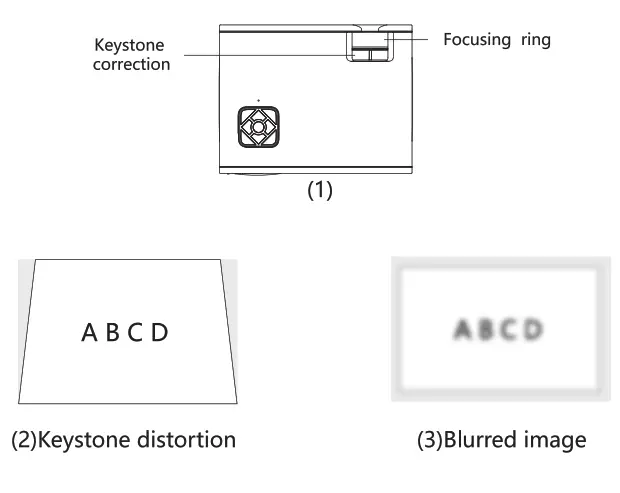
- Adjust the trapezoidal correction knob and focus ring of the projector to obtain a satisfactory clear image (Fig. 1).
- When the projection image is up-down asymmetric (Fig. 2), adjust the trapezoidal correction knob, and adjust the angle of trapezoidal correction: +15 degrees.
- When the Projection image is blurred (Figure 3), refer to the projection size of the previous page, and then adjust the focus ring to get the best projection effect.
Product operation manual
Please move forward or backward proportionally in case the adjustment is unable to obtain satisfactory a satisfactory definition.
Adjust the image projected on the screen.
Check the horizontal and vertical screen settings, Please center the projected picture on the screen.
- When the Projection image is offset (Fig. 4), adjust the angle of the projector in the vertical direction to keep the projector horizontal.
- When the Projection picture is left-right asymmetric (Fig. 5), adjust the projection angle of the projector’s horizontal level.
Product operation manual
Startup&Shutdown
- Press key ”
 ” to turn on, the indicator lamp on the projector turning the color to enter the normal working state. In a few seconds, the projector will be fully activated and the image will be projected.
 - Please press the key ” ‘ to power off. After shutdown, the fan will continue to work for about ten seconds to discharge the residual heat inside the projector. Do not directly pull off the power supply to turn off to avoid affecting the service life of the projector. Although the projector can connect multiple video signal sources, in practical use, it is recommended to connect only one signal source to avoid interference between signals and affect the performance of projectors. This series of projectors can be easily installed with forwarding/back-projection/hanging projection. The projection screen embodies 16:9 And 4:3 display modes at the same time to meet your different needs.
Recommended projection distance: 1.2 m-1.8 m. Please use it under the attitude of 2000 meters.
Product operation manual
Entering the menu
Menu key
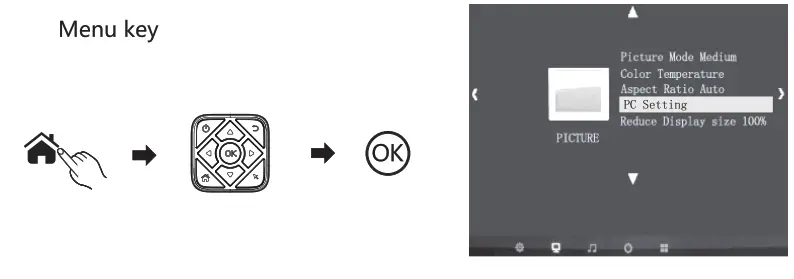
- Press”
 ” on the remote control or press “
 ” on the projector to display the menu setting interface.
 - Press the
 on the remote control or projector to select the first level menu item that you need to adjust or set.
 - Press the
 on the remote control or projector to sell the menu item that you need to adjust in the sub-menu.
 - Then press the ” OK ” on the remote control or projector to activate the sub-menu of the selected icon.
- Press the and to adjust the parameter values of the menu item you choose.
Repeat steps 2 to 5 above to adjust to the menu items or press ” = “or’  “directly Exit the menu interface.
Menu operation
Select the input signal source from the device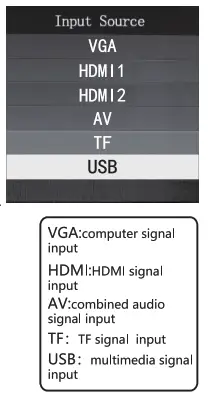 Verify that the signal connection is correctly connected
 Press the ” —a ” or ” R ” key to display the right interface.
- Press the ” • ” ” • ” key from VGA, HDMI 1, HDMI 2, AV, TF, and USB to select the singles you need to input.
- Press the “OK” key to determine the type of input signal.
Multimedia mode
- Check whether the U disk and TF card are fully plugged into the socket, Memory should not exceed 32G.
- Refer to the Selected Signal Source to switch the input signal to USB or TF card input mode, and select the file catalog that you want to play. Play the file in U-disk: selecting the Input signal as multimedia interface.
Play the file in TF card: selecting the Input signal as TF interface.
Product operation manual
15 Video play
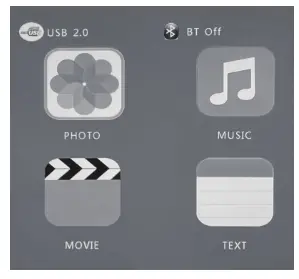
- Press the
 key to select the type of file to play from the menu interface on the right.
PHOTO: Photo Library
MUSIC: Music Library
MOVIE: Video Library
TEXT: Text Library
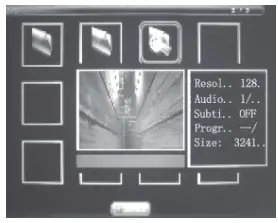
- Repeatedly pressing the “ok” key to enter the right file directory interface to select the file to play.
Select the file to play - using the keys move to the file you need to play and press the machin
 or “OK ” can play movies.
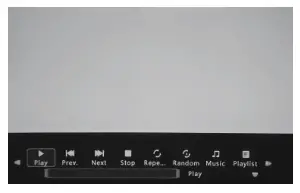
Play manual
- When the video is playing, press the ‘OK” key to bring up the following play menu.
- Press to select the function.
- Press the”EXIT” key of the remote control to exit the operation interface. Play/pause key: Play or pause the video. Fast Backward/Fast Forward:play the video as the speed of 2x, 4x, 8x, 16x Stop key: Stop playing the current video

Product Specification
| Projection technology | LED+ LCD TFT |
| The image flips Optical lens | Lifting180degrees,mirror 180degrees.mirror360 degrees |
| long-focus | |
| Screen ratio height to width The-light source | 16:9, 4:3 |
| LED | |
| Zoom way Physical resolution Support resolution Trapezoidal correction Focusing range Sound Projection size Net weight Product size Power input | Manual focusing |
| 1920x 1080pixels | |
| 480p 576i 720P 720i 1080i 1080P | |
| Physical correction of ±15 degrees | |
| 1.2m-3.5m Built-in 38inch-122inch 1.3KG | |
| 223x172x81mm | |
| AC 100-240V | |
| Input ports | hi DM I/USB/AVNGA/ AUDIO OUT/TF |
| USB, TF Card Supported format | Video format: MP4, MPG, WMV, AVI, MOV, VOB, MKV Audio formats: WMA, MP3, M4A , FLAC, WAV, OGG Picture format: BMP, PNG, JPG Text format: TXT |
This technical doc is only for reference, if the design or specifications have been changed, correct specifications depend on the actual model.
Product operation manual
Cleanin. method
Clean the projector by following steps:
- Make sure to unplug the power plug from the power outlet before cleaning.
- Clean the projector with a soft and dry cotton cloth. Wipe using a soft cloth with diluted neutral detergent and wipe up with a dry for very serious smudges. Please comply with the attention for wiping with a chemical fiber cloth.
- Do not use thinner, benzene cr other solvents to avoid lower quality or praying coating peeling off.A brush can be inserted in the front of the cleaner for cleaning the air vent. Avoid direct use of the cleaner without any joints or nozzles.


