![]()
FunFlix RD-828E 1080P Full HD Projector
Important Safety Instructions
Thank you tor purchasing the bowmaker Cinema s00 Max projector. Please read this manual thoroughly before using it and keep it for the Tuture reference. It physical injury, loss of data, or damage is caused by failure to follow instructions, the warranty does not apply. Set Up Do not install the projector in places without proper ventilation. Do not install the projector in hot and humid places. Do not install the projector in dusty or smokey places. Do not block the ventilation holes intake or exhaust). Do not install the projector near the temperature and smoke detectors. It may cause a sensor failure. Do not install the projector in areas where warm dnd cool di w doW y otherwise it may cause projector failure due to moisture condensation or large temperature changes. Power Supply Power off the device before removing the power supply from the socket. Use the power cord with caution to avoid unduly bending it. Damaged power cords may cause electric shock or fire. Unplug this device if there are lightning storms or when unused for a long period of time. Never touch the power cable or the power connection with wet hands. Unplug the power cord from the outlet after using the projector. Repairs Ne NE duy iepeas to ie projector yourself. No components in the projector can be repaired by customers. * Please entrust qualified professional maintenance personnel for repair. Caution Do not look at the lens or it may cause severe eye injury. During and after use, the temperature near the outlet will rise. Therefore touching it may cause burns. Do not place the projector in too warm or too cold a room, because the high-temperature or low-temperature will shorten the lifespan of the device. The working environment would be 5’C-35’C better.
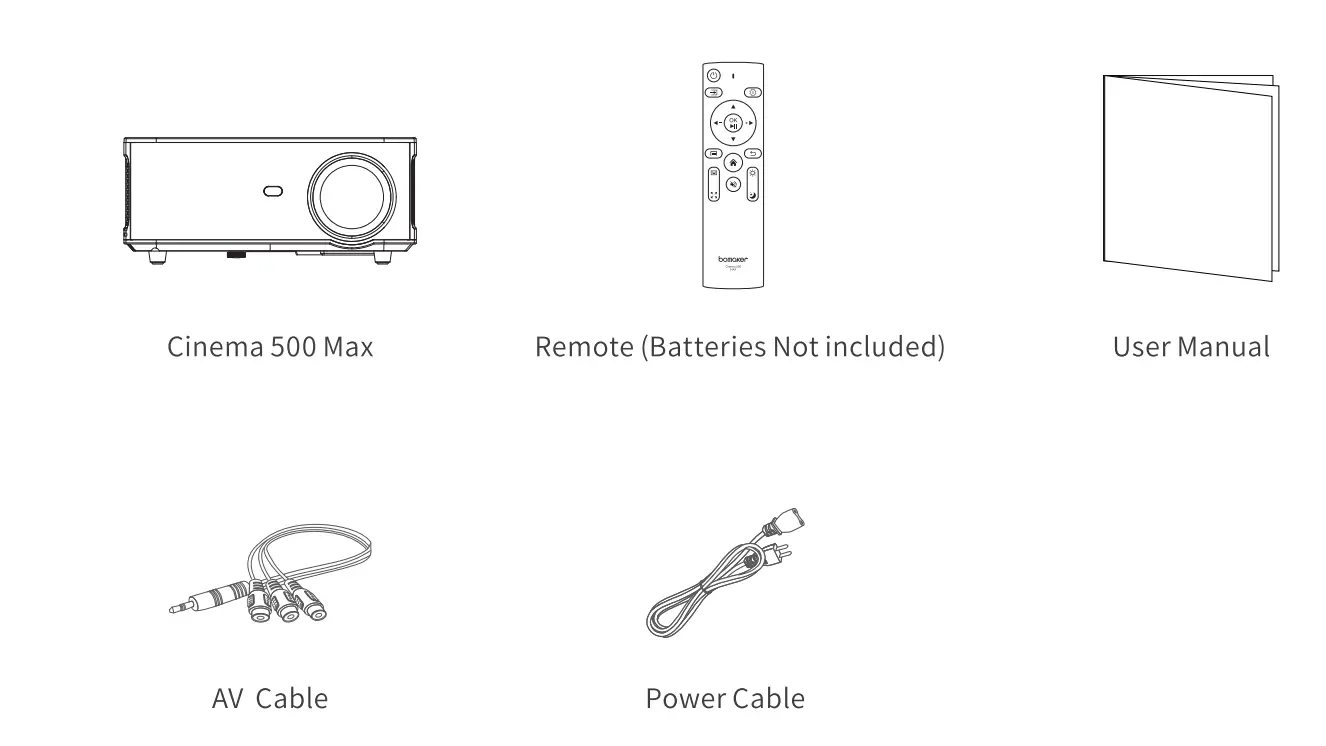
Packing List  Overview
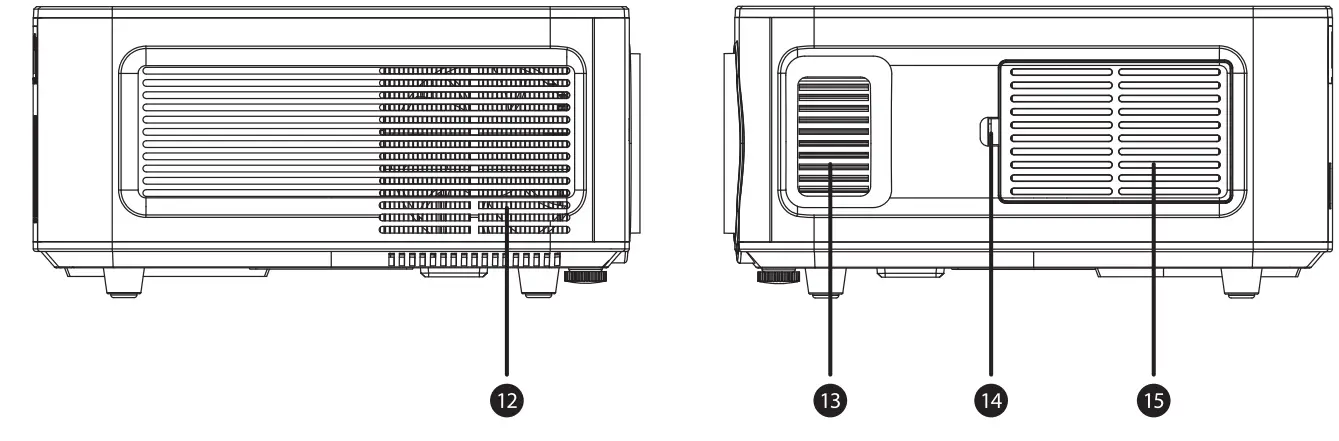
 Overview
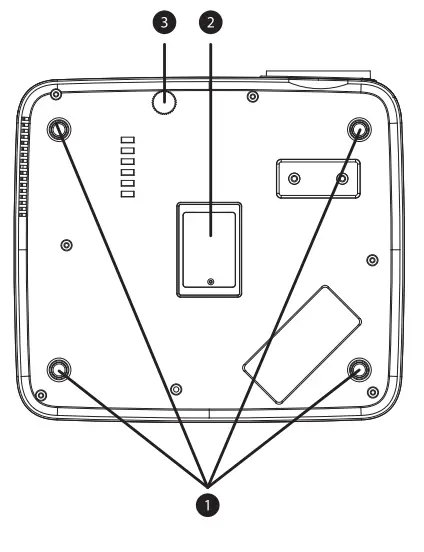
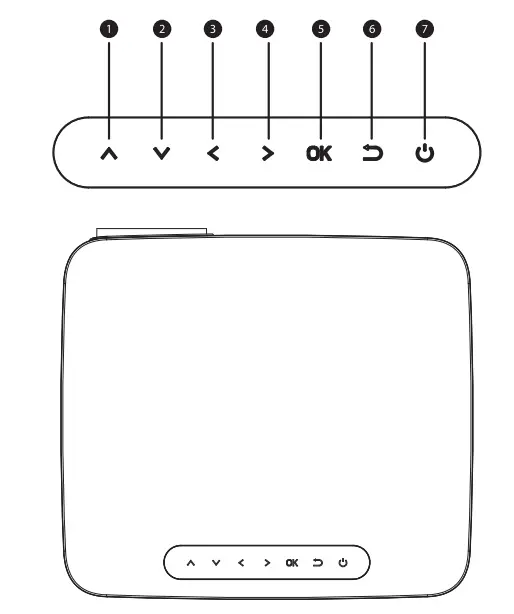
- Up
- Down
- Left(Decrease the volume)
- Right(Increase the volume)
- OK
- Return
- Power Button
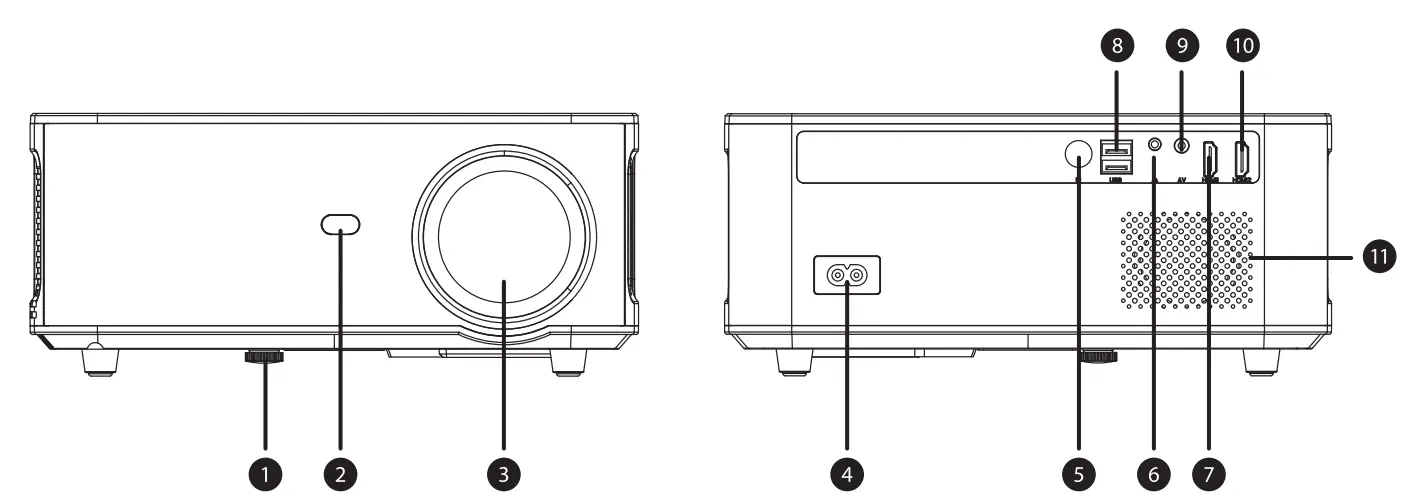
- Adjusting Knob
- IR receiver
- Focus Lens
- Power Switch
- IR for remote control
- 3.5mm port for audio output
- HDMI 1 port
- USB port
- AV port
- HDMI2 port
- Speaker
- Cooling window
- Focus
- Switch Of Removable Dust Cover
- Removable dust cover

- Projector mount holes
- Maintenance Window
- Adjusting Knob

REMOTE CONTROL
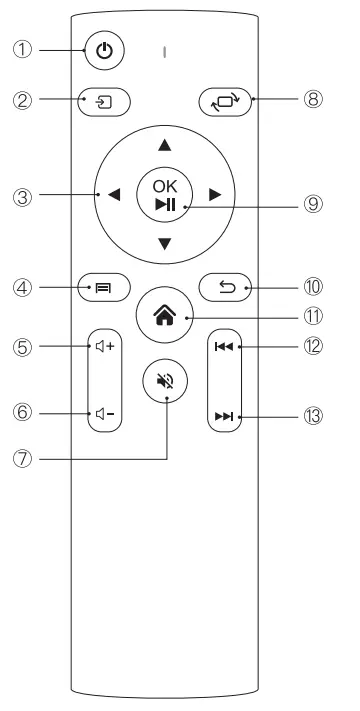
- Power Switch
- Source Switch
- Direction Button
- Menu Button
- Volume +
- Volume –
- Mute
- Screen Flip
- Confirm Button/(Pause/Play Button)
- Back Button
- Home Button
- Previous
- Next
Getting Started
Projector Placement
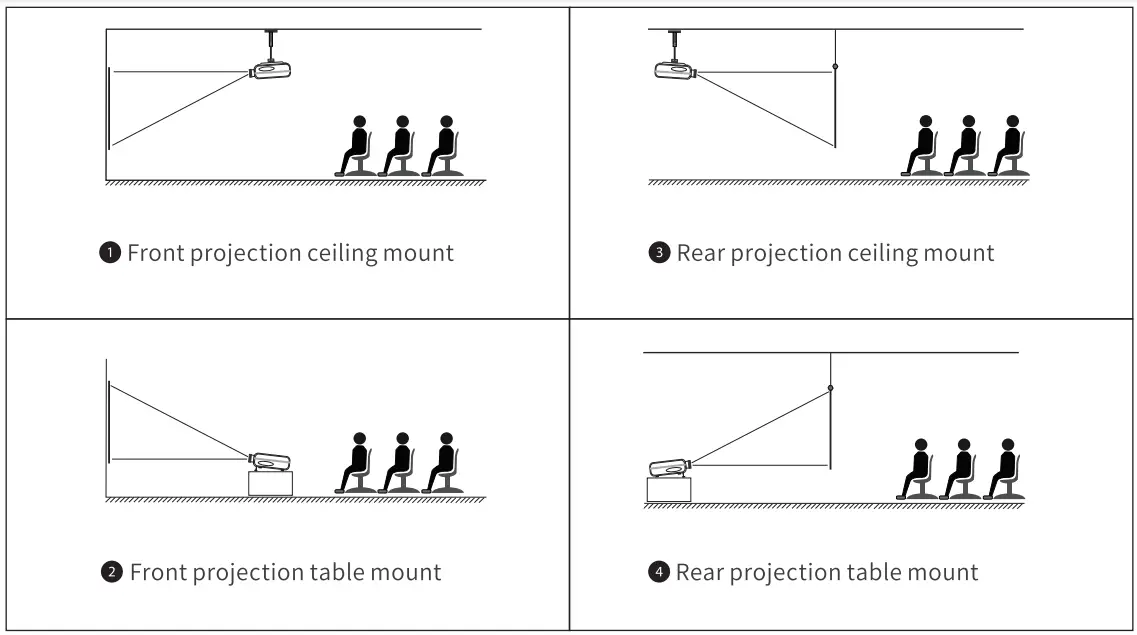
Note
- During the installation process, please do not operate with electricity to avoid the electric shock hazards and projector circuit failures.
- Please keep a gap of at least 30 cm from the wall. Do not cover or block the projector’s vents with any objects. Make sure that the projector has enough ventilation to ensure the projector’s. performance and reliability.
- If you have a projector screen that need to be mounted on a ceiling, the projector cannot be higher than the upper edge of the screen, otherwise, it will affect the image effect.
Ceiling installation 
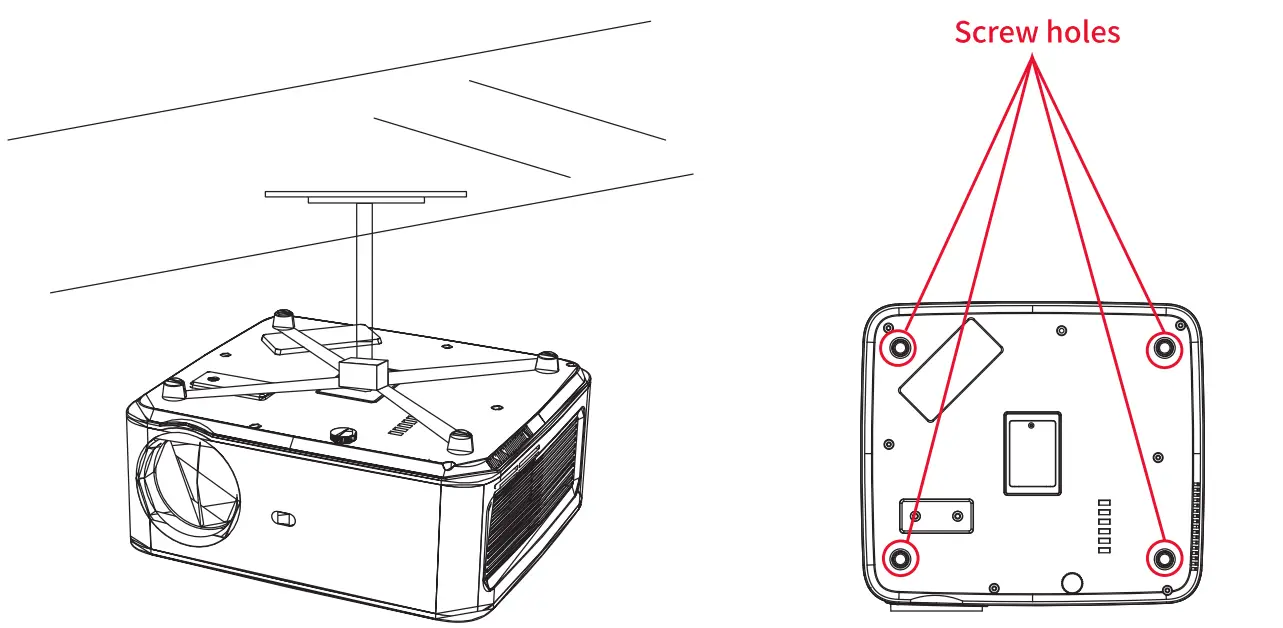
- Please purchase an universal projector ceiling mount;
- Remove the four rubber pads on the button of the projector.you will see the screw holes and use the M5 11mm screws for installing the ceiling, and then install it.
Start Using
Power On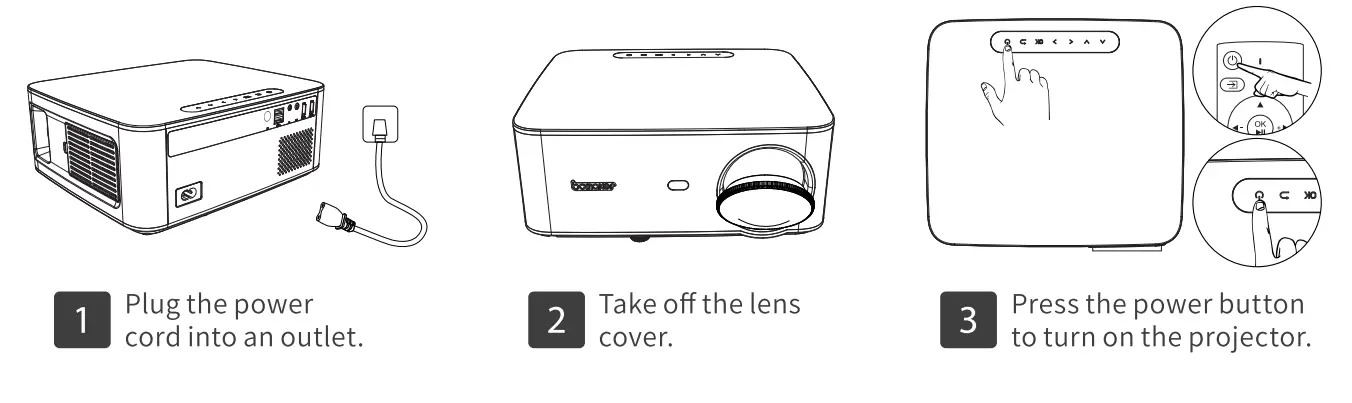 Projector Distance & Size
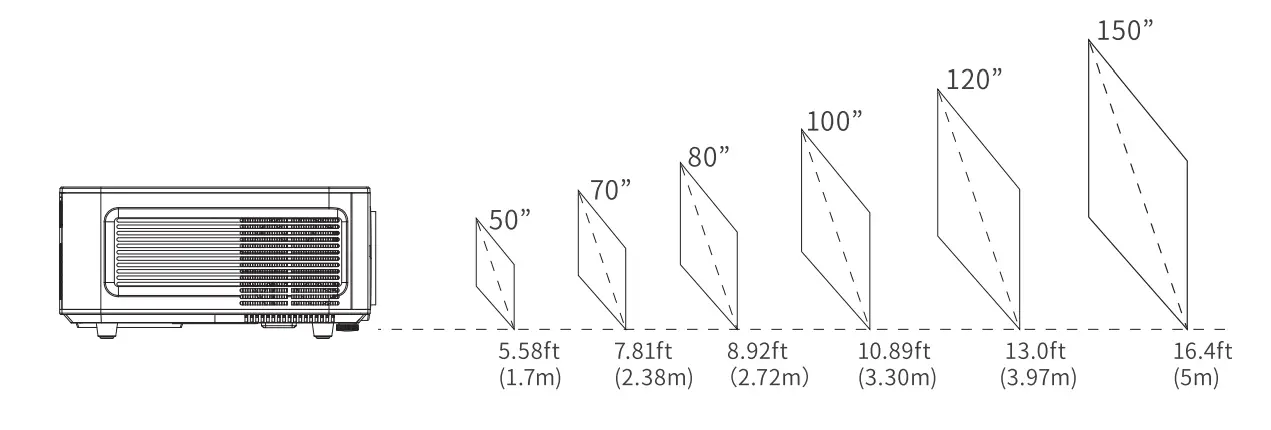
The recommended projection screen is around 80 inches with a projection distance of around 8.92 ft Ambient darkness will improve the clarity of the projected images.
| Distance | SCREEN |
| 5.58ft(1.7m) | 50 |
| 7.81ft(2.38m) | 70 |
| 8.92ft(2.72m) | 80 |
| 10.89ft(3.30m) | 100 |
| 13.0ft(3.97m) | 120 |
| 16.4ft(5m) | 150 |
Adjusting the projected image
After adjusting the size and distance of the projector, please rotate the focus ring left and right to change the front and rear positions of the lens until a clear image is obtained.
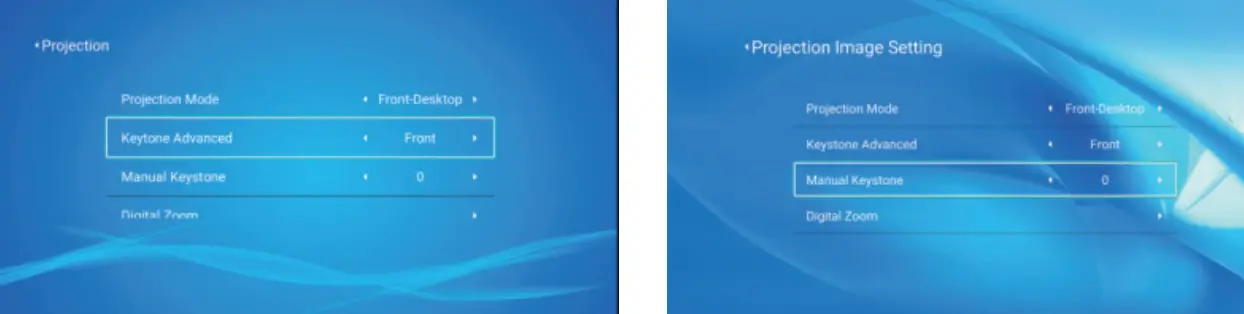
Electronic keystone correction
Vertical keystone correction
- Step 1: Use the remote control or projector button to enter the setting interface.
- Step 2: Select the Projection image setting press OK to enter, select [Front] in the [Keystone Advance] column, and then press the down button on the remote control to enter manual keystone correction.

- Step 3: If the picture is shown as picture (1), use the direction buttons of the remote control or projector to adjust the vertical parameter (-50-0) in the manual keystone correction option until the picture is obtained (4).
- Step 4:1f the picture is shown as picture (3), use the direction buttons of the remote control or projector to adjust the vertical parameters (0-50) in the manual keystone correction option until you get the picture (4).


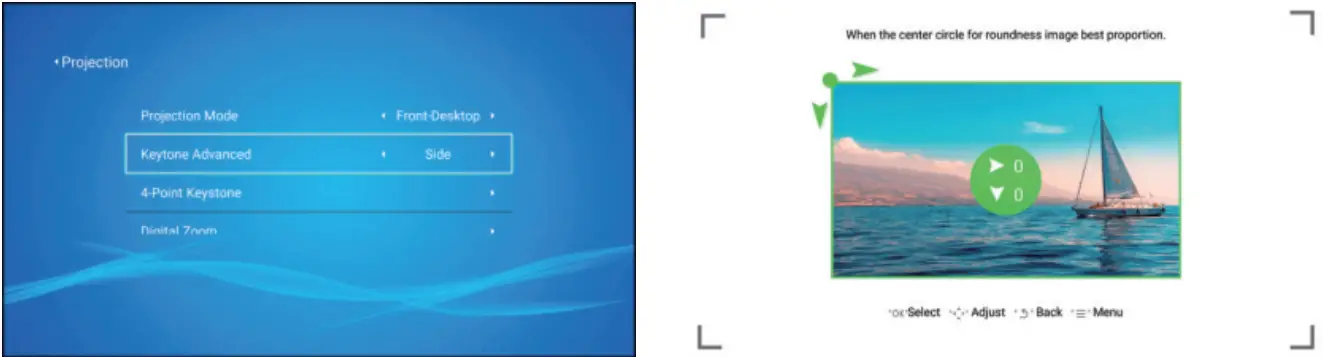
Four-point keystone correction (horizontal and vertical keystone correction)
When the projected image is not rectangular, it can be adjusted by four-point keystone correction
- Step 1: Use the remote control or projector button to enter the setting interface.
- Step 2: Select the Projection image setting interface, press OK to enter, select [Side] in the [Keystone Advance] column, then press the down button on the remote control to switch to manual keystone correction, and press OK to enter the four-point adjustment display interface.

- Step 3: Use the remote control or projector’s direction buttons to adjust the projected image according to the figure. After the current point is adjusted, press the OK button to enter the next corner point.
- Step 4: After adjusting the four points, you can press the return key to save the current adjustment status and return to the main menu intertace. Press the menu button to pop up a prompt whether to reset the current adjustment.


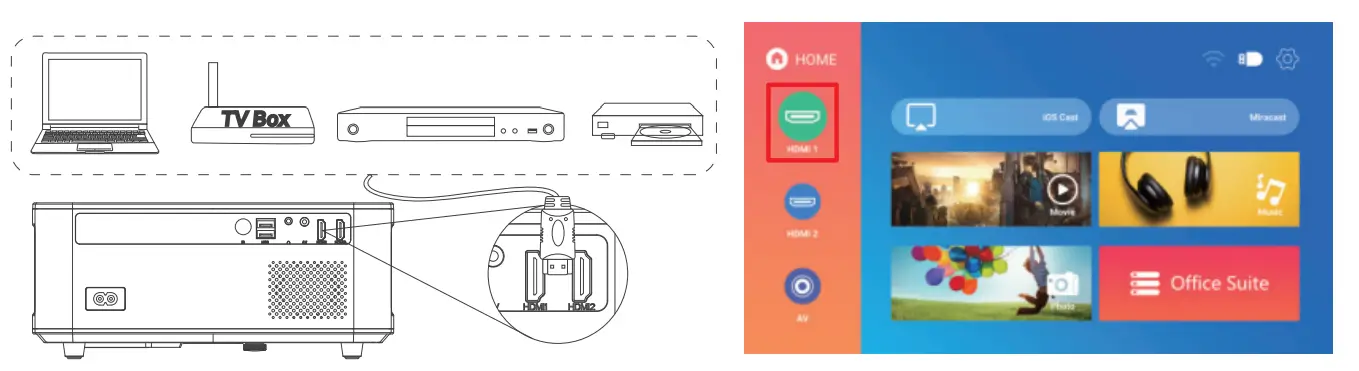
Input Source
HDMI Imode
- Step 1: Connect the projector and equipment vwith HDMI cable.
- Step 2: Press and hold the source button of the projector or remote control to enter the input source interface, or use the button to select HDMI on the main interface of the projector.
- Step 3: Select the HDM l cable to connect to the corresponding interface HDM|l or HOMI2, press the OK key to enter the interface, and press the return key to exit nd return to the main interfac of the projector.

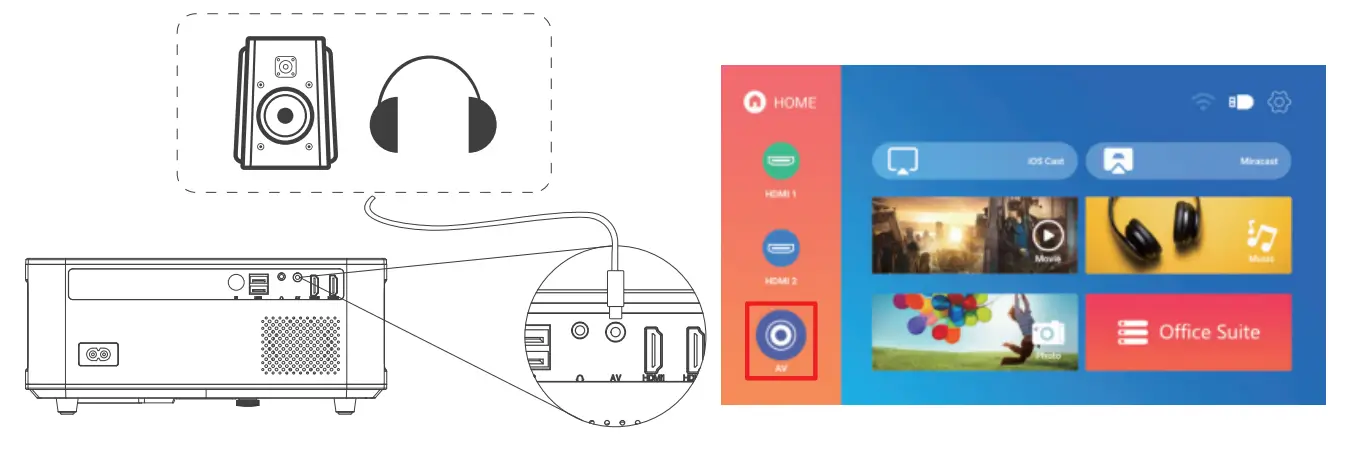
AV mode
- Step 1: Connect the projector and the equipment with the AV cable.
- Step 2: Press and hold the source button]of the projector or remote control to enter the input sOurce interface.
- Step 3: Select AV, press OK to enter, press Return to exit and return to the main interface of the projector.

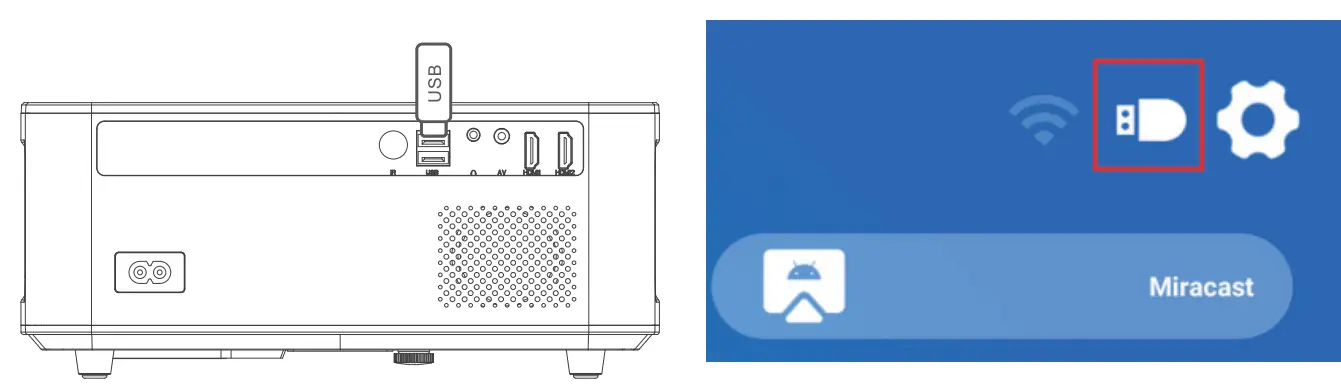
USB mode
- Step 1: Connect the projector to the U disk, the U disk on the main interface of the projection screen will display the highlighted state.
- Step 2: Select the corresponding Movie, Music, Picture and office Suite modules of the file type, and press

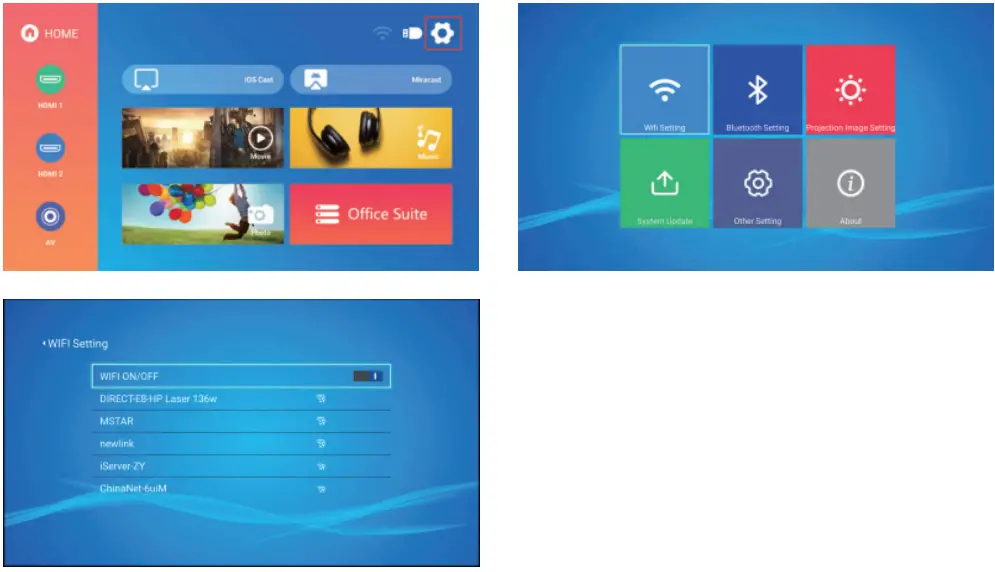
WiFi settings
- Step 1: Use the remote control or projector button to enter the setting interface at the upper right corner of the projector’s main interface.
- Step 2: Find the WI FI setting in the setting interface, press the OK button to enter the WiFi setting, press the OK button to turn on the WiFi, a list of WiFi names appears.

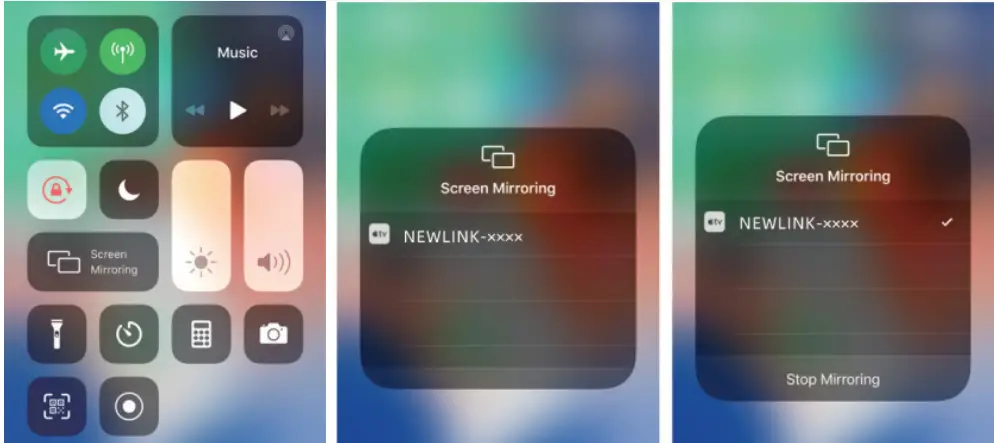
Screen Mirroring
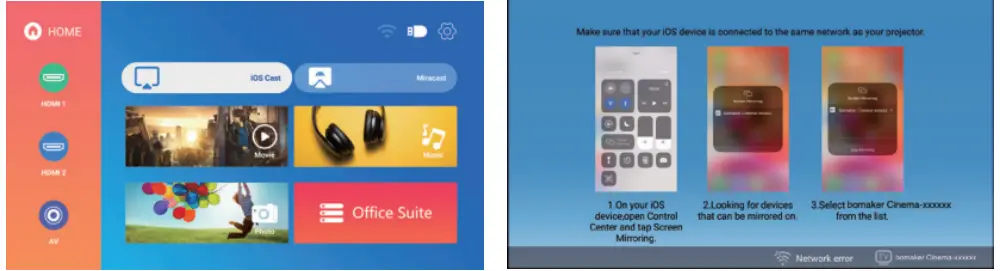
For iOS System (Streaming with WiFi) Note: It can only achieve screen mirroring via WiFi instead of data for iOS devices.
- Step 1: Connect the projector to the WIFl according to the projector WIFI setting steps and turn on WiFi on your iPhone, please make sure your iPhone and the projector are connected under the same Wifi.
- Step 2:Open the projector home menu, use the remote control to select iOS Cast, press OK to enter the interface.

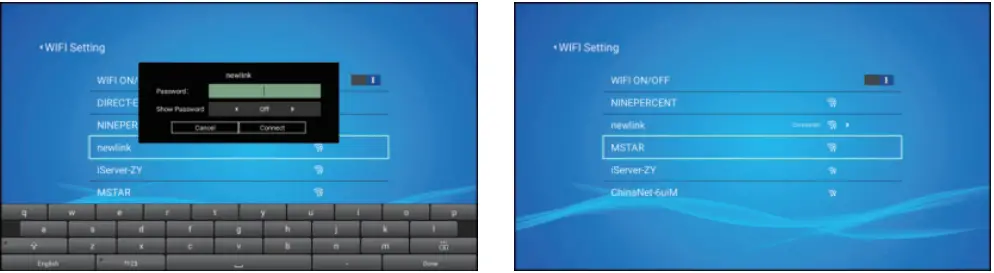
- Step 3: Select the WiFi name that needs to be connected, press the OK button to display a virtual keyboard, after using the remote control to enter the password, place the control cursor on the keyboard Donej, and press the OK button to complete the password input (Connecting the mouse to enter the WiF password is more convenient)
- Step 4: After entering the password, move the cursor to [Connect) with the direction buttons on the remote control, and press OK to connect.

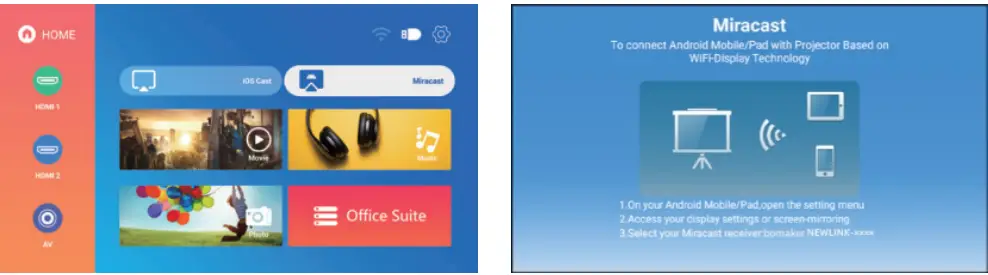
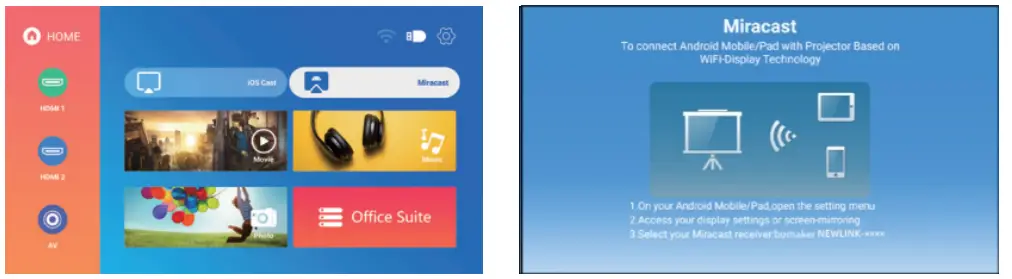
For Android System(Streaming with WiFi)
- Step 1: Connect the projector to WIFIl according to the projector WIFI setting steps, and turn on wifi on your Android device to connect to any wifi.
Note: There is no need for your Android device and the projector are connected to the same WiFi. - Step 2: Open the projector home menu, use the remote control to select Miracast, and press OK to enter the interface. Miracast HOME To connect Android Mobile/Pad with Projector Based on WIFHDINoley Technclog E office Suite 10n your Andoid Mobile Pat.ooen he sang meNu ZAccest for display settings.ar eeemiog

- Step 3: Select the “Wireless Display” option on your Android device, select the current projector name: NEWSLINK-XXxx, click and connect.
- Step 4: After successful connection, the screen content of your Android device is casted to the projection surface.


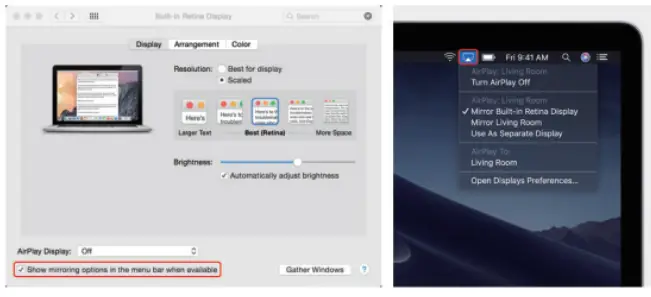
For MacBook device
- Step 1: Connect the projector to the WI F| according to the projector WIFI setting steps, and open the computer network settings, please make sure the Macbook and the projector are connected under the Same WiFI.
- Step 2: Use the remote control to select i0S Cast, press Ok to enter the interface.

- Step 3: Open the settings, find the Airplay option, click and search for the projector.
- Step 4: Select the current projector device: NEWSLINK- X * XX, click and connect.
- Step 5: when the projector and the device content are consistent, Screen mirroring is successful.

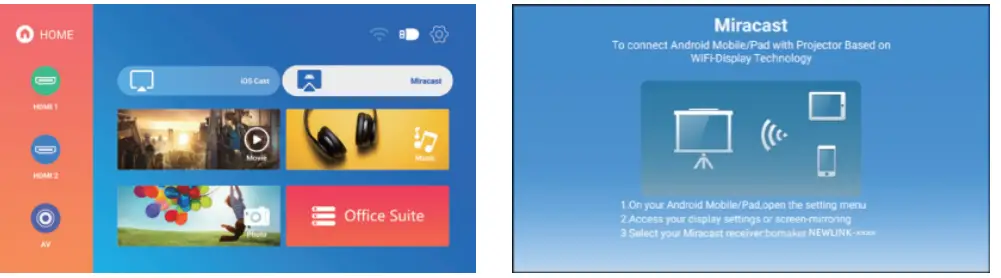
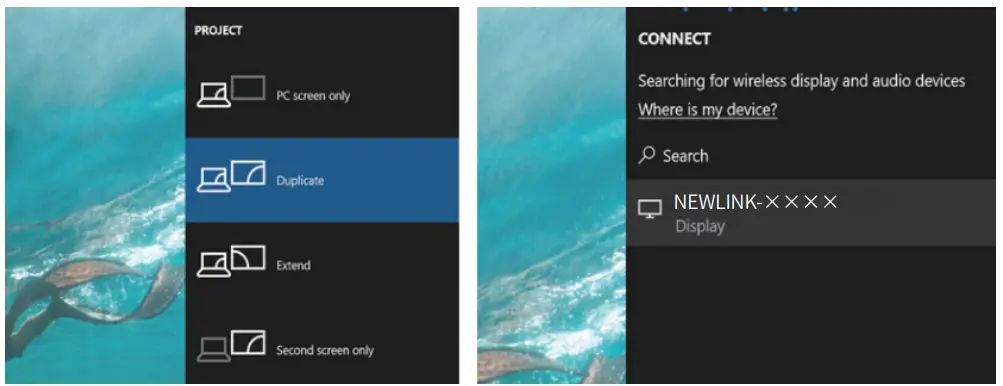
For Windows PC (Wireless Miracast only support Window 10 system)
- Step 1: Connect the projector to the WIFl according to the projector WIFI setting steps, and open the computer network settings, please make sure the PC and the projector are connected under the same WiFi.
- Step 2: Use the remote control to select Miracast, press OK to enter the interface

- Step 3: Use the shortcut key E+P to enter the projection settings, select Duplicate, and click Connected to a wireless display to enter the device search
- Step 4: Select the current projector device: NEWSLINK-X X Xx , click and connect
- Step 5: When the projector and the PC devices content are consistent, screen mirroring is successful

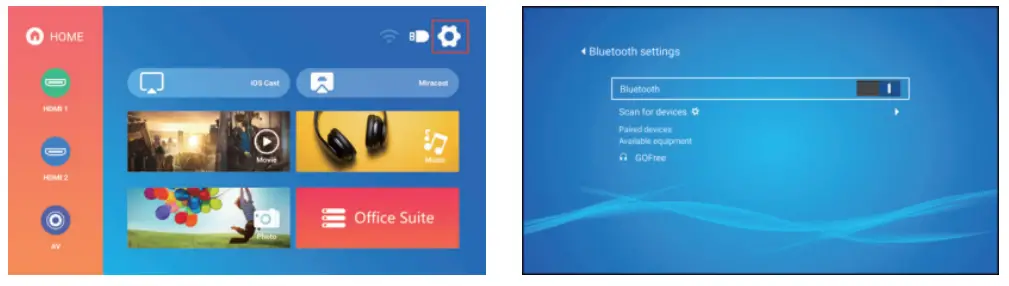
Bluetooth mode
Note:
The cinema 500 Max projector can be connected to the external speaker through Bluetooth. It cannot be connect to a smartphone or tablet for music streaming through Bluetooth. In Bluetooth mode, the projector cannot be used as a Bluetooth speaker.
- Step 1: Use the remote control or projector button to enter the setting interface at the upper right corner of the projector’s main interface
- Step 2: Find the Bluetooth settings on the setting interface, press OK to enter Bluetooth settings, press OK to turn on Bluetooth, the Bluetooth device list will be displayed

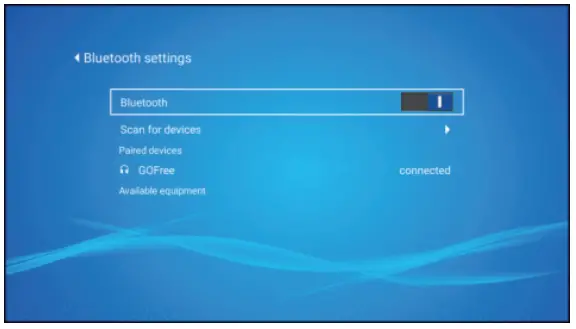
- Step 3: Select your Bluetooth speaker from the device list for connection, and press OK to pair.
- Step 4:After successful connection,it will display connected on Bluetooth devices.

SPECIFICATION
| Display Technology | LCD | Light Source | LED |
| Aspect Ratio | 16:9/4:3/Auto | Focus | Manual |
| Keystone | ±50° | Projection Mode | Front/Rear/Ceiling |
| Speaker | sw·1 | Power Supply | AC100-240V, 50/60Hz |
| Unit Dimension | 250•230•110 mm (10.2•9,05•4_33inches) | Unit Net Weight | 2.2kg(4.85lb)S0/60Hz |
| Photo Format Supported | JPG/JPEG/PNG/BMP | Audio Format Supported | MP3/ AAC / FLAC / OGG /WAV
/WMA/MID/DTS/M4A |
| Video Format Supported | 3GP/AVI / FLV / MP4 /MPG/ VOB TS/M2TS/RMVB/MKV | Ports | HDMl.2/ USB 2.0•2; Audio in
•1 /AV 0ut•1 |
Trouble Shooting
- Blurry lmage Make sure the projection distance is farther than the minimum projection distance of 1.3 m. Adjust the focus ring.
- The projector image shows no signal
* Please make sure all cables are connected to the projector properly and stably. Check whether the projector input source mode has been selected as the corresponding format.
For example the device and the projector are connected with an HDMI cable, the HDMI input channel must be selected for projection, and no signal will be displayed if other channels are selected. - What should I do if I want to watch content from Hulu, Netflix, and similar services via the projector? Please prepare a Fire TV stick, Roku stick, or ChromecastTM (not included), then connect it to the projector to watch the content.
- Remote Unresponsive Make sure the remote points at the IR receiver directly. Do not cover the IR receiver. Try a new pair of AAA batteries.
- Black spots appear in the projector picture Turn the bottom of the projector up and open the Maintenance Window at the bottom of the projector. Use a hair dryer or hair dryer to blow the bottom of the machine. Check whether there are still black spots in the projected image. If there are, it means that the dust has not been removed, and you need to continue cleaning until the image has no black spots. Close the Maintenance Window of the projector after cleaning to restore it to its original state.
- The projector will stop automatically every after time it is used for a period of time Check if the projector’s air inlet and outlet are blocked by other objects. Please pay attention to whether the local mains voltage is too low or too high or fluctuates too much.
FAQS
How does the projector perform in a brightly lit room?
As you know, many projectors on the market if are used without closing the curtains or turning off the lights, the projection effect will be more white. This FunFlix projector has a brightness of 15,000 lumens, even in a slightly brighter daytime You can also see the true color of the picture clearly.
Black dots appear on the projector screen, what should I do?
You can contact the seller and they will give you a solution. My problem was solved quickly.
Does the remote come with batteries? Do I need to buy it myself?
Yes, for shipping safety considerations and to support Amazon policy, remote control batteries are not included, you need to prepar your own 2 AAA batteries.
I can’t get the sound to work with my Firestick. How can i get that to work?
FunFlix Bluetooth WiFi Projector directly transmits the sound output by Firestick by default.
Can you guys stream Netflix, amazon prime video and Hulu on the projector? what do i have to do to play it?
Apps such as Amazon Prime Video, Netflix, and Hulu are copyrighted and cannot be projected directly to the projector for playback. You can use your Fire TV Stick or Roku Stick to enjoy Amazon Prime Video, Netflix, Hulu, and more. Or you can connect the computer via HDMI to play the video
Is this short throw? what is the minimum distance for 100″ image.
The minimum projection distance of the projector is 1.7 m (50 inches). Projection distance: 1.7m–50 inches, 2.3–70 inches, 2.7m–80 inches, 3.3m–100 inches, 5m–150 inches, please refer.
What is the warranty coverage?
Two Years
With this projector: can i run an hdmi cable from my laptop to the projector’s hdmi connection slot and run my powerpoint to the projector screen?
You absolutely can!
What is the difference between 4P keystone correction and 4D keystone correction?
4D can only adjust horizontal and vertical correction, 4P keystone correction can adjust 4 points at the same time.


