![]() HUSQVARNA® Striping Kit
HUSQVARNA® Striping Kit
MOUNTING INSTRUCTIONS
PEDHQZ242 Kohler Zero Turn Mower
IMPROTANT
Big League Lawns, LLC warrants their products to be free of defects in material and workmanship. This warranty does not cover defects due directly or indirectly to misuse, abuse, normal wear and tear, failure to properly maintain the product or used for a purpose other than that for which it is intended. The duration of this warranty is expressly limited to one year parts and labor beginning from the date of delivery to the original user.
The obligation of Big League Lawns, LLC is limited solely to the repair or replacement, at our option, at its factory or authorized repair agent of any part that should prove deficient. Purchaser must maintain the product under normal operating conditions at all times. Prior to operation, become farniliar with the attachment and quick
disconnect teatures. This product is not intended to be used ina transport position or to be backed over curbs. When not in use, the product should be removed from the mower and transported in a safe manner. Failure to follow these instructions will void the warranty.
PZ/PZT
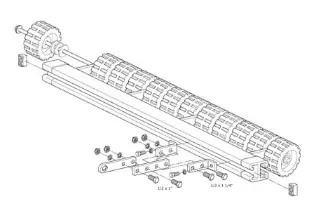
Step 1: Remove existing 3/8”-16 x 1” bolts from each side of the frame at noted location.
Step 2: Align the top holes of the CheckMate™ Mounting Plate (pointing up in a U shape) with each of the holes from step 1.
Step 3: Reinstall both 3/8”-16 x 1” bolts through the CheckMate™ mounting plate and the mower frame and attach with existing locknut.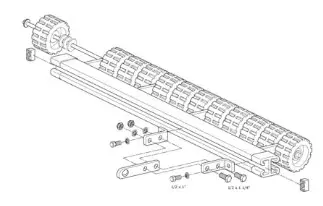
Step 4: Pull 7/16” lynch pins from stabilizer pins
Step 5: Slide CheckMate™ mounting arms onto stabilizer pins and replace lynch pins
Step 6: Using (4) 1/2” x 1” hex bolts, attach mounting arms to striping kit frame [finger tight]
Step 7: Center roller behind the machine and tighten mounting arms to gray striping kit frame [min. 90 lbs. Torque]
Z200 Series
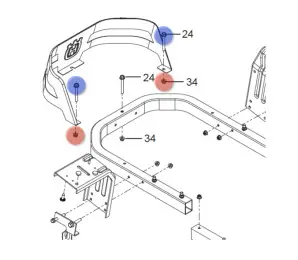
Step 1: Remove Nut #34
Step 2: Pull Bolt #24 from mower mainframe
Step 3: Align hole of CheckMate™ mounting bracket with newlexposed hole; mounting bracket will drop down on the ‘inside’ of the mowers tubular framing [e.g. engine side]
Step 4: Confirm that both quick release stabilizer pins are pointing in the same direction for quick release application.
Step 5: Place (1) 5/16” flat washer onto bolt #24
Step 6: Reinstall Bolt #24 through CheckMate™ mounting bracket, engine guard and mower mainframe
Step 7: Secure engine guard and CheckMate mounting arm in place by threading Nut #34 back in place [minimum 90 lbs. Torque]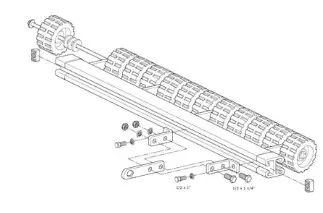
Step 8: Pull 7/16” lynch pins from stabilizer pins
Step 9: Slide CheckMate™ mounting arms onto stabilizer pinsand replace lynch pins
Step 10: Using (4) 1/2” x 1” hex bolts, attach mounting arms to striping kit frame [finger tight]
Step 11: Center roller behind the machine and tighten mountingarms to gray striping kit frame [min. 90 lbs. Torque]
MZ/MZT
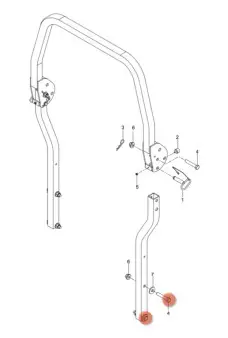
Step 1: MZT Series only; please remove 5/8”-11 x 3.5” bolts which secure rollover protection bar to mower mainframe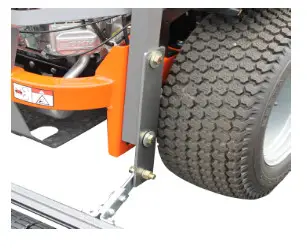
Step 2: *MZT Series only; align holes in CheckMateTM mounting plate with exposed holes in rollover protection bar. Reinstall 5/8”-11 x 3.5 bolt and tighten to secure plate and ROPS bar to mower mainframe
*MZ Series only; align holes in CheckMateTM mounting plate with exposed holes in mower mainframe. Using supplied 5/8”-11 x 2” bolts, lock washers and nuts; tighten and secure plate to mower mainframe.