
![]() THHMR 12 Inch Hand Push Roller Mower
THHMR 12 Inch Hand Push Roller Mower
User Manual
 Sales & Helpline 01793 333220
www.thehandy.co.uk
Before use please read & understand this manual, paying particular attention to the safety instructions.
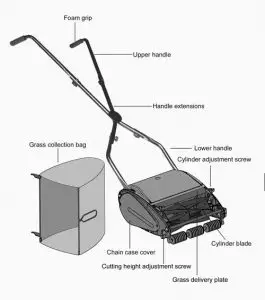
DIAGRAM
SAFETY INSTRUCTIONS AND PREPARATION
- Read and understand this owner’s manual before assembly and use. Learn its application and limitations as well as the specific potential hazards. Retain these instructions for reference.
- Retain all the packaging until you are sure that the product is operating correctly.
- Take care with the sharp cutting blades. It is recommended that gloves be worn when unpacking, assembling, adjusting, and maintaining the lawnmower.
- This lawnmower is for mowing lawns only and for domestic, not commercial use.
- Never allow children or people unfamiliar with these instructions to operate the mower.
- Inspect the area where the lawnmower is to be used and remove all stones, sticks, wires, and other debris or foreign bodies.
- Never place your hands, fingers, or feet near the cutting blade when the lawnmower is moving.
- Do NOT operate the mower whilst barefoot or wearing sandals.
- Walk slowly during use – do NOT run.
- Do NOT use it when the grass is wet enough to be slippery.
- Never intentionally strike or ram trees, fences, etc as this can cause injury and/or damage to the lawnmower.
- Do NOT mow steep slopes and also be sure of your footing.
SYMBOLS ON THE LAWNMOWER
| Danger! | |
| Read the instructions before use | |
| Keep a safe distance of at least 6 meters from bystanders | |
| Always wear gloves | |
| Sharp rotating blades, keep your hands and fingers clear |
ASSEMBLING THE MACHINE AND GRASS BAG
You will need a Phillips screwdriver and a 10mm spanner.
Take care when fitting the lower handles because of their proximity to the cylinder blade. We recommend the use of gloves.
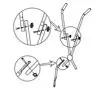
- Align the two holes on both of the upper handles with those on the handle extensions, Secure them using the wingnuts and screws provided.
Repeat the process with the lower handle.
- Attach the assembled handle with one lower handle, by locating onto the pegs within the main body recessed slots on each side of the mower.
Repeat the process with the other lower handle.
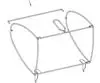
To assemble the grass bag:-
- Insert the two side frames separately into the holes of the clip on the front piece.

- Insert the single wire into the holes at the back of the side frame.

- Slip the fabric bag onto the wireframe and clip snap the plastic bars around the edge of the frame.

- Attach the grass bag by means of the hooks on the bag slot into the side plate.


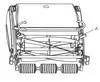
ADJUSTING THE BOTTOM (FIXED) BLADE
This operation needs to be done whilst carefully turning the cylinder blade.
We recommend the use of gloves.
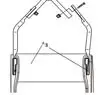
- The bottom fixed blade must be set correctly in order for the lawnmower to work efficiently. Using the spanner supplied, slacken off the two top nuts on each side of the side casing. Carefully tighten the two adjusting knobs (A) by turning them slowly in a clockwise direction.

- When the cylinder blade just makes contact with the bottom blade, turn the knobs slightly in an anti-clockwise direction until the cylinder blade turns without touching the bottom blade. Tighten up the nuts on the side casing.
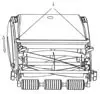
ADJUSTING THE CUTTING HEIGHT
- The mower can be set to cut at any height between 13mm and 23.5mm. Adjust the height of the cut by loosening the two knobs on the side of the cutting height roller and moving the roller up and down to the required height.

- Remember to adjust both sides of the roller equally otherwise the lawnmower will not give an even cutting finish.

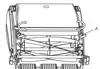
ADJUSTING THE DELIVERY PLATE
If the grass is not being thrown into the bag satisfactorily, then the delivery plate can be adjusted.
- Slacken the two screws (A)
- Underneath this cover, you will see the delivery plate with projections on either side. Move these projections backward or forwards until better results are achieved. The delivery plate must not touch the cutting cylinder.
- Re-tighten the screws on the cover.
ADJUSTING THE CHAIN
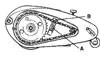
- To achieve the correct chain tension, first, remove the chaincase cover.
- Slacken the nut (A) which holds the chain skate – you will need a 13mm spanner.
- Lift the mower clear of the ground and rotate the rear roller clockwise one complete revolution. Note at what point the chain causes the chain skate/tensioner (B) to rise to its peak and, at the point, retighten the nut.
MAINTENANCE
After each use remove all grass clippings that may have collected in and around the wheels, roller, and blades.
We recommend a regular application of oil or lubricant (i.e. WD-40). This should be applied to all cutting surfaces, the cutting reel axle shaft, and roller and will keep your lawnmower in tip-top condition.
PARTS DIAGRAM
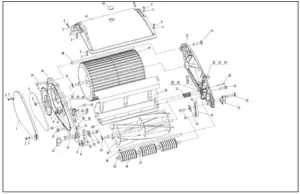
PARTS LIST
| No | Part No | Description | Qty | No | Part No | Description | Qty |
| 1 | TH133-1 | Chain Cover Case | 1 | 2 | TH133-2 | Bolt | 8 |
| 3 | TH133-3 | Washer | 8 | 4 | TH133-4 | Lock Nut | 2 |
| 5 | TH133-5 | Chain | 1 | 6 | TH133-6 | Sprocket Wheel Assy | 1 |
| / | TH133-7 | Lock Nut | 1 | 8 | TH133-8 | Washer | 1 |
| 9 | TH133-9 | Small Sprocket Wheel | 1 | 10 | TH133-10 | Carriage Bolt | 1 |
| 11 | TH133-11 | Chain Adjuster | 1 | 12 | TH133-12 | Hex Head Bolt | 2 |
| 13 | TH133-13 | Knob | 2 | 14 | TH133-14 | Hex Head Bolt | 4 |
| 15 | TH133-15 | Left Side Plate Assy | 1 | 16 | TH133-16 | Right Side Plate Assy | 1 |
| 17 | TH133-17 | Reel Spring | 1 | 18 | TH133-18 | Grass Delivery Plate | 1 |
| 19 | TH133-19 | Roller Assy | 1 | 20 | TH133-20 | Cutter Bar Fixing Pin | 2 |
| 21 | TH133-21 | Washer for Axle | 2 | 22 | TH133-22 | Cutter Bar Adjusting Knob | 2 |
| 23 | TH133-23 | Cutter Bar Adjusting Knob Cover | 2 | 24 | TH133-24 | Cutter Bar Adjusting Bolt | 2 |
| 25 | TH133-25 | Hex Head Nut | 2 | 26 | TH133-26 | Adjusting Stop Block Pushing up | 2 |
| 27 | TH133-27 | Adjusting Stop Pushing up Block | 2 | 28 | TH133-28 | Ball Bearing | 2 |
| 29 | TH133-29 | Bearing Cup 2 | 1 | 30 | TH133-30 | Bearing Cup | 1 |
| 31 | TH133-31 | Adjusting Spring | 2 | 32 | TH133-32 | Roller Bracket | 2 |
| 33 | TH133-33 | “U” Shape Washer | 2 | 34 | TH133-34 | Carriage Colt | 2 |
| 35 | TH133-35 | Roller Axle | 1 | 36 | TH133-36 | Roller | 3 |
| 37 | TH133-37 | Spacer | 2 | 38 | TH133-38 | Side Plate Connecting Pole | 2 |
| 39 | TH133-39 | Cutting Reel Assy | 1 | 40 | TH133-40 | Cutter Bar Assy | 1 |
| 41 | TH133-41 | Large Roller Cover | 1 | 42 | TH133-42 | Small Insert Cover | 1 |
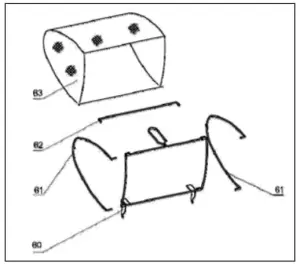
| No | Part No | Description | Qty |
| 60 | TH133-60 | Main Frame | 1 |
| 61 | TH133-61 | Support Arms | 2 |
| 62 | TH133-62 | Link Support Arm | 1 |
| 63 | TH133-63 | Grass Bag | 1 |
HANDLE DIAGRAM AND PARTS
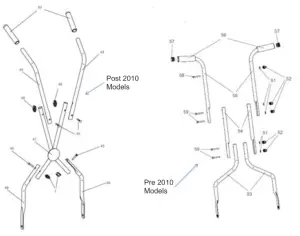
| No | Part No | Description | Qty |
| 45 | TH133-45 | Bolt | 4 |
| 46 | TH133-46 | Wing Nut | 4 |
| 47 | TH133-47 | Centre Handle | 1 |
| 48 | TH133-48 | Lower Handle | 2 |
| 49 | TH133-49 | Top Handle | 2 |
| 50 | TH133-50 | Handle Grip | 2 |
| 51 | TH133-51 | Washer | 5 |
| 52 | TH133-52 | Wing Nut | 5 |
| 53 | TH133-53 | Lower Handle | 2 |
| 54 | TH133-54 | Centre Handle | 2 |
| 55 | TH133-55 | Upper Handle | 2 |
| 56 | TH133-56 | Foam Grip | 2 |
| 57 | TH133-57 | Foam Grip Plug | 2 |
| 58 | TH133-58 | Bolt M5x45 | 1 |
| 59 | TH133-59 | Bolt M6x55 | 2 |
To order spare parts and see the complete range of garden machinery and garden equipment from Handy, visit:
www.thehandy.co.uk
![]()


