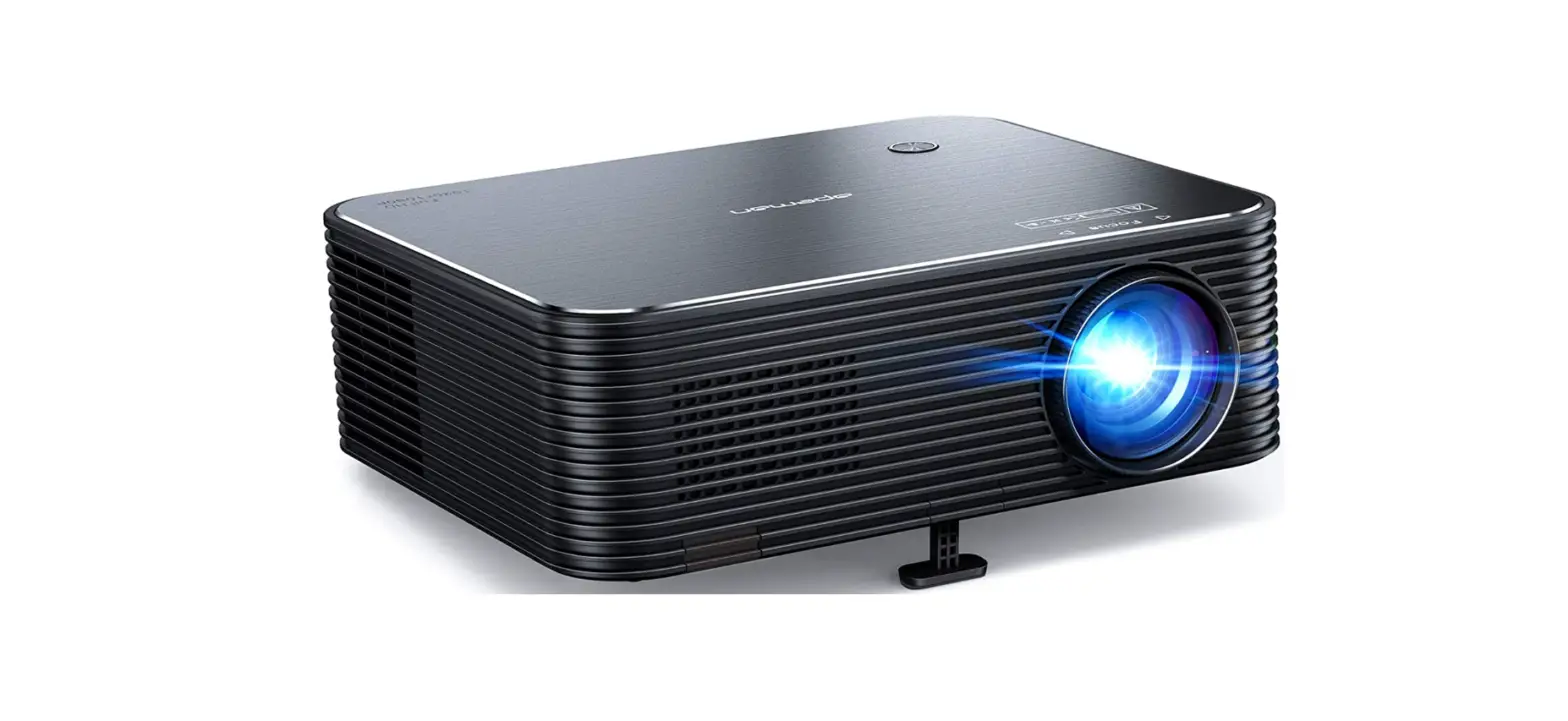
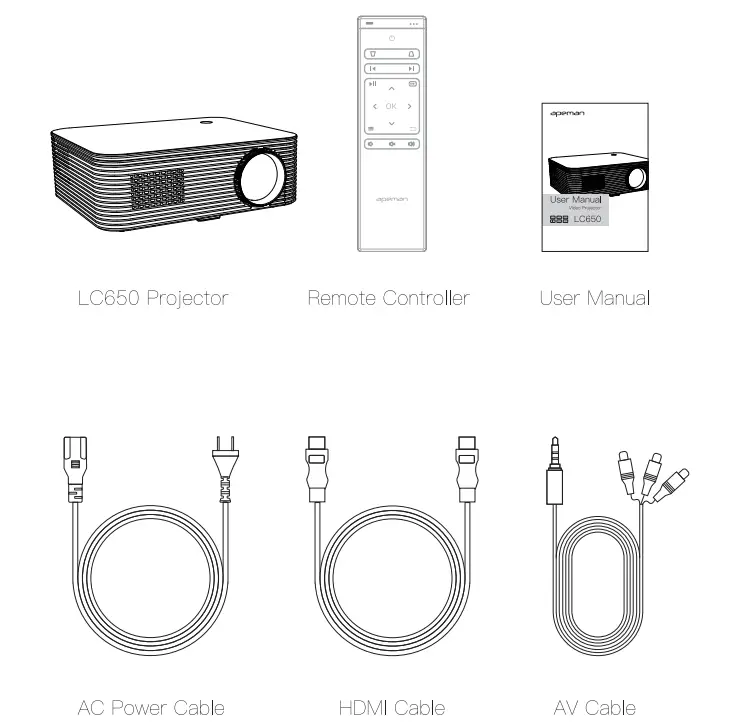
APEMAN LC650 Video Projector
INTRODUCTION
- Do not look straight into the projector lens while on, as it may cause serious eye damage.
- Do not block the ventilation openings to prevent overheating, and it is normal for the machine to generate heat during operation.
- Do not expose the device to rain or moisture to reduce the risk of fire or electric shock. Objects filled with liquids, such as vases, should not be placed on this device, as it may lead to potential accidents that damage the device.
- Do not have any type of impact, as it may damage the internal components. Do not make any repairs to this device by yourself. Our company will not cover the warranty if self-repair efforts were undertaken.
- Please use the included AC power cable to power the machine. Only use the included accessories specified by the manufacturer.
- Please use the power type marked on the projector to supply power. If the projector is not used for a long time, unplug the power cable.
- Please use a lens cleaner or special lens wipe paper when cleaning up the lens. Never use liquid, gaseous or easily flammable cleansers (sprays abrasives, polishes, alcohol) to clean.
- Please protect this device from overexposure to direct sunlight, heat, big temperature fluctuations and moisture. Avoid extreme temperatures. The suitable operations and storage temperature for this device and its accessories is 0’C to 35’C/ 0’F to 95’F.
- Please contact the seller for technical support when the product has any type of problem. Contact details are revealed at the end of this manual.
Product Overview Interfaces and buttons
 Interfaces and buttons
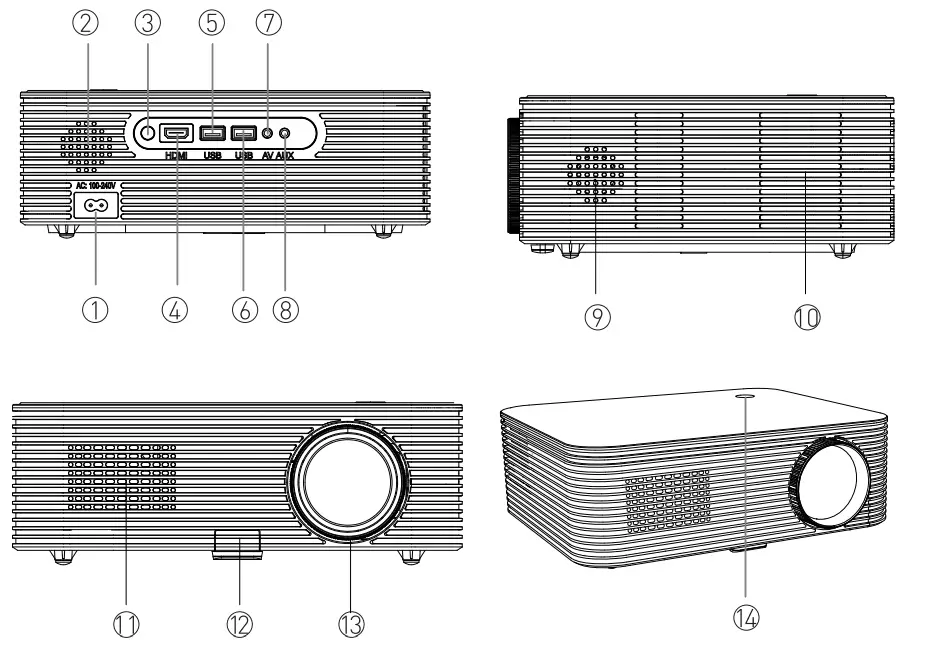
- Power Input
- Two-channel Speaker Outlet
- Sensor (Front)
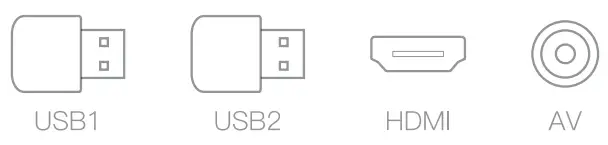
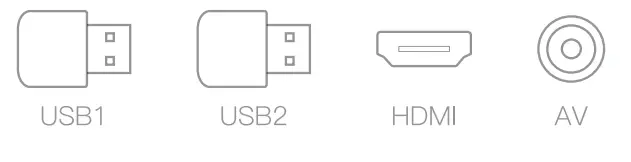
- DMI Input
- USB Input
- USB Input
- AV Input
- 5mm Audio Jack
- Two-channel Speaker Outlet
- Cooling Air Inlet
- IR Sensor (Rear)
- Height Adjustment Knob
- Focus Wheel
- Power Button
Remote Controller
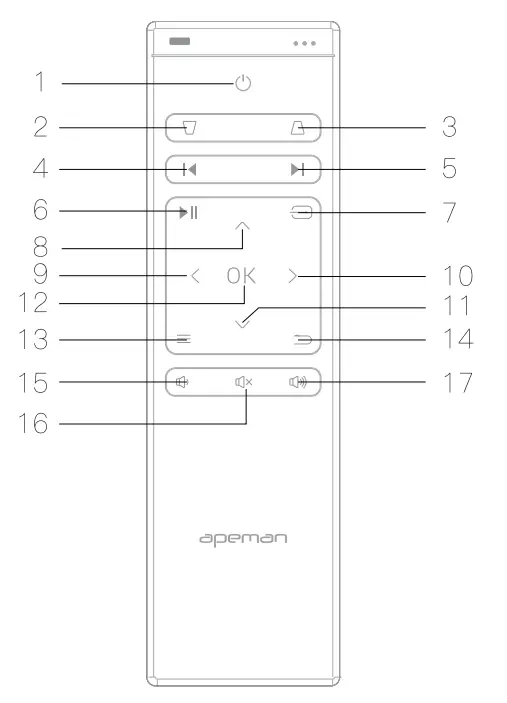
- ON/OF
- Up keystone correction
- Down keystone correction
- Previous
- Next
- Pause/Play
- Input Source
- Up
- Left
- Right
- Down
- OK
- Menu
- Return
- Volume down
- Mute
- Volume up
Warm Tips:
- When using the remote controller, please make sure that the signal transmitter of the remote controller aims at the IR Sensor (front or rear) of the projector. Please do not cover the IR sensor.
- Remove the battery compartment cover on the back of your remote controller by carefully sliding it to open. Fit two pieces of correct AAA batteries (not included), referring to the polarity markings. Finally, close the cover.
- Do not mix new batteries with old ones in the remote controller since it can cause operational failure.
- If you are not using the remote controller for an extended period, please take out the batteries to prevent battery leakage.
Installation
Your projector can be installed in four positions to meet different needs, please go to Menu >Option >Rotate to set up the projection modes. There are following installation modes for different options.
Front
Select this mode when the projector is placed in front of the wall/screen, and the image will be directly projected to the wall/screen. This is the most common way to position the projector for quick setup.
Front ceiling
Select this mode when the projector is placed upside-down from the ceiling in front of the screen.
NOTE: To install the projector on the ceiling, an extra four-corner projector mount is needed.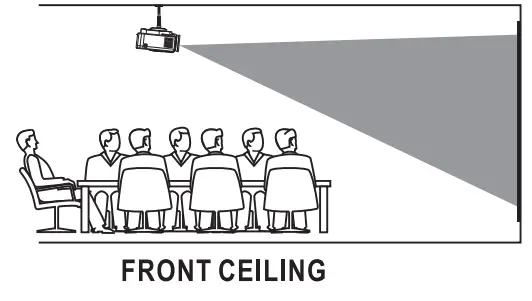
Rear ceiling
Select this mode when the projector is placed upside-down from the ceiling behind the screen. 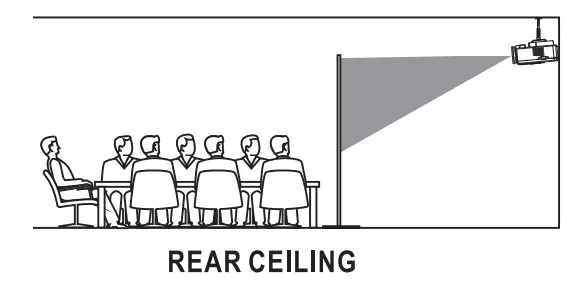
Rear
Select this mode when the projector gets placed behind the screen.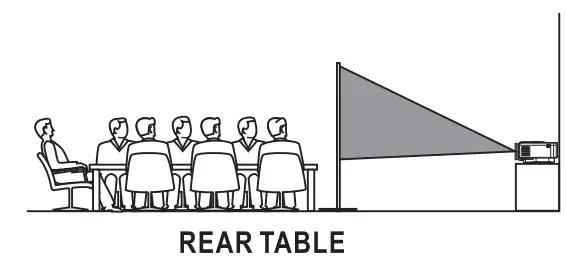
NOTE: A special rear projection screen is required.
Operation
Note:
As a safety precaution, please disconnect the projector and all equipment before connecting the cable.
As shown in Picture G), connect the projector and the power source with the included AC power cable.
As shown in Picture (2), the projector gets into standby mode as the LED indicator on the top of the projector turns red.
As shown in Picture @, turn on the projector by pressing the power switch button on the projector itself or on the remote controller. Start-up successes: LED indicator turns blue.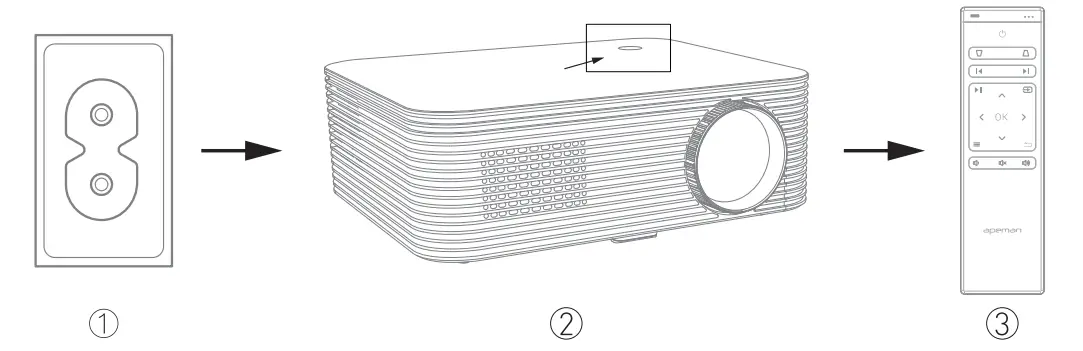
As shown in Picture @ and ®, adjust the Keystone correction on remote controller and the Focus wheel on the projector until you get a clear picture.
Warm Tips:
- If you want to correct the vertical keystone, you can press the “up keystone correction” and “down keystone correction” buttons on the remote controller to adjust and get a rectangular picture.
- If you want to correct the horizontal keystone, please enter the Menu-Option-Keystone-Horizontal to adjust and get a rectangular picture.
- Not recommend that the projection size being too large, otherwise, the image on the screen edges may not be as sharp as the screen center.
Multiple Connections
Select an input source
Warm Tips:
- All the operation should be done by the remote controller because there is only a power button on the projector.
- Please press the a button on remote controller to choose the right input source to get it connected, if you choose the wrong input source then you will get a “no signal” image.
Connection preparation steps
- Press the a button to enter an input source menu.

- Press the button ◄ or ► to choose the right input source you want.
Press the “OK” button to ensure the input source. This projector supports HDMI, USB, and AV input sources.
HDMI devices connection
The projector can be connected to devices via HDMI port. It is compatible with laptops, DVD players, Blue-ray players, Chromecast, TV Stick, etc. An HDMI cable is included.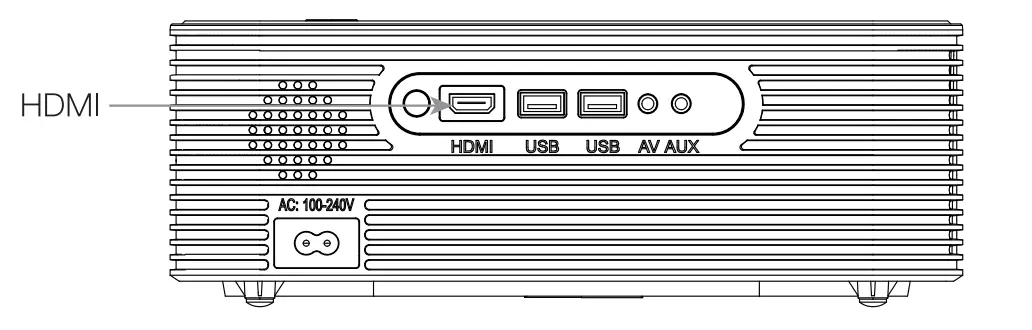
How to connect via HDMI port?
- To connect with iPhone, or iPad: an official Lightning to HDMI adapter(Not included) is needed.
- To connect with an Android Smartphone which has a casting screen function: a wireless Miracast/Dongle(Not included) is needed.
- To connect with MacBook: You can use an Apple Certifiable USB C to HDMI adapter(Not included) or an Apple Certifiable Thunderbolt to HDMI adapter to connect. Click “Enable Mirror” on the display settings bar at the top right corner of the screen with a monitor icon.
- To connect with laptop/computer: For most Windows computers, you need an HDMI cable(included). Press the [Windows] key +[Pl to make a connection.
Multimedia connection
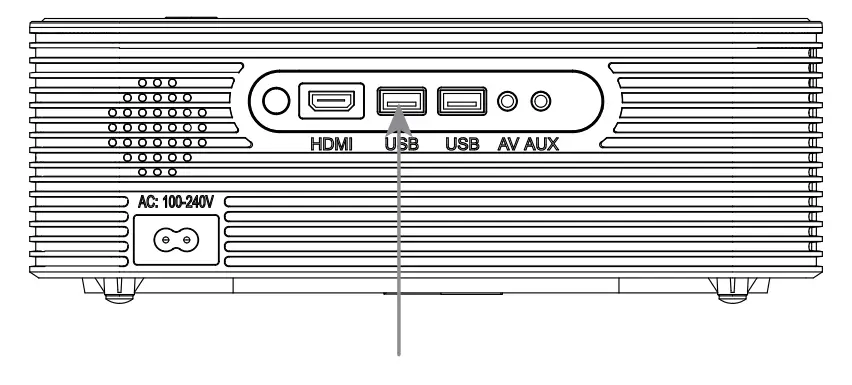
- Insert the USB flash drive into the corresponding “USB” port of the projector.

- Choose the corresponding “USB” input source.

- Select “Movie”, “Music”, “Photo” or “Text” to enter the file.

- Choose the file you want to play, and press the button “OK” to play or to pause.
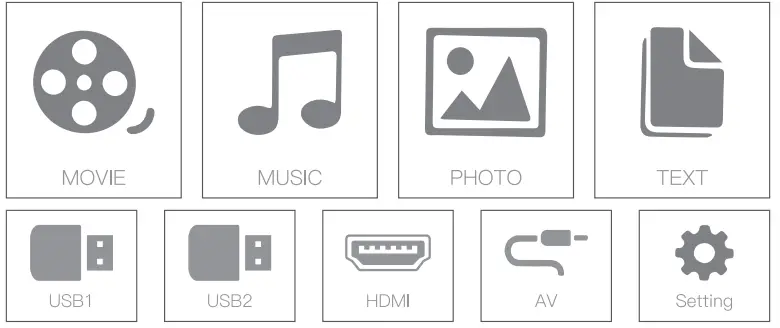
- File Type Format
- Video MP4/ AVI/MKV /FLV /MOV /MPG/VOB/RMVB/3GP
- Music MP3/WMA/OGG/ MC/ ASF/WAV
- Picture JPEG/BMP/PNG
- TEXT 1XT
AV video device connection
Connect the projector AV interface with the 3 in 1 AV female cable(included).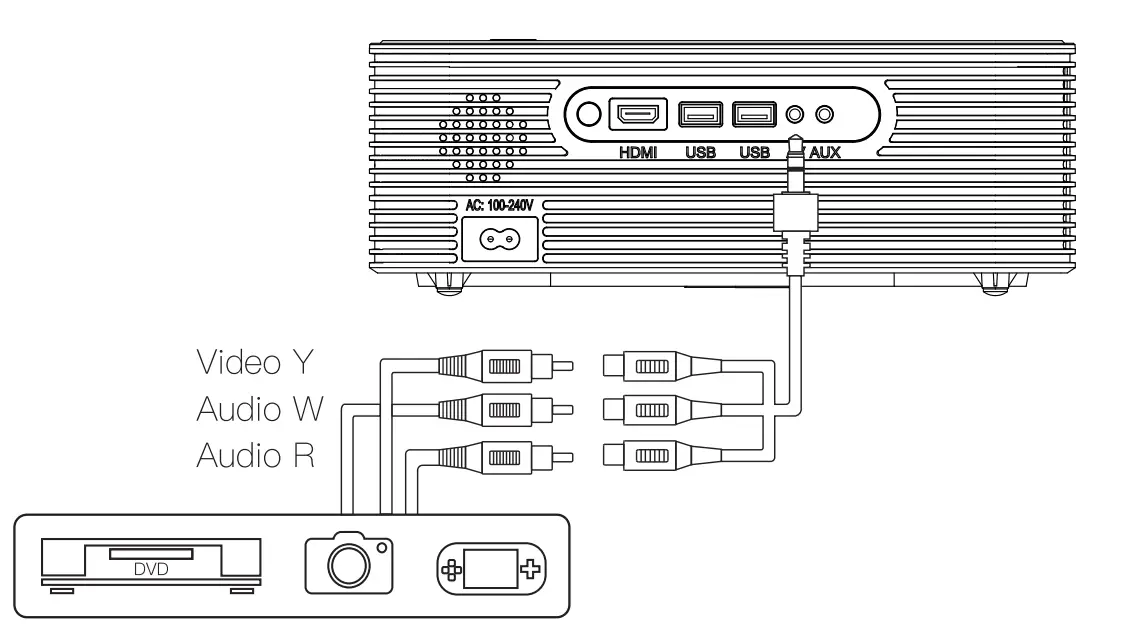
Audio devices connection
The projector can connect to a headphone or to a wired audio system via a 3.5mm jack (not included).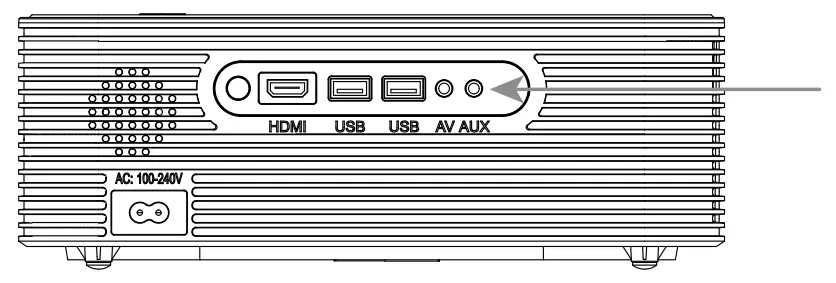
Settings
You can adjust the projector settings in the projector main menu by pressing the menu button on the remote controller.
Picture
- Picture Mode: User, Vivid, Standard, Soft
- Color Temperature: User, Cool, Medium, Warm
- Aspect Ratio: Auto, 4:3, 1 6:9
- Reduce Display
- Auto Source: On, Off
- LED Temperature
Sound
- Sound Mode: User, Standard, Music, Movie, Sports
- Surround Sound: Off, SRS T ruSurround XT, Surround
Time
- Clock
- Off Time
- On-Time
- Sleep Timer
- Auto Sleep
Option
- OSD Language: English, Deutsch, Franc;;ais, Italiano, Espanol
- Keystone: Horizontal, Vertical
- Rotate: Front, Front Ceiling, Rear Ceiling, Rear
- Software Update(USB)
- Restore Factory Default
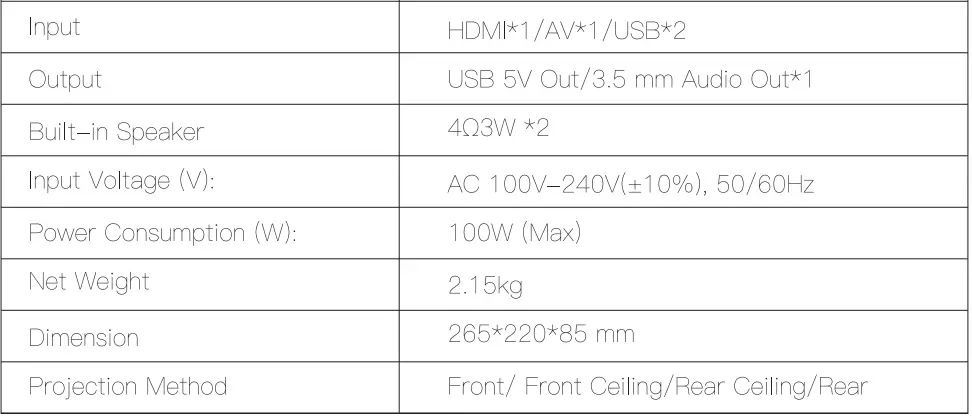
Specifications
Basic parameters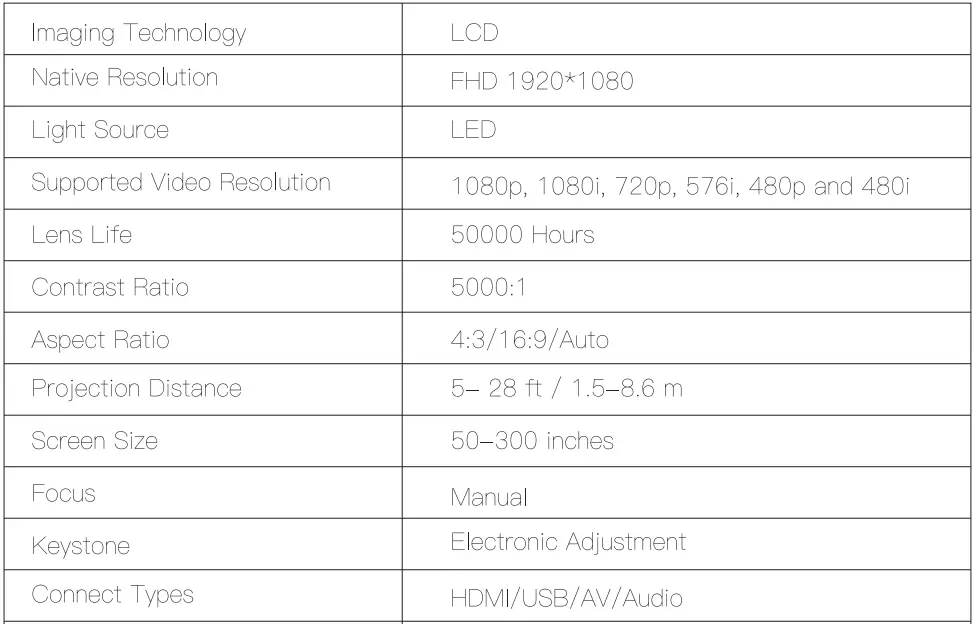
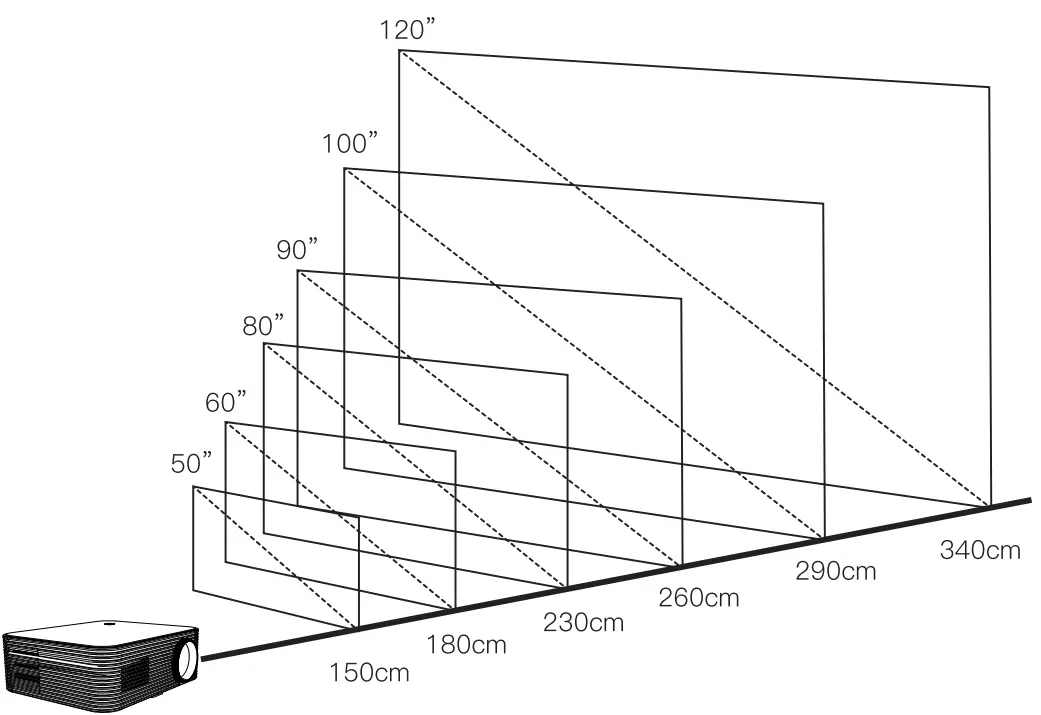
Projection distance and screen size
Troubleshooting
Can I use the projector for a presentation?
We recommend this projector for small meetings of around 20 people and it is recommended to use in a relatively dark room.
Is the image clear?
Yes, the native resolution of the projector is 1920*1 080P, which brings much clearer and sharper pictures.
Does the projector make some noise?
There is nearly no noise while working, you can deeply enjoy movie time with your family and friends.
What is the sound quality?
The projector’s unique dual-sound design brings you an amazing sound experience.
How do I connect to my Android phone (Samsung, Huawei, Xiaomi, etc.)?
- Plug the Miracast/Dongle to the HDMI port on the projector.
- Power the Miracast/Dongle via plugging the USB cable USB port on the projector.
- The Miracast/Dongle main page will be displayed on your projector image.
How do I connect to my iPhone?
- an official Lightning Digital AV Adapter from the Apple Store is necessary Then connect the projector and iPhone via the Lightning Digital AV Adapter and HDMI cable.
- If the connection fails, please try: to connect the projector to HDMI-compatible devices such as a laptop, TV box or DVD with your HDMI cable. If the connection is successful, the projector has no problem.
Please check your adapter or contact the adapter dealer.
What if there is no sound when playing Netflix or YouTube videos?
Turn off Dolby surround sound when using Netflix, and YouTube. (Settings > Display & Sounds > Audio > Dolby Digital Output > turn off Dolby Digital Plus 5.1 )
Does this projector have a Wi-Fi connection?
No, you can connect the projector to various devices (PC, TV Stick, iOS devices and Android phones, etc.) via HDMI port, and use USB flash drives via USB ports.
Warranty
This product carries a one-year warranty and a 30-day return or exchange service based on the order date.
Please feel free to let us know what we can do to assist you when you have any product problems.
APEMAN Projectors customer service e-mail addresses:
US: [email protected]
UK: [email protected]
DE: [email protected]
FR: [email protected]
IT: [email protected]
ES: [email protected]
JP: [email protected]
FAQS
The remote control doesn’t work?
Make sure the battery is already installed in the remote control. Make sure you are pointing the remote at the TV.
Blurred image?
Rotate the focus adjusting knob.
How do I recover/reset the projector?
to SETTI NG>SETTI NGS>Factory data reset.
How do I play videos when no Wi-Fi is available?
- Download the videos to a USB drive.
- Plug the USB drive into Apollo to play.
Followed installation instructions on app. No device was found. No device appeared on list. Any tips?
Please make sure that your iPhone or Android and are in the same WiFI network, when you try to pear!
Can this play movies and tv shows downloaded from iTunes on my iPhone to the fine mood?
I am not too sure about iTunes, but I think you can upload videos to Directly and it would work.
Can i used the android charging port to connect a converter to HDMI?
Yes
What is the resolution of this product?
Not bad
Is this now preloaded with the Disney plus app?
Disney+ app is now available in beta for all 360 users.
Is there any way i can watch Hulu?
We are excited to announce that Hulu and ESP are available in beta upon request! Please send your device serial # to our support team and we will roll out the feature for you:)
What is the video quality this projects the video at? 720,1080i or p…
Never could get the system to work at all
Does it have to be dark to see the images/videos? Does it work in daylight?
although Works during daylight, we advise to have dimmed or dark environment for a more immersive experience and bigger and brighter image quality.
Are there parent controls or setting where you can remove YouTube if desired?
Yes, you can remove Youtube app from your device and then upload it back from the cloud once you change your mind.


