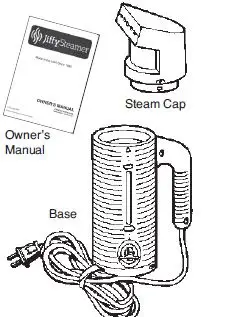
Jiffy Steamer J-2000 Garment with Plastic Steam Head  Important Instructions
 Important Instructions
- To reduce the risk of contact with hot water emitting from steam vents, check appliance before each use by holding it away from body and operating.
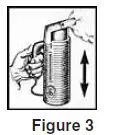
- Use appliance only for its intended use. Steam only in an up and down vertical motion. Never use steamer in a horizontal position or tilt into a backward position, this may result in water discharge.
- To avoid the risk of electric shock, do not immerse the appliance in water or other liquids.
- Never tug cord to disconnect from outlet; instead grasp plug and pull to disconnect.
- Do not allow cord to touch hot surfaces. Let appliance cool completely before storing or before adding water.
- Always disconnect appliance from electrical outlet when filling with water, emptying, and when not in use.
- Do not operate appliance with a damaged cord, or if the appliance has been dropped or damaged. To reduce the risk of electric shock, do not disassemble or attempt to repair the appliance, take it to a qualified service person or return to the Jiffy® Steamer factory for examination and repair. Incorrect reassembly or repair could cause a risk of fire, electric shock or injury to persons when the appliance is used.
- Close supervision is necessary for any appliance being used near children. Do not leave appliance unattended while connected to power source.
- Burns could occur from touching hot parts, hot water or steam. Use care when you empty a steam appliance as there may be hot water in the reservoir.
- Indoor use only.
- Never attempt to steam clothing while on body.
- Never use an extension cord.
- This marking on the product denotes that the unit is grounded
How to Steam
As your drycleaner knows, steam is the gentlest, safest, most efficient method to remove wrinkles. Not only is steaming five times faster than ironing, it is guaranteed not to scorch even the most delicate materials and fabrics. Our steamers will remove wrinkles from clothing, drapery, tablecloths…virtually any fabric. Use the following information to help guide you to more proficient steaming.
- Some articles can be steamed better from the underside. This allows the steam to relax the fibers of the material, thus removing the wrinkles.
- When steaming, touch material lightly with steam head and wrinkles will vanish instantly. The combination of the warm, moist steam and the steam head is important for a smooth finish
- You may use your Jiffy Steamboard to serve as a vertical pressing board to steam your garments
- Always steam with the hose in an upright position so any condensation is free to flow back into the steamer. If steaming in a low position near floor, frequently extend hose up and out to keep hose clear of condenstation
- Jiffy® Steamers are great for removing “closet crunch,” and they eliminate most trips to the drycleaner. Convenient hanger/hook mechanism holds both clothes and steam head securely.
Features
- 3 times more powerful than any other hand-held steamer on the market
- Largest water reservoir available
- Wide mouth, easy-to-fill water tank
- 600-watt heating element; automatic safety shut-off temporarily cuts unit off when it runs dry
- Uses plain tap or distilled water (no additives required)
- Comfortable, easy-to-grip handle
- Special outer housing for cool-to-thetouch operation
- No internal water lines or pumps to become clogged by hard water
- 9-foot power cord for more manageable handling
- Fits neatly inside attaché or suitcase
- Available with a multiple plug converter for world travel
Instructions for Use
- Make sure your Esteam® is unplugged before filling.
- Check to make sure the factory-installed red o-ring is secure inside the water tank before operating steamer
- Fill with tap or distilled water to the full mark on the outside of the steamer.
- Never overfill. Never use water left overnight in steamer. Stale water causes foaming action and can create water droplets.
- If you start to see scale buildup in the water cup of your ESTEAM, it is time to clean it with our Jiffy Steamer Liquid Cleaner. Not doing so, could alter the performance of the unit.
- After filling, place steam cap on steamer and twist firmly until cap arrows align with arrows on the tank Make sure it is secure before operating unit.

- Plug your Esteam® into proper voltage outlet. Steamer will start heating within 15 seconds, providing live steam from cold water within 2 minutes.
- Always steam with a vertical up and down motion Do not tilt unit forward or backward.
- Avoid allowing steamer to run dry of water.
- Refer to page 8 for complete cleaning instructions.

Parts Diagram
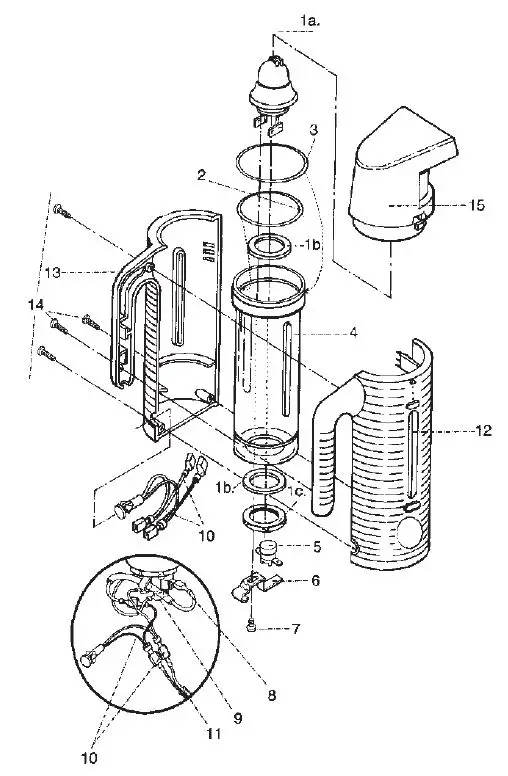
Parts Diagram Key
Should you ever need replacement parts for your Jiffy® Steamer, you may purchase them separately. Use this diagram and parts list to identify any part you may need. Please include model and serial number when ordering
Key# Part # Part Description
- 1a 0653 Esteam 120 Volt 600 Watt Heater with Gaskets and Nut
- 0655 Esteam 230 Volt 625 Watt Heater with Gaskets and Nut
- 1b Gasket for Esteam Heater (set of 2)
- 1c Nut for Esteam Heater
- 2 0661 Red Inside O-Ring
- 3 0662 Black Outside O-Ring
- 4 0669 Esteam Water Tank
- 5 0640 Esteam 36 T-L263 Thermostat
- 6 0643 Fusible Link Clamp
- 7 0644 Fusible Link Clamp Screw
- 8 0641 Fusible Link Wire with Insulated Lug (Orange)
- 9 0681 Red Wire with Insulated Lugs
- 10 0645 Pilot Light with Wiring Harness
- for 120 Volt Electrical Systems
- 0646 Pilot Light with Wiring Harness
- for 230 Volt Electrical Systems
- 11 0647 Cord set (18/2 gauge)
- 12 0665 Right Case Half
- 13 0666 Left Case Half
- 14 0667 Four (4) Screws for Esteam Outer Case Halves
- 15 0663 Complete Steam Cap with Face Plate
ACCESSORIES
- 0619 Voltage Converter for Travel
- 0899 Liquid Cleaner – 3 Ten (10) Ounce
- Bottles per Package*
Cleaning Instructions
- Pour 4 ounces of water in your
- ESTEAM®hand steamer.
- Plug in the unit and bring to full steam.
- Unplug the unit and allow to cool for 2 minutes.
- Pour out all water.
- Pour in 5 ounces (1/2 bottle) of the Jiffy® Steamer Liquid Cleaner.
- DO NOT STEAM THE UNIT WITH THE LIQUID CLEANER.
- Leave the liquid cleaner in the unit for 3 hours.
- Pour out the liquid cleaner solution.
- Scrub with a stiff bristled brush to remove excess sediment as necessary.
- Flush the unit 3 times with fresh water.
- Resume steaming as normal.
- Please call 1-731-885-6690 for further instruction or questions.
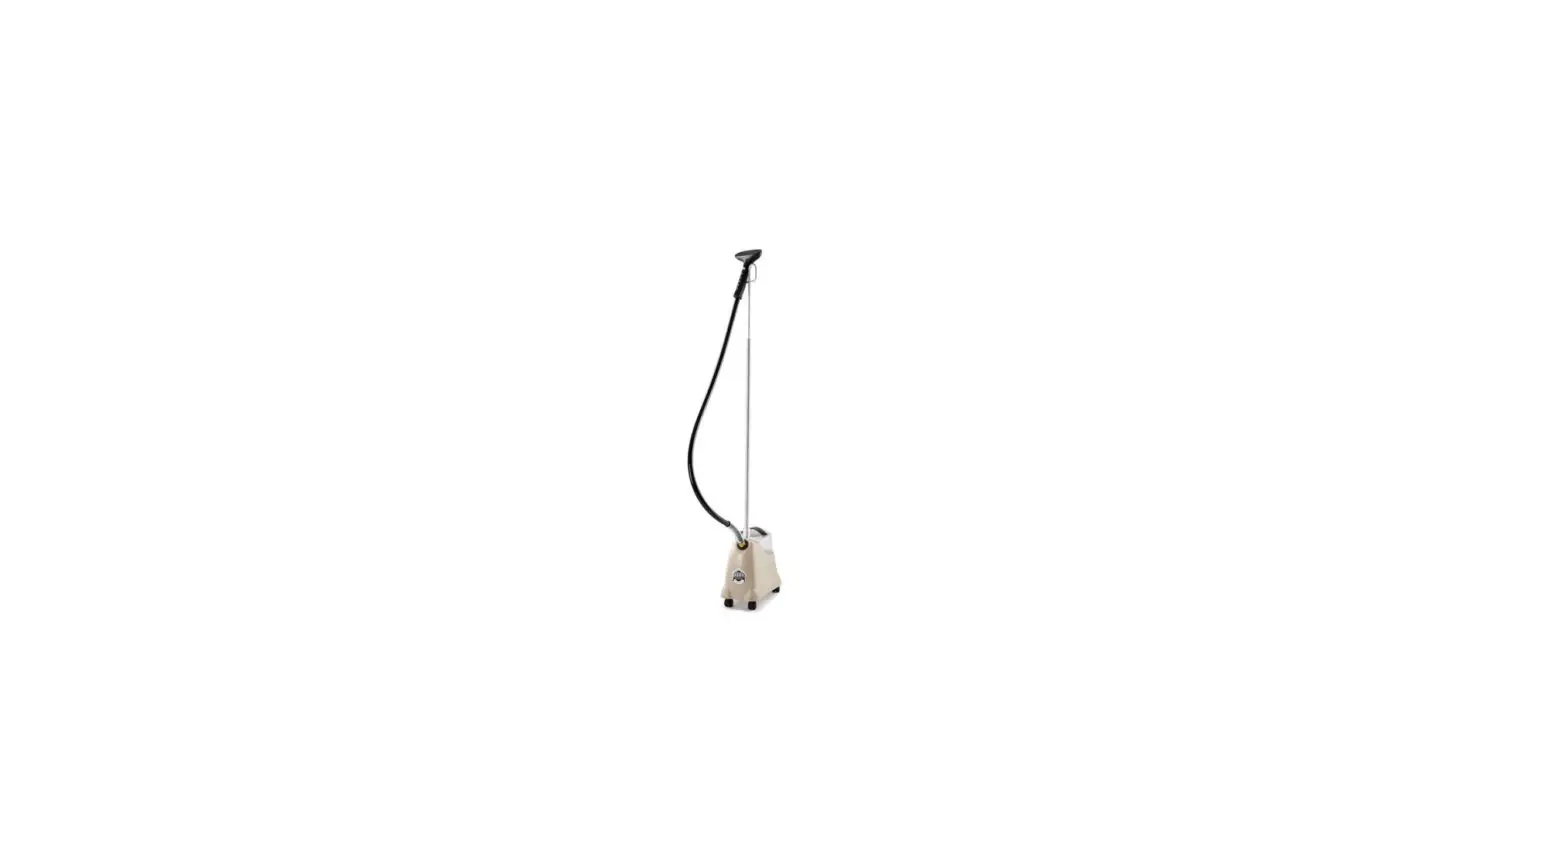
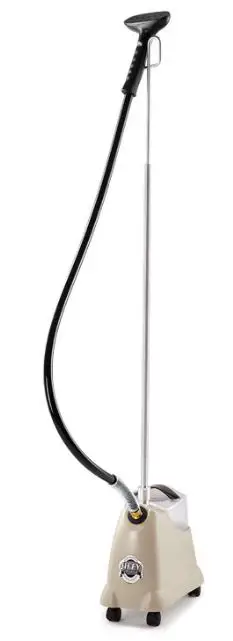
J-2000 Model
- Polymer outer housing unit for durability
- Lightweight, flexible hose
- Shatterproof water caddy
- Safety wiring feature temporarily turns the unit off should it accidentally run dry
- Comfortable, easy-to-grip handle
- Removes wrinkles up to five times faster than conventional ironing
- Easy-roll casters for mobility
- Numerous steam head attachments available
- 120 volt or 230 volt units available
- Backed by Jiffy®’s renowned Customer Service–should your steamer need repair, send it to us and we will repair and ship the unit within 24 hours from its arrival to our plant
INCLUDES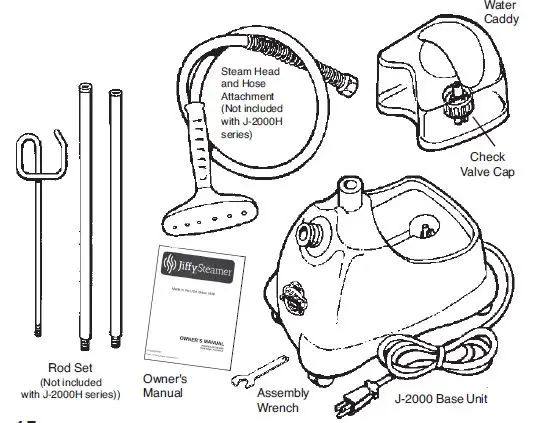
J-2000 Instructions
- Attach hose firmly with included assembly wrench. Assemble and attach hose hanger rod set.
- Invert water caddy filled with tap or distilled water, plug into proper voltage outlet, turn switch to lighted ON position and you will have steam within minutes.
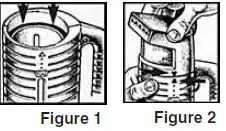
- For easy operation, mount optional Jiffy® Steamboard to door or wall to hold clothing while steaming (figure #2).
- The combined touch of the steaming head and the direct steam is very important.
- Some articles can be steamed better from the underneath side. Speed and efficiency is accomplished with a little practice.
- Always steam with hose in an upright position, so any condensation is free to flow back into steamer.
- If steaming in a low position near floor, straighten hose up and out frequently to keep clear of condensation.
- Hang steam head in an upright position in the hose hanger section when not in use and turn switch to OFF (figure #3).
- Periodically, pour old water out of steamer to avoid sediment buildup and maintain proper water level (figure #4).
J-2000 Parts Diagram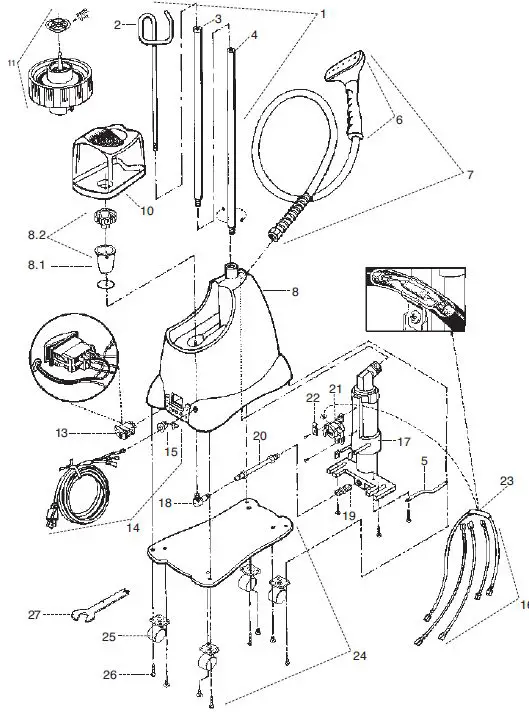
J-2000 Parts Diagram Key
Key# Part # Part Description
- 1 1029 Rod Set Complete with Threaded Bottom Section
- 1030 Rod Set and Nut Complete with Metal Studs (pre August 2021 models)
- 2 0035 Hook Section of Rod Set
- 3 0036 Middle Section of Rod Set
- 4 1033 Bottom Section of Rod Set (with Nut Attached) (pre August 2021 models)
- 1028 Bottom Section of Rod Set with Threads
- 0043 Metal Threaded Cap Screw for Rod Set
- 0039 Metal Threaded Stud for Rod Sections
- 5 1102 Grounding Strap for Heating Element
- 6 0253 Plastic Steam Head/Handle Replacement Kit
- 7 0251 Plastic Head/Handle Hose Attachment Complete
- 0280 Hose Per Foot (Black in Color)
- 8 1107B J-2000 Beige Housing Kit with Water Cup – 120 Volt
- 1107C J-2000 Beige Housing Kit with Water Cup – 230 Volt
- 1107PB J-2000 Pink Housing Kit with Water Cup – 120 Volt
- 1107PC J-2000 Pink Housing Kit with Water Cup – 230 Volt
- 1 1110 O-Ring for J-2000 Water Cup
- 2 1111 J-2000 Water Cup with 90 degree Bass Fitting and o-ring
- 1140 J-2000 Water Caddy Complete with Check Valve Cap
- 141 J-2000 Water Caddy Complete without Check Valve Cap
- 11 0027A Replacement Check Valve Cap
- 0564 Ryton Insulator Set (2 feet and 1 ring)
- 0027B Replacement Check Valve Cap Baffle Only
- 1125 Green Lighted Contura Rocker Switch – 120 Volt
- 6 Green Lighted Contura Rocker Switch – 230 Volt
- 0132 Cord Set (16/3 gauge) with Strain Relief
- 0146B Cord Strain Relief
- 0148 Internal Wire Set
- 0597 Heating Unit Kit (wiring included) for Models with Green
- Lighted Contura Rocker Switch – 120 Volt Cord Set and 4” Water Line
- 0597A Heating Unit Kit (wiring included) for Models with Green
- Lighted Contura Rocker Switch – 230 Volt Cord Set and
- 4” Water Line
- 17 0161A Heating Unit Assembly (no wiring included) for
- Models with Green Lighted Rocker Switch – 120 Volt
- Cord Set and 4” Water Line
- 0162A Heating Unit Assembly (no wiring included) for
- Models with Green Lighted Contura Rocker Switch –
- 230 Volt Cord Set and 4” Water Line
- 1131 Brass 90 Degree Elbow Joint – Extended Version
- 1130 3/8” x 1/4” Straight Brass Fitting for Heating Element Housing. *Beginning in
- November 2012, this fitting is now cast into the heating element.
- 20 0591 Copper Tube(4” length) with Nuts and
- Compression Rings
- 0160 L-290 Thermostat
- 0195 Fusible Link Clamp
- 0151 Fusible Link Wire with Insulated Lug and Clamp
- 1120 Bottom Plate with Casters
- 0011 Bottom Plate Casters (Set of 4)
- 1114 Screws for Bottom Plate (4 Screws Total)
ACCESSORIES
- 1026 “I” Kit – 5.5ʼ Hose with Four Attachments
- 27 1048 Jiffy Steamer Assembly Wrench
- 0254 Metal Head/Wood Handle Hose Attachment Complete
- 0256 Metal Head / Wood Handle Only
- 0269 Replacement Wooden Handle (for Metal Steam Heads)
- 0262 Wig Hose Attachment
- 1062 Steam Cleaning “B” Brush Hose Attachment
- 1063 Brush Only for the “B” Hose Attachment
- 0899 Liquid Cleaner – 3 Ten (10) Ounce Bottles per Package*
J-2000 Wiring Diagram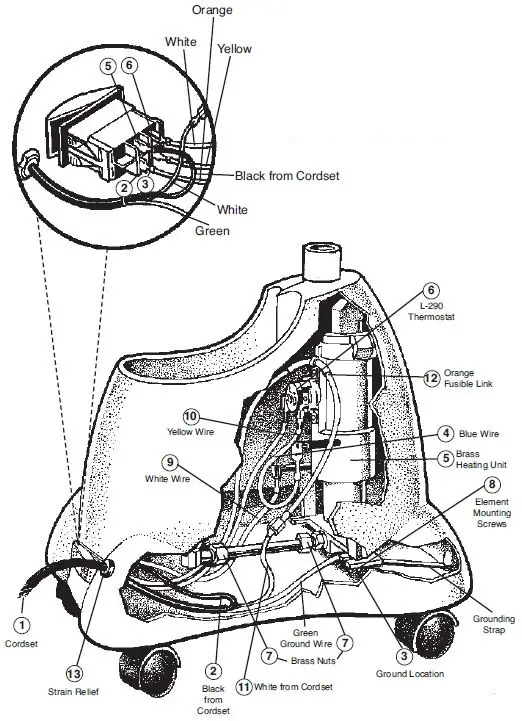
J-2000 Wiring Instructions
- Insert cord set (1) into housing and connect black positive wire (2) from cord set to terminal number 5 on the switch.
- Connect blue wire (4) from the right side of brass heating element (5) to right side of the L-290 thermostat (6).
- Insert brass heating element unit into housing. Hand tighten the brass nuts (7) on the water line to the element and to the 90 degree fitting from the cup.
- Tighten 2 mounting screws (8) at the base of heating element. Now, use a 5/8” wrench to securely tighten the brass nuts on the water line to the element and to the 90 degree fitting from the cup.
- Heating unit may be loosened and adjusted for a better fit if necessary.
- Place the copper 4 inch grounding strap as shown in drawing. Secure grounding strap and the green ground wire with the grounding screw by attaching to the heating element ground location (3).
- Connect white wire (9) from the left side of the heater unit to terminal number 6 on switch.
- Connect yellow wire (10) from the left side of the thermostat to terminal number 3 on the switch.
- Connect white neutral wire (11) from cord set bundle to orange fusible link with plastic connector (12).
- Connect other end of orange fusible link to terminal number 2 on the switch.
- Set steamer upright and place black plastic strain relief (13) approximately 4 1/2” from end of cord set and insert into housing using pliers.
- Secure bottom plate with four screws.
- To avoid leakage, be sure to tighten hose (or hat nozzle) with wrench before using steamer.
J-2000 Cleaning Instructions
- Unplug your steamer from the wall outlet. Remove hose attachment at the brass coupling using a wrench and remove water bottle from unit.
- Pour out any remaining water from your unit. If the hose attachment is blocked by sediment build-up, flush your hose attachment by using a garden water hose.
- This should loosen and remove any build-up that may have occurred within the hose itself.
- To clean the internal parts of your steamer, use of the Jiffy® Liquid Cleaner (10 ounce bottle) is recommended.
- This acid-based cleaner will remove hard water deposits and sediment build-up. This cleaner is not available for export.
- Pour the cleaning solution into the water cup of your steamer. This is the location on the steamer base where you normally place the water bottle or caddy.
- Allow the cleaning solution to remain in the unit for 3 hours.
- Pour the cleaning solution out of the steamer. Do this by tilting the steamer back and forth and pouring the solution out of the water cup area.
- Rinse the unit thoroughly by flushing with fresh water 3 times. 7. If discolored water or residue continues to come from the unit, the above procedure may need to be repeated.
- Please call 1-731-885-6690 for further instructions or questions
Steamer Maintenance
Clean and rinse your steamer regularly:
All steamers need to be cleaned and rinsed on occasion to remove mineral deposits. We recommend our Jiffy® Steamer Liquid Cleaner for cleaning internal parts.
Never use additives:
Additives such as salt, vinegar, bleach, perfumes and dyes should never be added to your steamer water. These substances will corrode or clog internal parts.
Never allow your steamer to run dry:
Running a steamer dry will cause internal damage to the heating element and wiring.
Never pour cold water into a hot steamer:
If by mistake your steamer has run dry of water, allow the unit to cool before adding water. Cold water poured on top of a hot heating element may cause damage to the element.
Steam in a vertical, upright position:
Do not use your steamer in a horizontal position like an iron. Steam in a vertical up and down motion. This will allow the condensation in the hose to flow back into the steamer.
Secure your hose nut tightly:
If your steamer has a hose attachment, use the assembly wrench to ensure the brass nut is fastened tightly to the base of the steamer.
Never use an extension cord:
Extension cords should not be used on this product. Adding an extension cord may create damage to the steamerʼs power cord and internal wiring.
Do not pull steamer by the power cord:
Pulling the steamer by the power cord may cause damage to the internal wiring.
Never use your foot to turn steamer ON/OFF:
Damage may occur to the power switch should you turn the unit off using excess pressure with your foot.
Storing the steamer:
Before storing the steamer for an extended period (30 days or more), empty all water from the unit. Water becomes stale with time and may clog internal parts
Steam Head Configurations
Configuration #1
Standard Plastic SteamHead Available on the J-2®,J-2000®, J-4000®and J-4000D® Model steamers.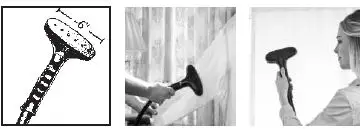
Configuration #2
Metal SteamHead withWooden Handle Available on the J-2M®,J-2000M®, J-4000A®, J-4000DM®and J-4000M® Model steamers.
Configuration #3
Carpet Installation andWallpaper Removal SteamHead Available on the J-4000C® Model steamer.
Configuration #4
Auto/Upholstery Pipe SteamHead & the Interchangeable Metal SteamHead Available on the J-4000A® Model steamer.
Configuration #5
Wig SteamHead Available on the J-2W®,J-2000W® and J-4000W® Model steamers.
Troubleshooting
| PROBLEM | POSSIBLE CAUSE | SOLUTION |
| Steamer works poorly or cycles ON and OFF while steaming. | The unit has sediment build-up and needs a thorough cleaning. Possible thermostat trouble. | Use Jiffy® Liquid Cleaner to clean off element. A small brush may be needed to help scrub unit. Replace thermostat on unit. |
| The red indicator light illuminates but the unit never heats or steams. | The fuse wire, heating element or thermostat may be bad. | Replace fusible link wire, heating element or thermostat in unit. This may be done by you, an authorized repair center, or by a Jiffy® Steamer Company technician. |
| The unit spits water from steam cap. | The unit is being over-filled.
The unit needs to be cleaned out inside tank and cap. | For best results from your steamer, use Jiffy® Liquid Cleaner periodically to remove sediment deposits from your water (every 3 to 4 months) depending on how much the unit is used. |
| User is tilting unit too far forward or backward during usage. | Do not over-fill unit above max water mark indicated on side of unit. |
| PROBLEM | POSSIBLE CAUSE | SOLUTION |
| Steamer works poorly or cycles ON and OFF while steaming. | The unit has sediment build-up and needs a thorough cleaning. Possible thermostat trouble. | Jiffy® Liquid Cleaner may solve the problem, but manual cleaning is the best solution at this point. The heating element must be disassembled and cleaned out manually. |
| The green indicator light does not illuminate when turned to ON position. | The fuse wire is bad. The cordset is bad. Wires may be disconnected. | Check the unitʼs current flow and replace defective part. Try to plug the unit into another outlet. |
| The switch is bad. | ||
| The unit is not plugged in. | ||
| The outlet may be defective or inoperable. | ||
| On units purchased in 1986 and before, the red indicator light illuminates but the unit never heats | The heating element may be bad. | Replace the heating element. This may be done by you, an authorized repair center, or by a Jiffy® Steamer Company technician. |
| or steams. | ||
| The steamer spits water from the steam head. | The steam head may be cracked or damaged. The rod set is not fully assembled (three sections for most models and four sections for drapery steamers). The unit has sediment build-up and needs to be cleaned. | Replace head once signs of excess wear are apparent. Make sure the hose is straight and that it has no kinks which may trap condensation in the hose.
Use Jiffy® Liquid Cleaner. |
| Unit does not produce steam when green indicator light is on. | Check water level to make sure unit is not out of water. Heating element may be bad. | Turn unit off, allow cool down period and refill water container. Check unit with a voltage meter (if qualified). |
| Wire may be disconnected. |
| PROBLEM | POSSIBLE CAUSE | SOLUTION |
| The red indicator light remains ON for over 20 minutes, but no steam is produced from the unit at the STEAM setting. | The heating element may be bad. Thermostat may be bad. Check water level. | Replace the heating element and reseal the tank assembly with high temperature silicone. Replace thermostat. |
| The red indicator light does not illuminate when the switch is turned to the STANDBY or STEAM setting. | The fuse wire is bad. The cordset is bad. Wires may be disconnected. | Check the unitʼs current flow and replace defective part. |
| The switch is bad. | ||
| The unit is not plugged in. | ||
| The red indicator light works on the STANDBY or STEAM setting, but not on both. | Wires may be disconnected. The switch is bad. The L170 or L220 thermostat is bad. | Wiring needs to be checked by an authorized repair center, or by a Jiffy® Steamer Company technician. Replace switch. Replace thermostat. |
| The steamer spits water from the steam head. | The steam head has a crack or blemish. Hard water sediment has built up in the head. The unit has been overfilled (4 quarts maximum). The rod set is not fully assembled (three sections for most models and four sections for drapery steamers). The unit has sediment build-up and needs to be cleaned. | Replace head once signs of excess wear are apparent. Never fill the steamer with more than 4 quarts. Make sure the hose is straight and that it has no kinks which may trap condensation in the hose.
Use Jiffy® Liquid Cleaner. |
| The steamer leaks water at the base of the unit. | There may be a hole in the tank (most common with older model units using aluminum tanks). | The faulty tank must be replaced with a new stainless steel tank. This involves replacing the tank, lid, and housing. This task is best serviced by a Jiffy® Steamer Company technician. |
| The brass coupling between the hose and unit may be loose. | Tighten hose coupling with a wrench. | |
| The silicone sealant or rubber gasket around the tank assembly is leaking. | Reseal the tank and lid with a high heat silicone. |
SPECIFICATIONS
| SPECIFICATIONS | ESTEAM® | J-1® | J-2® | J-2000® | J-4000® |
| Voltage (120V) | |||||
| Voltage (230V) | |||||
| Wattage | 600W (120V) 625W (230V) | 1300W | 1300W | 1300W | 1500W |
| Amps (120V) | 5 | 10.83 | 10.83 | 10.83 | 12.5 |
| Amps (230V) | 2.71 | 5.65 | 5.65 | 5.65 | 6.52 |
| Fusible Link Safety Fuse | |||||
| Power Cord Length | 9 feet | 7 feet | 7 feet | 7 feet | 7 feet |
| Multiple Cord Plug Configurations Available | |||||
| High Temperature Silicone Braided Wiring | |||||
| Electrical Certifications (Both 120V and 230V) | UL cUL, CE, TUV, NOM, ANCE | UL cUL, CE, TUV, NOM, ANCE | UL cUL, CE, TUV, NOM, ANCE | UL cUL, CE, TUV, NOM, ANCE | UL cUL, CE, TUV, NOM, ANCE |
| Uses Ordinary Tap Water | |||||
| Water Capacity | 8 ounces | 1 gallon | 1 gallon | .75 gallons | 1 gallon |
| Water Level Easily Viewed | |||||
| Pre-Heat Time with Maximum Water | 2 minutes | 2 minutes | 2 minutes | 2 minutes | 15 minutes |
| Steam Duration | 15 minutes | 2 hours | 2 hours | 1 hour 30 minutes | 2 hours |
| Hose Length | — | — | 5.5 feet | 5.5 feet | 5.5 feet or 7.5 feet |
| Stainless Steel Boiler Tank | — | — | — | — | |
| Heating Element Type | Die Cast in Aluminum | Die Cast in Brass | Die Cast in Brass | Die Cast in Brass | Incoloy |
| Die Cast Aluminum Housing | |||||
| Hose/Clothing Hanger | |||||
| 3 Year Limited Warranty | |||||
| Made in the U.S.A. | |||||
| Net Weight Assembled | 2 pounds | 12 pounds | 15 pounds | 14 pounds | 22 pounds |
| Gross Packaged Weight | 3 pounds | 14 pounds | 17 pounds | 17 pounds | 26 pounds |
| Assembled Dimensions (L x W x H ) | 5.75 x 3.25 x 10.5 inches | 13.5 x 7.5 x 13 inches | 13.5 x 7.5 x 64.5 inches | 15 x 10 x 64 inches | 18.5 x 10.5 x 62 inches |
| Single Carton Dimensions (L x W x H ) | 11 x 5 x 7 inches | 18 x 12 x 17 inches | 18 x 12 x 17 inches | 18 x 12 x 17 inches | 20 x 12 x 14 inches |
| Attachments Available Legend A = Auto B = Steam Brush C = Carpet D = Drapery DM = Metal Head Drapery H = Hat I = Interchangeable Steam Head M = Metal Head P = Plastic Head W = Wig | Voltage Converter (converts 230 voltage electrical current to 120 voltage) | B, H, M, P, W | B, H, I, M, P, W | B, H, I, M, P, W | A, B, C, D, H, I, M, P, W |
Warranty
As the global leader of steaming equipment since 1940, we feel that our warranty should properly stand behind every product we craft. The Jiffy® Steamer is precisionbuilt, tested and inspected before leaving our factory in Union City, Tennessee. It is guaranteed against defects in material or workmanship for three (3) years from date of purchase. Cords are excluded. If any part proves to be defective, this product will be repaired free of charge. A nominal handling fee does apply. This warranty shall not apply to any unit which has been subject to misuse, neglect, negligence, accidents or has not had routine cleaning maintenance. Such damage will be reconditioned at our normal repair services rate. Jiffy® Steamer Company, LLC shall not be in any manner responsible for any incidental, special or consequential damages. All implied warranties including but not limited to implied warranties of fitness and merchantability, are limited in duration to three (3) years from date of original purchase. This warranty gives you specific legal rights, and you may have other rights which vary from state to state. Some states do not allow the exclusion limitations on how long an implied warranty lasts, so the above limitations and exclusions may not apply to you. If your Jiffy® Steamer requires service, ship it, with proof of purchase to the address at the bottom of the page.
FAQS
How long does a Jiffy Steamer last?
This steamer has a 3 quart water caddy that fits down into the unit and fits more flush with the unit. This 3 quart caddy will provide steam for about 1 ½ hours.
What is the brush attachment on a steamer for?
The fabric brush that is included with most garment steamers is a great way to get lint and dust off upholstery or clothing that isn’t ready for the wash
Can you overcook in a steamer?
Is it possible to overcook veggies with the power of steam? Yes—but because steam cooking is a gentler form opposed to frying or boiling, it’s not likely that you’ll ever burn your meal
How often should you descale a steamer?
With regular use, your garment steamer should be descaled every 2 weeks.
What is a steamer nozzle?
The steam nozzle is a passage of varying cross-section by means of which a part of the enthalpy of steam is converted into kinetic energy as the steam expands from a higher pressure to a lower pressure.
Do you touch the clothes when steaming?
To get the most wrinkles out of your clothes, you should hold the plate of your garment steamer against your clothes.
How do you remove buildup from a steamer?
Fill the water tank with distilled white vinegar or cleaning vinegar.
Do you put water in the bottom of a steamer?
Add about 1 inch water to the bottom of the saucepan or pot, then place in the steamer basket.
Should I use a lid when steaming?
The absolute best way to maintain the heat of steam is to keep the lid on your pot or steamer
How long should I sit under the steamer?
If your hair is only slightly thirsty, 10-20 minutes should do the job. If it feels more dry and damaged, leave it for a good 20-30 minutes
Can you put vinegar in a clothes steamer?
If your steamer is sputtering, the vents are probably clogged. Clean them by adding a 50:50 mix of distilled white vinegar and water to the steamer.
Can you put baking soda in a steam cleaner?
Make sure to not use more than a teaspoon as it can lead to damage to carpet tissues.
Can I put vinegar in my steamer?
Add 1/4 cup of white distilled vinegar to the rinse water in the steam cleaner’s water reservoir
How much vinegar do you use to clean a steamer?
Fill the reservoir with one part white vinegar to two parts distilled water. Run the steamer until about half of the solution is gone.
Do steam cleaners need detergent?
No chemical or detergents can, or should, be used in these systems.


