
VITEK VT-TPTZ25HRAN-4PNL Cameras and Security

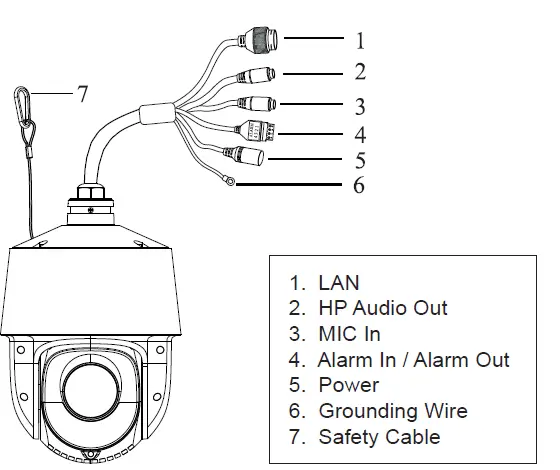
Product Information
Features
- LAN connection
- HP Audio Out
- MIC In
- Alarm In / Alarm Out
- Power connection
- Grounding Wire
- Safety Cable
- 1/2.7” BSI and NIS (Backside-Illuminated and Near-Infrared Sensing) 4 MegaPixel Progressive Scan CMOS STARLIGHT Sensor
- Up to 4 MegaPixel (2560 × 1440) Max Resolution @ 30fps
- Ultra High-Speed Pan / Tilt / Zoom with 25× Optical Zoom Lens
- 3.6s Zoom Speed (Optical, Wide-Tele), F1.65~F3.8 Aperture Range
- Smart IR with up to 525’ (160m) IR Range
- Smart H.265+/H.265/H.264+/H.264/MJPEG Compression
- Real-Time Auto Zoom Tracking: Transcendent Gen. IV IP PTZ Cameras Feature the Most Advanced PTZ Auto-Tracking Available, Powered by A.I.
- Gen. IV Advanced Analytics: Intrusion Detection, Line Crossing, Region Entrance / Exit, Target Counting [All by Human / Vehicle Classification] Scene Change, Face Detection
- Backlight / Highlight Compensation, Auto-White Balance, Gain Control, Day / Night
- True 120dB WDR (Wide Dynamic Range)
- 360 Presets, 8 Cruises, up to 16 Presets / Cruise + 4 Tracks (3+ Min. Recording / Track)
- 1 Ch. Audio In + Out*, 1 Ch. Alarm In + Out
- Advanced Starlight Technology
- True Day/Night with ICR Cut Filter with Auto/Manual Gain Control
- 360° Endless Pan Range, Configurable Speed: .1~200°/s + 240°/s Preset
- Built-in MicroSD Card Slot, Supporting Local Recording up to 256GB
- IP66 Ingress Protection + IK10 [Excluding Glass] Impact Rating
- 12VDC Power or PoE+ (802.3.at, class 3)
- 12VDC 3Amps Power Supply Included, **PoE Injector Required for PoE Power: VT-POE60 / VT-POE95 [see pg. 13]
- Reset Button, Heater, Fan, Water Removal with Quick Spinning
- 1 RJ45 10M/100M Adaptive Ethernet (Supports PoE 802.3.at)
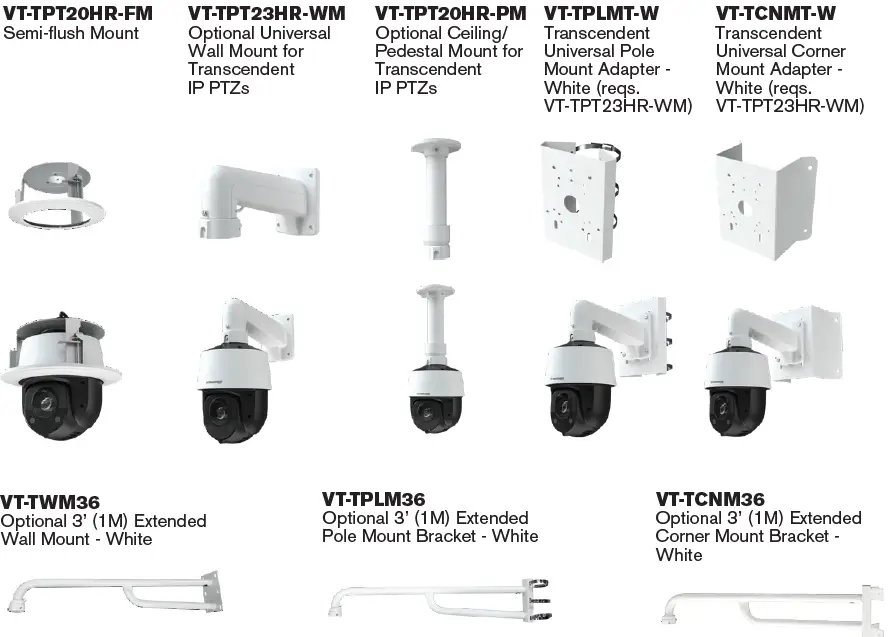
- Wall Mount, Pendant Mount, Semi-Flush Mount, Corner Mount Adapter and Pole Mount Adapter Sold Separately [see pg. 13]
- 3-Year Warranty
- Please research local, state and federal laws regarding the implementation of audio surveillance.


PLEASE NOTE:
Complete User Guide, Software, Tools, and Updates are available online. Scan the QR Code or visit: http://www.vitekcctv.com/Downloads
Important Note:
Please research local, state, and federal laws regarding the implementation of audio surveillance.
Complete User Guide, Software, Tools, and Updates:
Available online. Scan the QR Code or visit: http://www.vitekcctv.com/Downloads
Overview
- LAN
- HP Audio Out
- MIC In
- Alarm In / Alarm Out
- Power
- Grounding Wire
- Safety Cable

Cable Connections
First, connect the Weather Resistant Cap to an Ethernet patch cable, then connect the camera’s Ethernet adaptor. If not powering the camera with PoE+, also connect the power cable to an approved 12VDC Power Supply.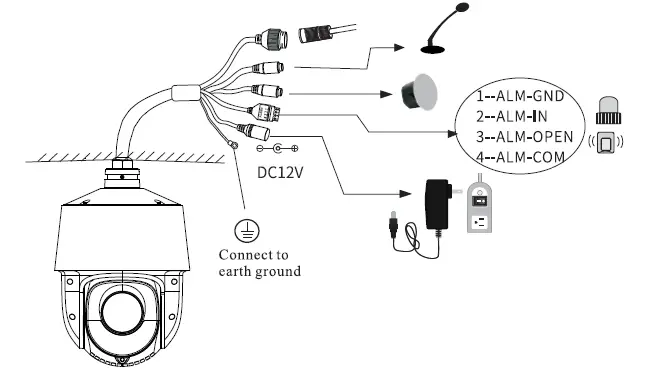
Weather Resistant Network Coupler: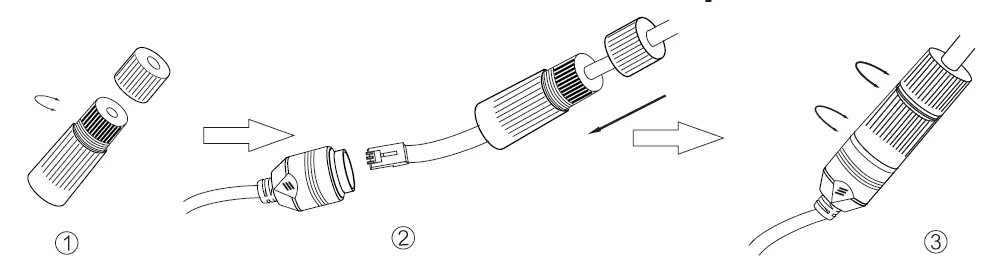
- Loosen the nut from the Weather Resistant Network Coupler.
- Run Ethernet cable through coupler, then attach an RJ-45 connector.
- Tighten the nut and coupler for a weather resistant seal.
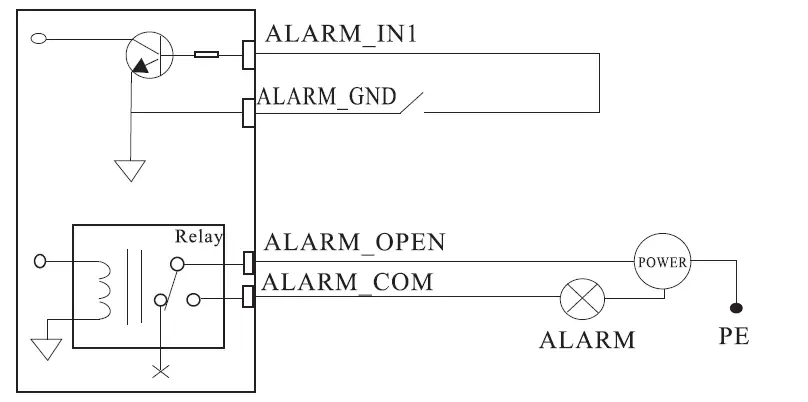
Alarm Connections:
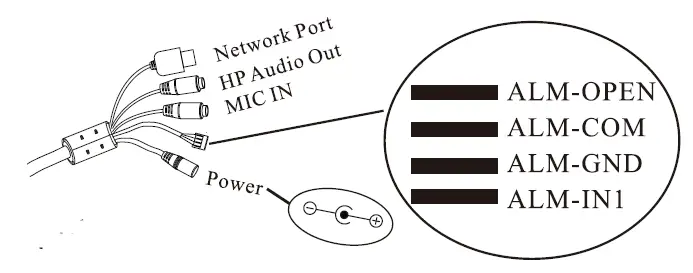
- Alarm Input
- a) There is one independent alarm input port (ALM-IN1), and one grounding port (ALM-GND).
- b) Alarm input (NO type): Connect DC5V~DC12V voltage between the alarm input port (ALM-IN1) and the grounding port (ALM-GND).
- c) Alarm input (NC type): Disconnect the voltage between the alarm input port (ALM-IN1) and the grounding port (ALM-GND).
- Alarm Output
- a) Supports 1CH alarm output including OPEN, COM connections.
- b) Alarm output: One passive switch for a user to connect alarm devices, the alarm output state will be on/off according to your users’ setting.

Installation:
Before beginning, make sure that the wall or ceiling is strong enough to withstand the weight of the camera, and that the power is off. Follow the wall mounting instructions below, followed by ceiling mounting and semi-flush mounting.
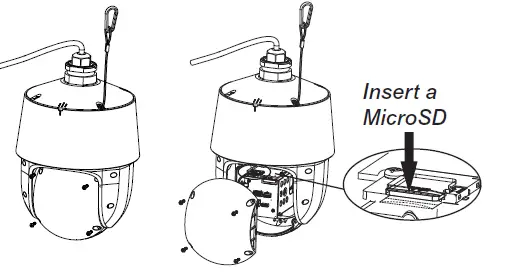
MicroSD Card Installation:
- Loosen the cover’s 4 screws and remove it.
- Insert a MicroSD card as indicated and re-install the cover.
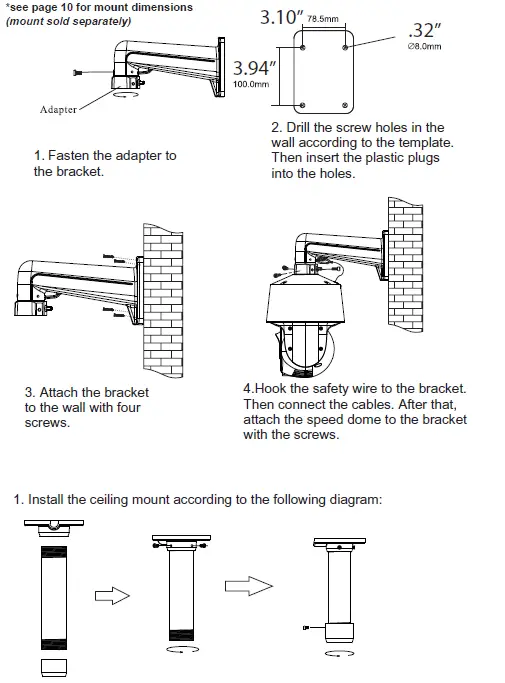
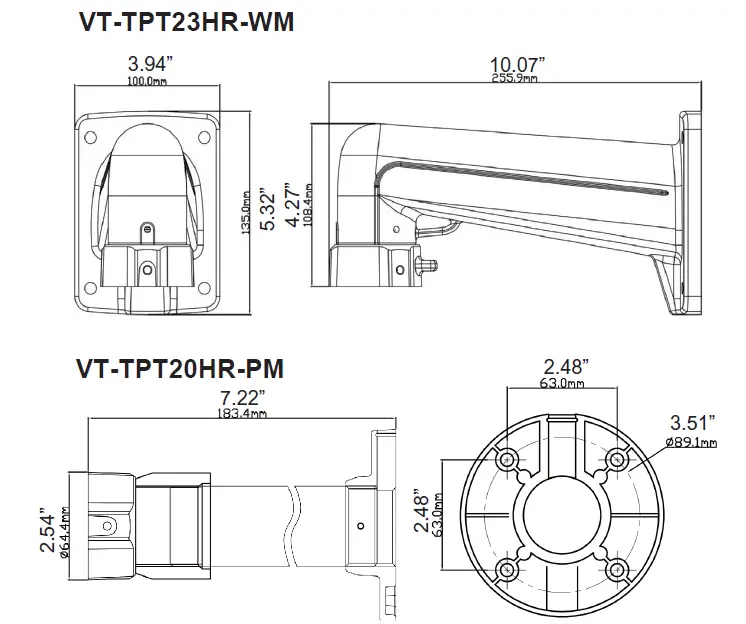
Installation Using Wall Mount VT-TPT23HR-WM:
*see page 10 for mount dimensions (mount sold separately)
- Fasten the adapter to the bracket.
- Drill the screw holes in the wall according to the template. Then insert the plastic plugs into the holes.
- Attach the bracket to the wall with four screws.
- Hook the safety wire to the bracket. Then connect the cables. After that, attach the speed dome to the bracket with the screws.

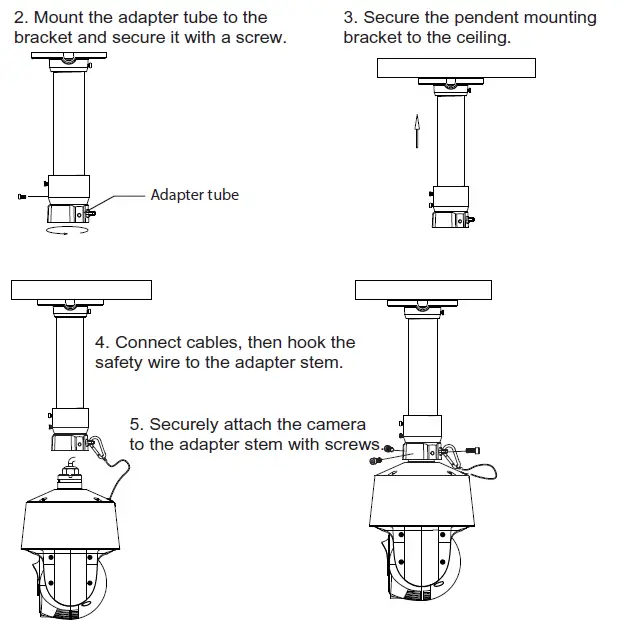
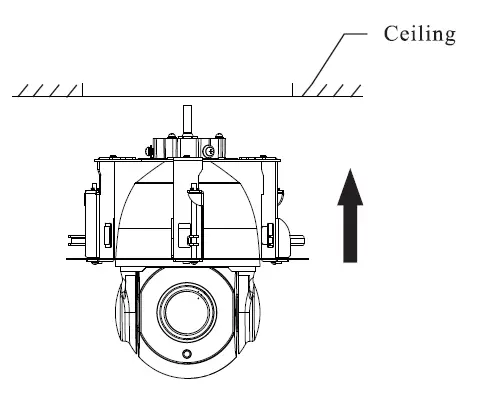
Installation Using Ceiling Mount:
- Install the ceiling mount according to the provided diagram.
- Mount the adapter tube to the bracket and secure it with a screw.
- Secure the pendent mounting bracket to the ceiling.
- Connect cables, then hook the safety wire to the adapter stem.
- Securely attach the camera to the adapter stem with screws.


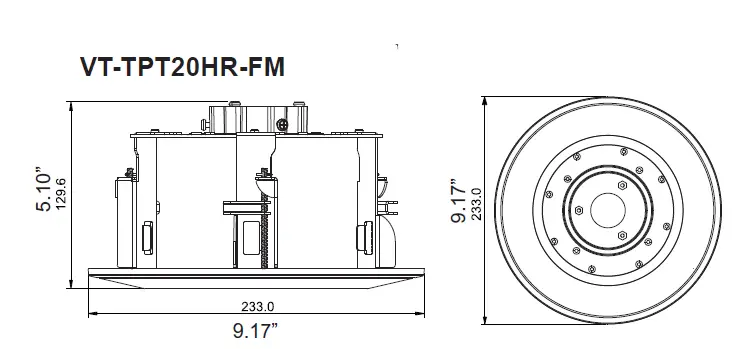
Installation Using Semi-Flush Ceiling Mount VT-TPT20HR-FM:
see page 10 for mount dimensions (mount sold separately. The following illustrations are for demonstration purposes only, and depictions of the PTZ camera used as an example will differ from the actual camera.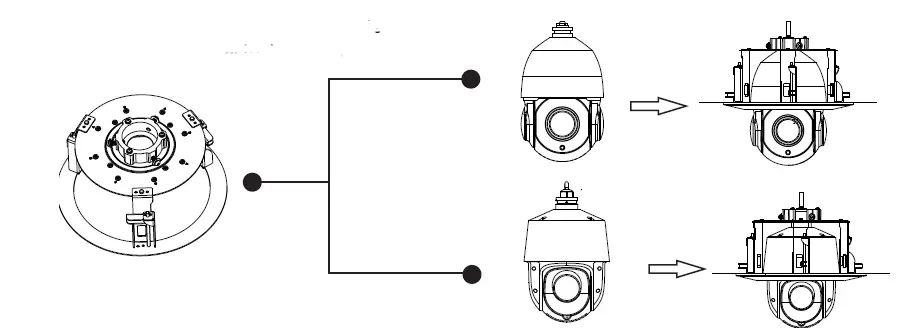
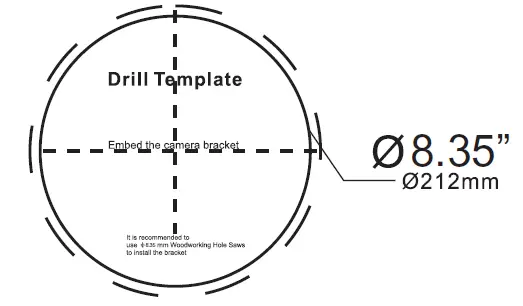
- Attach the drill template to the ceiling where you want to install the speed dome. Then cut a hole according to the drill template. Note that +2mm of the circle diameter is allowed.

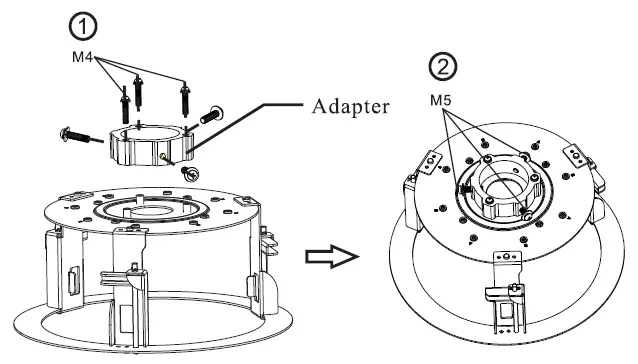
- Attach adapter to the in-ceiling mounting bracket with the screws (M4) provided.
- Insert the screws (MS) provided into the side holes of the adapter, but do not tighten them as shown above.

- Place the in-ceiling bracket on the speed dome according to the direction of the arrow as shown above. Then tighten the screws on the adapter to fix the bracket and the speed dome.

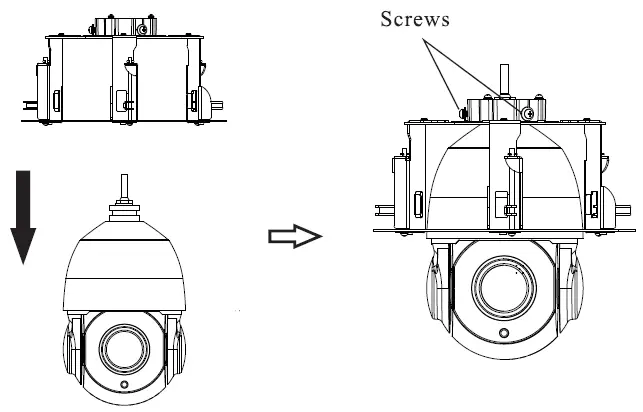
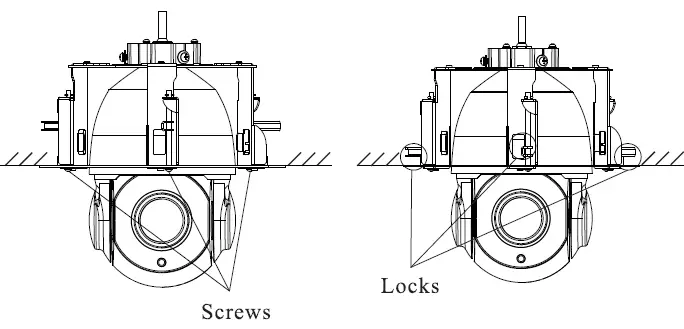
- Route the cable through the ceiling and connect the cables. Then push the speed dome into the mounting hole in the ceiling.

- Tighten the lock screws with the screwdriver and the locks will automatically rotate outwards to secure the speed dome to the ceiling.

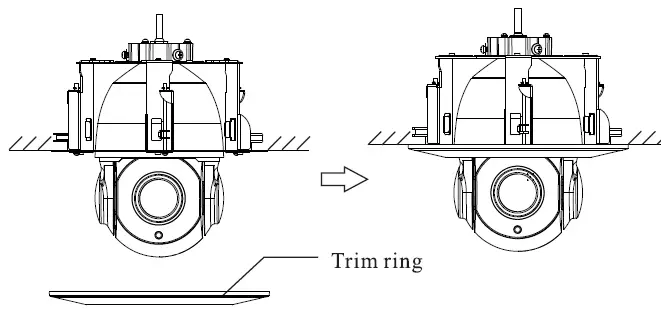
- Install the trim ring.

LAN Configuration:
The camera can be accessed on the local network either using the IP-Tool or directly in a web browser.
Accessing the Camera Using the IP-Tool
- Make sure the camera and PC are connected to the LAN.
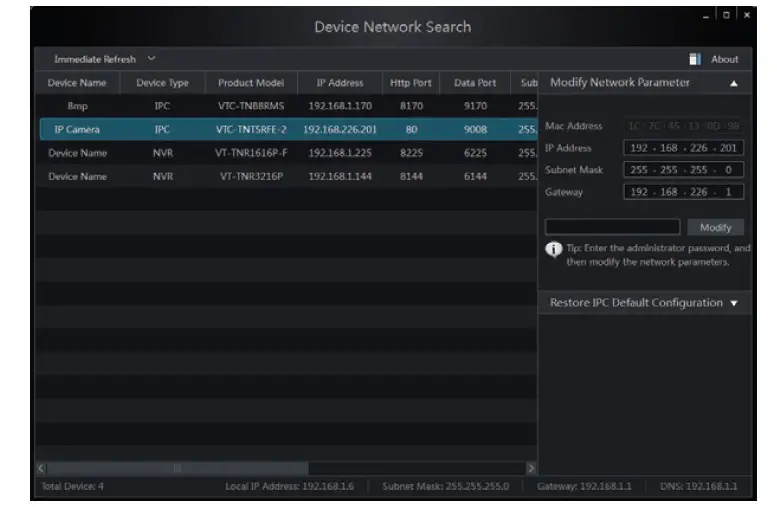
- Locate the IP-Tool installer at www.vitekcctv.com/Downloads/Software/ Transcendent-IPTool_v2.0.2.zip, then install on the PC. Open the installed application.

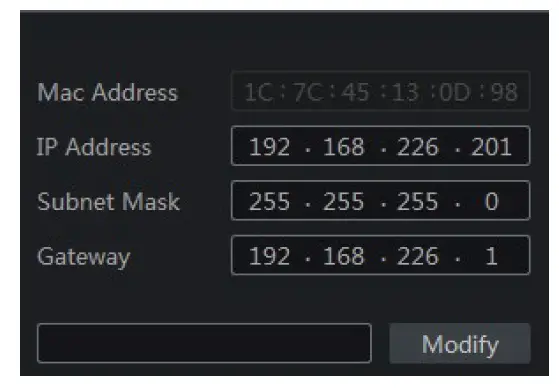
- Modify the IP address. The default IP address is 192.168.226.201. Click the information of the camera listed in the above table to show the network information on the right side. Modify the IP address and gateway of the camera and make sure its network address is in the same local network segment as the computer’s. Please modify the IP address of your device according to the practical situation.
For example, the IP address of your computer is 192.168.13.4. So the IP address of the camera shall be changed to 192.168.13.X. After modification, please input the password of the administrator and click “Modify” button to modify the setting. Default admin password: “123456″.
- Double-click the IP address and then the system will pop up the web browser to connect IP-CAM. Edge in IE mode / IE browser will download the Active X. control. After downloading, a login window will pop up as shown below:

Input the user name and password to log in. Default user name: admin / Default password: 123456.

Directly Access Through a Web Browser
The default network settings are as shown below:
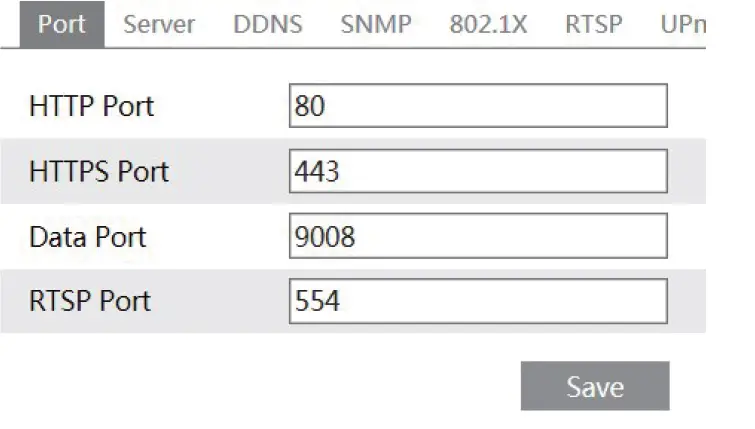
- IP address: 192.168.226.201 HTTP: 80
- Subnet Mask: 255.255.255.0 Data Port: 9008
- Gateway: 192.168.226.1
- You may use the above default settings when you log in the camera for the first time.
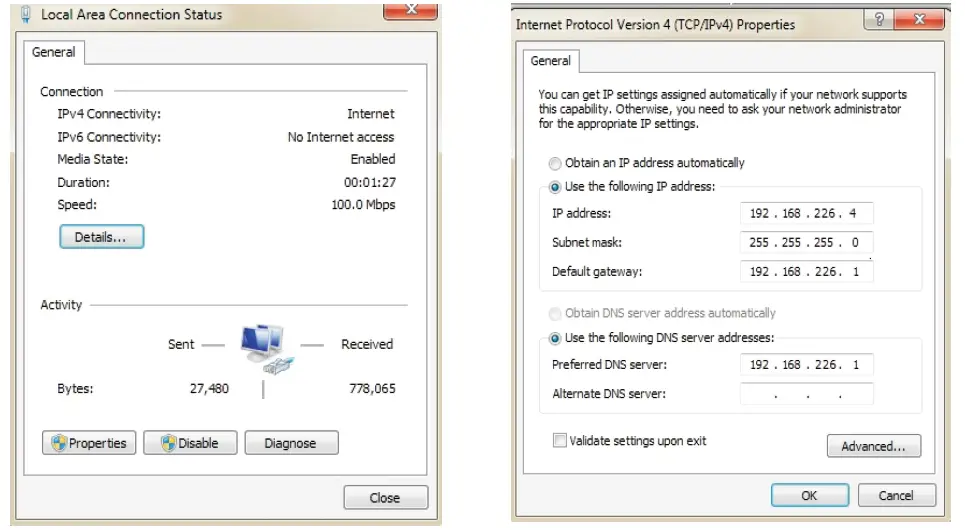
- Manually set the IP address of the PC. The network segment should be the same as the default settings of IP-CAM. Open the network and share center. Click “Local Area Connection” to pop up the following window.
Select “Properties” and then select Internet protocol according to the actual situation (for example: IPV4). Next, click “Properties” button to set the network of the PC.
- Open Edge in IE mode / IE browser and input the default address of IP-CAM and confirm. Edge in IE mode / IE browser will download Active X control.
- After downloading Active X control, the login dialog box will pop up.
- Input the default username and password and then enter to view.
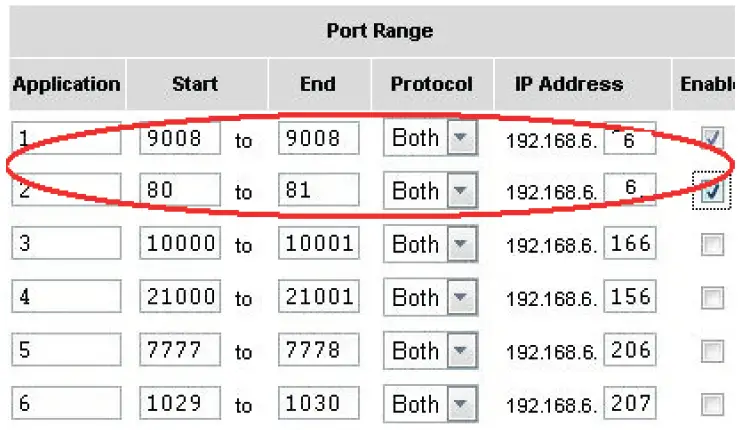
WAN Configuration
Access the camera by the router or virtual server for example.
- Make sure the camera is connected to the LAN; Then log into the camera via LAN and go to system Congfig-Network Config-port menu to set up the port number.
- Enter System Config-Network Config-IP Address menu to modify the IP address.

- Go to the router’s management interface through IE browser to forward the IP address and port of IP-CAM in the “Virtual Server”.

- Open the web browser and input its WAN IP and HTTP port to access the IP-CAM.
Installation Mount Dimensions

DETAILED SPECIFICATIONS
| Image Sensor | 1/2.7” BSI (Backside-Illuminated) and NRI (Near-Infrared Sensing) Progressive Scan STARLIGHT CMOS Sensor |
| Pixel Size | 2.0um |
| Effective Pixels | 2884(H) × 1624(V) |
| Resolution | 4.0 MegaPixel (2560 ) Resolution @ 30fps |
| Min. Illumination | Color: 0.01 Lux @ (F1.65 AGC On) B/W: 0.002 Lux @ (F1.65 AGC On), 0 Lux w/IR |
| Image setting | Flip, Mirror, Saturation, Brightness, Contrast, Sharpness, AGC, (Adjusted by Client) |
| Shutter Speed | 60Hz (NTSC): 1/30s ~ 1/30,000s, 50Hz (PAL): 1/25s ~1/25,000s |
| White Balance | Auto / Manual / Indoor / Outdoor |
| Day / Night | True Day/Night via ICR Cut Filter + Schedule [Auto/Manual Gain Control] |
| Iris Control | Auto / Manual |
| SNR | ³52dB |
| DNR | XD-DNR (3D-DNR / 2D-DNR) – Auto/Manual |
| WDR | True WDR (120dB) |
| IR Type / Distance | Smart IR – Up to 525’ IR Range (160M) |
| Smart IR | Yes |
| Image Enhancement | Backlight Compensation (BLC), Highlight Compensation (HLC) |
| Privacy Mask | 4 Areas, up to 4 Masks in a Single Frame |
| Overlay Features | Picture: Custom Logo on video [128x128px], 24bit BMP, OSD: Max 15 Character / Line, 8 Lines, White or Red Font |
| Lens / Focal Length | 4.8~120mm Lens (25x Optical Zoom) w/3.6s Zoom Speed, and Digital Zoom |
| Zoom Speed | Approx. 3.6s (Optical Zoom, Wide Tele) |
| Field of View (FOV) | Horizontal: 55°~2.4° / Vertical: 33°~1.4° / Diagonal: 61.5°~2.8° (Wide-tele) **All listed speeds + / – 5% |
| Working Distance | Wide: 1.0m ~ INF, Tele: 1.5m ~ INF |
| Aperture Range | F1.65 ~ F3.8 (wide-tele) |
| Iris Type | Auto DC-IRIS, 16 Stops |
| IR Cut type | Removable IR Cut filter |
| D.O.R.I. (US) D.O.R.I. (Metric) | Detect (8px/ft): 7874’, Observe (19px/ft): 3124’, Recognize (38px/ft): 1575’, Identify (76px/ft): 787’ Detect (25px/M): 2400M, Observe (63px/M): 952M, Recognize (125px/M): 480M, Identify (250px/M): 240M |
| Pan Range / Speed | 360° Endless, Configurable from .1°/s ~ 200°/s; Preset speed: 240°/s |
| Tilt Range / Speed | -10°~90° [Auto-Flip] / Configurable, from 0.1/s~200°/s, Preset speed: 240°/s |
| PTZ Features | Proportional Zoom, Pwr-Off Memory, 3D Position, PTZ Position Display |
| Preset / Cruise | 360 / 8 Cruises, Up to 16 Presets for Each Cruise |
| Tracks | 4 Tracks, Record Time Over 3 Minutes for Each Track |
| Scheduled Tasks | Preset / Cruise / Track / Random Scan / Boundary Scanning / Dome Reboot |
| Max Resolution | 2560×1440 (16:9 Aspect Ratio) |
| Main Stream | 30fps: 2560×1440,1920×1080,1280×960,1280×720 |
| Sub Stream / Third Stream | Sub: 60Hz: 30fps (704 × 480, 640 × 480, 352 × 240) / Third: 30fps @ 1920×1080 (1080p) and Lower |
| Video Compression (Standards) | H.265+/H.265/H.264+/H.264/MJPEG (H.265: H.265 / HEVC Codec MP, Level 5.0, H.264: H.264/AVC codec BP/MP/HP, Level 5.1) |
| Video Bit Rate | 64Kbps to 8Mbps |
| Audio Compression / Bit Rate | G.711A/U / 64Kbps |
| Deep Learning Engine | Supports Face Recognition (FR) up to 15 Human Faces / Sec (max), Human/Vehicle Detection |
| Smart Auto Tracking | Auto Tracking (supports tracking specified target types such as human and vehicle), Manual Tracking |
| Basic Event Detection | Motion detection, Video Tampering, Exception (Network Disconnected, IP Address Conflict, SD Card Full / Error) |
| Smart Event Detection | Trip Wire (+ Bi-Directional), Intrusion / Line Crossing / Region Entering + Exiting, Support Alarm Triggering by Specified Target Types (Human / Vehicle), Un-attended Baggage, Object Removal, Auto / Manual Smart Tracking |
| Gen. IV Advanced Analytics | Face Detection (15 faces simultaneously), Detect, Track, Capture + Vehicle / Non Vehicle Detection & Tracking |
| Protocols | HTTP, HTTPS, IPv4/IPv6, 802.1x, QoS, FTP, SMTP, UPnP, SNMP, DNS, DDNS, NTP, RTSP, RTCP, RTP, TCP/ IP, UDP, DHCP, PPPoE |
| Audio Interface | 1 Audio Input (MIC in), 1 Audio Output,* Line Level, Impedance, 600W |
| Alarm Interface | 1 Alarm Input (Dry Contact); 1 Alarm Output |
| Alarm Linkage | Alarm Actions, Including Preset, Cruise, Track, Memory Card Video Record, Trigger Recording, Upload to FTP/Memory, Card, Send Email |
| Live View Connections | Up to 6 Simultaneous Live View Connections |
| User/Host | Up to 16 users, 3 levels: Administrator, Advanced and Normal Users |
| Security Measures | User Authentication (ID and PW), Host authentication (MAC address); HTTPS encryption., IEEE802.1x port-based net account control; IP address filtering |
| Web Browser | Internet Explorer (IE) – Plug-in Required, Edge in IE Mode |
| API | ONVIF, Third-Party Integration |
| CVBS (BNC), RS485 | NA |
| On-Board Storage | Built-in microSD/SDHC/SDXC card slot, up to 256GB |
| Network Interface | 1 RJ45 10M/100M Adaptive Ethernet (Support PoE+ 802.3.at) |
| Thermal / Weather Management | Internal Heater and Fan + Quick Spin Water Removal |
| Reset Button | YES |
| Working Environment | -40°F~140°F (-40°C~60°C), 90% RH [STORAGE CONDITIONS: -40°F~158°F (-40°C~70°C), 95% RH] |
| Cold Start | -22F / – 30°C (30 Minutes Waiting Time), 90% RH |
| Weather / Impact / Protection | IP66 + IK10 (Excl. Glass Window), 6000V (Lightning, Surge, and Voltage Transient Protection) |
| Power | 12VDC @ 3amps, PoE+ (23W with IR on, PTZ on) *Power Supply Included ,**PoE Injector Req’d for PoE Power – see following page |
| Dimensions and Weight | 6.81” × 10.51” (173mm × 268mm), NET: 4.85lb (2.2kg) / SHIPPING: 7.50lb (3.4kg) |
MOUNTS [SOLD SEPARATELY]
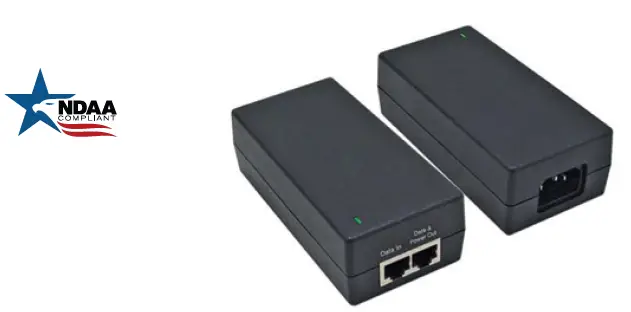
POE INJECTORS [SOLD SEPARATELY]
- VT-POE60
60 Watt POE Mid-Span Injector, 4-Pair Compliant - VT-POE95
95 Watt POE Mid-Span Injector, 4-Pair Compliant
ALSO CONSIDER THESE OTHER GREAT TRANSCENDENT IP PRODUCTS!
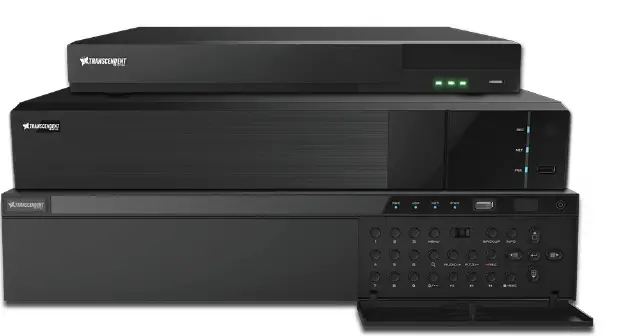
VITEK Network Video Recorders Supporting up to 12MP Resolution & Real Time Video!
Pair with VITEK Transcendent Series NDAA Compliant Network Recorders: VT-TNR818PFN, VT-TNR1646PFN, and VT-TNR3216PFN with Built-in PoE and Gen IV. Advanced A.I. including Face Detection, Target Counting, and Other Fully Programmable Analytics.
Vitek Wireless Access Points to Reduce Costly Cable Installation!
VT-WAP1150 and VT-WAP2150 High Speed 5.8GHz DIP AP / CPE Wireless Bridge w/ 8MB Storage, 64MB RAM, 150MBps transmission, and Point-to-Multi-Point (P2MP) Topology.
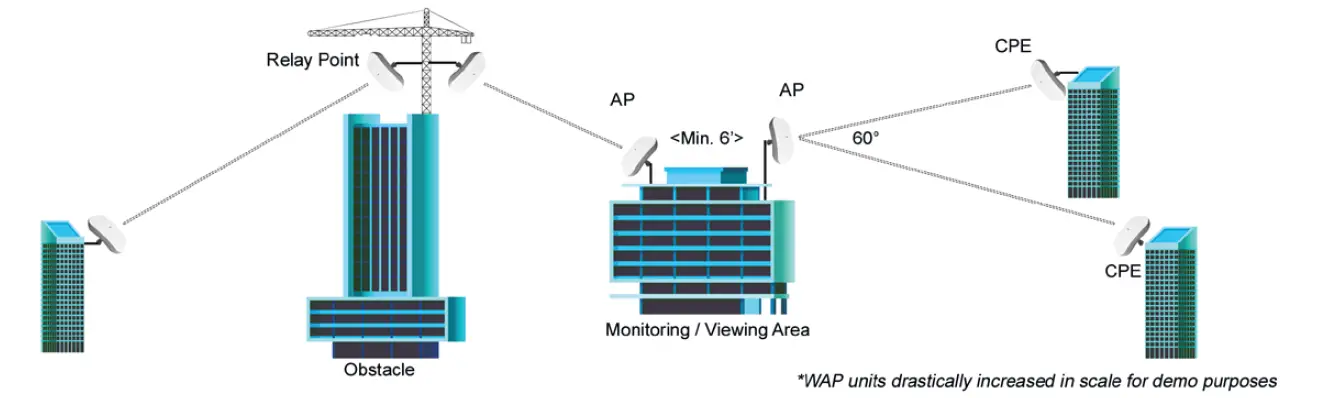
With high speed transmission of 150Mbps and a wireless range of 3000ft. (VT-WAP1150) and 1.25 miles (VT-WAP2150) these products eliminate the need for expensive and troublesome longdistance cables in areas where CCTV monitoring and rigorous surveillance take place. These small, lightweight and durable units are easy to install and easy to use with an innovative and straightforward 10-button plug-and-play dip switch that facilitates the creation of a robust wireless network without a computer. Set-up can be simply configured for point-to-point or point-to-multipoint topology depending on the application, with up to 128 IP group configurations!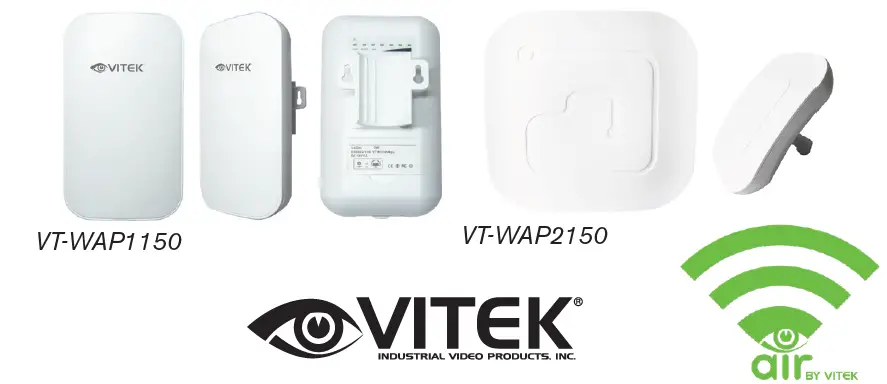
LIMITED PRODUCT WARRANTY
VITEK products carry a three (3) year limited warranty. VITEK warrants to the purchaser that products manufactured by VITEK are free of any rightful claim of infringement or the like, and when used in the manner intended, will be free of defects in materials and workmanship for a period of three (3) years, or as otherwise stated above, from the date of purchase by the end user. This warranty is nontransferable and extends only to the original buyer or end user customer of a VITEK Authorized Reseller. The product must have been used only for its intended purpose, and not been subjected to damage by misuse, willful or accidental damage, caused by excessive voltage or lightning. The product must not have been tampered with in any way or the guarantee will be considered null and void. This guarantee does not affect your statutory rights. Contact your local VITEK Reseller should servicing become necessary.
CLASS A DIGITAL DEVICE (INDUSTRIAL & COMMERCIAL ENVIRONMENT)
This equipment has been tested and found to comply with the limits for a Class A digital device, pursuant to CE and FCC Rules. These limits are designed to provide reasonable protection against harmful interference when the equipment is operated in a commercial environment. This equipment generates, uses and can radiate radio frequency energy and, if not installed and used in accordance with the instruction manual, may cause harmful interference to radio communications. Operation of this equipment in a residential area is likely to cause harmful interference in which case the user will be required to correct.


