![]()
 Countertop Electric Fryer
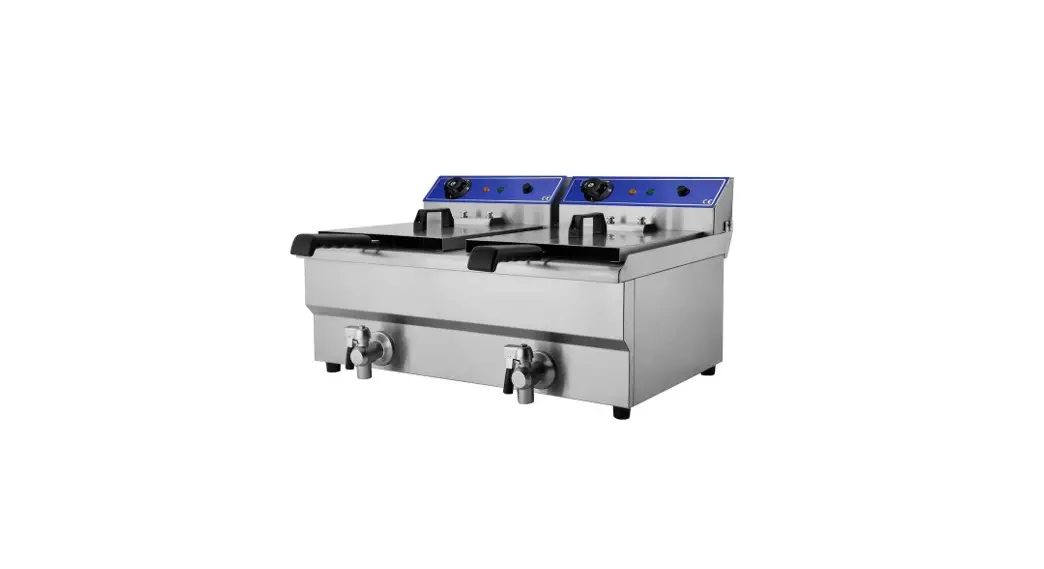
Instruction Manual
Model: Suitable for all models of the DF Series Countertop Electric Fryer
Please read this instruction manual carefully before operation
 Safety Tips
This instruction manual contains information about the installation, operation and maintenance of the device and should be consulted as an important source of information and reference guide. Awareness of the safety instructions and instructions for use in this manual will ensure the safe and correct use of the device. In addition to the information given here, you should comply with any local Health and safety Controls and applicable safety regulations. The instruction manual forms part of the product and should be kept near the device and easily accessible for anyone carrying out the installation, servicing, maintenance or cleaning. Please keep these instructions and give them to future owners of the device.
Safety instructions:
- Keep out of reach of children.
- Do not leave the device unattended during operation, this could result in overheating of the oil. In case high temperatures occur, oil might ignite.
- Never leave the device unattended when in use.
- This device is only suitable for indoor use.
- The device is not adapted for use with an external timer or remote control.
- Do not put flammable liquids, gas or other hazardous substances around the product.
- The shell of this machine must be grounded for safety reasons. If the oil level is below the minimum indicated level, it can cause a fire.
- Only a qualified technician and using original spare parts and accessories should carry out repairs and maintenance of the device. Do not attempt to repair the device yourself as this will make your warranty void.
- Do not use any accessories or spare parts that have not been recommended by the manufacturer. This can be dangerous for the user and lead to damage of the device or personal injury, and a void warranty.
- To prevent hazards and to ensure optimum efficiency, no modifications or alterations to the device that are not explicitly approved by the manufacturer may be undertaken.
- Any use going beyond the intended purpose and/or any different use of the device is forbidden and is not considered as conventional. Any claims against the manufacturer or his authorized representative as a consequence of experiencing damages resulting from unconventional use or modifications are not valid. The operator is liable for all damages resulting from inappropriate use.
A. Structure
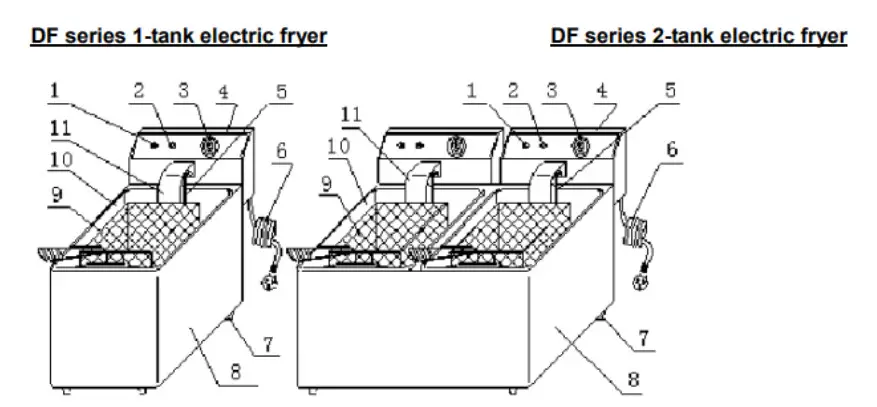
- POWER INDICATOR
- HEATING INDICATOR
- TEMPERATURE CONTROLLER
- ELECTRIC BOX
- ELECTRIC HEATING TUBE
- POWER CABLE
- RUBBER FOOT
- LOWER BOX
- FRYING BSSKET
- OIL POT 1
- PROTECTION BOARD FOR ELECTRIC HEATING TUBE
CIRCUIT DIAGRAM
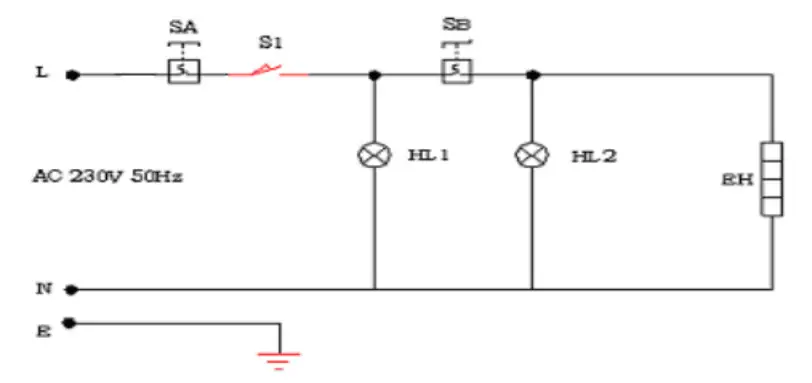
S1-MICRO-SWITCH
SA-TEMPERATURE LIMITER
EH-ELECTRIC HEATING TUBE
HL1-POWER INDICATOR
HL2-HEATING INDICATOR
E-EARTH GROUND
SB-TEMPERATURE CONTROLLER
NOTE: THE CIRCUIT PRINCIPLE OF THE DF SERIES SINGLE TANK & TWIN TANK ELECTRIC FRYER IS DIFFERENT. THE TWIN TANK FRYER HAS TWO TANKS AND TWO ELECTRIC BOXES AND TWO SEPARATE TEMPERATURE CONTROLLERS.
SOLID DIAGRAMS & PARTS GUIDE
SINGLE TANK FRYER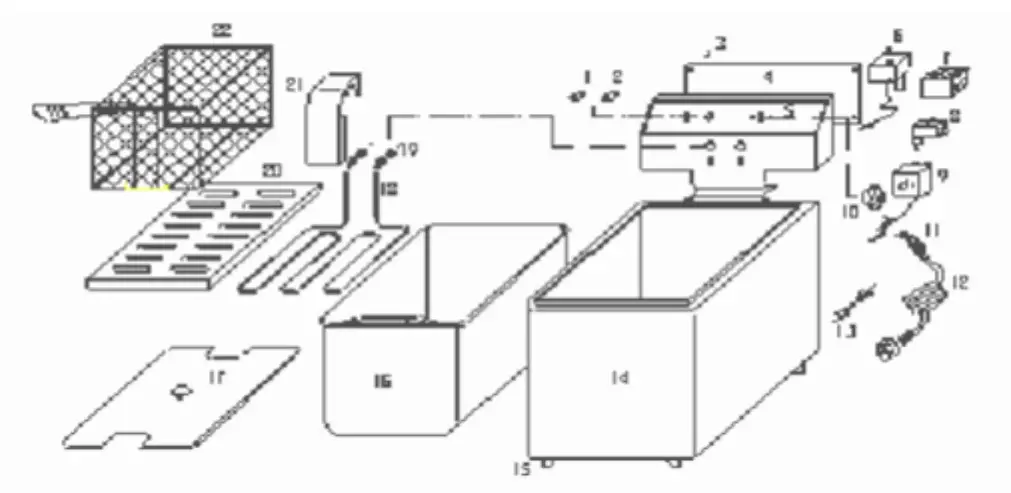
| 1-POWER INDICATOR | 13-EQUIPOTENTIAL |
| 2-HEATING INDICATOR | GROUNDED SCREW |
| 3-SCREW OF SIDE BOARD | 14-LOWER BOX |
| 4-BACK BOARD | 15-RUBBER FEET |
| 5-ELECTRIC BOX | 16-OIL POT |
| 6-TEMPERATURE LIMITER | 17-COVER OF OIL POT |
| 7-PORCELAIN SOCKET FOR | 18-ELECTRIC HEATING TUBE |
| CONNECTION | 19-FIRMED SCREW |
| 8-MICRO-SWITCH | 20-PARTITION BOARD |
| 10-KNOB | 21-PROTECTING BOARD FOR |
| 11-THEATH OF POWER CABLE | ELECTRIC HEATING TUBE |
| 12-POWER CABLE | 22-FRYING BASKET |
The specification of each electric heating tube in fryer is:
a)DF-4L: 2000W, 220-240V/50Hz
b)DF-6L: 2500W, 220-240V /50Hz
c)DF-8L: 3250W, 220-240V /50Hz
d)DF-11L: 3500W, 220-240V /50Hz
TWIN TANK FRYER
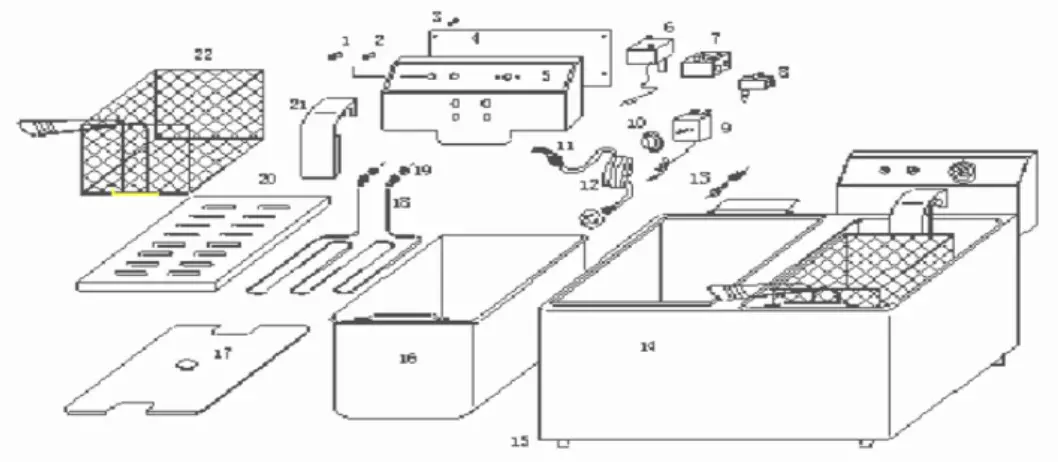
| 1-POWER INDICATOR | 13-EQUIPOTENTIAL GROUNDED SCREW |
| 2-HEATING INDICATOR | 14-LOWER BOX |
| 3-SCREW OF SIDE BOARD | 15-RUBBER FEET |
| 4-BACK BOARD | 16-OIL POT |
| 5-ELECTRIC BOX | 17-COVER OF OIL POT |
| 6-TEMPERATURE LIMITER | 18-ELECTRIC HEATING TUBE |
| 7-PORCELAIN SOCKET FOR CONNECTION | 19-FIRMED SCREW |
| 8-MICRO-SWITCH | 20-PARTITION BOARD |
| 10-KNOB | 21-PROTECTING BOARD FOR ELECTRIC |
| 11-THEATH OF POWER CABLE | HEATING TUBE |
| 12-POWER CABLE | 22-FRYING BASKET |
PARTS & SPECIFICATION LIST
SINGLE TANK FRYER
NUMBER | NAME | SPECIFICATION | AMOUNT | NOTE |
| 1 | Power indicator | Φ12 250V/14A | 1 | Outsourcing, green with line |
| 2 | Heating indicator | Φ12 250V/14A | 1 | Outsourcing, green with line |
| 3 | Fix screw for back board | M4×8 with flat pat | 4 | Outsourcing |
| 4 | Back board | Stainless S=0.8 | 1 | |
| 5 | Electric box | Stainless S=0.8 | 1 | |
| 6 | Temperature limiter | 230℃/250V | 1 | Outsourcing |
| 7 | Connection ceramic | Insulated ceramic 250V/16A | 1 | |
| 8 | Micro-switch | KW-7-0/16A | 1 | Outsourcing |
| 9 | Temperature controller | 190℃/250V | 1 | Outsourcing |
| 10 | Knob of temperature controller | ABS Plastic | 1 | |
| 11 | Sheath of power cable | Φ15/ABS Plastic | 1 | With bayonet |
| 12 | Power Cable | 250V 3×1.5mm² | 1 | Outsourcing, with plug (>2.5m) |
| 13 | Equipotential ground screw | M6×15/Brass | 1 | With screw and spring, flat pat |
| 14 | Bottom box | Stainless S=0.8 | 1 | |
| 15 | Rubber feet | Φ30×15/Black | 4 | Outsourcing |
| 16 | Oil pot | Stainless steel | 1 | Outsourcing, with oil level |
| 17 | Cover of oil pot | Stainless S=0.8 | 1 | |
| 18 | Electric heating tube | 230V/50Hz | 1 | Out-processing |
| 19 | Fix screw for electric heating tube | 45# steel M12 | 2 | |
| 20 | Partition board for oil | Stainless S=0.8 | 1 | |
| 21 | Protecting board for electric heating tube | Stainless S=0.8 | 1 | |
| 22 | Frying basket | Stainless wire, net | 1 | Handle can be folded |
PARTS & SPECIFICATION LIST
TWIN TANK FRYER
NUMBER | NAME | SPECIFICATION | AMOUNT | NOTE |
| 1 | Power indicator | Φ12 250V/14A | 2 | Outsourcing, green with line |
| 2 | Heating indicator | Φ12 250V/14A | 2 | Outsourcing, green with line |
| 3 | Fix screw for back board | M4×8 with flat pat | 8 | Outsourcing |
| 4 | Back board | Stainless S=0.8 | 2 | |
| 5 | Electric box | Stainless S=0.8 | 2 | |
| 6 | Temperature limiter | 230℃/250V | 2 | Outsourcing |
| 7 | Connection ceramic | Insulated ceramic 250V/16A | 2 | |
| 8 | Micro-switch | KW-7-0/16A | 2 | Outsourcing |
| 9 | Temperature controller | 190℃/250V | 2 | Outsourcing |
| 10 | Knob of temperature controller | ABS Plastic | 2 | |
| 11 | Sheath of power cable | Φ15/ABS Plastic | 2 | With bayonet |
| 12 | Power Cable | 250V 3×1.5mm² | 2 | Outsourcing, with plug (>2.5m) |
| 13 | Equipotential ground screw | M6×15/Brass | 2 | With screw and spring, flat pat |
| 14 | Bottom box | Stainless S=0.8 | 2 | |
| 15 | Rubber feet | Φ30×15/Black | 4 | Outsourcing |
| 16 | Oil pot | Stainless steel | 2 | Outsourcing, with oil level |
| 17 | Cover of oil pot | Stainless S=0.8 | 2 | |
| 18 | Electric heating tube | 230V/50Hz | 2 | Out-processing |
| 19 | Fix screw for electric heating tube | 45# steel M12 | 4 | |
| 20 | Partition board for oil | Stainless S=0.8 | 2 | |
| 21 | Protecting board for electric heating tube | Stainless S=0.8 | 2 | |
| 22 | Frying basket | Stainless wire, net | 2 | Handle can be folded |
OPERATION & USE
Check if the installation of power supply is normal, and make sure the supplied voltage is coordinated with the using voltage.
- There is an oil level mark in the internal oil pot, when in use, the quantity of oil in the oil pot should be kept at a certain level. “MAX” shows the most volume of oil, “MIN” shows the lesser volume of oil. While in use, you can adjust the volume of oil according to your needs.
- Plug the machine and get through power supply, the green indicator will come on, and a current has been supplied to the machine.
- Rotate the temperature controller clockwise, put the needed temperature degree to the red point. The yellow indicator will come on and the green indicator will be off. It will indicate that the electric heating tube has stopped working and the temperature of oil in the pot is rising.
- When the temperature of oil rises to the setting temperature, the temperature controller will cut off power automatically.
- When the temperature of oil lowers, the temperature controller will get through power automatically. The yellow indicator will be on and the green indicator will be off, indicating that the electric heating tube is working again and the temperature of oil will rise.
- It repeats again to make sure the temperature of oil is constant in the setting temperature.
- The cover of pot is designed for keeping the pot clean and warm. When putting on the cover, please make sure there is no water on it in case the water drops into the pot, causing oil splashes.
- The enclosed frying basket is for frying small food. There is hook and handle on the basket. Soak the basket into oil when operating. When the frying is finished, lift the basket and put it on the front notch of the pot to filter oil. It can be put big food into pot to fry.
- After working, please rotate the temperature controller counter-clockwise to the limit position and cut off power for safety.
- Pour the old oil out of pot when the temperature of oil lowers to normal. Firstly, cut off power, then take the partition board for oil out of the pot. Take the electric box out of the back notch in the bottom box. The electric heating tube and electric box are separate from pot,- put them on a clear surface, then take the out oil of the pot to clean.
- In order to make sure the stove is safe and durable, please clean dregs of oil pot and the electric heating tube in order to keep them clean..
- The partition board of the oil pot is designed for protecting the electric heating tube. Put the partition board into the oil pot when frying food.
- There is a temperature control in the electric box. The moving temperature is 230℃;and the reset temperature is less than 170℃.
- There is a “reset button for over heating” on the outer shell. When temperature is up, the protection button will kick in. Press the reset button to restart.
- There is micro-limit switch in the electric box. When putting the electric box into the bottom box electricity take it out then the power is off.
- Please use fresh vegetable oil in case of over boiling. Do not use old oil because it will have a reduced flash-point and be more prone to surge boiling.
The voltage for this equipment must be coordinated with the supplied voltage. Users should install a suitable power switch and breaker switch near the fryer.
At the back of the device is the earth bolt. Please connect the earth wire in compliance with the safety regulations with copper cable of no less that 2mm².
Before using, check whether every connection is formed, voltage is normal and ground connection is safe. 5. Do not use water to clean the electric box directly. The installation of this stove must be done by professionals.
This device must be operated by trained professionals.
Do not modify it in any way, any modifications of this product could cause accidents and void your warranty.
Do not clean the product with a water jet or soak the electric box into water while cleaning, this may cause electric
High temperatures will cause burns. When a fire-facing oven is in use and before or after being used, do not directly touch the device, it will be hot.
Do not use another power supply with a different voltage.
Do not use the main switch that is not coordinated with safety regulations.
In a thunderstorm, shut off main switch to avoid the appliance being damaged by possible lightning strike. Do not use hard or sharp object to destroy the surface of oven body and the surface of oil pot.
After using, shut off the main switch.
The installation and maintenance of electric circuit must be carried out by professionals.
If the power cord is damaged, contact the retailer you purchased the unit from.
During transportation, the machine should be carefully handled and avoid shaking it. The packaged machine should not be stored in the open air. It should be put in a ventilated warehouse without corrosive gas. It should not be put upside down. If it needs to be stored in open air temporary, measurement against rain in needed.
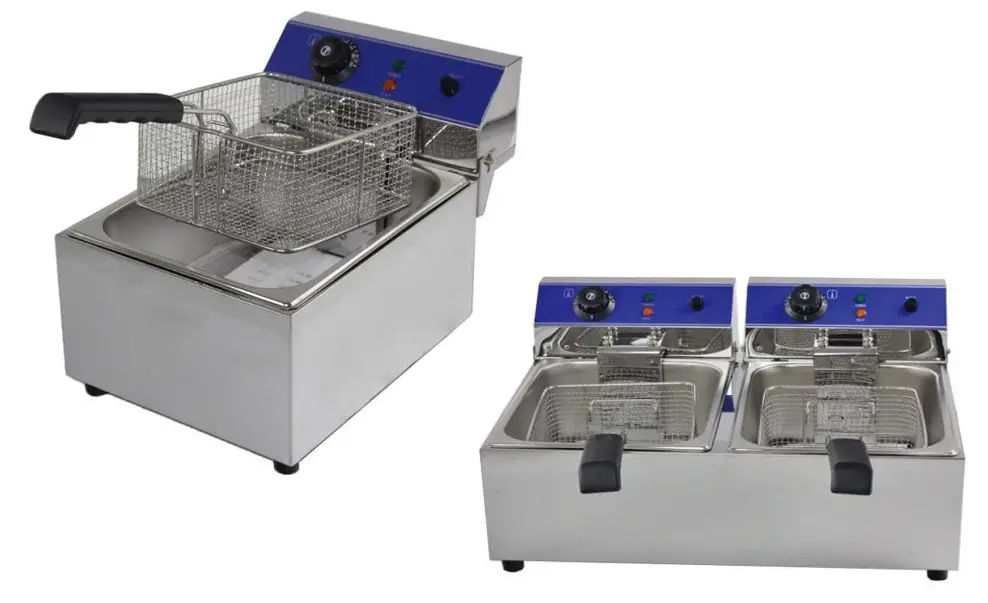
The DF series Countertop Electric Fryer has two types. One is a Single Tank fryer, another is a Twin Tank fryer. The thermostat sets the temperature for frying. The power indicator and heating indicator shows the heating status.
When the temperature of oil is over the temperature limit, the protecting device for limiting temperature can cut off the power automatically. Reset the device by hand. When lifting the electric box, the micro-switch works at once. It cuts off power for safety purposes and in the case of the electric heating tube being dry burned. The handle of the frying basket can be folded and dismantled. It has a stainless steel moving oil tank with a calibration mark of oil level. It is easily operated, cleaned, transported and stored. The electric heating tube has a protecting board and it can be easy to draw out of the bottom box with the electric box, separate from the oil pot. This makes it also easy to clean.
BASIC PARAMETERS – SINGLE TANK FRYER
MODEL | DF-4L | DF-6L | DF-8L | DF–11L |
| VOLTAGE | 220-240V, 50Hz | 220-240V, 50Hz | 220-240V, 50Hz | 220-240V, 50Hz |
| POWER | 2000W | 2500W | 3250W | 3500W |
| NO. OF OIL POTS | 1 | 1 | 1 | 1 |
| SIZE OF OIL POT | 185×270×175 | 240×300×150 | 240×300×200 | 300×325×200 |
| NO. OF BASKETS | 1 | 1 | 1 | 1 |
| BASKET SIZE | 150×220×135 | 195×250×125 | 195×250×150 | 210×280×150 |
| OIL TEMPERATURE SETTING RANGE | 50℃~190℃ | 50℃~190℃ | 50℃~190℃ | 50℃~190℃ |
| MOVING TEMPERATURE OF TEMPERATURE LIMITER | 230℃ | 230℃ | 230℃ | 230℃ |
| HAND RESISTING TEMPERATURE | <150℃ | <150℃ | <150℃ | <150℃ |
| DIMENSIONS (mm) | 220×400×315 | 265×430×290 | 265×430×340 | 325×460×340 |
| LENGTH OF HANDLE | 240 | 240 | 240 | 240 |
| WEIGHT (kg) | 5.5 | 6 | 7.2 | 8.1 |
BASIC PARAMETERS – TWIN TANK FRYER
MODEL | DF-4L2 | DF-6L-2 | DF-8L-2 | DF–11L–2 |
| VOLTAGE | 220-240V, 50Hz | 220-240V, 50Hz | 220-240V, 50Hz | 220-240V, 50Hz |
| POWER | 2x2000W | 2x2500W | 2x3250W | 2x3500W |
| NO. OF OIL POTS | 2 | 2 | 2 | 2 |
| SIZE OF OIL POT | 185×270×175 | 240×300×150 | 240×300×200 | 300×325×200 |
| NO. OF BASKETS | 2 | 2 | 2 | 2 |
| BASKET SIZE | 150×220×135 | 195×250×125 | 195×250×150 | 210×280×150 |
| OIL TEMPERATURE SETTING RANGE | 50℃~190℃ | 50℃~190℃ | 50℃~190℃ | 50℃~190℃ |
| MOVING TEMPERATURE OF TEMPERATURE LIMITER | 230℃ | 230℃ | 230℃ | 230℃ |
| HAND RESISTING TEMPERATURE | <150℃ | <150℃ | <150℃ | <150℃ |
| DIMENSIONS (mm) | 435×400×315 | 550×430×290 | 550×430×340 | 670×460×340 |
| LENGTH OF HANDLE | 240 | 240 | 240 | 240 |
| WEIGHT (kg) | 10.2 | 11.1 | 13.1 | 14.6 |
NOTE:
- THE QUANTITY OF FOOD MUST BE LIMITED IN ORDER TO AVOID OIL OVERFLOWING.
- FRYING FOOD THAT IS TOO WET, AS WELL AS ADDING TOO MUCH TO THE FRYER WILL CAUSE OIL TO OVERBOIL.
TROUBLESHOOTING
| PROBLEM | POSSIBLE CAUSE | SOLUTION |
| Machine is plugged in with through power supply, power indicator is not on, no heat. | 1. Plug is not inserted well. 2. Micro-switch contacts not working | 1. Remove the plug. 2. Adjust the limit distance of the micro- switch |
| Heating indicator is not on and temperature is not raised. | Connection of electric heating tube is loosened. | 1. Firm two sides of electric heating tube and screw. 2. Change electric heating tube |
| Power indicator is on but the setting temperature is not raised. | Temperature controller is burned. | Change temperature controller |
| Temperature control is normal but indicator is not on | Indicator is burned | Change Indicator |
| After circuit heating, electric heating tube is not heated. | Temperature limiter in use | Reset “over heating protecting button” by hand. |
| Temperature control can not be controlled. | Temperature limiter is out of order. | Change temperature limiter |
BEFORE USING THIS MACHINE PLEASE CHECK THE FOLLOWING:
- Is the machine tilted?
- Is the power cord old, broken or damaged?
- s the control panel is damaged?
AFTER USING THIS MACHINE PLEASE CHECK THE FOLLOWING:
- Is there is strange smell?
- Is the upper and lower module plate cannot be heated at the same time?
- Is there any strange noises or is the machine out of control while the machine is lifting?
- Check the machine everyday.
- The temperature around the machine should not be over 300℃.
- Stop using if you feels that there are some problems in the circuit or machine. Ask a qualified engineer to check the machine as soon as possible.
Waste disposal
DISCARDING THE DEVICE
At the end of its service life the device has to be disposed in accordance with the national regulations. It is advisable to contact a company which specialises in waste disposal, or just contact the local disposal service in your community.
WARNING!
To avoid any hazards, make the device unfit for use before disposal. For that purpose, disconnect the device from the mains supply and remove the mains connection cable from the device.
CAUTION!
For the disposal of the device please act accordingly to the national and local rules and regulations.
WARRANTY
WARRANTY Hamoki Ltd warrants the original purchaser of every new product (under normal and proper use and maintenance service as specified by Hamoki Ltd and upon proper installation and start-up in accordance with the instruction packet supplied with each unit) a one year parts warranty.
Hamoki Ltd’s obligation under this warranty is limited to a period of one (1) year from the date of original installation.
WARRANTY CLAIMS:
All claims for parts must be made directly through the retailer in the first instance. All claims raised with the retailer should include:
Your name:
Model number:
Your company:
Serial number of the product:
Address: Date of purchase:
Email: Proof of purchase :
Phone:
Information supporting the alleged defect.(A video/photo) Photo of the dataplate.


