DiOVDP-B02 Videophone 100% Wireless
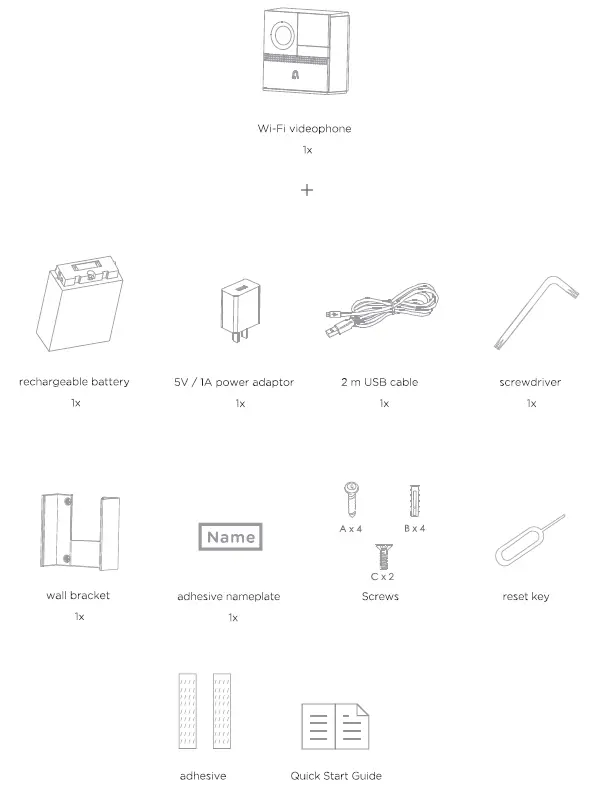
in the box
Registering your warranty
To register your warranty, fill in the online form at www.chacon.com/warranty
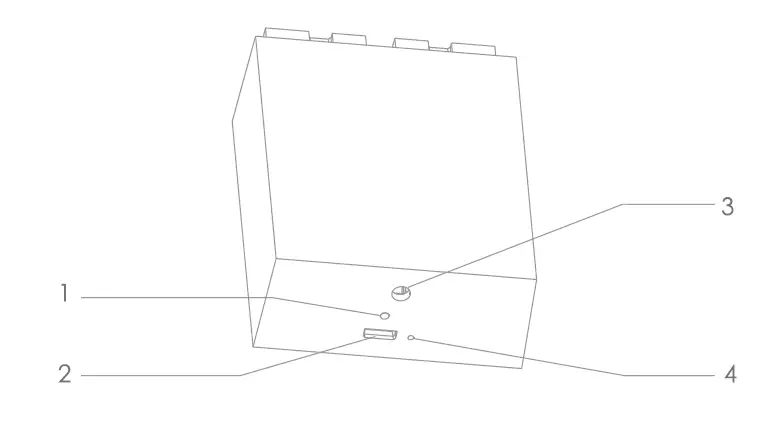
Description of the device
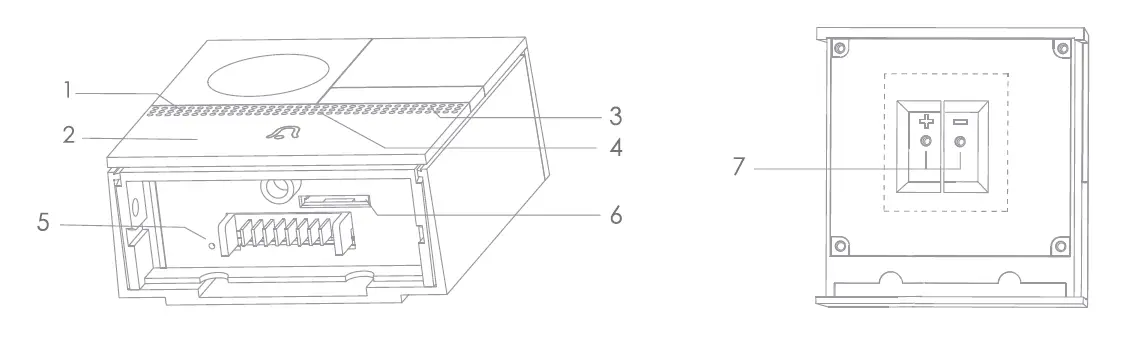
- Microphone: captures the sound of your video
- Push-button: press to activate the videophone
- Status light:
- Steady red light: camera connection problem
- Flashing red light: waiting for Wi-Fi connection, or connecting (rapid flashing)
- Steady blue light: camera working correctly
- Speaker:
- Reset button 1:
- Micro-SD card slot:Max. 128 GB (not included) 12~24V AC/DC
- External power port: (use the screws to attach the cables)

Rechargeable battery: capacity 6700mAh
- Charging indicator
- Steady red light: battery charging
- Steady blue light: charging complete
- DCSV+-10%
- Mini USB charging port
- Security screw: use the screwdriver provided to lock/ unlock the battery
- Reset button 2
Installing the videophone
You can install the videophone wirelessly by connecting it to the battery provided or by wiring it up to the videophone’s electrical circuit (replacing your existing intercom).
Completely wireless installation with battery
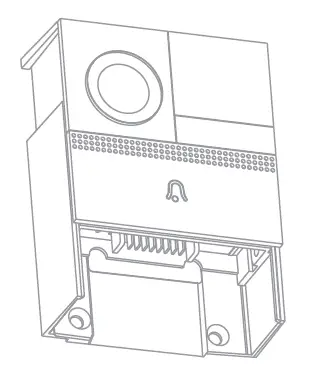
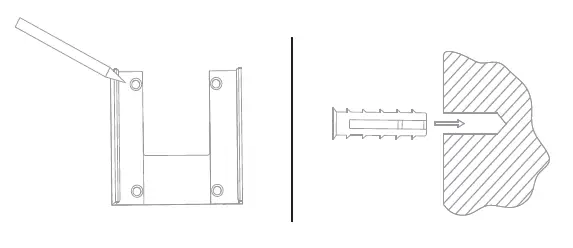
- Remove the bottom cover using the screwdriver provided and the wall bracket as shown in the illustration.

- Screw the bracket to the wall. Use the 4 holes in the wall bracket to mark the drilling holes. Drill the 4 holes, insert the wall plugs and attach the bracket to the wall using the screws provided

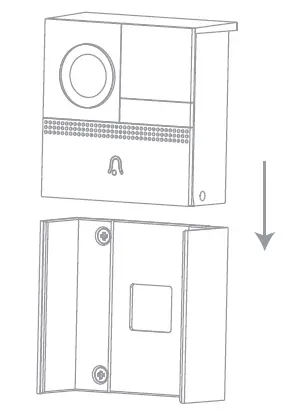
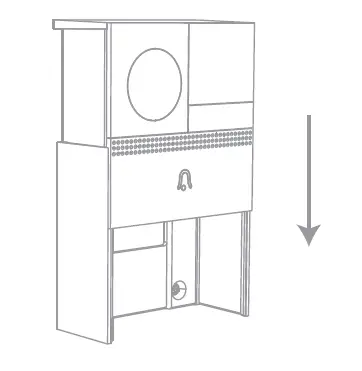
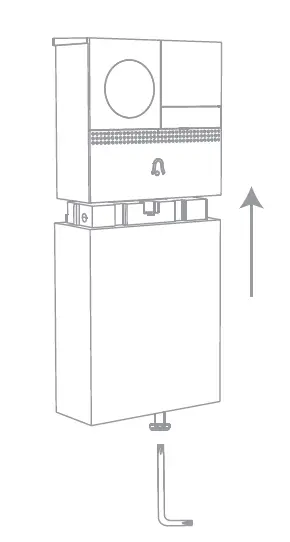
- Install the videophone in the wall bracket from top to bottom (as shown in the illustration).

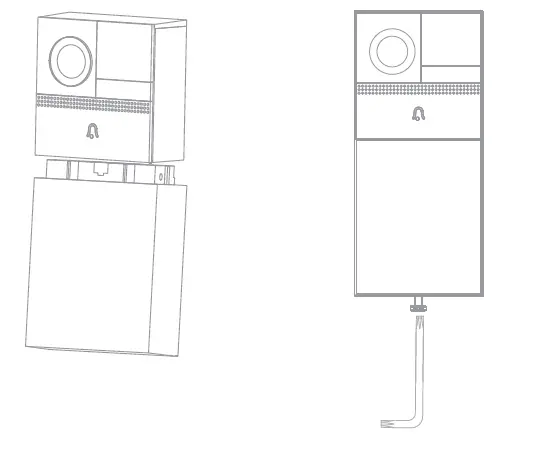
- Connect the rechargeable battery to the videophone and screw it in using the screwdriver provided. This will attach the videophone firmly to the wall.


Attention: The battery is delivered with a load of approximately 40%, please charge it before the first use (see paragraph – 5.1 ). The full charge time of the battery is 6 to 8 hours.
Wired installation (with battery)
!!Warning!!
Disconnect the power supply before carrying out any work.
Please contact your electrician if you have any doubts about your installation.
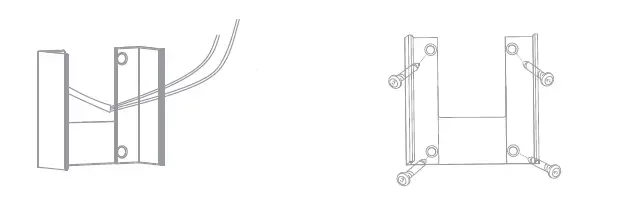
- Use the 4 holes in the wall bracket to mark the drilling holes. Drill the 4 holes and insert the wall plugs.

- Pass the 2 wires through the central hole of the bracket and screw the bracket to the wall using the screws provided.

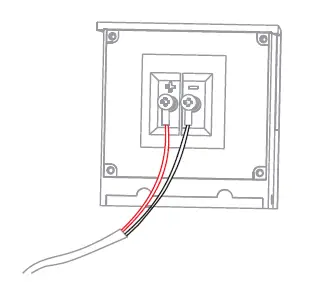
- Connect the wires to the external power ports of the videophone by connecting the red wire to the’+’ terminal and the black/white wire to the’-‘ terminal using the screws provided.

- install the doorbell into the bracket.

- Insert the battery compartment into the doorbell.

Connecting the videophone to the Wi-Fi
- After you have connected the videophone to the battery or to the power supply you will hear a short beep. This indicates that the videophone can be connected to the Wi-Fi through your smartphone or tablet.
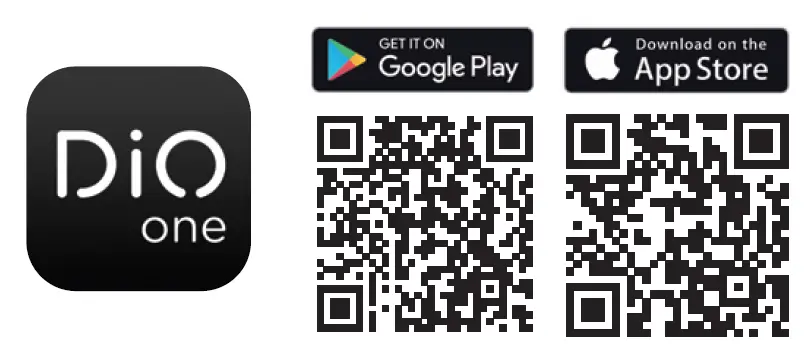
- Download the free DiO One app and create your account.

- 3. Follow the instructions in the app to connect the videophone to the Wi-Fi. Make sure your Wi-Fi network is available and is within range of the videophone.
Add the videophone to the app by clicking on the”+”, select the device to be added and choose your setup mode (QR scanner code provided by the APP or automatic search of the Wi-Fi network).
Warning:- Make sure that the Wi-Fi router has a 2.4 GHz band (it does not work at 5 GHz).
- When configuring it, your smartphone must be on the same Wi-Fi network as the videophone.
- If you want to install it on a different Wi-Fi network, press reset button 1 or 2 for 5 seconds. The device restarts and the indicator light begins to fiash red.
- A videophone can only be added to an account (you can subsequently share it through the app, see section 5.2). If the videophone has already been added, it cannot be added to another account


Linking with a DiO 1.0 receiver
This product is compatible with all DiO 1.0 peripherals operating under the 433MHz radio protocol.
You can link the videophone push button to the DiO doorbell to be notified of a visitor when you are at home, and/or a DiO 1.0 module/plug or bulb to light the garden path as soon as a visitor push the videophone button, for example.
You can also link 3 buttons provided with your DiO One app to DiO accessories to open your gate or electric bolt {by linking it with the DiO 1.0 gate module) or to turn on a light (by linking it with a DiO 1.0 lighting module, socket or bulb) with just one click on your smartphone from anywhere in the world.
Linking the videophone push button to the DiO 1.0 receiver (doorbell)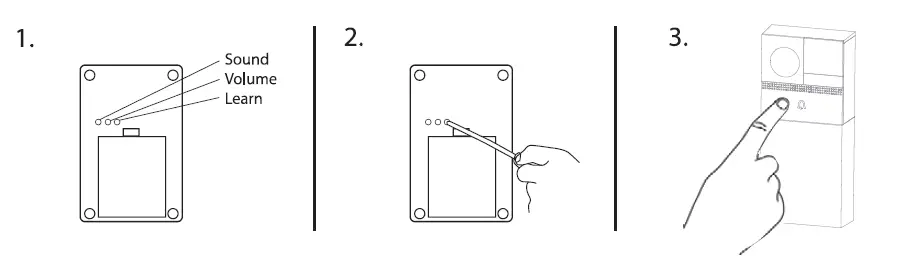
- Select the ring tone and volume by pressing the 2 buttons of the doorbell.
- Press the doorbell LEARN button. The LED starts to flash slowly.
- Within 15 seconds, press the videophone push button; the doorbell beeps twice to confirm that the 2 products are linked and the LED goes out.
You can link several DiO 1.0 receivers with this push button.
Warning: The range between the doorbell and the DiO videophone is 50 m or 300 m (depending on the doorbell used), but this may be reduced by the thickness of the walls or a current wireless environment.
Linking the button on the DiO One App with the DiO 1.0 receiver {gate module, lighting module, plug or bulb)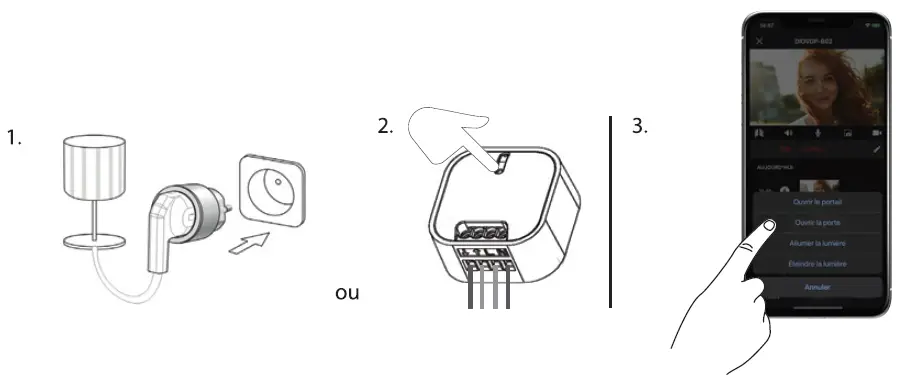
- 1. Connect the receiver (module, plug, bulb – see receiver manual).
- Press the learn button on the receiver (see receiver manual). The receiver LED flashes.
- Press the button selected on the videophone interface in the DiO One app.
- Opening a gate or electric strike
- Open a second gate, electric strike
- ON – turn on your lighting
- OFF – turn off your lighting
The LED stops flashing to confirm the link.
You can link several DiO 1.0 receivers on a single button/icon for centralized control, to turn several lamps on, for example.
Warning: The range between the DiO 1.0 receiver and the DiO videophone is 50 m, but this may be reduced by the thickness of the walls or a current wireless environment.
Use
Visitors
When a visitor presses the videophone push button, you will receive an Available: You can answer your visitor and talk with them using your smartphone. If your videophone is inked to a Did1.0 accessory you can open the gate with just one click on your smartphone or turn on a light.
Not available:
Leave a message (optional: you can record a message up to 30 seconds mot he able to leave you a message in return, but they ua essage in return, but they will be automatically videoed. No answer: When a visitor presses the button on your video phone, a Video will auto maucauy be recorded on the micro-SD card (not supplied).
Viewing
The videophone is in standby mode to save the battery. You can activate the Thie funi o E etace Note This Function is not available wnen the battery 1S 1o
Security and detection
the videophone has a people detector. when someone goes past the device,a notification will be sent to you on your smartphone and a 20-second video will be recorded on the icro-SD card (accessible through the app). You can adjust the sensitivity of the detection or switch it off.
Managing battery consumption
You can display the status of the battery at any time through the videophone Setu when the battery charge is below 20%. nu in the Doone pp. you wi receive d Warning 10%
Recharge the battery
When the battery charge is less than 209%, you will receive Disconnect the rechargeable battery from the videophone by unscrewing it with sage. the supplied screwdriver. Then, charge it using the SV power adapter and micro USB cable provided The charging indicator at the bottom of the battery is red when the battery s charging, it will turn blue when the battery IS T0090 charged. Average autonomy based on 10 triggers per day: 3 months VEtdge liable duLOony menus
DiO One app interface 
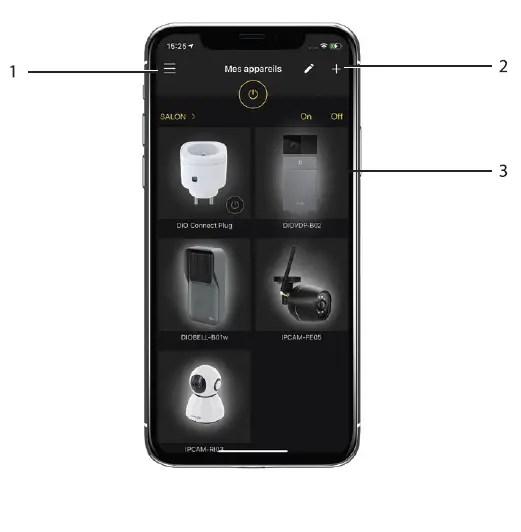
- Account Setup Menu
- To add a new device
- CameraNideo Phone Interface
Videophone interface

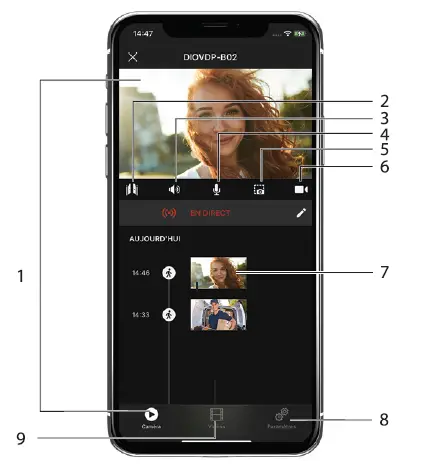
- Live Viewing
- Controls for DiO 1.0 devices
- Sound on/off
- Activate the telephone microphone to be able to speak
- Save an image from the video stream
- Record the video stream on the phone
- Motion Detection Captures
- Video Phone Setup Menu
- Viewing recordings
To record your videos, you need to install a micro-SD card. on the videophone.
DiO 1.0 interactions 
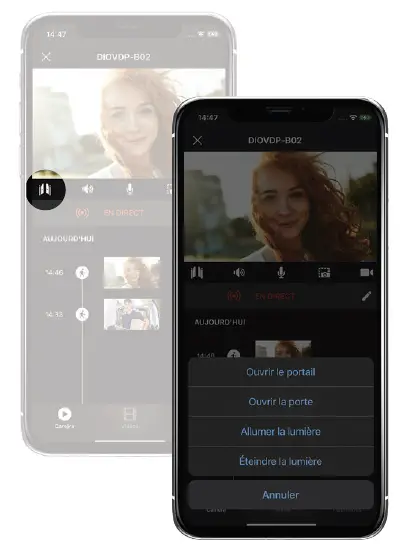
- Opening a gate or electric strike
- Open a second gate, electric strike
- ON – turn on your lighting
- OFF – turn off your lighting
Videophone settings menu 
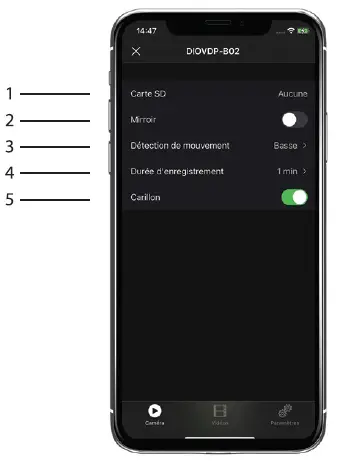
- SD card option ( format, free space, total space )
- Flip the image over
- Activate/ deactivate/ adjust the motion detection sensitivity
- Registration option
- Enable the chime function ( makes a DiO 1.0 chime sound when a visitor rings the doorbell)
Reset
To restore the videophone factory settings, change Wi-Fi network and/or change owner, press the videophone reset button 1 or 2 for 5 seconds and delete the device from your account in the app. You can then reinstall it in your account or another account (see section 3).
Troubleshooting
The video image is slow or does not load correctly Make sure that the Wi-Fi network is working properly and/or that the videophone is within range. If it is not, we recommend using a Wi-Fi repeater to extend the range of your Wi-Fi network or move your videophone.
You want to change your Wi-Fi settings
First, remove the device from your app, then press the videophone reset button 1 or 2 for 5 seconds. You can then reinstall it with the new Wi-Fi network.
The device does not recognize the installed micro-SD card
Make sure that the micro-SD card is available and formatted as FAT32. Go to the videophone settings menu > 7. Format the SD card
You don’t get a notification on your smartphone if there is a visitor or in the event of detection
You must enable “Dio One” notifications in your smartphone settings to receive push notifications.
Technical specifications
- Video
- HD1080p (1920×1080)/ 25 fps
- Ange of view: 145
- CMOS 1/2.9 ” sensor 2Megapixel
- Adjustable motion detection (low, medium, high or off)
- Night vision up to 5 m with infrared filter
- Audio: Built-in speaker and microphone
- Compatible with Wi-Fi 802.11b /g /n-WPA WPA2-Personal
- Frequency: Wi-Fi 2.4 GHz + 433.62MHz by Dio
- EIRP:<100mW
- Power supply:
- Rechargeable battery: 6700mAh
Average life: 3 months (based on 10 triggers per day)
Average life in standby mode: 10 months - Power supply DC 5V (optional)
- Rechargeable battery: 6700mAh
- External use: IP54
- Operating temperature:-20°C to 50°C
- Dimensions: 58 x 130 x 26 mm (without battery) 58 x 60x 26 mm (with battery)
Expanding your installation
Expand your installation with DiO solutions to control your heating, lighting, roller shutters, or garden, or to use video surveillance to keep an eye on what is happening at home.
Easy, high-quality, scalable, and economical. learn about all of the Dio
Connected Home solutions at www.chacon.com
Direct current (DC)
Recycling
In accordance with European WEEE directivlil1 (2002/g6/EC) and in relation to occumulotor1 (2006/66/EC). an only electrical or electronic device or accumulator mu1t be collected 1eporetely by e local in the collection of 1uch wo1te. Do not di1poH or tl”WH product, with ordinary white. Check the regulation, in forclil. Th• logo 1hoped like o wo1te bin indicote1 thot thi1 product mu1t not be di1po11d of with household w11te in any EU country. To prevent any ri1k to
the 1;1nvironm1nt or human 1-worth due to uncontrolled 1croppini;i, r1;1cycl1;1 tl-w product in o r11pon1ibl1 manner. Thi1 will promote the 1u1toinobl1 u11 of material r11ourc11. To return your used device, u1e the return and collection 1y1tem”, or contact the original dholer. The dliloler will rlilc)’chill it in accordance with provi1ion1
Declaration of conformity
The undersigned, Chacon. declares that the WiFi equipment reference: DIOVDP-B02 is in conformance with Directive 2014/53/EU
The complete text of the EU declaration of conformity is available at the following Internet address: www.chacon.be-support-telechargements
There might be 1p1ciric r1quir1ment1 concerning the in1tall1tion and UH or a 1urveillonc1 corridor in your ploc1;1 of rliltidlilnClil (country, municipality, city). You are for finding; out about local requirements and applying them according to us.
Support: www.chacon.com/support


