
 Lenovo P620 AMD Threadripper Pro Castlepeak to Chagall CPU Upgrade
 Overview
The introduction to the new Chagall Workstation processors expands the AMD Ryzen Threadripper Pro Series lineup. AMD and Lenovo have collaborated toenable Chagall CPU upgrades on the existing P620 platform using Castle Peak CPU. The Chagall CPU is a drop in compatible part that requires only a basic system BIOS update in order to function.
| AMD Threadripper Pro Processors – Chagall | |||||
| CPU | 5945WX | 5955WX | 5965WX | 5975WX | 5955WX |
| Base Frequency | 4.1GHz | 4.0GHz | 3.8GHz | 3.6GHz | 2.7GHz |
| Max Boost Clock | TBD | TBD | TBD | TBD | TBD |
| Cores | 12 | 16 | 24 | 32 | 64 |
| Threads | 24 | 32 | 48 | 64 | 128 |
| Cache (L3) | 64M | 64M | 128M | 128M | 256M |
| Memory Speed | 3200MHz | 3200MHz | 3200MHz | 3200MHz | 3200MHz |
| TDP | 280W | 280W | 280W | 280W | 280W |
| AMD Threadripper Pro Processors – Castlepeak | ||||
| CPU | 3945WX | 3955WX | 3975WX | 3995WX |
| Base Frequency | 4.0GHz | 3.9GHz | 3.5GHz | 2.7GHz |
| Max Boost Clock | 4.3GHz | 4.3GHz | 4.2GHz | 4.2GHz |
| Cores | 12 | 16 | 32 | 64 |
| Threads | 24 | 32 | 64 | 128 |
| Cache (L3) | 64M | 64M | 128M | 256M |
| Memory Speed | 3200MHz | 3200MHz | 3200MHz | 3200MHz |
| TDP | 280W | 280W | 280W | 280W |
Step 1 – Update BIOS
Updating system BIOS is a critical first step to allow the P620 platform to support the new Chagall family of CPUs. Support for Chagall CPUs was added to BIOS is a staged approach, so it is critical that the proper flashing sequences be followed in order to ensure BIOS is updated successfully. The flash sequence will be determined by the starting BIOS that is installed on the target P620 system. Table 1 below shows the proper flash procedures based on the starting BIOS level. Note that up to two separate flash procedures might be necessary based on the starting BIOS version.
Table 1: ThinkStation P620 BIOS version update process to support Chagall processors.
| If starting BIOS is < BIOS 26A… | If starting BIOS is >= 26A… |
| 1. Flash to BIOS 26A first.
Note – Refer to special instructions below if starting BIOS is 21A or 22A. | 1. Flash to BIOS 45A (or latest available BIOS). |
| 2. Flash to BIOS 45A (or latest available BIOS). | 2. Proceed with physical CPU installation. |
| 3. Proceed with physical CPU installation. |
Note: It is critical that system BIOS be upgraded successfully as highlighted above prior to the Chagall CPU installation. Otherwise, the system could fail to boot properly.
Lenovo recommends using BIOS S07KT45A (45A) or higher when using Chagall CPUs in the P620 platform.
Special Instructions for Starting BIOS 21/22A
If the starting BIOS version is BIOS S07KT21A (BIOS 21A) or S07KT22A (BIOS 22A), an additional step must be taken during the flash process to ensure it completes successfully. Follow the steps below if the starting BIOS is 21A or 22A:
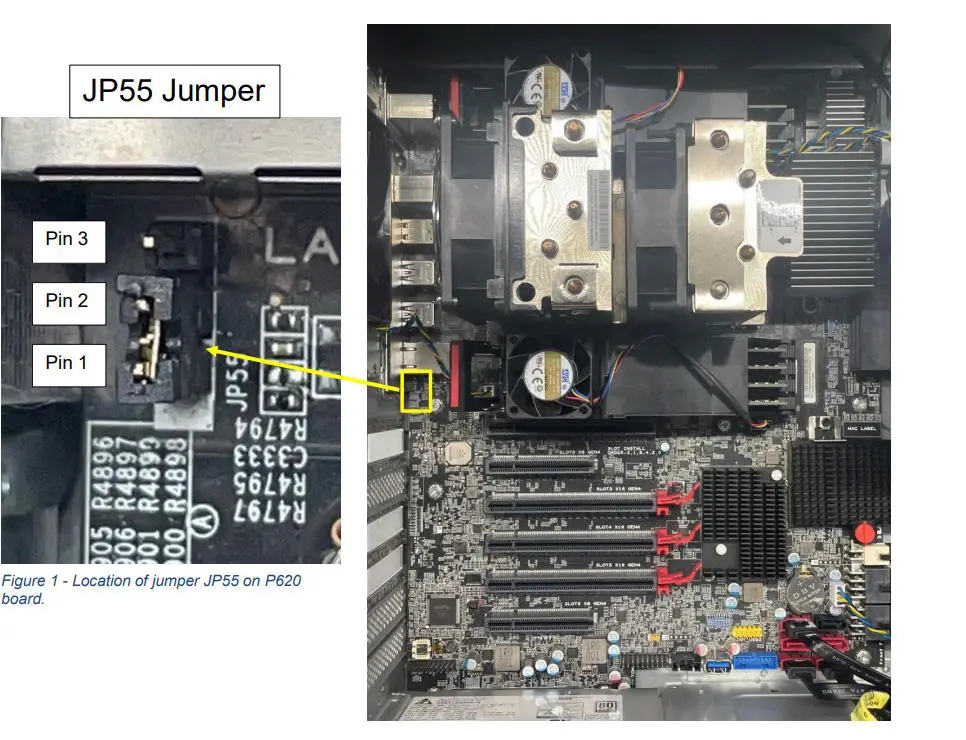
- With the system powered off, locate jumper JP55 on the P620 motherboard (see Figure 1 below).
- Move the jumper from the default position connecting pins 1-2 to the disabled position which connects pins 2-3.
- Run the BIOS flash update for BIOS 26A as instructed.
- Once the flash update for 26A completes successfully, power off the system and move JP55 back to the default position connecting pins 1-2.
- Follow the general BIOS Flash Update Procedure steps listed in the next section.
General BIOS Flash Update Procedure
Note: Select the BIOS update package that suits your need such as flash from Windows operating system, flash from EFI shell, or flash from ISO image.
- Flash BIOS to S07KT26A. Refer to the readme file in the BIOS update package for specific instructions on each flash method.
- EFI Shell: https://download.lenovo.com/pccbbs/thinkcentre_bios/s07j326usa.zip
- Flash from Windows OS: https://download.lenovo.com/pccbbs/thinkcentre_bios/s07jy26usa.exe
- Flash from ISO image: https://download.lenovo.com/pccbbs/thinkcentre_bios/s07j926usa.iso
- Reboot the system and verify BIOS revision level in BIOS setup. See Figure 2.
- Flash BIOS to S07KT45A. Refer to the readme file in the BIOS update package for specific instructions on each flash method.
- EFI Shell: https://download.lenovo.com/pccbbs/thinkcentre_bios/s07j326usa.zip
- Flash from Windows OS: https://download.lenovo.com/pccbbs/thinkcentre_bios/s07jy26usa.exe
- Flash from ISO image: https://download.lenovo.com/pccbbs/thinkcentre_bios/s07j926usa.iso
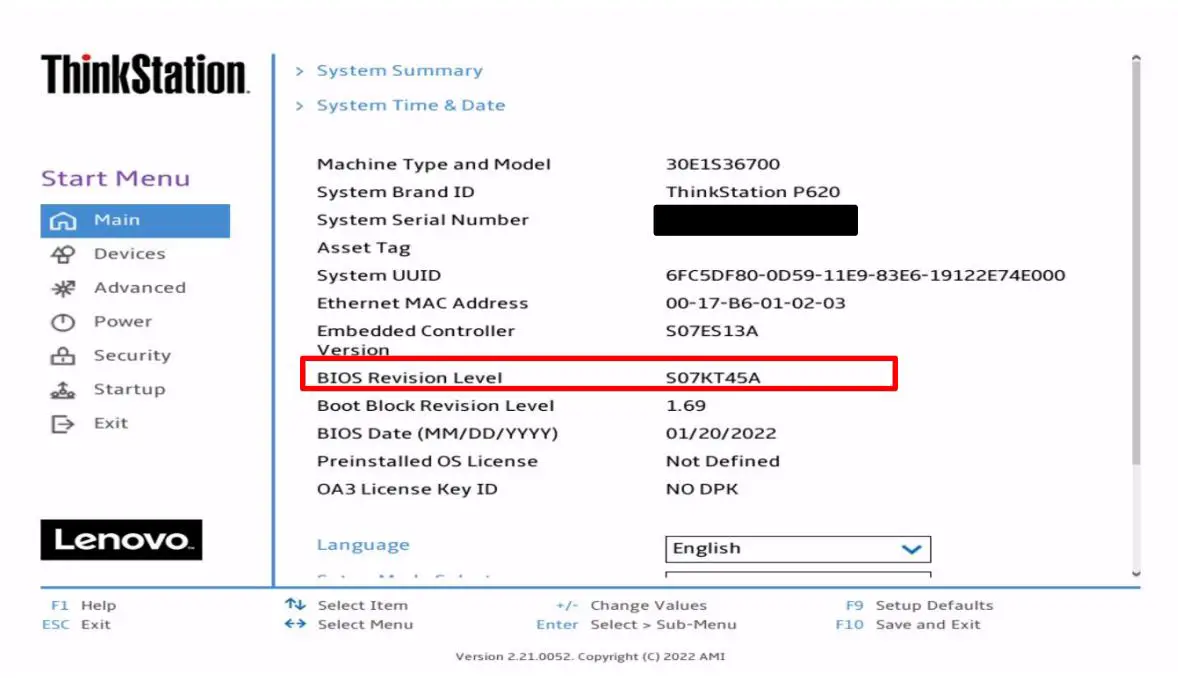
- Reboot the system and verify BIOS revision level in BIOS setup.
Figure 2: BIOS revision level after successful BIOS update to version S07KT26A. 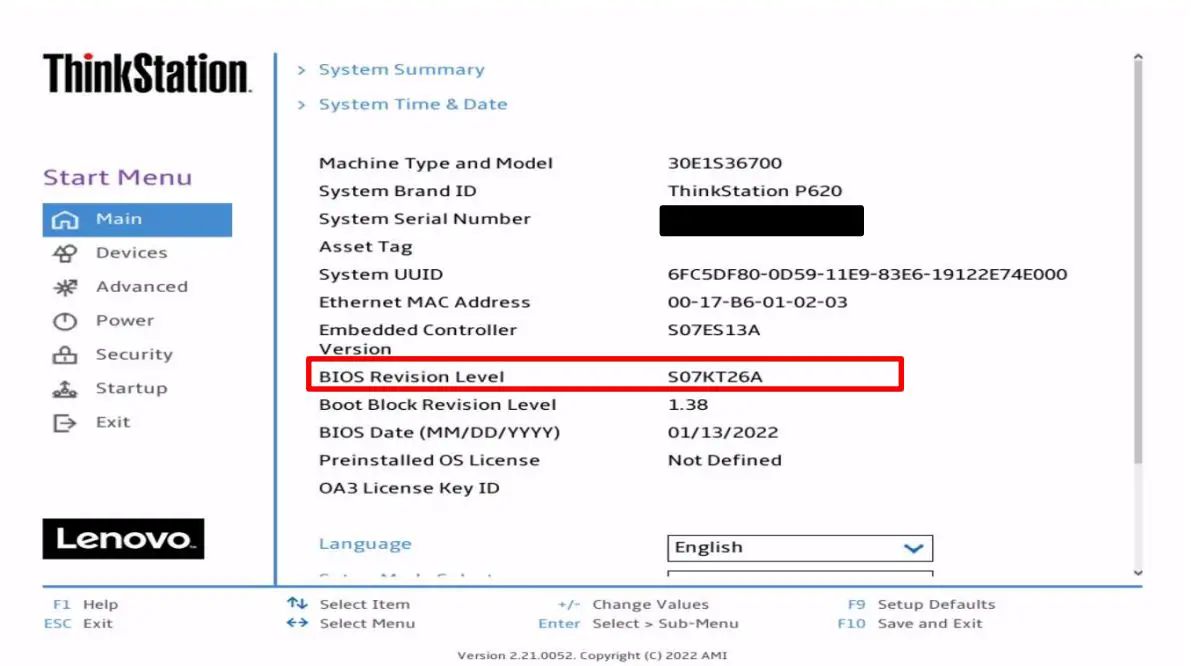
Figure 3: BIOS revision level after successful BIOS update to version S07KT45A.
Step 2 – CPU Removal and Installation
Please refer to the following document with step-by-step instructions on how to remove and install the new Chagall Workstation CPUs.
https://download.lenovo.com/pccbbs/thinkcentre_pdf/ts_p620_cpu_installation_removal_v1.0.pdf
Step 3 – CPU Fusing
The ThinkStation P620 platform supports AMD’s Platform Secure Boot (PSB) technology, which provides robust security against remote hackers that could seek to embed malware into system firmware. As a result of supporting PSB, any Threadripper Pro CPU that is installed in the P620 platform will be bound via a one-time programmable fuse to Lenovo’s signed BIOS code. From that point on, the fused processor will only function on motherboards using Lenovo’s code signing key.
Figure 4: The following prompt will appear during POST on the first boot with a new processor.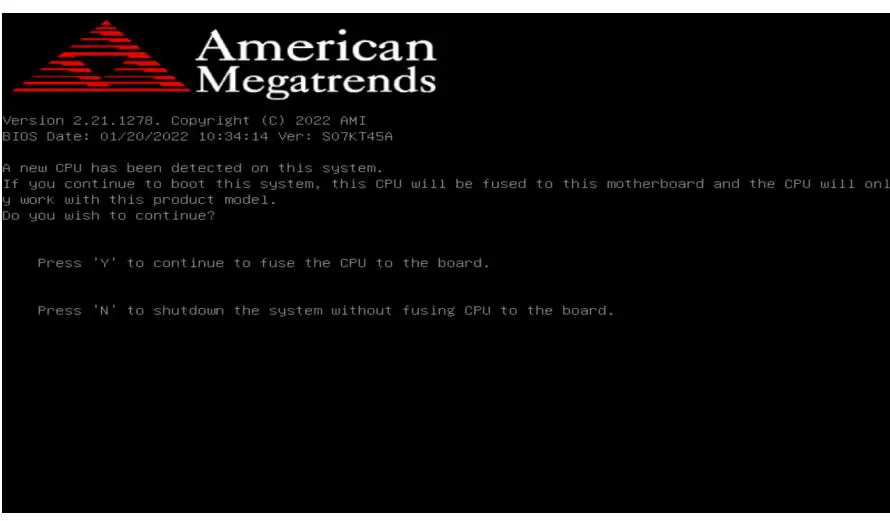
Notes
- Press ‘Y’ to continue to fuse the CPU to the board. This is non-reversible.
- Press ‘N’ to shutdown the system without fusing CPU to the board. This will not continue to boot and will instantly shut down the system.
Revision History
| Version | Date | Author | Changes/Updates |
| 0.7 | 4/12/2022 | Cory Chapman | Updated instructions for Step 1. |
| 0.6 | 3/24/2022 | Jason Moebs | Added details regarding JP55 jumper. |
| 0.5 | 2/23/2022 | Jason Moebs | Added mid-level BIOS update. |
| 0.4 | 2/11/2022 | Jason Moebs | Updates throughout. Added Step 3 about CPU fusing. |
| 0.3 | 1/25/2022 | Jason Moebs | Updates throughout. |
| 0.2 | 1/18/2022 | Jason Moebs | Updates throughout. |
| 0.1 | 1/12/2022 | Jason Moebs | Initial release |


