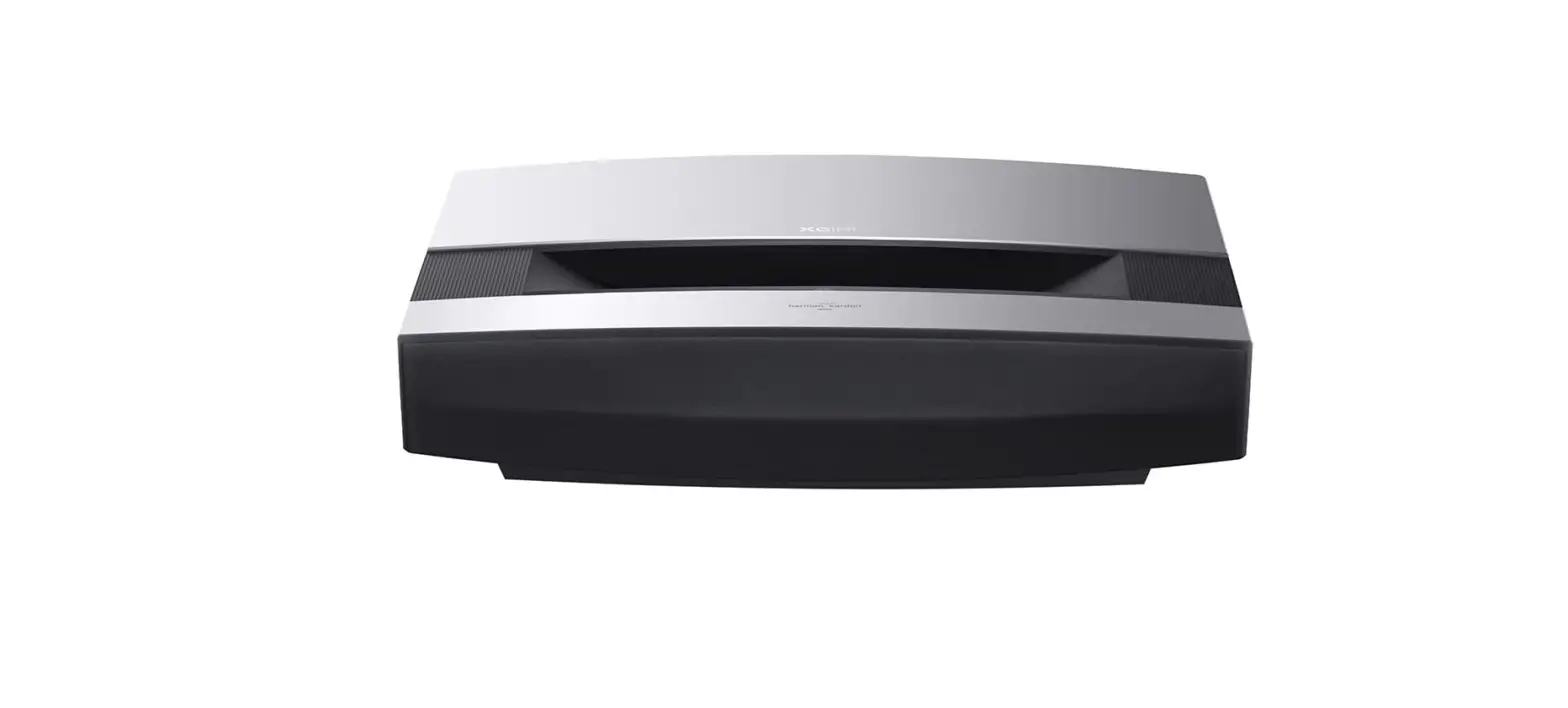
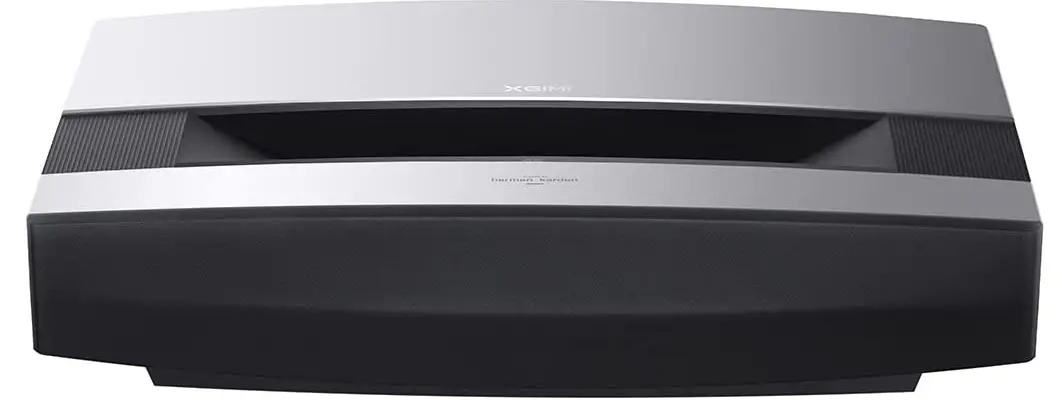
XGIMI Aura 4K UHD Ultra Short Throw Laser Projector
Important Precautions
Correct use of the device:
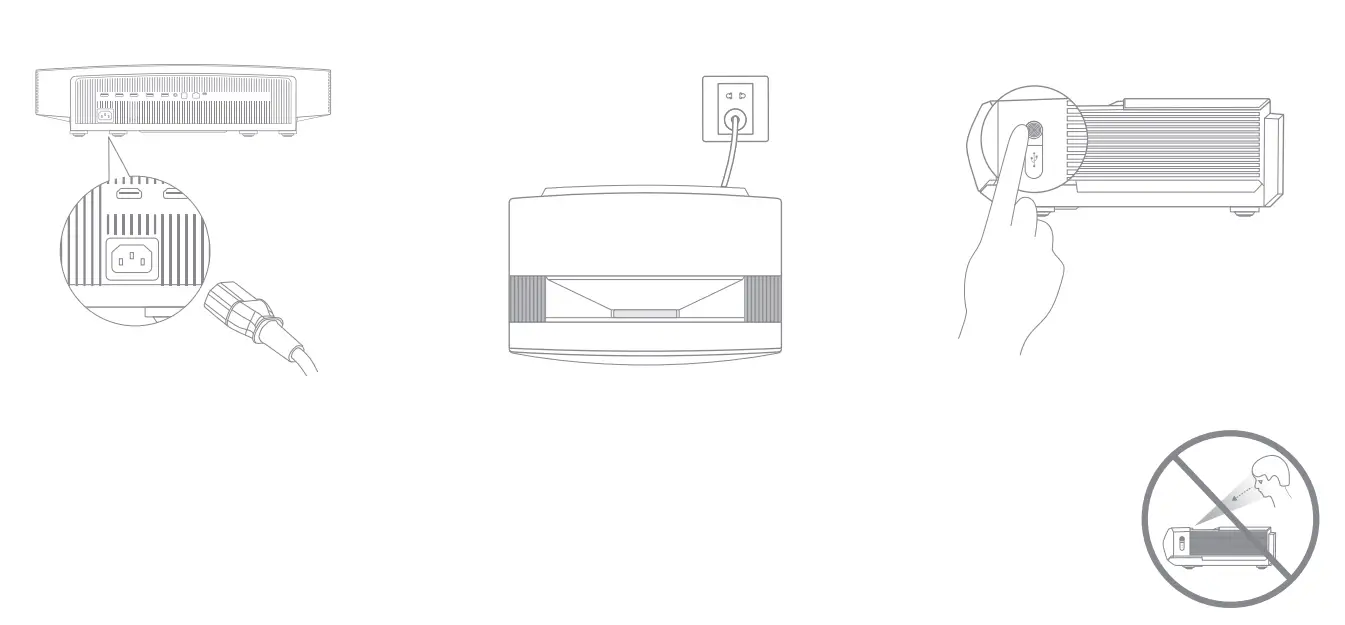
- Do not face lens into eyes because the strong projector light may cause injury to the eyes.
- Do not block the air inlet/outlet of the device in order to avoid damage to internal electronic devices arising from normal heat dissipation failure of the device.
- Do not wipe the lens directly with cleaning tools including paper and cloth in order to avoid damage to the lens. Please clean up the dust on the lens surface through clean air blowing.
- Do not wash the device with chemicals, detergents, or any liquid in order to prevent the circuit board from being corroded by rainwater, moisture, and mineral-containing liquids.
- Keep the device and its components and accessories out of reach of children.
- Make sure that the device is used in a dry and ventilated environment.
- Do not store the device in overheated or overcooled places, because extreme temperatures will shorten the life of electronic devices. Place and use the device in an environment of 0°C-40°C.
- Do not put the device into any heating equipment (such as dryer and microwave oven) for drying.
- Do not firmly extrude the device or place barriers on it or its back to avoid damage to the device.
- do not throw, strike, or sharply vibrate the device to avoid damage to the internal circuit board.
- Do not try to disassemble and assemble the device yourself. If any issue occurs, please contact the after-sales service ofXGIMI.
- Do not repair any product on your own. If the device or any component cannot work properly, consult the after-sales service of XGlMI in a timely manner or return it to the factory for repair.
What’s Included
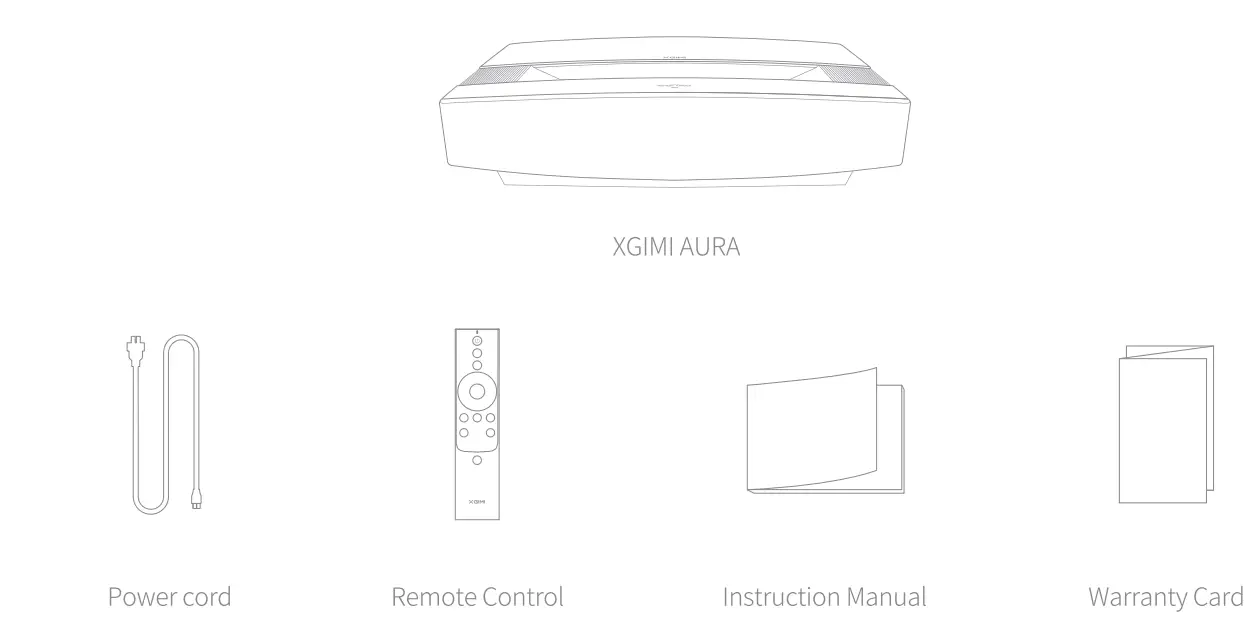
Note: Please keep the original package in case of needed transportation in the future. To protect the product, please wrap it how it was received.
Overview
Front & Top View 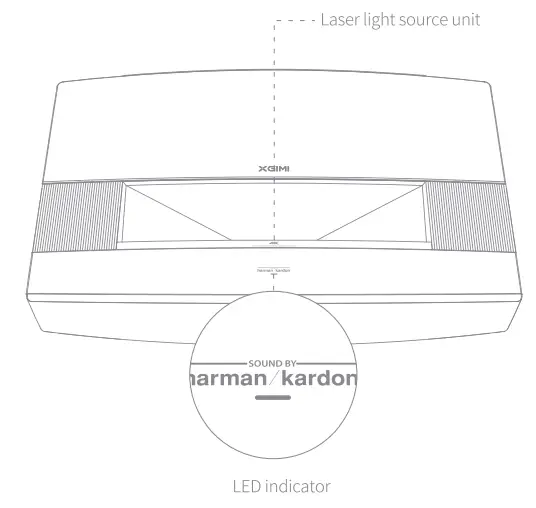
| LED STATUS | DESCRIPTION | |
| I. | Orange Light
Steady-cn for seral seconds | The device(, is powered on after plugging in the power cord. |
| 2. | White Light Flashing | Tht:1 device is powering on/off. |
| 3. | White Light Steady-on | The device is powered on with the “Display Off”. |
| 4. | Orange Light Blinking | Th+:1 firmware is updating. |
Side View (right) 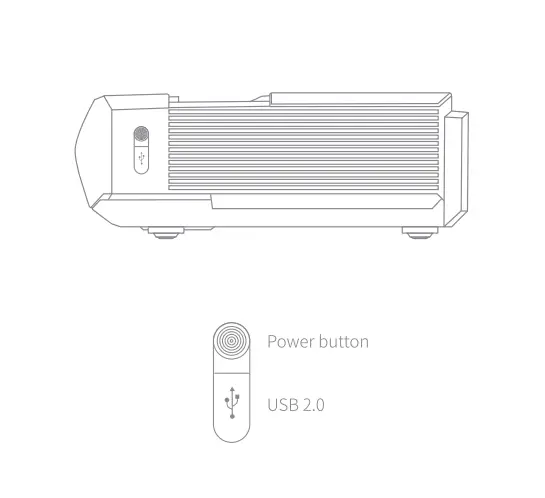 Rear View
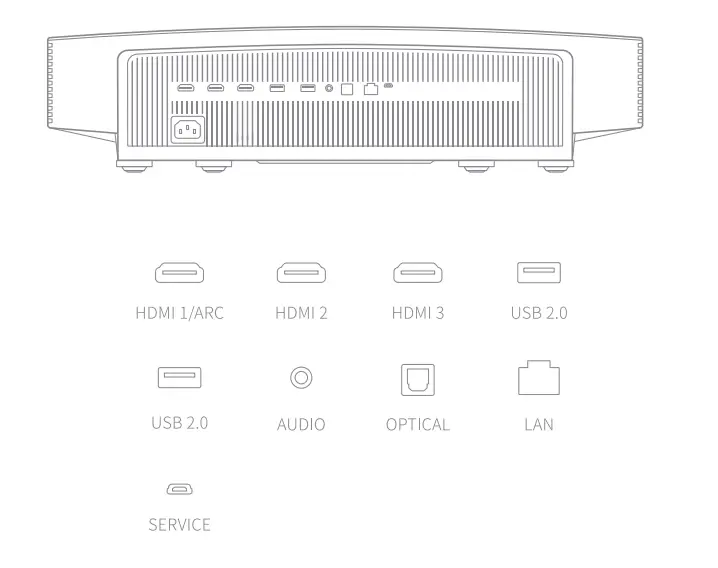
Note: Use HDMI 2.0 cables when using HDMI 2.0 interfaces.
Remote Control  Getting Started
 Getting Started
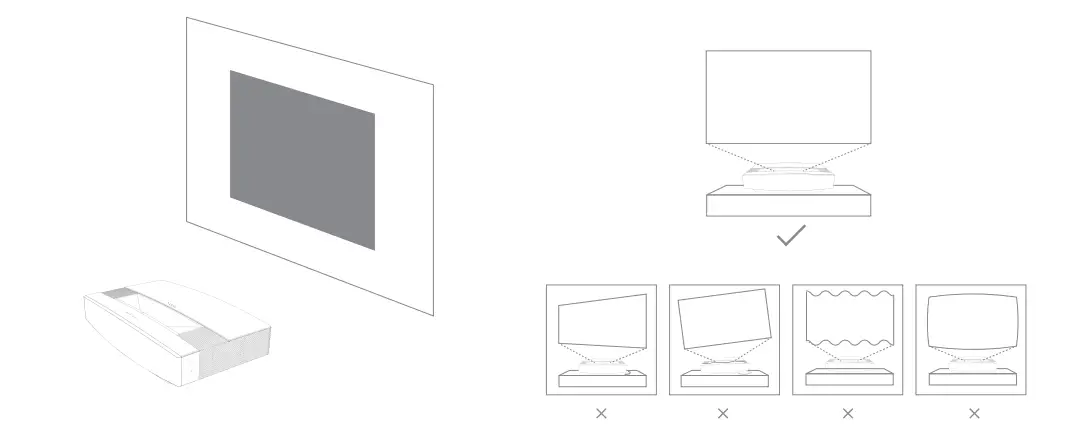
- Placement
Place the projector on a stable, flat surface and ensure the lens is aligned with the projection plane (display wall/surface). The rear of the projector should be parallel to the projection plane.
To achieve optimal projection, make sure the projection plane is white and flat, or you can use a projector screen. The wall for projection should be larger than the size of your desired image.
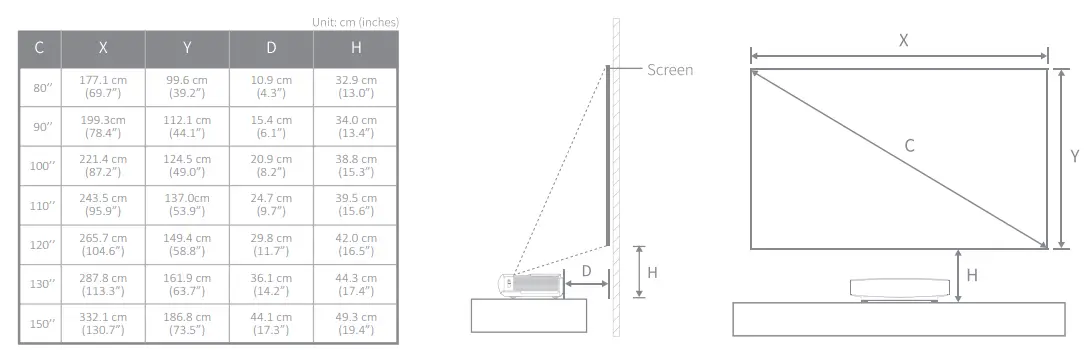
The screen sizes for each projection distance may differ depending on the installation environment.
- Using the Remote Control
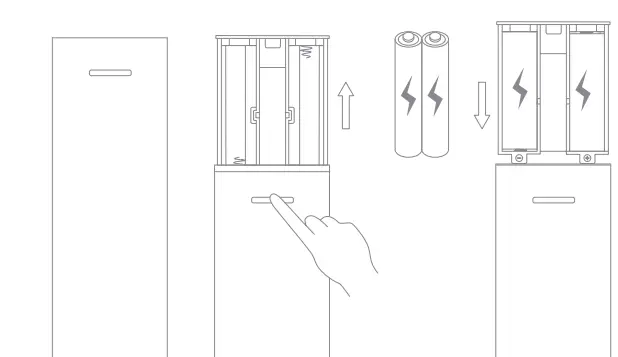
- Upon the first use, press the battery compartment release button on the back of the remote control to remove the battery compartment.
Then, insert two AAA batteries. - When you insert the batteries, make sure that the+ and – symbols on the batteries match the+ and – symbols inside the battery compartment, and then

- Upon the first use, press the battery compartment release button on the back of the remote control to remove the battery compartment.
- Powering on the Device
- Connect the power cord to the XGIMI AURA
- Connect the power cord to the power socket.
- Press the power button to turn on the device.
 Ensure the remote control is within 10 cm of the device, press and a simultaneously until the indicator light begins flashing. This means that the remote control has entered pairing mode. When you hear a “Ding”, the connection is successful. If pairing fails, the remote control will exit pairing mode after 30 seconds. Repeat the above steps after exiting.
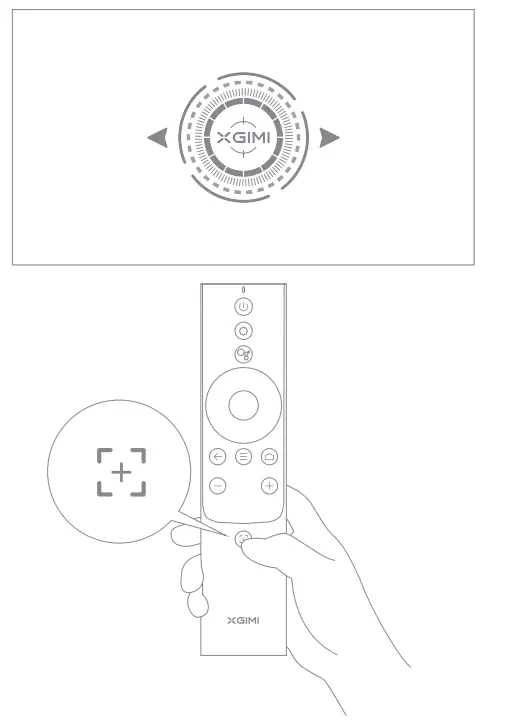
- Adjusting the Focus
Press the:+; button to enable manual focus adjustment. You can manually adjust the focus by pressing the “left/right” button or the “VOL+/-” button. After adjusting, you can press any other button to exit.
- Setting Up Android TV
After the remote control is paired, follow the onscreen instructions to complete the Android TV setup.- Quick Setup (Android)
Android users can follow the onscreen instructions to quickly set up Android TV with their smartphones. - set upXGIMI AURA (iOS)
For iOS users, follow the instructions below to complete the setup:
- Skip the quick setup process.
- Connect XGIMI AURA to your network.
- Log in with your Google account.
YourXGIMI AURA will be powered by Android TV after the setup process is complete.
- Quick Setup (Android)
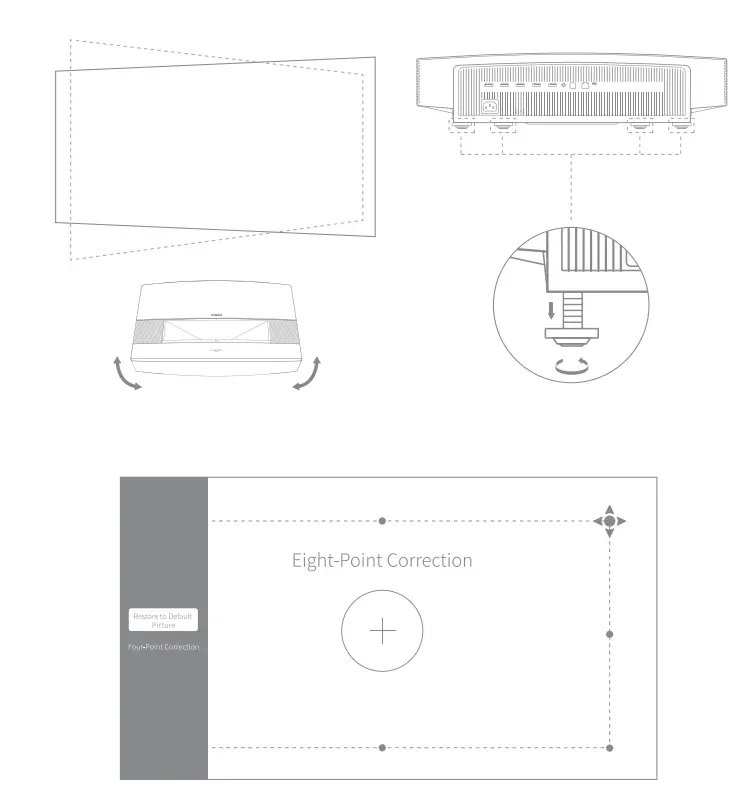
- Adjusting the Projection Picture
Adjust the picture angle by moving the projector left or right or by altering the tilt angle adjustment foot at the bottom to make the screen rectangular.
If you still think the projection picture is not square enough, use the remote control to open [Settings], select [Projector Settings]-> [Keystone Correction]-> [Manual Keystone Correction], and then choose the adjustment points to alter the projection picture further.
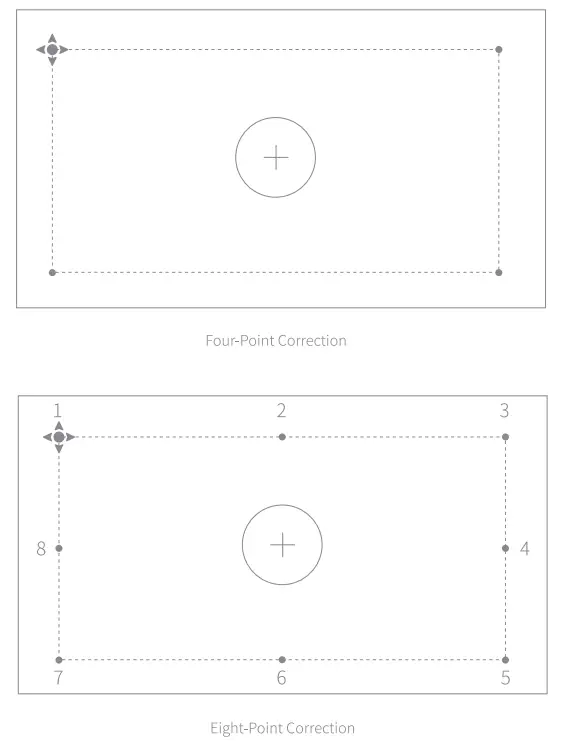
Manually adjust the projection picture by using one of the following two methods:
Four-point correction: Manually correct the projection picture by adjusting the 4 points. Press OK to switch adjustment points.
Eight-point correction: A better way to fine-tune the projection picture compared to four-point correction. Apart from the adjustment points 1, 3, 5, 7, you can alter the edge of the image by adjusting points 2, 4, 6, and 8.
 Ensure the remote control is within 10 cm of the device, press and a simultaneously until the indicator light begins flashing. This means that the remote control has entered pairing mode. When you hear a “Ding”, the connection is successful. If pairing fails, the remote control will exit pairing mode after 30 seconds. Repeat the above steps after exiting.
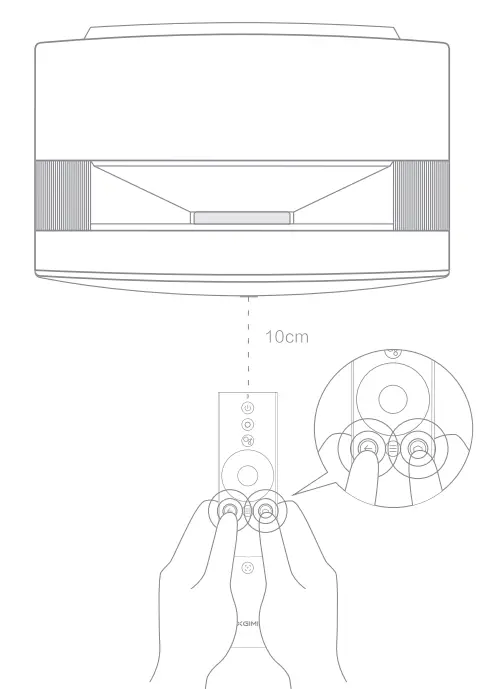
UsingXGIMIAURA
- Android TV Features
After the projector is connected to a wireless network, you can access Android TV online services and enjoy movies, music, and pictures. In addition to the
pre-installed apps, you can also install other apps from the Google Play store and ask Google Assistant to help via various voice commands.
Press the Google Assistant button on your remote to search for movies and shows, get recommendations and answers, control smart home devices, and more.
You can project photos, videos, and music from your smartphone or PC directly to your projector.- Play a video clip with a smartphone or PC app that supports Chromecast built-in”, and then select on the screen.
- Select the target device, “XGIMI AURA”, to begin projecting your smartphone content.
Note: Make sure the projector and your smartphone or PC are connected to the same network.
- Bluetooth
Connect a Bluetooth speaker- Open [System Settings]-> [Remotes & Accessories]-> [Add New Device].
- Search for and pair with a Bluetooth speaker.
To switch back to the projector speaker while the Bluetooth speaker is connected, press O, and then select [Sound Output]-> [Internal Speaker]
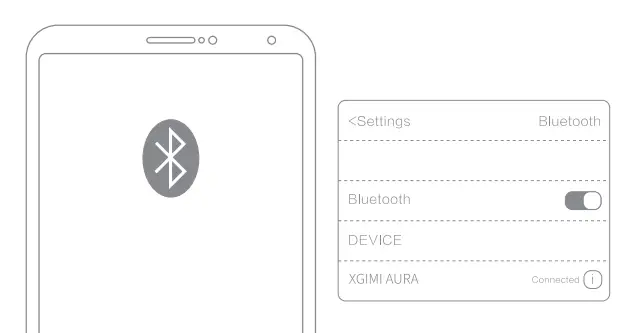
Play music via Bluetooth
Use smartphone Bluetooth settings to search for “XGIMI AURA” to pair with the device and play songs.
- XGIMI Apps
XMusic Player
XMusic Player is a built-in music playerforXGIMI AURA and can play local music or music via Bluetooth. In the XMusic Player app, you can select different playback wallpapers to achieve an immersive listening experience.
If you need to turn off the projection frame during music playback, you can press the l’.l button and select “Display Off”.
Bluetooth music: When your smartphone Bluetooth is connected to XGIMI AURA, the XMusic Player app will open automatically. You can also select O on the homepage to go to the app list and open the app.
Local music: You can access an internal or external storage device using the built-in app File Manager. Open a music file, and it will play on the XMusic Player app by default.
Note: Some wallpapers may contain flashing lights and spectrums that may trigger epileptic seizures. If you experience dizziness, convulsions, or vision changes, switch the wallpaper to “Classic CD” and seek medical attention.
File Manager
Use the File Manager app to view files on the device storage or external storage.- On the home page, click
 Apps to open the app list. Select File Manager, and then select the device storage or external storage device.
 - Press and hold on to the “Settings” button to manage files. Press the “Menu” button for more actions.
Note: According to Android TV security requirements, you can only read files from external storage devices but cannot copy and paste these files.
- On the home page, click
- Settings
At any interface, you can press the O button on the remote control to quickly adjust the settings on your device. To configure more settings, go to the [All Settings] page.
The main settings include:
Brightness and Color
Select a brightness mode, such as standard, bright, or eye-protection, and adjust the brightness level.
To customize the brightness and color of the picture, you can select “Custom mode”.- Standard: Used when watching films.
- Bright: Brighter than Standard mode.
- Eye-protection: Reduced blue light, preventing eye fatigue or strain.
- Performance: Recommended when you highly demand brightness.
- Custom: Customize the RGB value and 10-class brightness level.
Image Mode
When watching content via HDMI or watching videos, select different image modes for different scenarios, such as movie, football, office, and game, to enjoy the optimal viewing experience. - Movie: Ideal for watching films or TV series thanks to its cinematic picture quality.
- Football: Ideal for watching football games.
- Office: Ideal for office use.
- Game: Ideal for playing video games thanks to its low latency rates.
- Custom: Customize image parameters such as contrast, saturation, sharpness, noise reduction level, and motion compensation level.
Sound Effect
XGIM I AU RA offers you professional sound quality with DTS Studio Sound and Harman Kardon. Select different sound effects for different scenarios, such as movie, music, and sport, to enjoy the optimal sound experience.
- System Upgrade
Check for the latest version and upgrade the system by selecting [Settings]-> [Device Preferences]-> [About]-> [System Update].

FCC warning
The device meets provisions of part 15 of FCC rule. Operation meets the following 2 conditions:
- the device will not cause harmful interference, and
- the device must accept any interference received, including interference that may result in accidental operations.
User ma nu al or operating instructions shall remind users that intentional or unintentional modification and replacement of radiators without explicit approval from the responsible compliance party may prevent the user from operating the device. If the manual is provided in a form other than paper, such as, provided in computer disk through the Internet, then the information required in the section can be included in the manual in the alternative form under the premise that users can have access to the form information.
Notes: the device has been tested to meet restrictions of part 15 of FCC rule on B-class digital device. These restrictions are aimed at providing the effective prevention of harmful interference in a residential installation. If installation and use are not made according to the instructions, the device will generate and radiate radio frequency energy, and may cause harmful interference to radio communication. However, there is no guarantee that interference will not occur in a particular installation. If the device does cause harmful interference to radio or television reception (determined by stopping and starting the device), it is suggested that users should attempt to correct the interference by one or more of the following measures:
- Reposition direction of receiving antenna.
- Increase the distance between the device and the receiver.
- Connect the device into an outlet on a circuit different from that to which the receiver is connected.
- Consult distributors or experienced radio/television technicians to seek help
- This device is acting as a slave and operating in the 2.4 GHz (2402-2480 MHz, 2412-2462 MHz) band or 5 GHz (5.180 GHz-5.240 GHz, 5.260 GHz-5.320 GHz, 5.500 GHz-5.700 GHz, 5.745 GHz-5.825 GHz) band.
CE Maintenance
- Use careful with the earphone maybe excessive sound pressure from earphones and headphones can cause hearing loss.
- The product shall only be connected to a USB interface of version USB2.0.
- EUT Operating temperature range: 0°C-40°C.
- Power supply and ADP (rating):
AC 100 V-240 V, 50/60 Hz, 3.5A. - To prevent possible damage to hearing, do not listen at high volume levels for long periods.
- The device complies with RF specifications when the device is used at a distance of 20 cm away from your body.
Declaration of Conformity
Chengdu XGIMI Technology Co., Ltd. hereby declares that this product is in compliance with the essential requirements and other relevant provisions of Directive 2014/53/EU.
This product is allowed to be used in some of EU member states. For example, the device can be used in the following Member States:
Operations in the 5.15-5.25 GHz band are restricted to indoor usage only.
This Frequency applies to the following Member States or the geographical area within a Member State where restrictions on putting into service or requirements for authorization of use exist.
The appliance coupler is used as a disconnect device, the disconnect device shall remain readily operable.
IC Warning
This device complies with Industry Canada licence-exempt RSS standard(s). Operation is subject to the following two conditions:
- This device may not cause interference, and
- This device must accept any interference, including interference that may cause undesired operation of the device.
Radiation Exposure Statement
For remote control, this device complies with FCC and IC radiation exposure limits set forth for an uncontrolled environment.
The transmitter shall not be placed or operated in conjunction with any other antenna or transmitter.
For the laser projector, the device meets FCC and IC radiation exposure limits specified for uncontrolled environments. In the installation and operation of the device, the distance between the radiator and the body should be at least 20 cm.
Notes: 5150-5250 MHz frequency range is only for indoor use.
This Frequency applies to the following Member States or the geographical area within a Member State where restrictions on putting into service or requirements for authorization of use exist.
Disposal instructions for used products:
- The product is designed and manufactured with high quality
- materials and components that are recyclable.
This is under the symbol on Directive the product 2012/19/EU. indicates that it is protected
WARNING
- Do not open to avoid the risk of electric shock.
- Of the internal check, please contact the authorized customer service center.
- Possibly hazardous optical radiation is emitted from this product. Do not stare at the operating beam. May be harmful to the eye.
As with any bright source, do not stare into the direct beam, RG2 IEC 62471-5:2015
Complies with 21 CFR 1040.10 and 1040.11 except for conformance with IEC 60825-1 Ed. 3., as described in Laser Notice No. 56, dated May 8, 2019.
IEC 60825-1:2014
- Only use attachments/accessories specified or provided by the manufacturer.
- Beware that this product may emit harmful light radiation.
FAQS
The 3D playback feature has to be manually implemented because the projector does not know which 3D format you are using.
Are you using up/down, or side by side? Once you choose the 3D function menu, you then have to tell it
what format and the projector take it from there.
What’s even more interesting with this feature is that the projector has the ability to convert 3D formatted movies back into 2D in real-time. This means that if you did not charge your 3D glasses or don’t feel like wearing them, you can watch a 3D movie in 2D just like we did before 3D movies were invented.
If you are asking if it’s possible to watch a 3D movie on this projector without the proper 3D glasses, the answer is NO.
That same answer applies to most if not all of the remaining video devices that can display 3D content.
There was a company that made a prototype TV that could display 3D video content without 3D glasses. That prototype was also on display at the CES show years ago but it never went into production due to the high cost of manufacturing.
The only drawback with this glasses free technology is that there is a very small sweet spot for viewing the
image in 3D and as you go off axis to the side of the viewing area, the 3D effect is diminished accordingly.
Yes as long as they are hdmi connections.
None really. You can attach a dongle to get Netflix; from Amazon Fire TV, google or xgimi’s own dongle is free if you buy it with the projector.
Yes it has one hdmi arc port.
this unit would be easy to mount on the ceiling. You would have to make your own mount. I did this years ago with a CRT projector that was over 200 lbs. Hardest part was getting it to the mount, took 4 of us but I thing it would only take 2 people to lift this to your mount.
XGIMI AURA is a Ultra Short Throw Laser Projector.
For further questions , please contact [email protected]. Thanks for your support and understanding.
No
Half a meter, 50 cm
Typically a projector does not have the processing power to handle the specific software functions as your laptop or tablet computer normally do. So the solution is to connect your laptop or tablet using its HDMI
monitor connection plugged into one of the HDMI inputs on the projector
No
No idea if it is 120, I do know I play 35 gig movies .mkv 2160 with zero issues from a usb flash drive, on a freakin 10 foot screen, it is next level.


