
![]()
Installing the Litter-Robot 3 Drawer Full Indicator
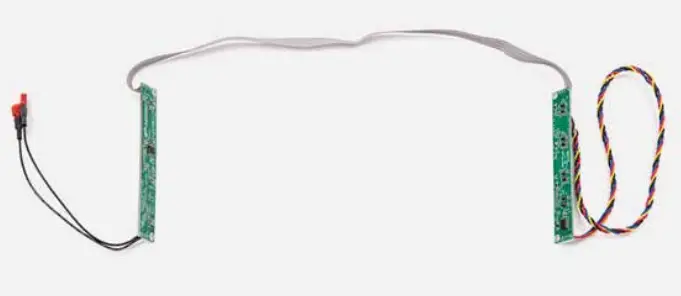
Kit includes: Drawer Full Indicator board assembly, (2) retainers, and (4) screws.
Best Self-Cleaning Litter Box
Installation guide
You will need:
| Needle-nose pliers | |
 | 8-inch #2 Phillips screwdriver (20.3 cm) |
How to install
Preparation:
![]() Press the Power button to turn the unit off and unplug it from the wall. Remove the Bonnet, Globe, and Waste Drawer. For detailed instructions, visit
Press the Power button to turn the unit off and unplug it from the wall. Remove the Bonnet, Globe, and Waste Drawer. For detailed instructions, visit
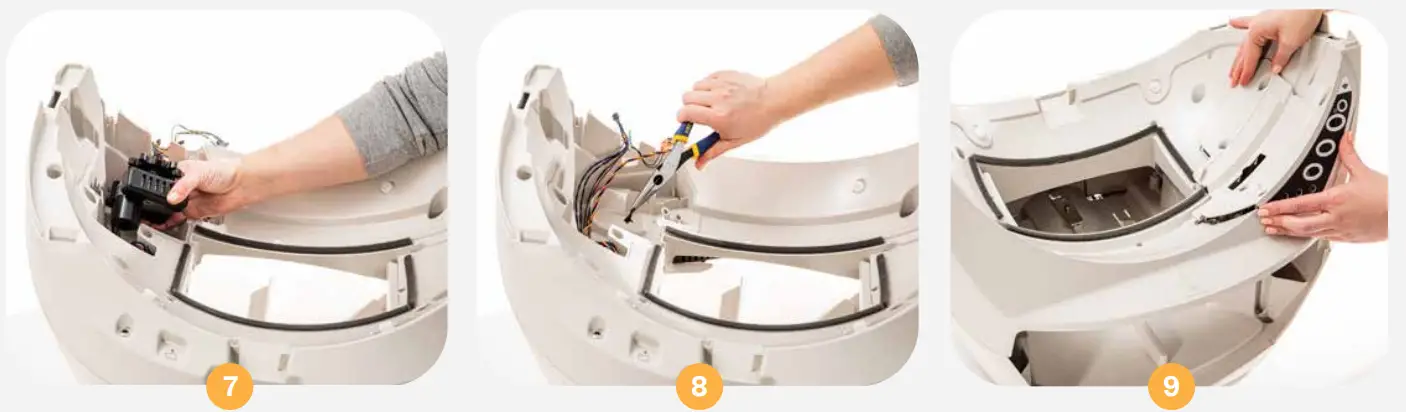
litter-robot.com/owners-manual.html![]() The plastic component that covers the Control Panel on the Base is called the Bezel. Unscrew the 5 screws to remove the Bezel.
The plastic component that covers the Control Panel on the Base is called the Bezel. Unscrew the 5 screws to remove the Bezel.
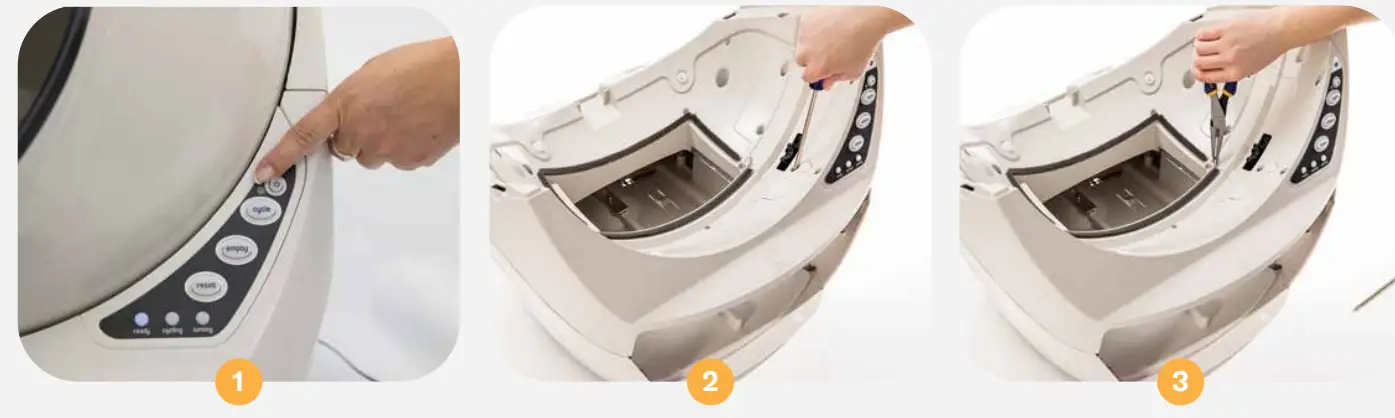
![]() Use needle-nose pliers to lift the Bezel out of place.
Use needle-nose pliers to lift the Bezel out of place.![]() Separate the Bezel from the Control Panel by pushing the buttons through and lifting up. Set the Bezel and screws aside.
Separate the Bezel from the Control Panel by pushing the buttons through and lifting up. Set the Bezel and screws aside.
Note: The Circuit Board and Keypad may be held in place by a piece of tape (assembly aid). If present, simply remove it; it is not required for reassembly.![]() Turn the Keypad/Circuit Board over and unplug the 4-pin connector (that holds the red, yellow, black, and blue Drawer Full Indicator wires).
Turn the Keypad/Circuit Board over and unplug the 4-pin connector (that holds the red, yellow, black, and blue Drawer Full Indicator wires).
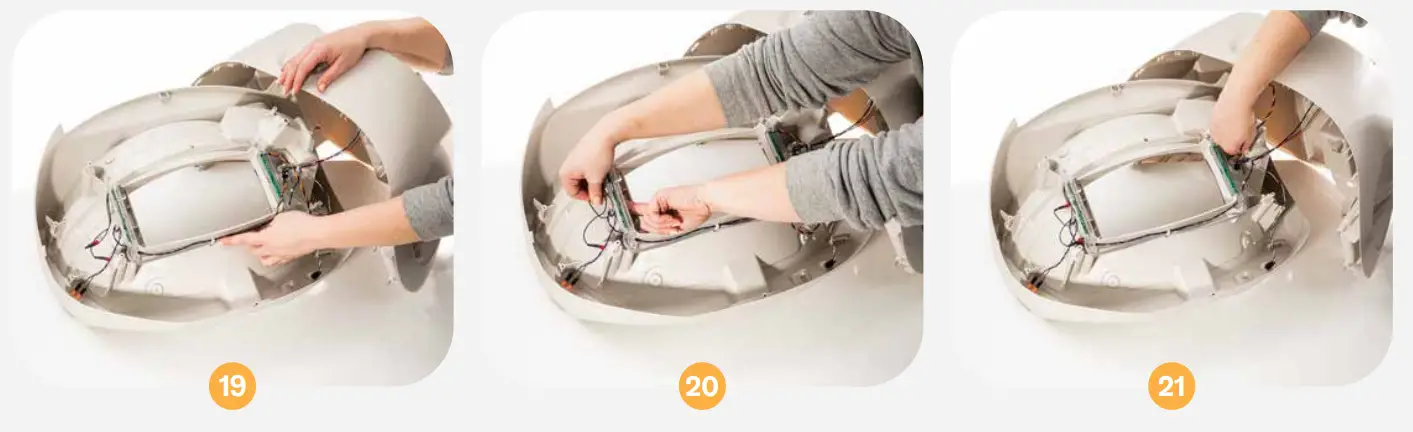
![]() Free the Drawer Full of Indicator wires by peeling back the piece of tape that holds the wires in the channel and out of the way of the Motor.
Free the Drawer Full of Indicator wires by peeling back the piece of tape that holds the wires in the channel and out of the way of the Motor.
Note: It is best to reuse the tape. If the tape cannot be reused, replace it with a piece of stretchable tape that adheres strongly to the Base to ensure it will remain in place over time. We recommend Scotch 8884 Stretchable tape or something comparable.![]() Lift the Motor to free the Drawer Full of Indicator wires from underneath it.
Lift the Motor to free the Drawer Full of Indicator wires from underneath it.![]() Use needle-nose pliers to pull the black wire stopper out of the Base and feed the Drawer Full Indicator wires down the hole.
Use needle-nose pliers to pull the black wire stopper out of the Base and feed the Drawer Full Indicator wires down the hole.
![]() To keep the Motor, wires, and Circuit Board in place during the next steps, replace the Bezel. To do this, hold the Circuit Board upright and it the Bezel over it, so the buttons come through the Control Panel. Lower it into place on the Base, then tighten any of the screws.
To keep the Motor, wires, and Circuit Board in place during the next steps, replace the Bezel. To do this, hold the Circuit Board upright and it the Bezel over it, so the buttons come through the Control Panel. Lower it into place on the Base, then tighten any of the screws.
Remove old Drawer Full Indicator Board Assembly:
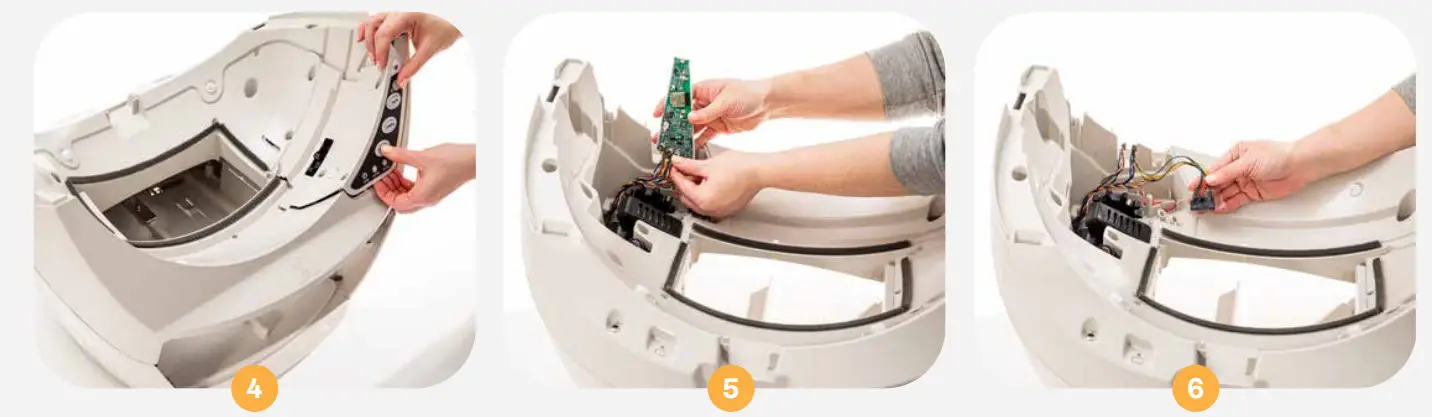
![]() Gently turn the Base over and unscrew the 9 screws that attach the two halves of the Base.
Gently turn the Base over and unscrew the 9 screws that attach the two halves of the Base.![]() Lift the top half of the Base away from the bottom and set it to the right (remember: there are still connected wires).
Lift the top half of the Base away from the bottom and set it to the right (remember: there are still connected wires).
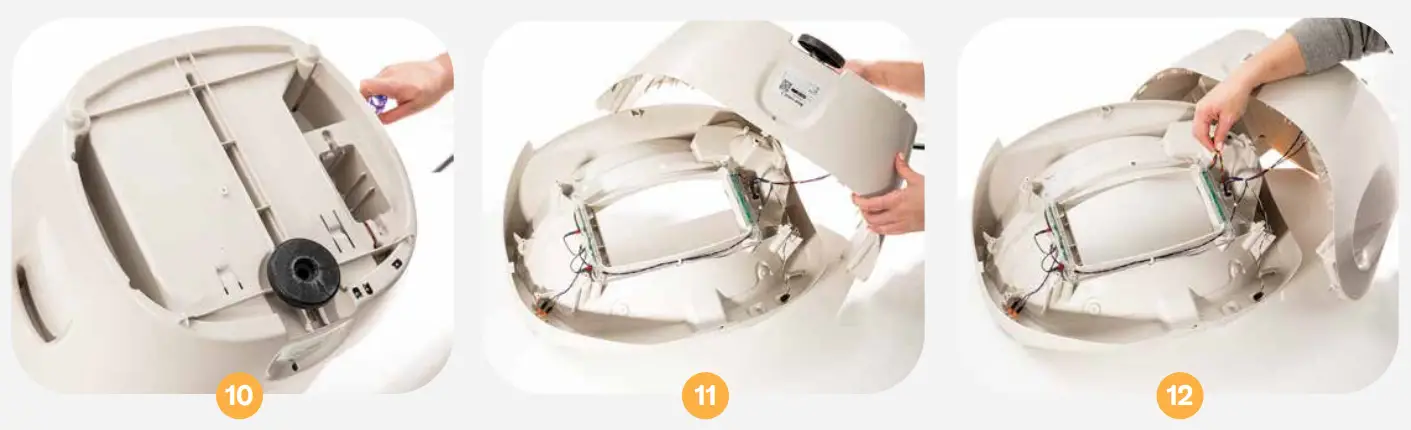
![]() Locate the Drawer Full Indicator Boards on either side of the opening. On the right, pull the Drawer Full Indicator wires through the hole if they are not already through.
Locate the Drawer Full Indicator Boards on either side of the opening. On the right, pull the Drawer Full Indicator wires through the hole if they are not already through.![]() On the left, locate the two black wires and use needle-nose pliers to separate the connectors from the terminals.
On the left, locate the two black wires and use needle-nose pliers to separate the connectors from the terminals.![]() On each side, remove the 2 screws that attach the Drawer’s Full Indicator Boards to the Base.
On each side, remove the 2 screws that attach the Drawer’s Full Indicator Boards to the Base.
![]() On the front edge of the opening, free the gray ribbon cable from under the hook.
On the front edge of the opening, free the gray ribbon cable from under the hook.
Install new Drawer Full Indicator Board Assembly:
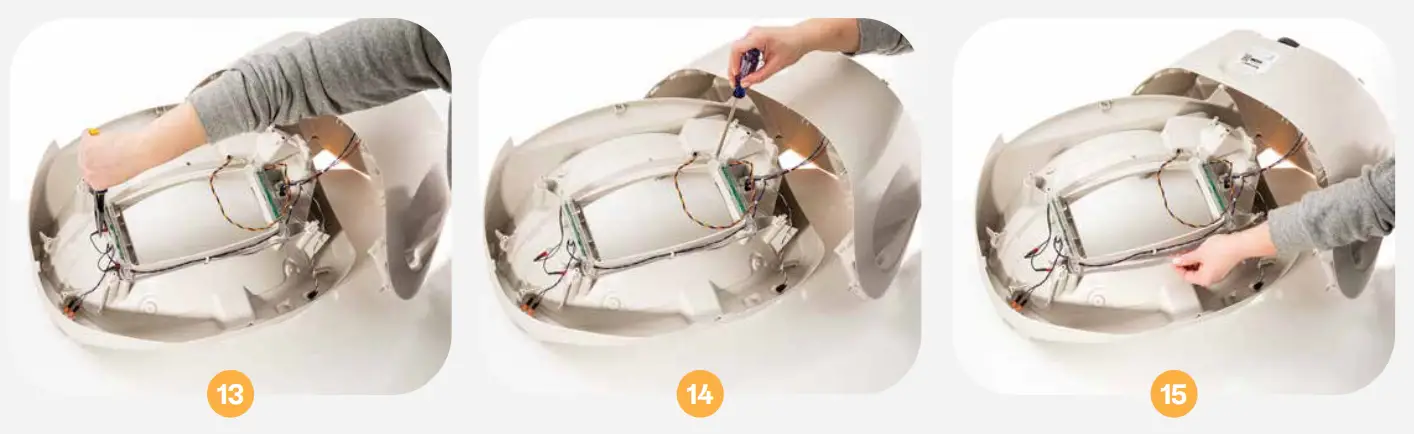
![]() Lift the Drawer Full Indicator Board retainers off the Base.
Lift the Drawer Full Indicator Board retainers off the Base.![]() Take the new Drawer Full Indicator Board Assembly and orient it so the black wires are on the top left and the Drawer Full Indicator wires are on the top right.
Take the new Drawer Full Indicator Board Assembly and orient it so the black wires are on the top left and the Drawer Full Indicator wires are on the top right.
Make sure the gray ribbon cable is not twisted and is out of the way of the screw bosses as you push the retainers onto the Base.
Note: The Drawer Full Indicator Circuit Board and brackets might look slightly different depending on when the unit was manufactured.
![]() Replace the 4 screws to secure the two retainers onto the Base.
Replace the 4 screws to secure the two retainers onto the Base.![]() Tuck the gray ribbon cable under the retainer clip (and over the wires that are already there).
Tuck the gray ribbon cable under the retainer clip (and over the wires that are already there).![]() Push the spade connectors on the black wires onto the metal terminals (in any order and orientation). To reduce stress on the component, it is best to place a finger opposite the connector as you apply pressure.
Push the spade connectors on the black wires onto the metal terminals (in any order and orientation). To reduce stress on the component, it is best to place a finger opposite the connector as you apply pressure.
Note: Make sure the metal terminal is inserted into the metal connector and not accidentally pushed into its red case.
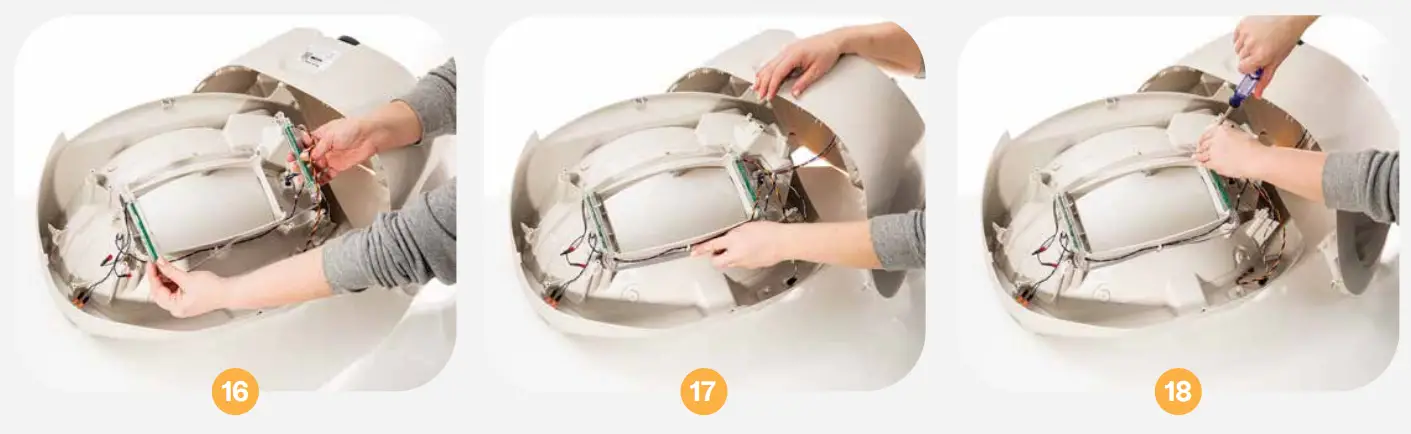
![]() On the right, feed the Drawer Full Indicator wires through the hole, so you can access them later.
On the right, feed the Drawer Full Indicator wires through the hole, so you can access them later.

![]() Replace the other half of the Base, making sure the top and bottom halves of the screw bosses align.
Replace the other half of the Base, making sure the top and bottom halves of the screw bosses align.
BEFORE tightening any screws, carefully rotate the Base and look through the front where the Waste Drawer would be. Make sure the wires on the left are to the left of the screw boss, so they do not get in the way of the Waste Drawer. You may have to lift the Base apart to reposition the wires.![]() Once everything is seated correctly, tighten the 9 screws. Be careful not to ovetighten.
Once everything is seated correctly, tighten the 9 screws. Be careful not to ovetighten.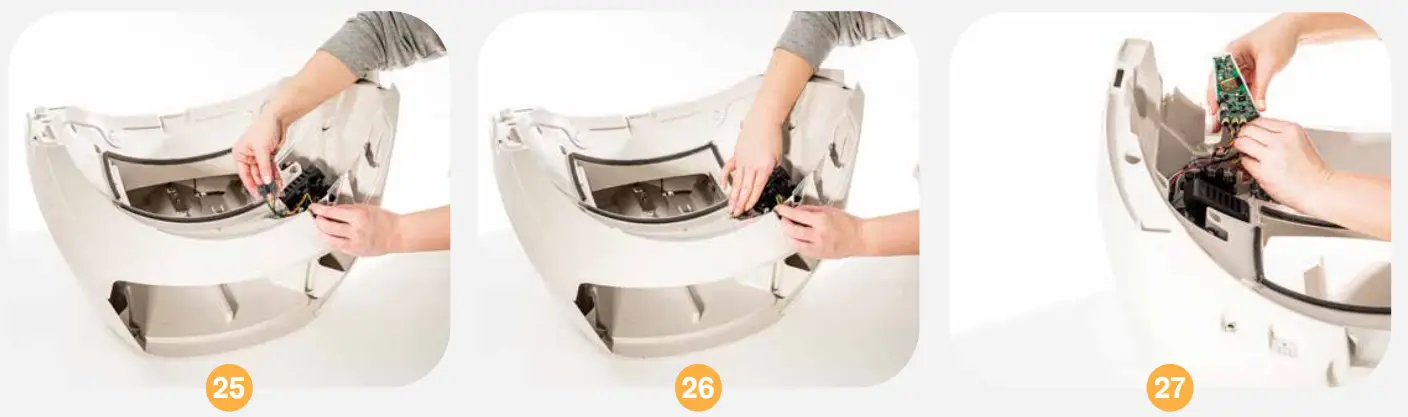
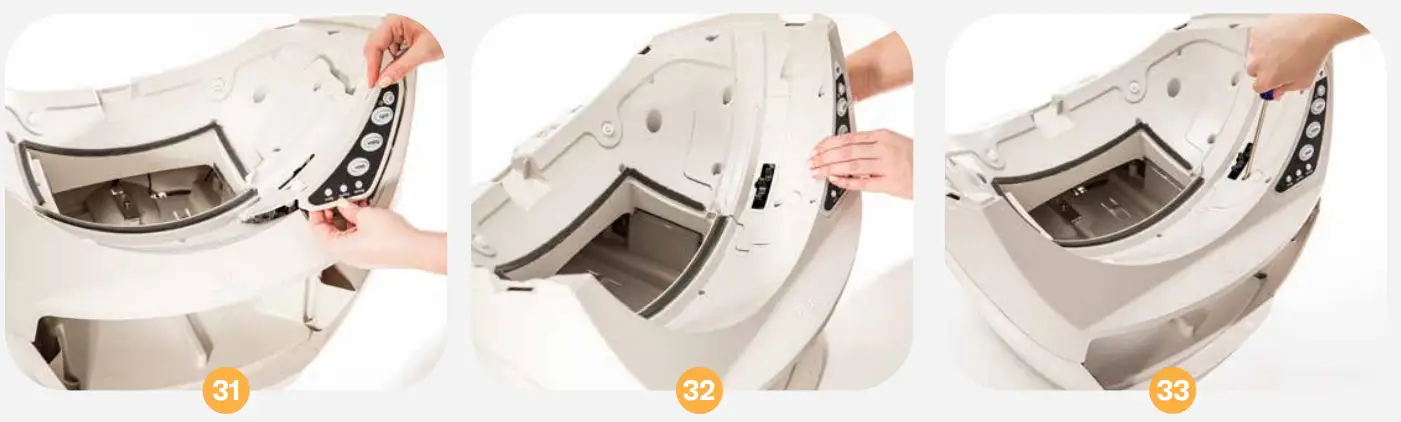
![]() Turn the Base right side up and unscrew the Bezel. Lift it up, press the buttons to free it, and set it aside. See page 1 for detailed instructions.
Turn the Base right side up and unscrew the Bezel. Lift it up, press the buttons to free it, and set it aside. See page 1 for detailed instructions.![]() Locate the Drawer Full Indicator wires that you pushed through the hole.
Locate the Drawer Full Indicator wires that you pushed through the hole.![]() Gently lift the Motor to seat the Drawer Full Indicator wires in the channel below it, and continue placing the wires in the channel in front of the Motor.
Gently lift the Motor to seat the Drawer Full Indicator wires in the channel below it, and continue placing the wires in the channel in front of the Motor.![]() Reconnect the 4-pin connector to the Circuit Board in the bottom left corner. The connector is keyed (there is a top and bottom), so it will only trt on one way; if you feel
Reconnect the 4-pin connector to the Circuit Board in the bottom left corner. The connector is keyed (there is a top and bottom), so it will only trt on one way; if you feel
resistance, turn it over, and try again.
Reassembly:
![]() Secure the tape over the wires to keep them in the channel and out of the way of the Motor and Gear.
Secure the tape over the wires to keep them in the channel and out of the way of the Motor and Gear.![]() Replace the wire retainer plug by pushing it until it snaps in securely.
Replace the wire retainer plug by pushing it until it snaps in securely.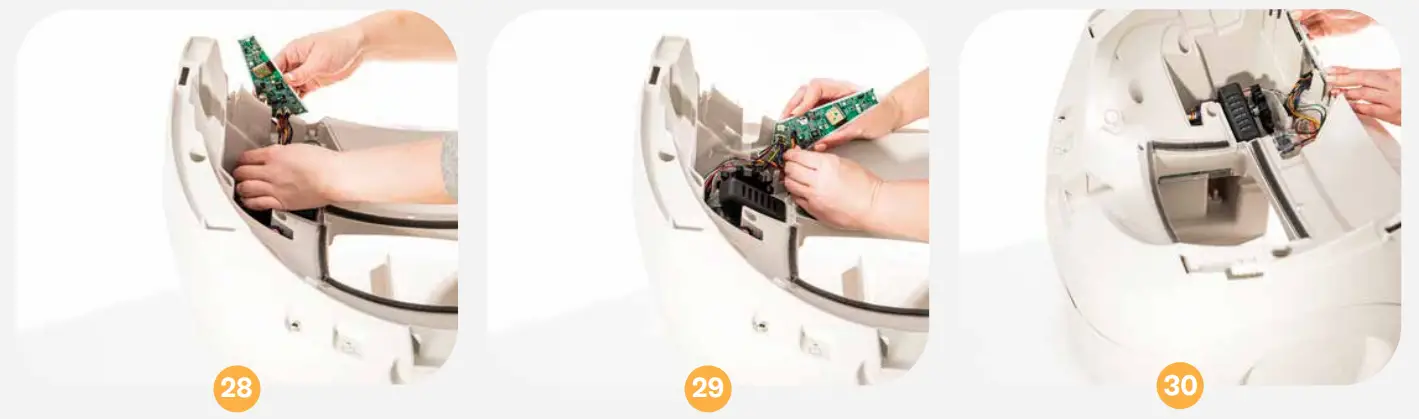
![]() Make sure the wires attached to the Circuit Board are tucked behind it in the wire channel.
Make sure the wires attached to the Circuit Board are tucked behind it in the wire channel.![]() Reassemble the Bezel onto the Circuit Board and Keypad. Hold the Circuit Board upright and fit the Bezel over it, so the buttons come through the Control Panel.
Reassemble the Bezel onto the Circuit Board and Keypad. Hold the Circuit Board upright and fit the Bezel over it, so the buttons come through the Control Panel.
Make sure to keep the Keypad wrapped around the edges of the Circuit Board.![]() Make sure the edges of the Bezel rest flush with the Base.
Make sure the edges of the Bezel rest flush with the Base.
Once in place, look through the opening where the black gear protrudes and make sure no wires are visible. If wires are visible, remove the Bezel, tuck them into the wire channel, and secure them with a piece of tape.
![]() Attach the Bezel by tightening the 5 screws. Do not over-tighten.
Attach the Bezel by tightening the 5 screws. Do not over-tighten.

![]() Reassemble the Globe, Bonnet, and Waste Drawer. Plug the unit in, turn it on, and let the initial Clean cycle finish. The Globe should return to the Home position with the blue Ready light on.
Reassemble the Globe, Bonnet, and Waste Drawer. Plug the unit in, turn it on, and let the initial Clean cycle finish. The Globe should return to the Home position with the blue Ready light on.
If your unit does not cycle or does not cycle properly, review your installation.
LR3-8051-0c
Questions? Visit
whiskersupport.com


