
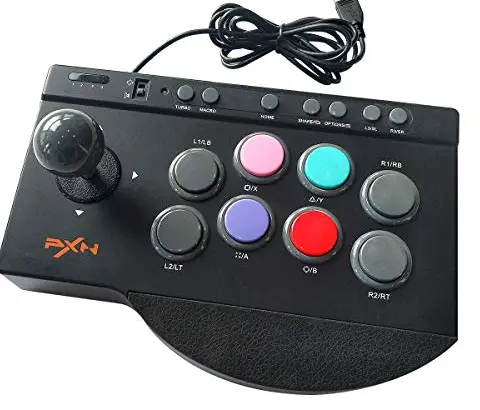
PXN 0082 Arcade Fight Stick
System Requirements
Support Platform
PC / PS3 / PS4 / Switch / Xbox One / Xbox Series X&S
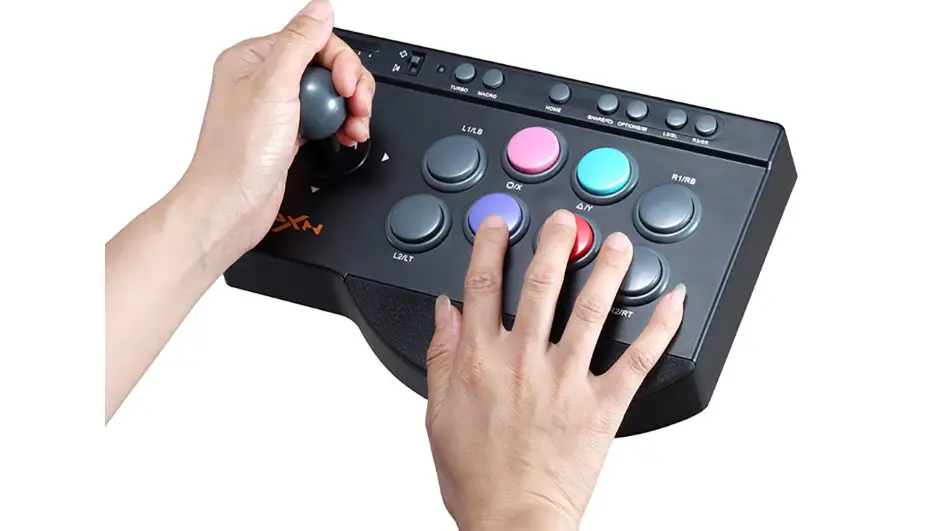
Product Overview

PC Connection
- Step 1 Plug the USB of Joystick into the computer USB interface.
- Step 2 At the first connection, your computer will find new hardware and install the driver automatically.
Testing
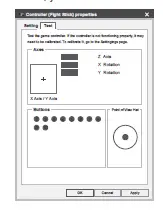
It Can test function buttons and stick through computer game controller on PC. The specific methods show below:
WIN XP/7/10: enter Control Panle → Devices and Printers → controlller icon → right click with your mouse → Game controller settings, choose Properties test.
Open the test interface as below, you can test the axes and buttons.
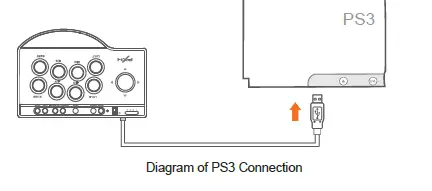
PS3 Connection
- Step 1 Plug the USB of Joystick into the PS3 USB interface, power on the console.
- Step 2 After connection, the console will allocate a channel to Joystick and the compared indicator light on. You can start to play gameor set functions of console.
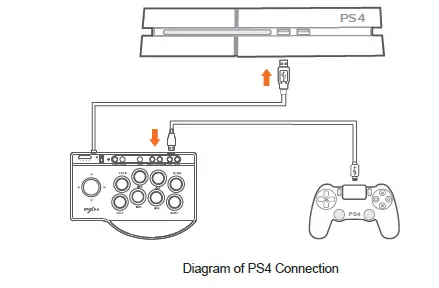
PS4 Connection
- Step 1 Power off the original controller of PS4.
- Step 2 Connect the Joystick with PS4 controller by Micro USB cable.
- Step 3 Plug the USB of Joystick into PS4 USB interface.
- Step 4 Press the button of “HOME” . After that the Joystick can start to play game and setting.
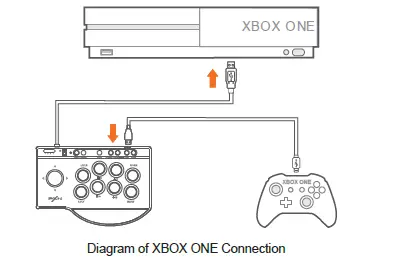
XBOX ONE /XBOX SERIES X&S Connection
- Step 1 Power off the original controller of Xbox One /Xbox Series X&S.
- Step 2 Connect the Joystick with console controller by Micro USB cable.
- Step 3 Plug the USB of Joystick into console USB interface.
- Step 4 Press the button of “HOME” . After that the Joystick can start to play game and setting.
SWITCH Connection
- Enter System settings
 Controllers and Sensors, Select Pro Controller Wired Communication. The option state is ON.
 - Connect With Switch Console
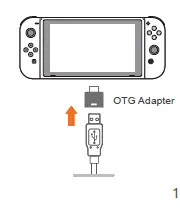
- Step 1 Connect the TYPE-C OTG with the USB of Arcade Fightstick.
- Step 2 Connect the USB main cable of the Arcade Fightstick to Switch Console.
- Step 3 Power on switch console to play.

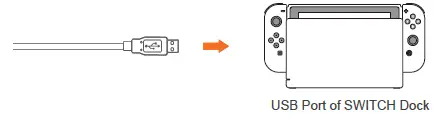
- Connect With Switch dock
- Step 1 Place the Switch dock and ensure successful connection.
- Step 2 Plug the USB of Arcade Fightstick into Switch dock and power on Switch console.

Joystick MODE Change
Turn the switch to the icon of “D-pad+ ”, the joystick is D-pad function on different console application. Turn the switch to the icon of “Controller Joystick ” the joystick is Controller joystick function on different console application.
TURBO Function
- Available Buttons: A、 B、 X、 Y、 LB、 RB、 LT、 RT.
- TURBO Set: Press TURBO and Available Buttons, indicator LED flash.
- TURBO Clear: Press TURBO and Well-Setting Buttons, indicator LED lights off.
MACRO Function
MACRO Function: L3、 R3.
MACRO Sourcing Buttons: A, B, X, Y, LB, LT, L3, RB, RT, R3, Joystick UP/
DOWN/LEFT/RIGHT.
MACRO Setting
- Step 1 Press MACRO, Green LED lights on, press L3 or R3, Green LED flash.
- Step 2 Press Sourcing Buttons what you want to set, after setting, press MACRO and exit, green LED light off.
- Step 3 Press well-setting button with MACRO function, it will act macro action after releasing, green LED flash to indicate.
- The maximum times of setting MARCO function buttons at a time is 15 times. Pressing several buttons meanwhile means 1 time, After 15 times, it will save and exit this setting automatically.
- SHARE and OPTIONS buttons are used as separating key for dividing two identical action keys or delay functions.
MACRO Cancel
- Step 1 Press MACRO, green LED light on, press well-setting buttons of MACRO, green LED flash.
- Step 2 Press MACRO again, green LED light off, cleared.
- Step 3 Re-plug Arcade fight stick or power off and reconnection, MACRO function will be cleared automatically.
Attentions
- Avoid fierce vibration. Don’t take apart, revise and mend by yourself.
- Don’t let water or other liquid entering inside of the gamepad to make any damages.
- Don’t store in places of high humidity, temperature, heavy oil or smoke.
- Don’t drop the gamepad into fire or explosion danger may be caused by built-in battery.
- Children should be under the custody of adults to use this product.
Product Specifications
- Connection USB Cable
- Model PXN – 0082
- Working Current < 25mA
- Packaging Size Appr. 268 * 195 * 114 mm
- Product Size Appr. 250 * 175 * 105 mm
- Unit Weight Appr. 720 g
- Usage Temperature 10-40 ℃
- Usage Humidity 20~80 %


