U S SAWS SX50005G Ultra Vac 1250-G Honda Gas Engine User Manual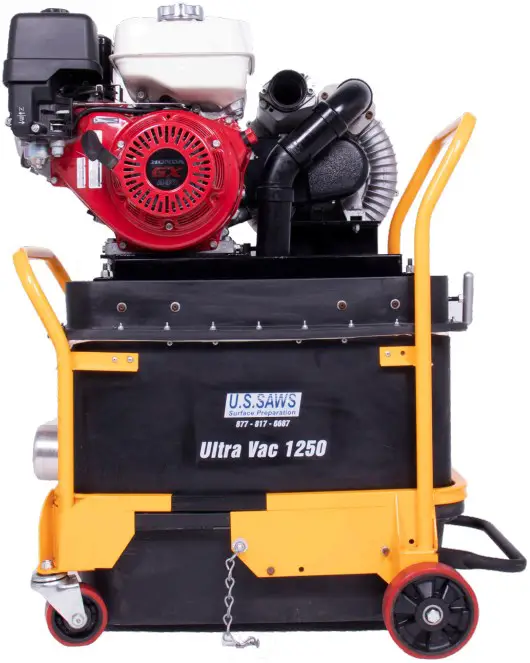
INSTRUCTIONS FOR USE OF MANUAL SECTIONS
Foreword/Introduction
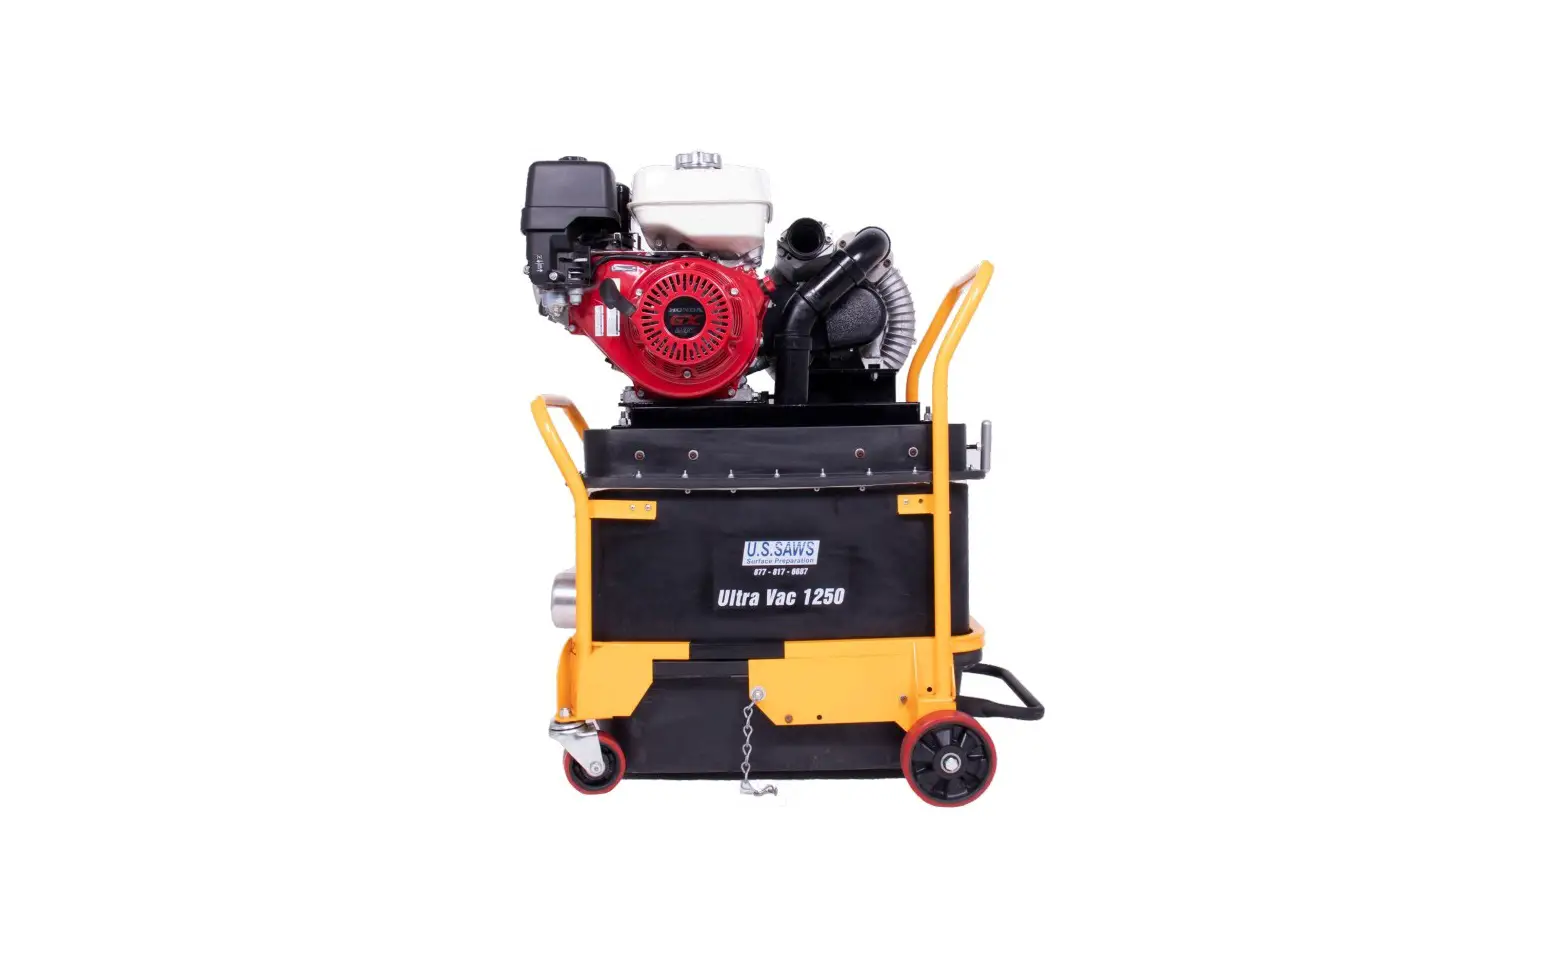
This manual outlines the maintenance and operation of the Ultra Vac 1250-G. This is a professional tool and is intended for use by trained and experienced operators. To get maximum benefit from your tool and to ensure maximum safety, be sure to read this manual thoroughly. You should also periodically review safety instructions. Keep all manuals provided with your equipment in a safe place at all times. The information and specifications included in this publication were in effect at the time of approval for printing. U.S.SAWS reserves the right, however, to discontinue or change specifications or design at any time without notice and without incurring any obligation. The U.S.SAWS Ultra-Vac 1250-G is a heavy duty vacuum designed for collecting concrete dust where a gas powered engine is most convenient. Read this entire operations and maintenance manual before using your new tool. Pay close attention to the Rules for safer operation, This machine is constructed of an all steel tube frame with a polyethylene body for years of use and abuse. Powered by a reliable Honda GX240. This vac comes with a 25’ 3” hose
Disclosure
By purchasing/renting/borrowing/using the Ultra Vac 1250-G, you agree to release U.S.SAWS of any and all liability. Under no circumstances will U.S.SAWS be held liable for incidental or consequential damages resulting from the use of this product and/or defective parts or products associated with this product.
SPECIFICATIONS
| Model | Ultra Vac 1250 Gas |
| Part Number | SX50005G |
| CFM | 450 |
| Water Lift | 115 |
| Dust Bin | 12.5 Gallons |
| Power Source | Honda Gas Engine GX240 |
| Filter Size | 18.3 sq. ft. |
| Weight | 150 |
| Hose Inlet Size | 3” |
| Frame / Body | Tube Steel / High Density Polyethylen |
SYMBOLS & DECALS
For Safe Operation
You must be qualified for safe operation of the U.S.SAWS Ultra Vac 1250- G machine. You must clearly understand the written instructions supplied by U.S.SAWS, be trained – including actual operation – & know the safety rules & regulations for the job site. It is a safety practice to point out & explain safety signs & practices to others & to make sure they understand the importance of following these instructions.
Be Safe
Human error is the result of many factors: carelessness, fatigue, sensory overload, preoccupation, unfamiliarity with the machine or attachments, or drugs or alcohol, to name a few. You can avoid serious injury or death caused by these & other unsafe work practices. Be safe and never assume accidents cannot happen to you. For your safety and the safety of others, act safely and encourage your fellow workers to act safely as well.
Dangers, Warnings and Cautions.
The purpose of safety symbols and explanations are to attract your attention to possible hazards and how to avoid them. The safety symbols and explanations do not by themselves eliminate any danger. The instructions or warnings they give are not substitutes for proper accident prevention measures.
DANGER: Indicates an imminently hazardous situation that if not avoided, will result in death or serious injury. This signal word is limited to the most extreme situations.
WARNING: Indicates a potentially hazardous situation that, if not avoided, could result in death or serious injury.
CAUTION: Indicates a potentially hazardous situation that, if not avoided may result in minor or moderate injury. It may also be used to alert against unsafe practices that may cause property damage.
 Read and understand operator’s manual before using this machine. Failure to follow operating Instructions could result in injury or damage to equipment.
![]() Always wear protective glasses or full face protection
Always wear protective glasses or full face protection
 Wear Head Protection, breathing protection, and the use of hearing protection is mandatory
 Wear safety boots when operating this machine
 Wear appropriate clothing
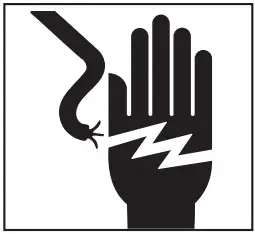
 Wear hand protection
 Wear proper electrostatic grounding equipment at all times
 Wear proper electrostatic grounding equipment at all times
SAFETY INSTRUCTIONS
KNOW THE RULES & YOUR EQUIPMENT.
Most job sites have rules governing equipment use & maintenance. Before starting at a new work location, check with the supervisor or safety coordinator. Ask about any rules or regulations you need to abide.
OSHA enforces federal laws within the United States that apply to the safe operation, application, & maintenance of equipment on job sites. It is the employer’s responsibility to comply with these laws. Do not operate this machine unless you have read the operations and maintenance manual carefully
RECEIVE PROPER TRAINING.
Do not operate this machine unless you have received operational and maintenance training from a U.S. SAWS representative or from an authorized distributor for U.S.SAWS.
PROTECT YOUR FEET.
Observe all applicable local, state and federal safety regulations. Wear OSHA approved foot protection.
PROTECT YOUR EYES.
Observe all applicable local, state and federal safety regulations. Wear OSHA approved safety glasses.
PROTECT YOUR LUNGS.
Breathable silica may be generated by use of this product. Silica can cause severe and permanent lung damage, cancer, and other serious diseases. Do not breath the dust. Do not rely on your sight or smell to determine if the dust is in the air. Silica may be in the air without a visible dust cloud. If air monitoring equipment for silica is not provided by your employer at your work site, you MUST wear appropriate respiratory protection when using or servicing the machine. Consult your employer and OSHA regarding the appropriate respiratory protection.
PROTECT YOUR HEARING.
Observe all applicable local, state and federal safety regulations. Wear OSHA approved hearing protection.
DRESS PROPERLY.
Do not wear loose clothing or jewelry that can be caught in moving parts. Wear protective hair covering to contain long hair. Keep hair away from motor air vent. Rubber gloves and non-skid footwear are recommended when working outdoors.
AVOID A DANGEROUS ENVIRONMENT.
Do not expose machine to rain. Do not use machine in wet conditions. Water entering a power tool will increase the risk of electric shock. Keep work area well lit. When working at an elevated location, pay attention to articles and persons below. If operating the power tool in damp locations is unavoidable, use a Ground Fault Circuit Interrupter (GFCI) protected supply. Use of an GFCI reduce the risk of electric shock.
ELECTRICAL SAFETY
Power tool plugs must match the outlet. Never modify the plug in any way. Do not use any adapter plugs with earthed (grounded) power tools. Unmodified plugs and matching outlets will reduce risk of electric shock. Avoid body contact with earthed or grounded surfaces such as pipes
ELECTRICAL CORD MANAGEMENT
Do not abuse the cord. Never use the cord for carrying, pulling or unplugging the power tool. Keep cord away from heat, oil, sharp edges or moving parts. Damaged or entangled cords increase the risk of electric shock. When operating a power tool outdoors, use an extension cord suitable for outdoor use. Use of a cord suitable for outdoor use reduces the risk of electric shock.
REMOVE ADJUSTING TOOLS.
Form a habit of checking to see that tools such as adjusting wrenches are removed from the machine and properly stored before starting the engine.
STAY ALERT.
Watch what you are doing. Use common sense. Do not operate machine when you are tired or fatigued.
DO NOT USE DRUGS, ALCOHOL, MEDICATION.
Do not operate machine while under the influence of drugs, alcohol, or any medication.
KEEP THE RIGHT PARTS IN THE RIGHT POSITIONS.
Do not operate machine with parts missing or improperly mounted.
CHECK DAMAGED PARTS.
Verify all machine guards are in good condition and will function properly before using the machine. Check for alignment of moving parts, binding of moving parts, breakage of parts, mounting, and any other conditions that may affect machine operation. A guard, power switch or other part that is damaged should be properly repaired or replaced by an authorized service center unless indicated elsewhere in this instruction manual. Do not operate machine if lever or engine on/off switch does not function properly.
OPERATION CHECKLIST
Read and understand operator’s manual before using this machine. Failure to follow operating instructions could result in injury or damage to equipment.
Warning label – read and understand manual
This vacuum is designed for intermittent use, i.e. not more than 2 hours continuously. If you are not sure about your application requirements, contact your USSAWS representative.
Wear proper electrostatic grounding equipment at all times.
 Flying debris and loud noise hazards. Wear ear and eye protection
Wear Head Protection, breathing protection, and the use of hearing protection is mandatory
Wear hand protection
WARNING: U.S.SAWS vacuums are not to be used for the removal of liquids or of volatile, viscous, flammable, or explosive media. If you are unsure about your application requirements call your local U.S.SAWS representative.
CAUTION: Disconnect the machine from power before and during inspection and/or maintenance.
Wear proper electrostatic grounding equipment at all times. Static discharge during fueling can cause explosion
VACUUM LOSE SUCTION
When the vacuum begins to lose suction, it means it is full or the filter needs maintenance.
Stop use of your power tool.
Shut the motors off and wait for the motors to stop turning completely to let the dust fall into the collection bin.
Shake the filter shaker back and forth to clean the filter
(Note: The shaker handle only needs to travel 2-3 inches and does not need to be “slammed” to the stop point for effective shakedown)
Use your foot to lift up on the dust bin positioning lever and IMMEDIATELY turn one of the motors on. This will prevent air bore dust from escaping the filter cavity. Inspect the level of dust in the bin and empty it if it is more than 3/4 full. Slide dust bin all the way in until it touches the front of the frame, and press the dust bin positioning lever down firmly until the dust bin is locked in place.
VACUUM CONNECTION
Before beginning, make sure you are using the proper sized vacuum for the operation you will be performing.
STEP 1
Insert the metal hose adapter into the inlet on the vacuum. The button will click into place when it is all the way in
STEP 2
Attach the hose to the hose adapter. Connect the other end of the hose to the tool you will be using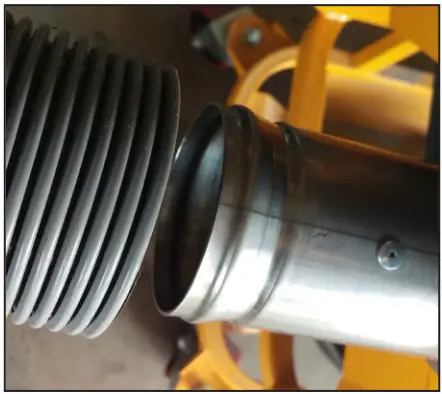
STEP 3
Turn ON choke and gas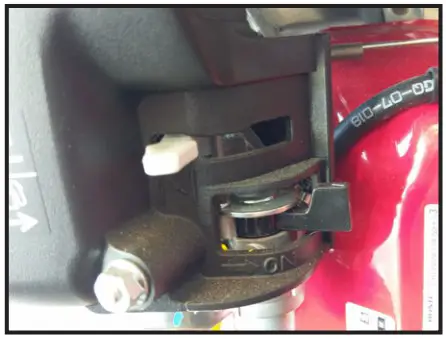
STEP 4
Turn the ignition switch ON and pull the start cord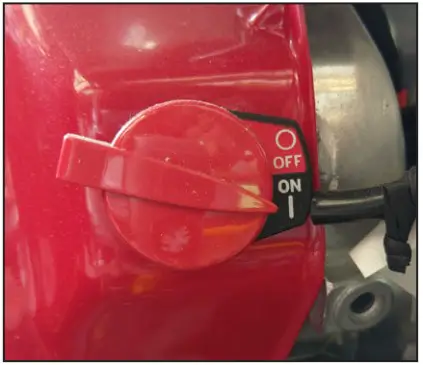
ULTRAVAC 1250 and Accessories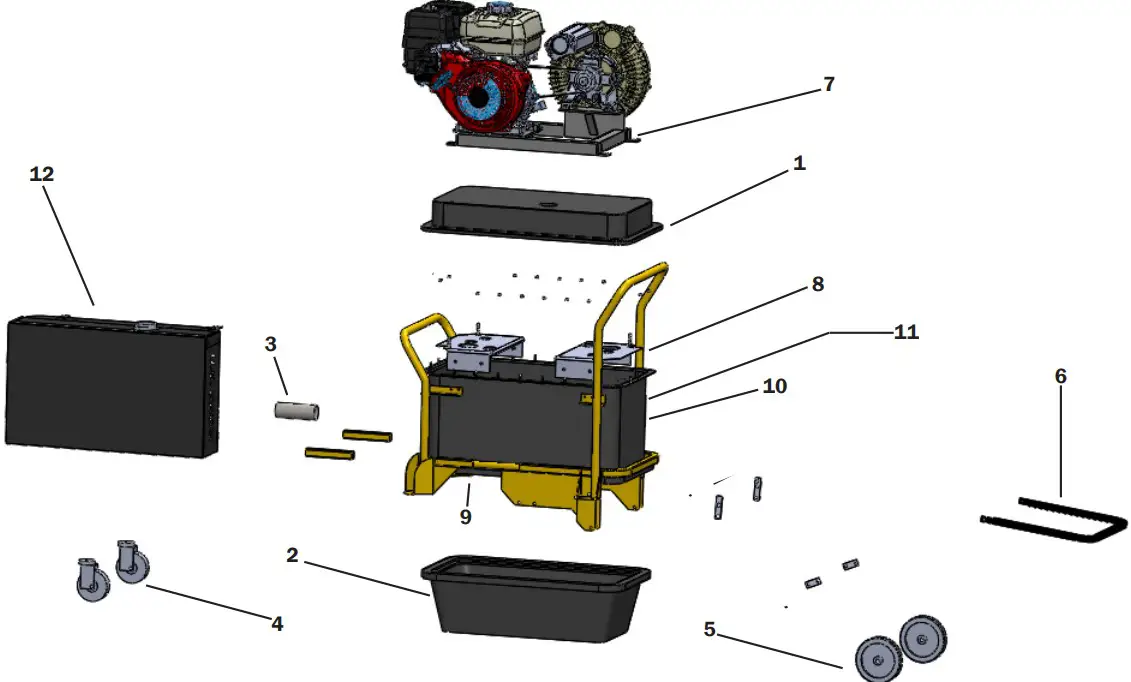
| Item | Part Number | Description | QTY |
| 1 | US24600-15 | Ultra-Vac 1250 Motor Mount Housing | 1 |
| 2 | SX50115 | Dust Bin | 1 |
| 3 | SX24604 | 3” Hose Adapter | 1 |
| 4 | SX50132 | 4” Flat Wheel (*SX50133: Swivel Rig) | 2 |
| 5 | SX50131 | 6” Flat Wheel | 2 |
| 6 | US24600-9 | Foot Lifting Handle | 1 |
| 7 | US50104 | Mounting Frame for Motor and Blower | 1 |
| 8 | SX50124 | Reinforcement Plate | 2 |
| 9 | US24600-52 | Seal | 78” |
| 10 | US24600-15.1 | Filter Housing | 1 |
| 11 | US24600-54 | Shaker Bar Handle | 1 |
| 12 | SX1250GAS-HEPA | HEPA Filter Kit (Discharge) – *Optional | 1 |
| Not Pictured | |||
| SX50109 | Belt (320J10) *SX50155 – Upgrade Kit | ||
| US24600-10 | Main Filter Element | ||
| SX1250/950HEPA | HEPA Filter (4) | ||
ULTRAVAC 1250 Motor & Blower Parts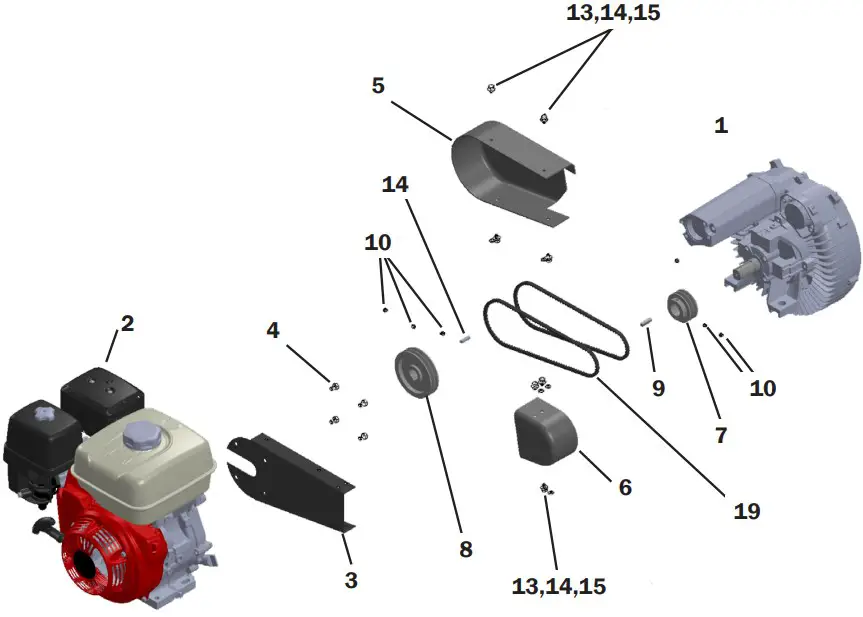
| Item | Part Number | Description | QTY |
| 1 | SX51533 | 1530 Regenerative Blower | 1 |
| 2 | SXGX240 | Honda GX240 Motor | 1 |
| 3 | US24600-68 | Belt Guard | 1 |
| 4 | US31114-1 | 5/16-24 x 1/2” Screw | 4 |
| 5 | US24600-66 | Engine Pulley Cover | 1 |
| 6 | US24600-67 | Blower Pulley Cover | 1 |
| 7 | SX50161 | 2.8”OD x 28MM Bore, 2 Groove 3VX | 1 |
| 8 | SX50165 | 4.5”OD x 1.0” Bore, 2 Groove 3VX | 1 |
| 9 | US24600-81 | Key, 8mm x 7mm x 30 mm | 1 |
| 10 | US27539-2 | 5/16”-24 Thread, 1/4” Set Screw | 6 |
| 11 | US31078 | 1/4-20 x 1/2” Screw | 7 |
| 12 | US31318 | 1/4” Lock Washer | 6 |
| 13 | US60225 | 1/4” Flat Washer | 7 |
| 19 | SX50170 | 3VX315 Belt | 2 |
WARRANTY AND SERVICE
Warranty
This document is to be used as a guide in determining warranty policies and procedures for U.S.SAWS and its U.S.SAWS products. It is to be used in determining whether a warranty is justified and as a procedural guide in completing a U.S.SAWS warranty claim form.
Warranty Responsibility
The distributor or the end user must prepare a Machine Warranty Information Card when the machine is delivered. Failure to comply will make any and all warranties on this equipment null and void. Credit for warranty repairs will be given only after receipt of the WARRANTY CLAIM FORM, properly completed with all the required details. Submittal details are described later in this document.
Warranty Policy
U.S.SAWS warrants its U.S.SAWS products against defects in material and workmanship under normal and proper use for a period of one year (365) days from the date of delivery; in the case of Rental Fleet Machines, date of assignment to Rental Fleet. Such warranty is extended only to the buyer who purchases the equipment directly from U.S.SAWS or its authorized distributor. This warranty does not include expendable parts such as, but not limited to, plugs, cutters, blades, blast wheel, wear parts, liners and seals.
The obligation under this warranty is strictly limited to the replacement or repair, at US SAWS’s option, of machines and does not include the cost of transportation, loss of operating time, or normal maintenance services.
This warranty does not apply to failure occurring as a result of abuse, misuse, negligence, corrosion, erosion, normal wear and tear, alterations or modifications made to the machine without express written consent of U.S.SAWS .
Warranty request must be submitted in writing within thirty (30) days after failure.
Written authorization to return merchandise under warranty must first be obtained from U.S.SAWS .
U.S.SAWS reserves the right to inspect and make the final decision on any merchandise returned under warranty.
U.S.SAWS offers no warranty with respect to accessories, including but not limited to, engines, motors, batteries, electrical boards, tires and any other parts not manufactured by us but which the original manufacturer warrants.
U.S.SAWS reserves the right to make product changes or improvements without prior notice and without imposing any obligation upon itself to install the same on its products previously sold.
The above warranty conditions can only be altered by US SAWS. US SAWS must confirm alterations in writing for each specific transaction.
U.S.SAWS reserves the right to establish specific warranty terms for used or demo machines on an individual transaction basis. Invoices covering such merchandise will clearly state the provisions of the applicable warranty for each specific transaction.
WE DO NOT AUTHORIZE ANY PERSON, REPRESENTATIVE OR SERVICE OR SALES ORGANIZATION TO MAKE ANY OTHER WARRANTY OR TO ASSUME FOR US ANY LIABILITY IN CONNECTION WITH THE SALE OF OUR PRODUCTS OTHER THAN THOSE CONTAINED HEREIN.
UNDER NO CIRCUMSTANCES SHALL US SAWS BE LIABLE TO CUSTOMER OR ANY OTHER PERSON FOR ANY DIRECT, INCIDENTAL, OR CONSEQUENTIAL DAMAGES RESULTING FROM THE USE OF THE PRODUCT OR ARISING OUT OF ANY BREACH OF ANY WARRANTY OR FOR ANY SPECIAL OR CONSEQUENTIAL DAMAGES OF ANY CHARACTER, INCLUDING WITHOUT LIMITATIONS, DAMAGES FOR ANY LOSS OF GOODWILL, WORK STOPPAGE, OR ANY AND ALL OTHER COMMERCIAL DAMAGES OR LOSSES.
TO ENSURE THE PROPER WARRANTY COVERAGE IS EXTENDED TO THE OWNER OF THIS MACHINE, FILL OUT THE ATTACHED CARD COMPLETELY AND ACCURATELY.
WARRANTY REGISTRATION CARD
IMPORTANT! To ensure that your U.S.SAWS machine is covered under warranty, please fill in the following information and mail or fax it to U.S.SAWS, 8004B E. Broadway Ave. Tampa, FL 33619, Fax No. (813) 621 7125
| COMPANY |
| NAME |
| ADDRESS |
| INTENDED USE |
| DATE OF PURCHASE |
| INTENDED USE |
| SERIAL NUMBER |
If you are not the owner of record as shown on the manual copy of the warranty registration card, do not operate this machine before contacting U.S.SAWS at 1-877-817-6687. Verify the following before operating the equipment:
CHANGE OF OWNER OR NEW ADDRESS REGISTRATION CARD
IMPORTANT! To ensure that your U.S.SAWS machine is covered under warranty, please fill in the following information and mail or fax it to U.S. SAWS, 8004B E. Broadway Ave. Tampa, FL 33619, Fax No. (813) 621 7125
| COMPANY |
| NAME |
| ADDRESS |
| INTENDED USE |
| DATE OF PURCHASE |
| INTENDED USE |
| SERIAL NUMBER |


