DOORsafe DS6668 HD Internet Doorbell With Camera User Guide

Quick Start Guide DS6668
Download app: Smart Life of Tuya Smart (=zelfde app)
Uitgever: Volcano Tech. Lim. / Tuya Inc.

→ Connect doorbell to: 15VDC 0.8A or 24V DC 0.5A
→ Connect red (+) to white printed black wire from power supply.
→ Connect black (-) to all black wire from power supply.
→ Connect further via connection diagram, see overleaf for all diagrams
LED flashes blue & red: doorbell button has just been pressed
LED flashes blue: waiting for WiFi connection
LED flashes blue quickly: pairing with app
LED flashes red: internet signal available via network cable
LED flashes red quickly: pairing with app
LED solid white: connected to the internet / ready to use
Pair with app:
→ connects Smartphone with 2.4 Ghz. WiFi with the same router as the doorbell. Then there are 2 options for pairing with app: Option 1 Via network cable: → doorbell button flickers red → open app → choose + → choose: Camera surveillance → choose: Smart Doorbell → put QR code (top right) to: Cable → search in network → + → name doorbell. Option 2 Via WiFi: → doorbell button flickers blue → open app → choose + → select: Camera surveillance → select: Smart Doorbell → set QR code (top right) to: Wi-Fi mode → select: Next → select: AP mode → enter own WiFi password in → connect to Smartlife-XXXX network that doorbell is broadcasting → go back to app → name doorbell.
To turn on recordings:
→ look in app by camera → open settings → memory card settings →
Turn on SD card registration switch
View video recordings:
→ watch in app by camera → choose: Playback in app
View photos & notifications:
→ choose Profile at the bottom of the app → choose: Messages
Set up motion detector:
→ view in app by camera → open settings → set detection alarm
→ Turn on Motion Detection Alarm Switch → Set Sensitivity / Activity Region / Body Detection / Time Schedule
Set speaker volume in doorbell:
→ look in app by camera → open settings → sounds
→ set volume
Set up two-way audio:
→ look in app by camera → open settings → Basic Feature Set → set
two way audio in
Share with additional users:
Every user needs their own account.
Use a new email address for a new account.
→Share all permissions: go to profile →choose: Home management →add members
to a room/family (account number=email address)
→Restricted permissions (no unlock): → view through camera → open settings → choose share device (account number=email address)
Reset:
→ Press 5 sec. on Reset button: LED flashes white 2 times & doorbell reboots.
→ Press less than 2 sec. Press the Reset button on the back of the doorbell, or swipe the master card/chip 4 times, to
reset all Master cards as well as all
to delete user cards. It is only possible to simultaneously control the master + all
to delete user cards/chips, only 1 specific card or chip cannot be deleted.| Afmeting: 154 x 55 x 21 mm Montagebeugel: 30° hoek Lengte/dikte kabel:40cm / 5mm | App: Smart Life (Tuya), iOS & Android app – Push bericht bij bezoek/beweging/diefstal |
| Materiaal: zink/aluminium legering – Weer/stof bestendigheid: IP65 | Video compressie / frame rate: H264 of H265 (in te stellen via DigitalTools) / 25fps |
| Internet aansluiting: via 2,4 Ghz. WiFi 802.11 b/g/n met externe antenne of UTP LAN-kabel | Camera: 2MP CMOS HD camera Resolutie/kijkhoek: 1920 x 1080 (1080p) / 120° |
| Stroom: 15 – 24V DC 0,8A (ver- bruik 6W-3W=standby) POE: via DS4976 adapter (=optie) | Nachtzicht: 6 x 850nM IR LED, zet via app op: aan/uit/automatisch |
| Bewegingsmelder: via camera, gevoeligheid, de- tectiegebied & lichaamsdetectie instelbaar | Speaker: 1W / 8 Ohm Microphone: -38DB±2/2V Audio compressie: G.711U – 64 Kbps |
| Diefstalbeveiliging: Ja Sirene & melding via app als deurbel loskomt van muur | Audio intercom: full duplex (stel in app in op 1 of 2-weg) / volume instelbaar in app |
| Geheugen: 32Gb Class 10, FAT32 micro SD-kaart (max. 128Gb) | Deuropener: max. 1; type: arbe- ids- of ruststroom; kan max. 36V AC/DC 4A schakelen |
| Temperatuur: -40 – 60°C Luchtvochtigheid:10-90% | Unlock tijd: 5 sec. (instelbaar via DigitalTools) Exit button: aansluitbaar |
| Bestaande/DS6601 gong aansluitbaar: Ja. (rinkeltijd instel- baar via DigitalTools) | Verzadiging/contrast/helderhe- id: instelbaar via DigitalTools |
| Aanbelbevestiging: LED gaat knipperen & toon is te horen (duur instelbaar via DigitalTools) | Opnames: maakt foto’s / video’s van wie aanbelt/bij beweging (kan uitgezet); opslag op SD; terugkijken via Playback in app |
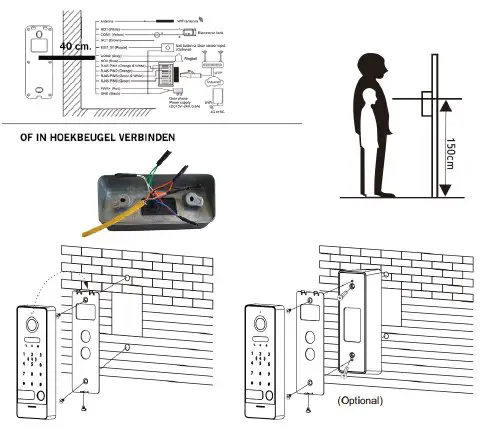
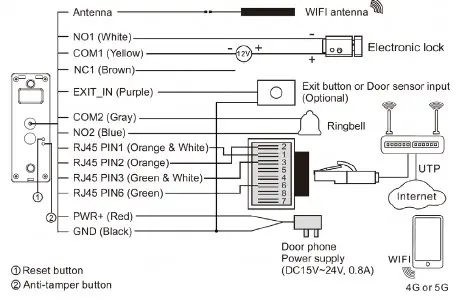
Connection option A:
Connect to power & internet via network cable (without POE) → Connect doorbell to: 15VDC 0.8A or 24V DC 0.5A → Connect red (+) to the white printed black wire of the power supply
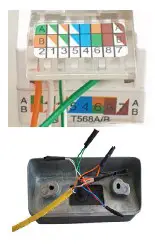
. Connect black (-) to the all black wire. → Connect to the network cable in the corner mounting bracket or with the RJ45 adapter → Connect the doorbell to the RJ45 adapter as follows: 2: orange
– 1: orange white – 3: green white – 6: green – see picture opposite or diagram below: → Note: (illogical) sequence & that wires in adapter make good contact. → Use CAT6 UTP cable,
especially important for longer than 10 meters. → If the network cable is in the router and provides an internet signal: LED flashes red. → Now add the doorbell to the app. See steps overleaf.
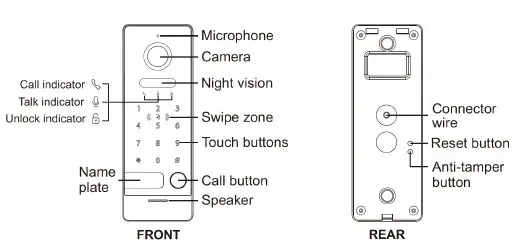
IC/ID Card/Chip type
Up to 100 cards/chip can be added of the following type: Em marine – 125KHZ – Supports ISO/IEC 18000-2 type A (ID) Mifare – 13.56MHZ – Supports ISO/IEC 14443 type A 106kb/s (IC)
Set up keypad
Default admin code: *000000# Default unlock code: 123456# Set new admin code: → enter *000000# → enter a total of 2x new 6 digit admin code, start with a * and end with a #.
So eg *888888# and then directly again *888888#. Set new unlock code: → enter *admin code# → enter a total of 2 x the new 6 digit unlock code, end with a # (first * not necessary). S
o eg 666666# and then directly 666666# again.
Set up cards/chips
First use/set up Master card/chip & reset all cards/chips: → Press less than 2 sec. Press the Reset button on the back of the doorbell, or swipe the master card/chip 4 times, to clear all
Master cards as well as all User cards. → After the Reset, the keypad will flash and beep continuously. → The 1st card/chip that is now placed on the keypad becomes the Master card/chip, after which the beeping stops. It is not possible to open the door with the Mastercard. It is only possible to simultaneously delete the master + all user cards/chips, only 1 does not delete.
Add user cards/chips: → 1
. Swipe the Master card/chip once → 2. Now swipe the new user card/chip twice. Repeat these 2 steps for each new user card. (only 1 user card/chip cannot be deleted, only all)
Unlock time: 5 sec. (this duration can be set via Digital Tools). Upon successful unlocking, the LED light next to
the Unlock idicator with the Lock icon will illuminate and a beep will be heard.
Connection option C: Connection via 2.4 Ghz. WiFi
→ Connect doorbell to: 15VDC 0.8A or 24V DC 0.5A
→ Connect red (+) to the white printed black wire of the power supply.
→ Connect black (-) to the all black wire.
→ Connect the WiFi antenna to doorbell
→ LED slowly flashes blue when doorbell is ready to connect to WiFi
→ Now add the doorbell to the app. See steps overleaf.

Additional settings via Digital Tools (download at doorsafe.nl/support/doorsafe-6660/)
→ Unlock time: between 0.2 and 10 sec. (default: 5 sec.)
→ Ring confirmation tone duration (tone from doorbell): between 0 and 30 sec. (default: 1 sec.)
→ Ringing time of a connected chime (RINGBELL): between 0 - 9 sec. (default: 1 sec.)
→ Brightness: a value between 0 and 9 (default: 5)
→ Contrast: a value between 0 and 9 (default: 5)
→ Saturation: a value between 0 and 9 (default: 5)
→ Video codec: H264 or H265 (H265 gives a better image quality, which does not require much more data) (default: H264 - because it is more compatible)
SCAN QR CODE VOOR:
+ VOLLEDIGE MANUAL
+ FAQ’s
+ TUTORIALS


