LANDMANN GG-V-491 Grill Chef Wagon
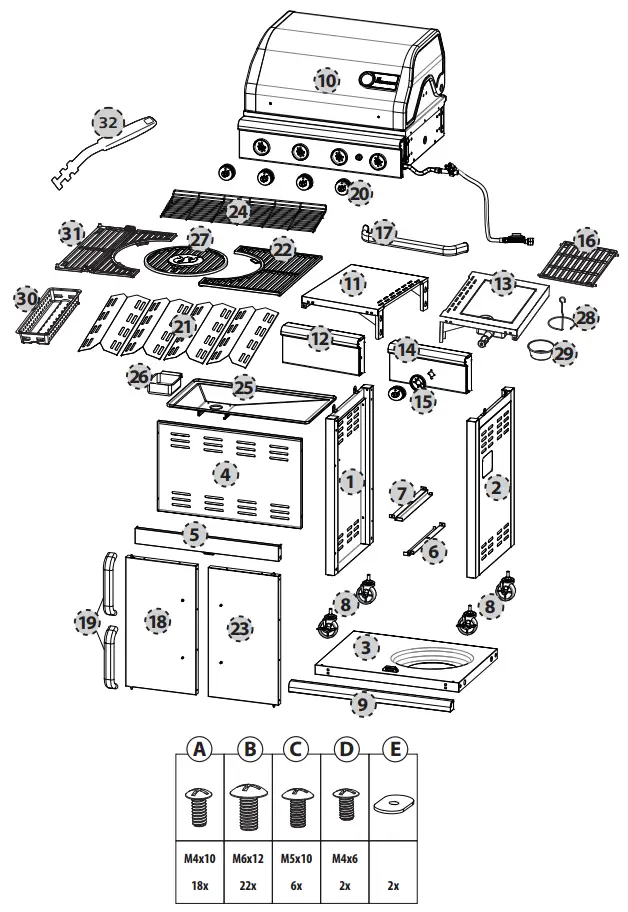
Part list

| Item | Qty. | Part name |
| 1 | 1 | Side frame, left |
| 2 | 1 | Side frame, right |
| 3 | 1 | Cart base |
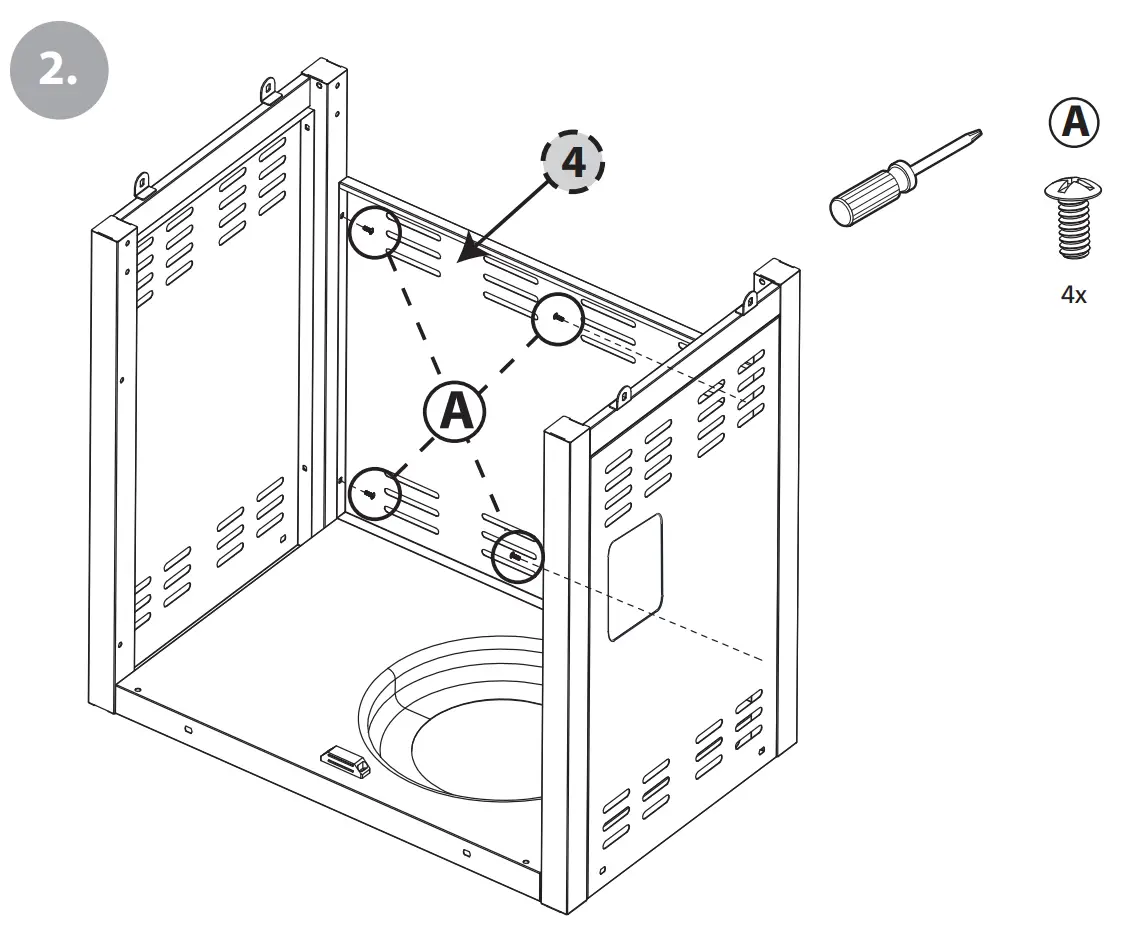
| 4 | 1 | Rear panel |
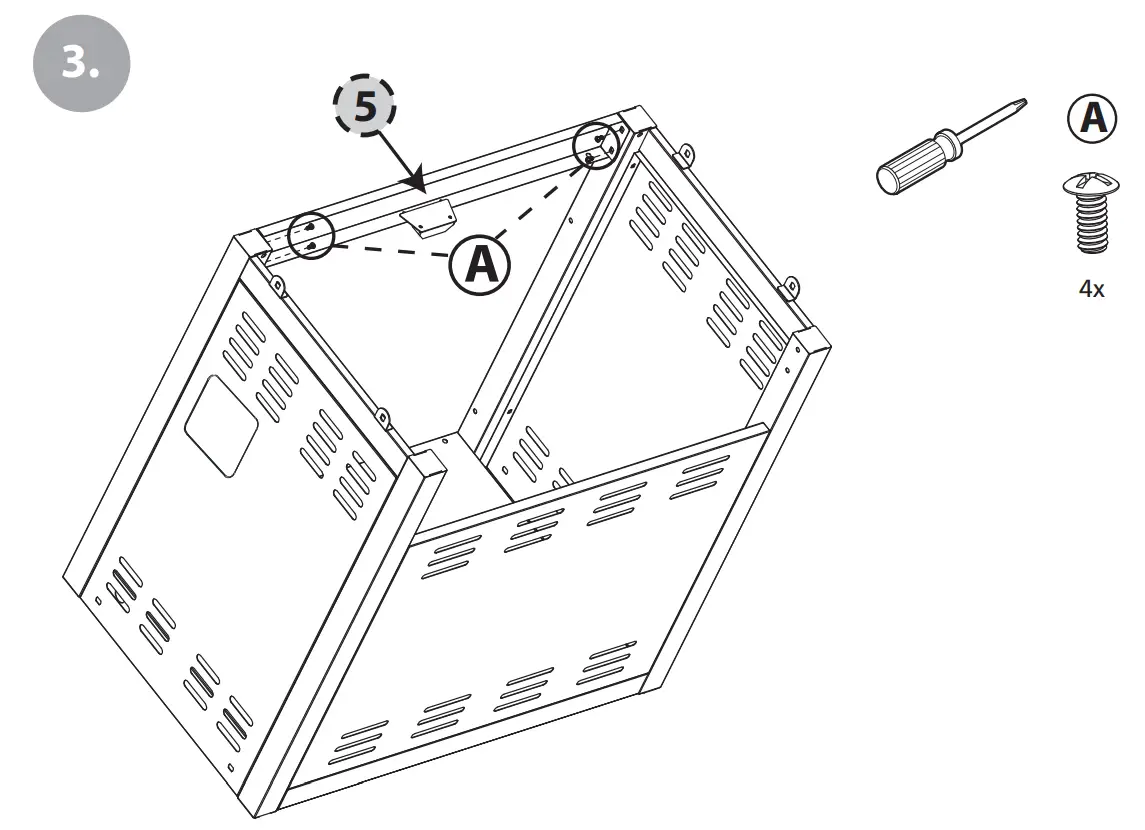
| 5 | 1 | Front panel strut, top |
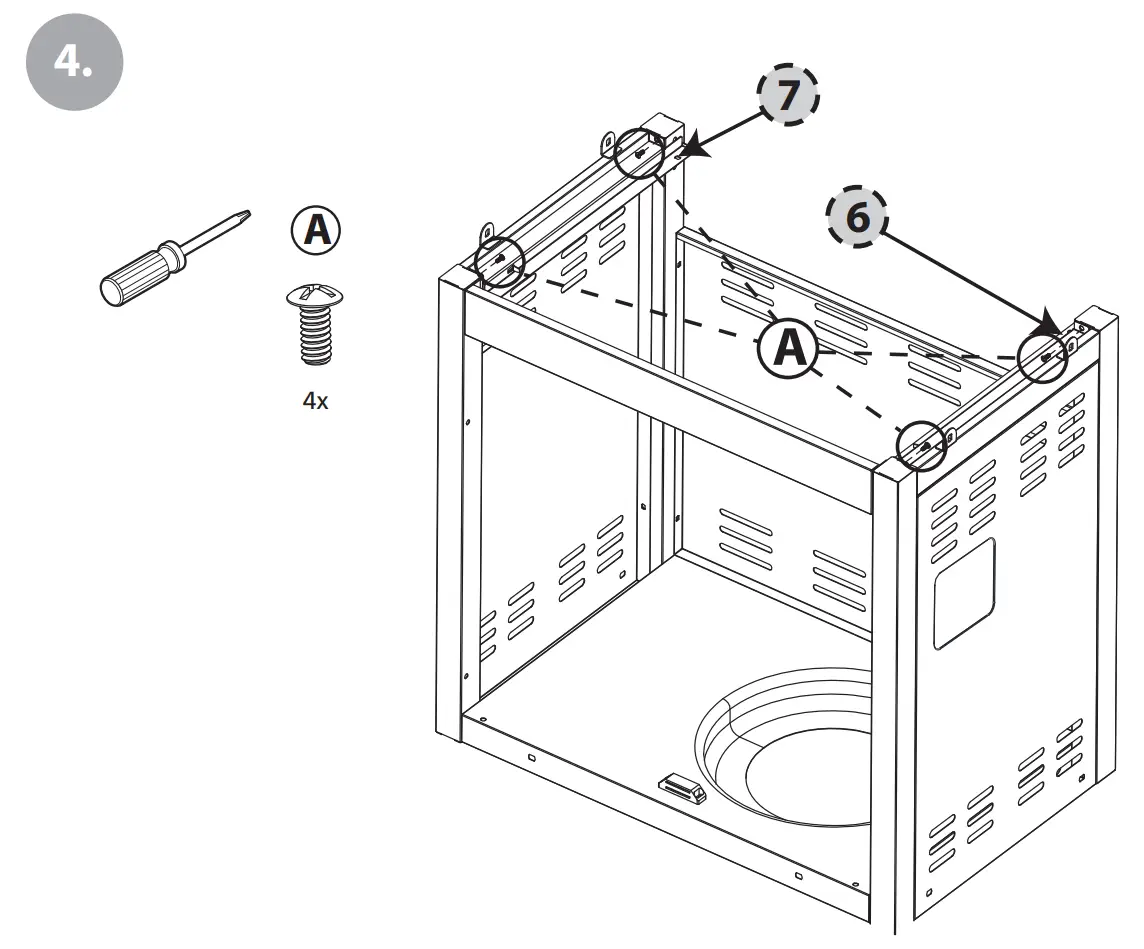
| 6 | 1 | Grease catchment tray, right |
| 7 | 1 | Grease catchment tray, left |
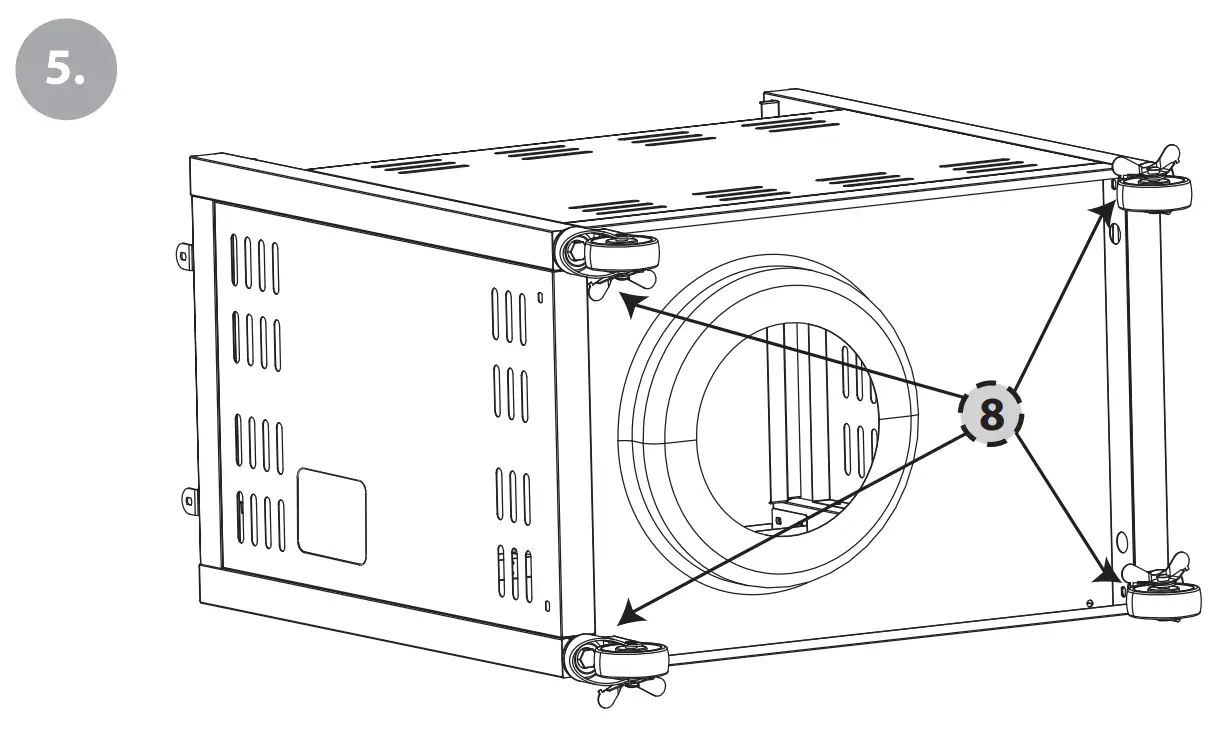
| 8 | 4 | Rollers |
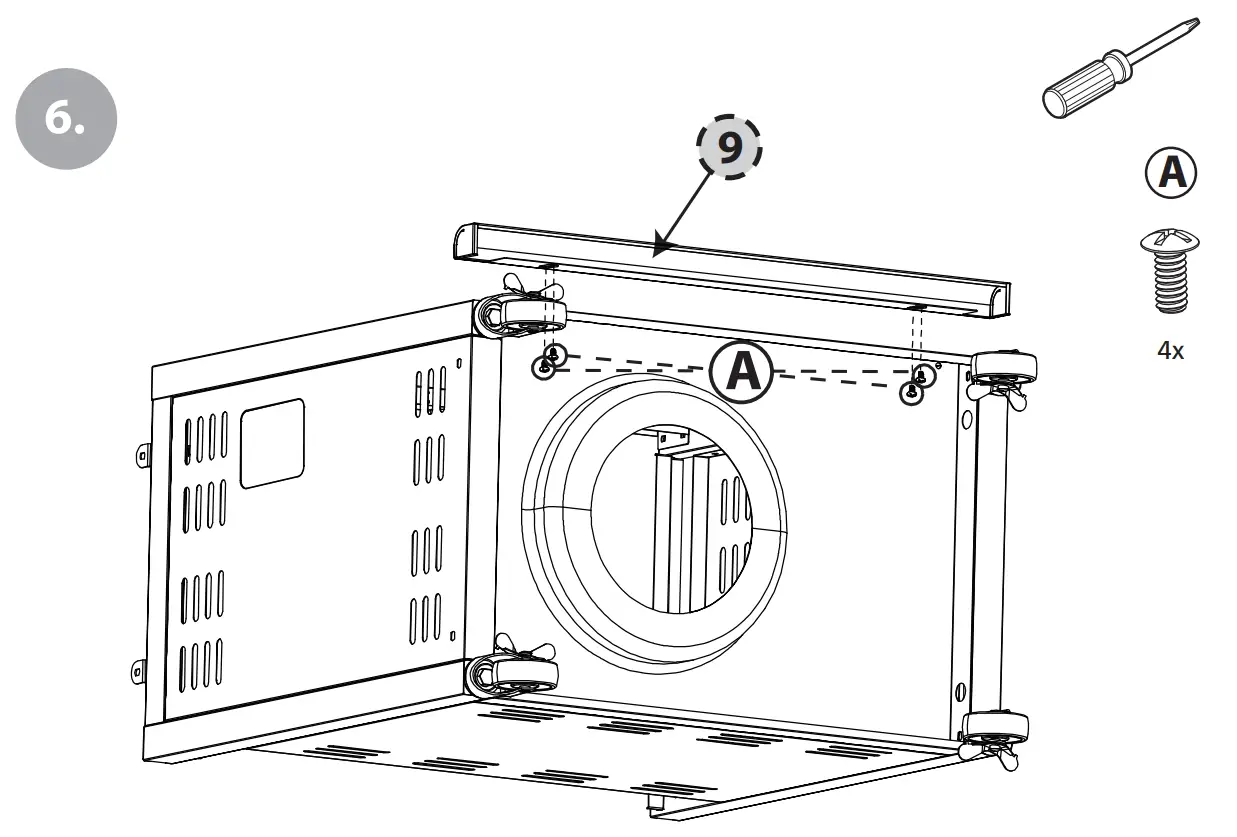
| 9 | 1 | Front panel strut, bottom |
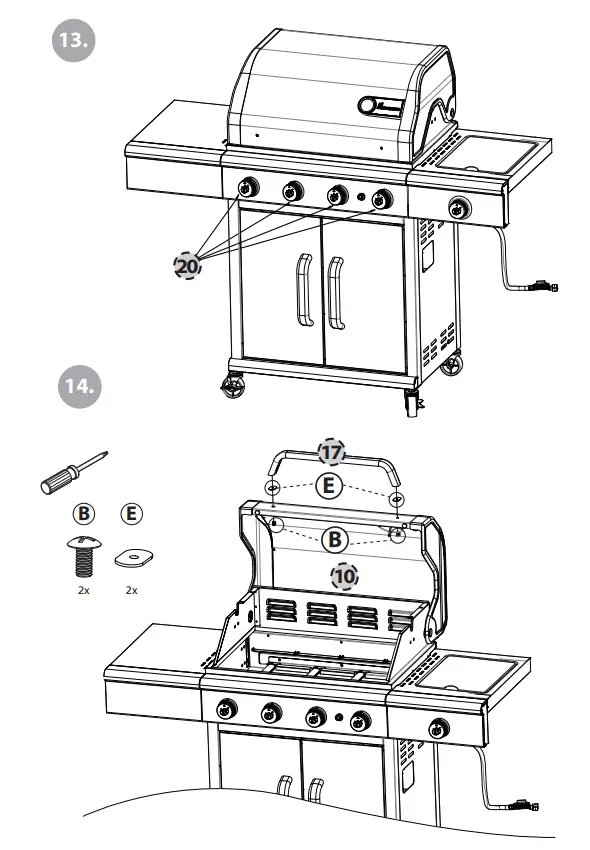
| 10 | 1 | Barbecue unit, preassembled |
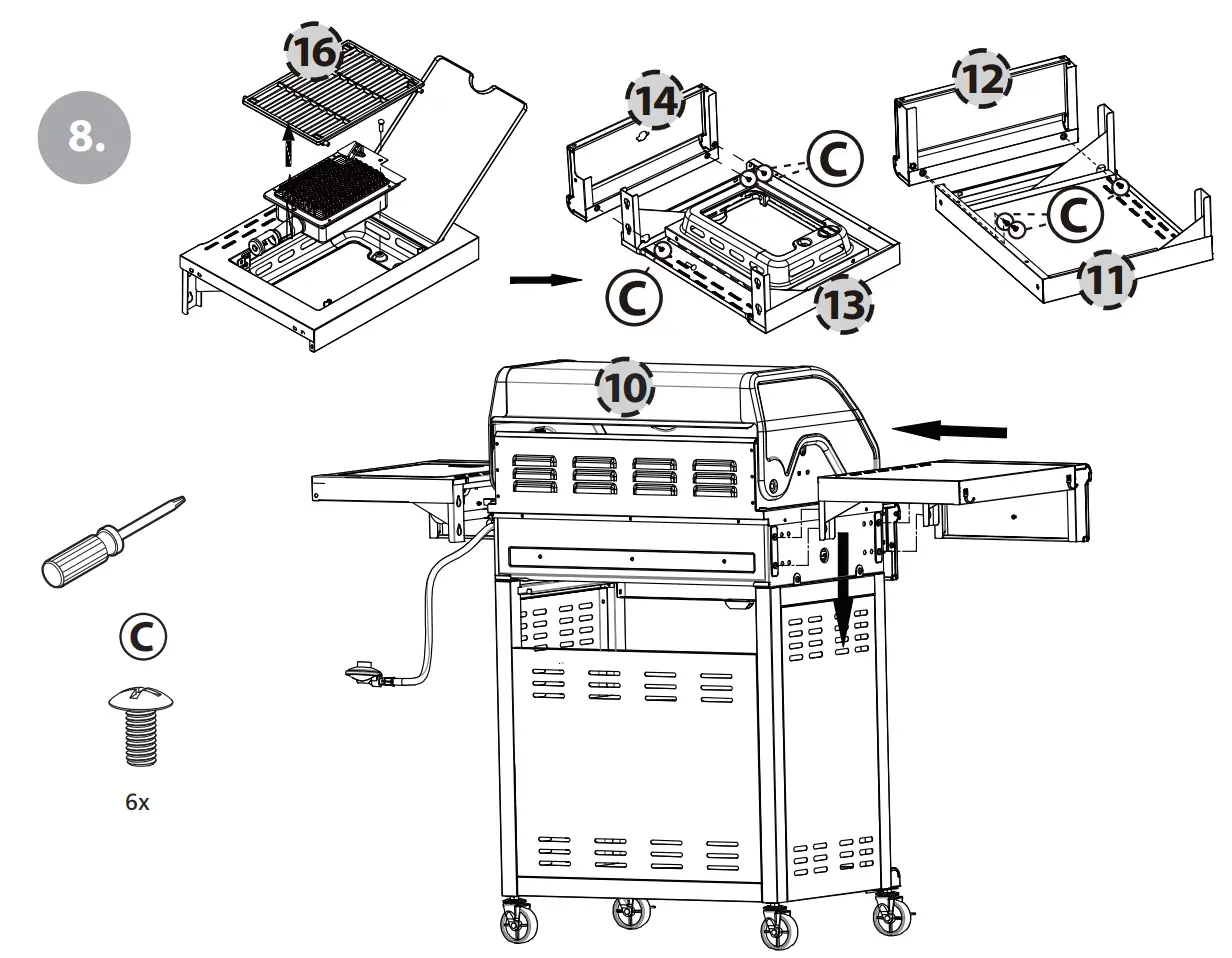
| 11 | 1 | Side table |
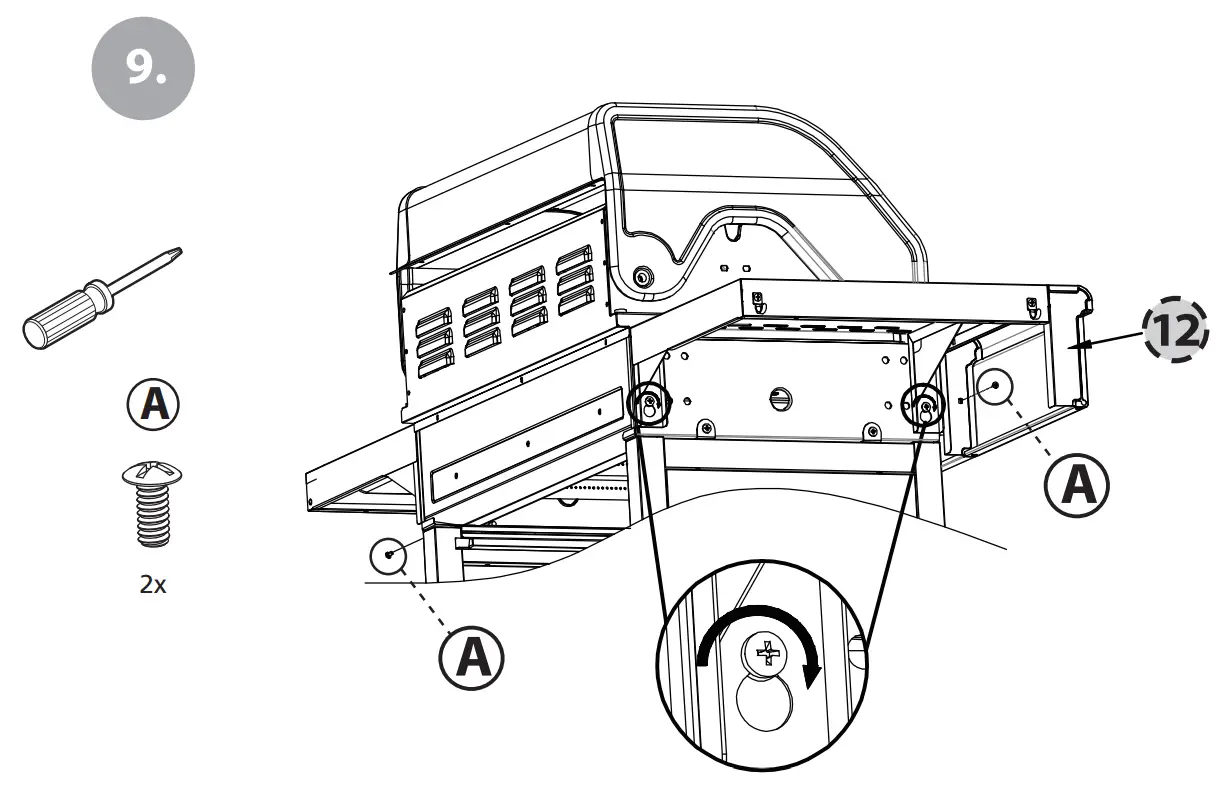
| 12 | 1 | Side table panel |
| 13 | 1 | Side burner table |
| 14 | 1 | Side burner table panel |
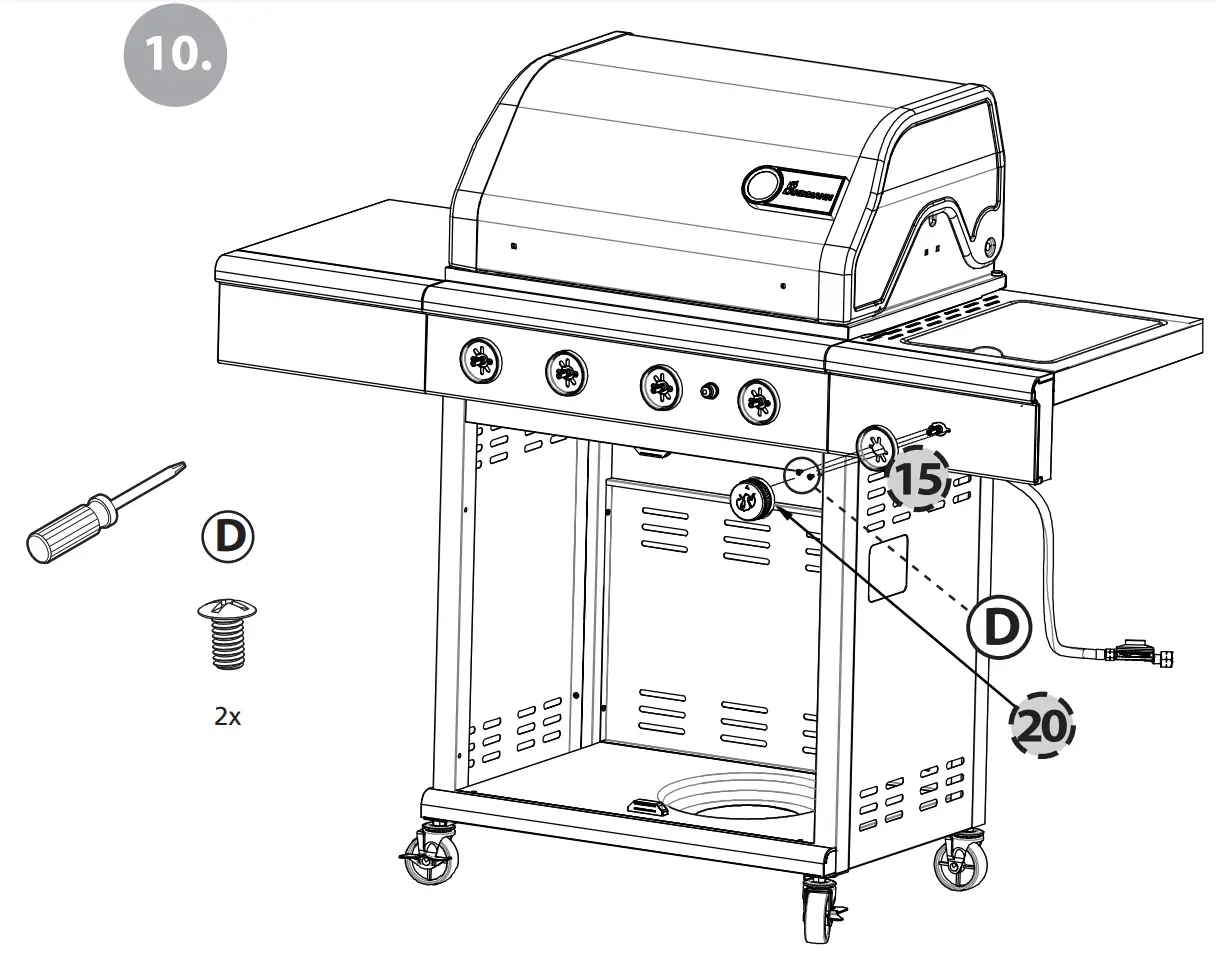
| 15 | 1 | Side burner regulator ring |
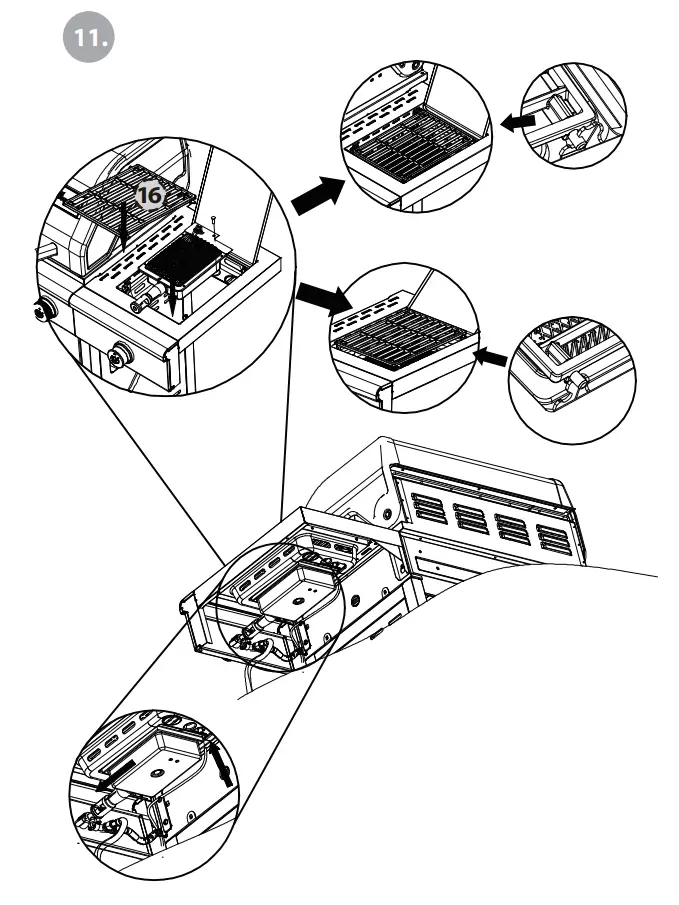
| 16 | 1 | Side burner cooking grill |
| 17 | 1 | Lid handle |
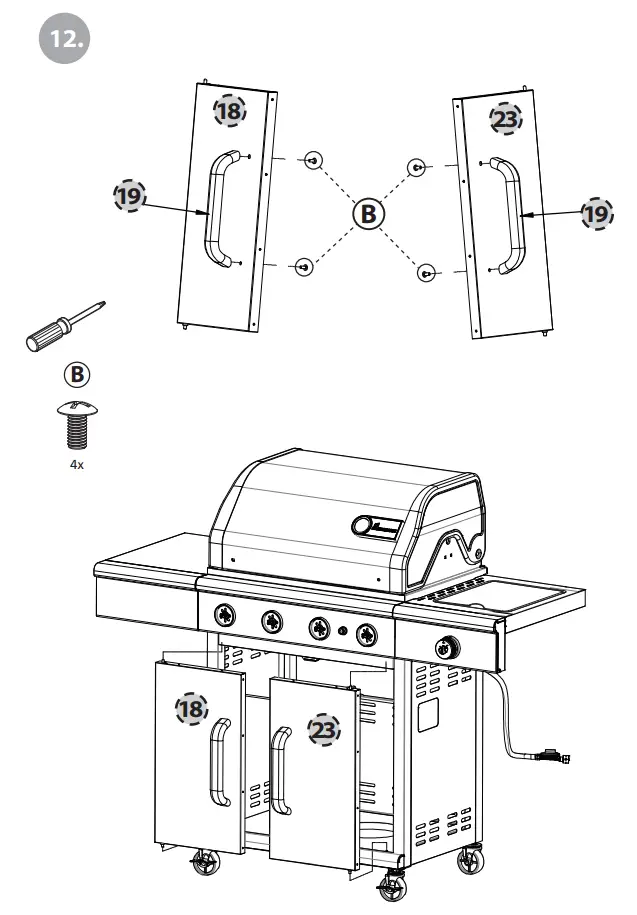
| 18 | 1 | Lower cupboard door, left |
| 19 | 2 | Door handle |
| 20 | 5 | Adjusting knob |
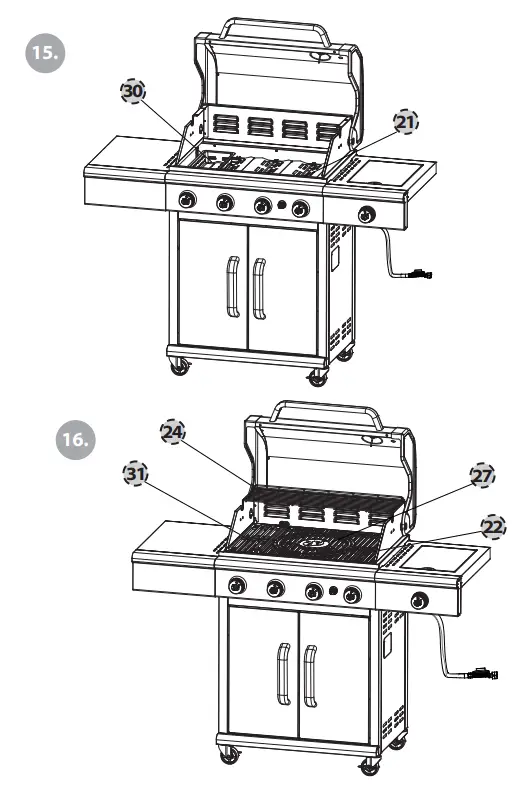
| 21 | 4 | Flame tamer |
| 22 | 2 | Cooking Grill 1 |
| 23 | 1 | Lower cupboard door, right |
| 24 | 1 | Warming rack |
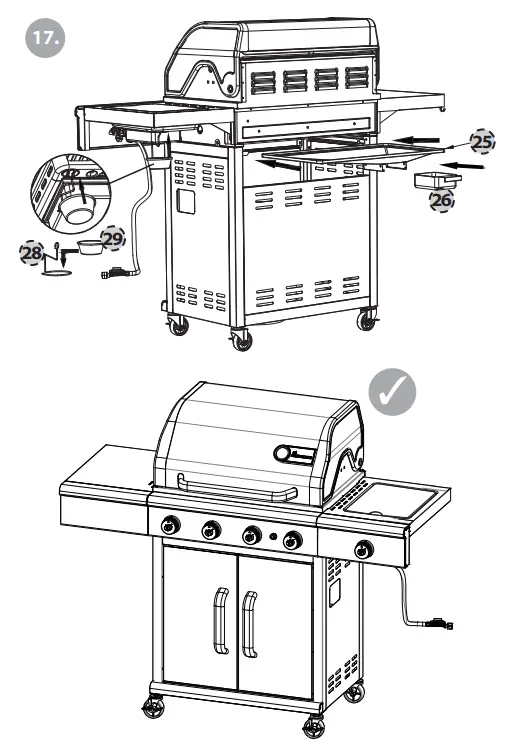
| 25 | 1 | Grease tray |
| 26 | 1 | Fat catcher tray |
| 27 | 1 | Cooking Grill 2 |
| 28 | 1 | Grease cup holder |
| 29 | 1 | Grease cup |
| 30 | 1 | Charcoal Tray |
| 31 | 1 | Cooking Grill 3 |
| 32 | 1 | Modulus lifter |
| 1 | Screw set with assembly material |
Dimension
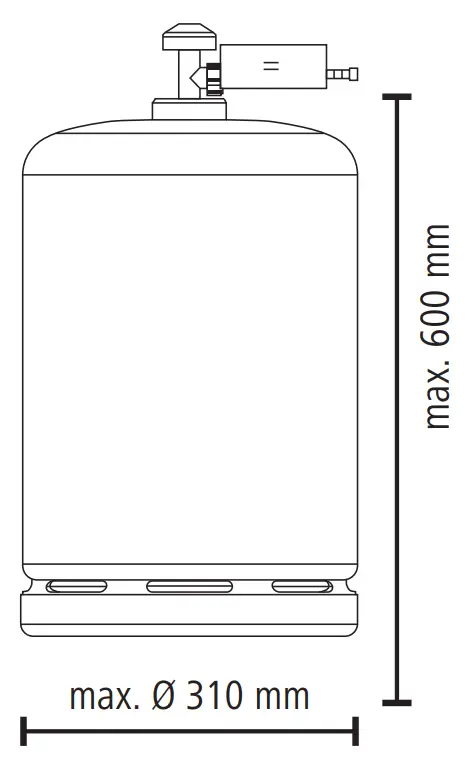
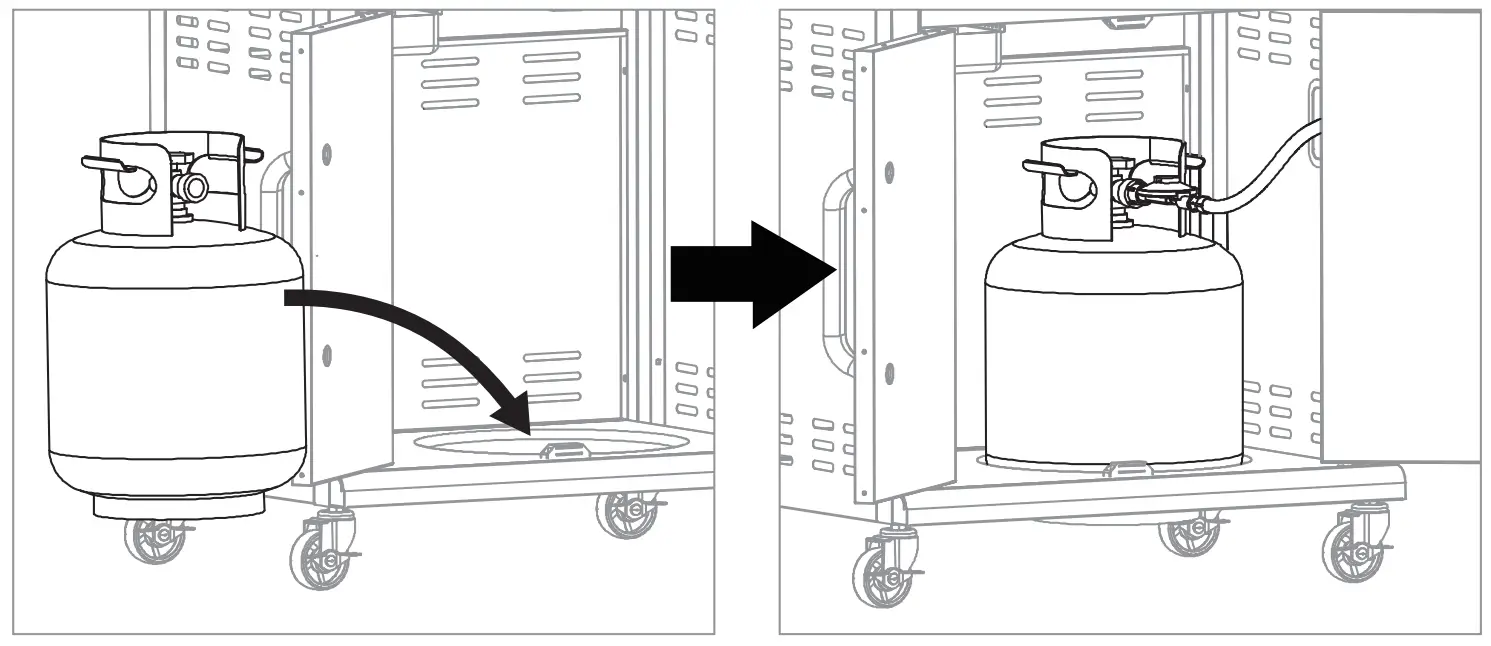
Placement of the gas cylinder during use
Position the gas cylinder next to the barbecue during use.
Placement of the gas cylinder after use
The gas cylinder can be stored in the base cabinet after use, provided that it does not exceed the specified maximum dimensions (see below). Place the gas cylinder in the recess provided for this purpose in the base.
Charcoal Tray
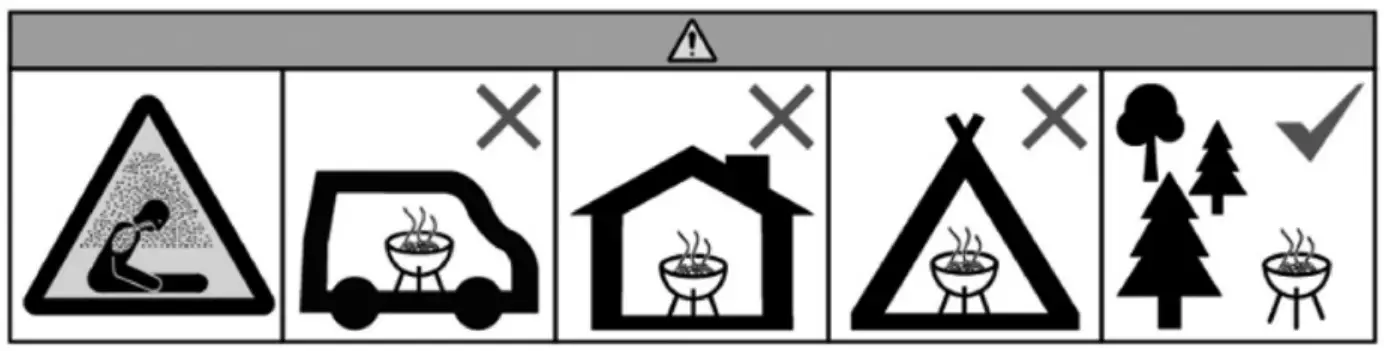
![]() PLEASE NOTE: risk of carbon monoxide poisoning! Only operate outdoors! Do not operate in closed and/or habitable spaces, e.g. buildings, tents, caravans, mobile homes, boats!
PLEASE NOTE: risk of carbon monoxide poisoning! Only operate outdoors! Do not operate in closed and/or habitable spaces, e.g. buildings, tents, caravans, mobile homes, boats!
![]() Use only barbecue charcoal or charcoal briquettes (tested to DIN EN 1860-2).
Use only barbecue charcoal or charcoal briquettes (tested to DIN EN 1860-2).
![]() PLEASE NOTE! Do not use any spirits or petrol for ignition or reignition!
PLEASE NOTE! Do not use any spirits or petrol for ignition or reignition!
![]() Before barbecuing for the first time, heat up and allow the fuel to glow for at least 30 minutes.
Before barbecuing for the first time, heat up and allow the fuel to glow for at least 30 minutes.
![]() Never use water to extinguish the charcoal. Allow the barbecue to cool down.
Never use water to extinguish the charcoal. Allow the barbecue to cool down.
![]() Only place the food on the grill when the fuel is covered with a layer of ash.
Only place the food on the grill when the fuel is covered with a layer of ash.
- Insert the charcoal tray and the grill rack into the barbecue in the manner shown in assembly steps 15 and 16.
- Open up the grill rack above the charcoal tray using the Modulus lifter.
NOTICE: The Modulus lifter can be pulled out of the grill rack more easily if you lift up the opened grill rack slightly using barbecue tongs. - Fill the charcoal tray with no more than 500 g of fuel (barbecue charcoal or barbecue charcoal briquettes).
- Light the burner beneath the charcoal tray (see above).
- As soon as the fuel has been lit, you can switch off the burner.
- Wait for approx. 15 – 20 minutes until you see white ash on the fuel. The charcoal is then in the optimum condition. Fold down the grill rack and start barbecuing.
Utilization
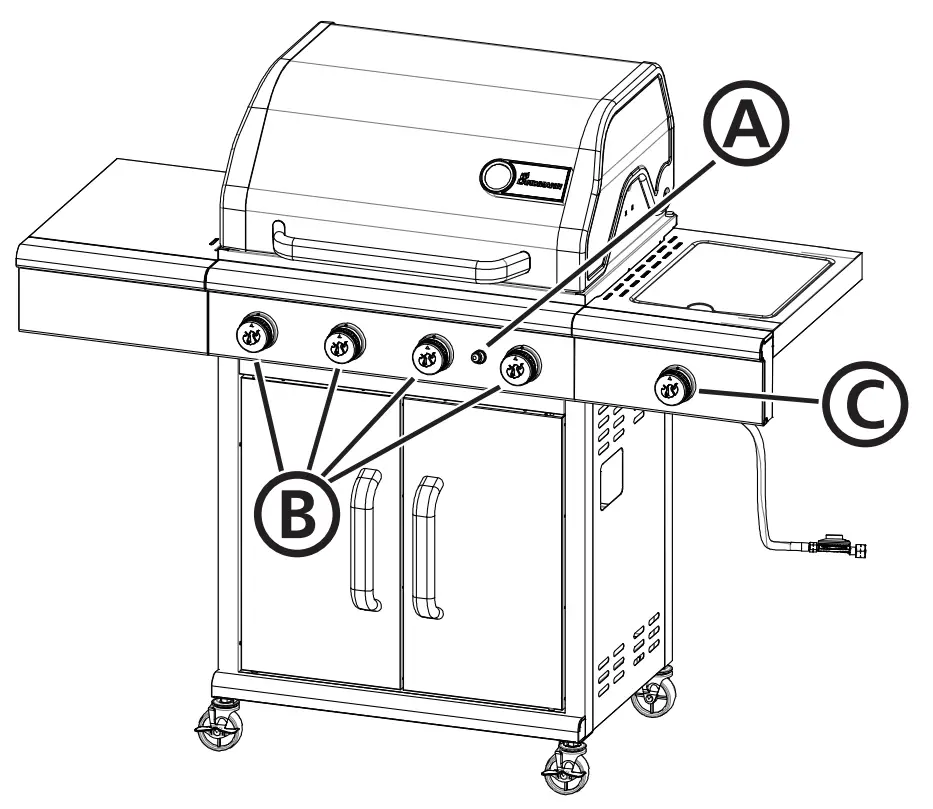
Functional elements
A. Electronic ignition
B. Main burner control knob
C. Side burner control knob
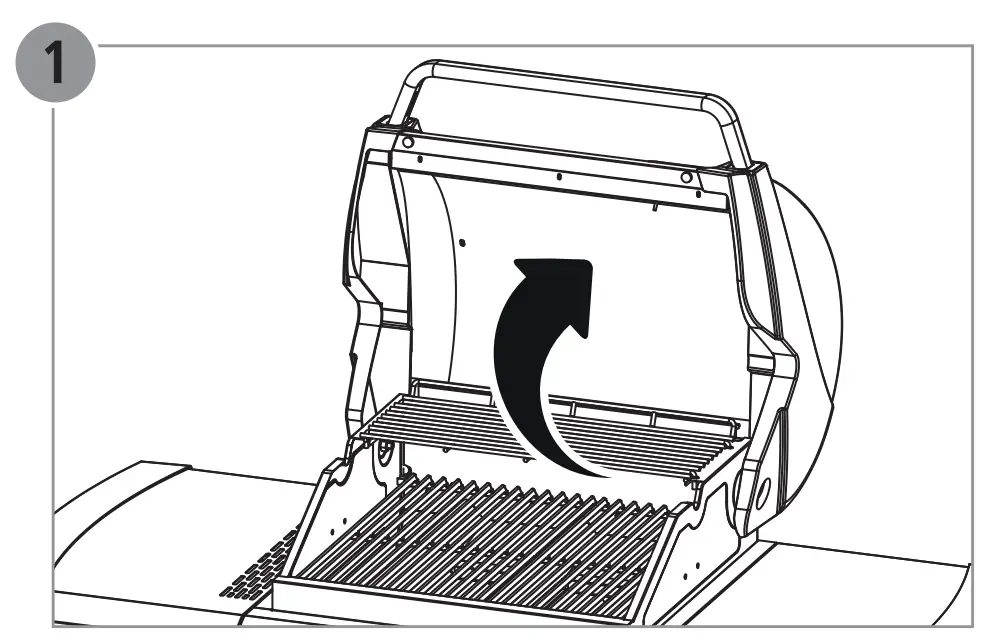
Starting up the barbecue
- Open the lid on the grill unit (1).
- Open the gas supply on the gas cylinder (see operating manual).
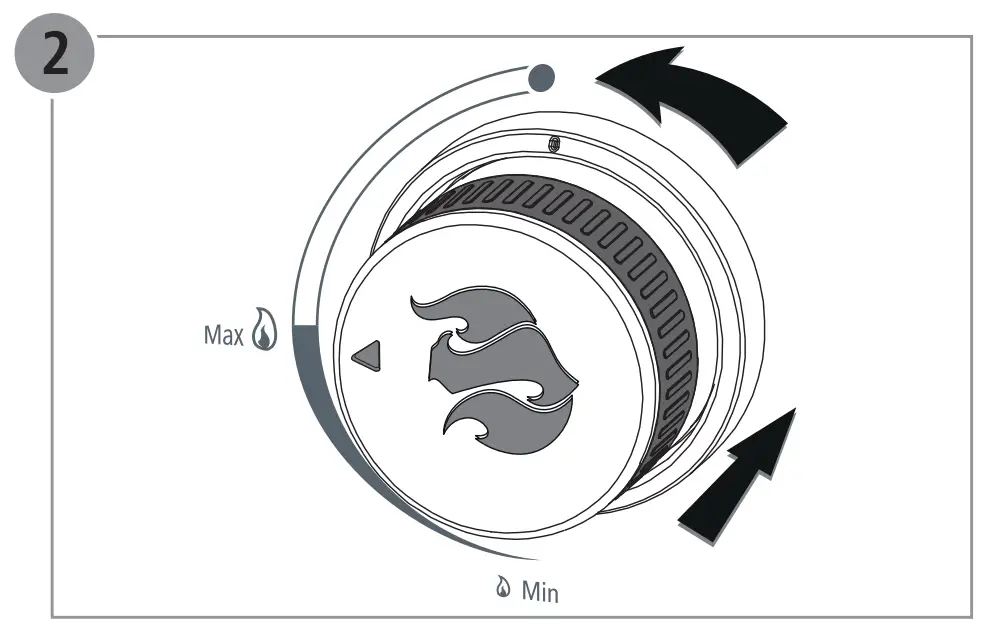
- Each burner has its own ignition system and they can therefore be ignited individually. Press the control knob and turn it anti-clockwise to the MAX position. Hold down the control knob (2).
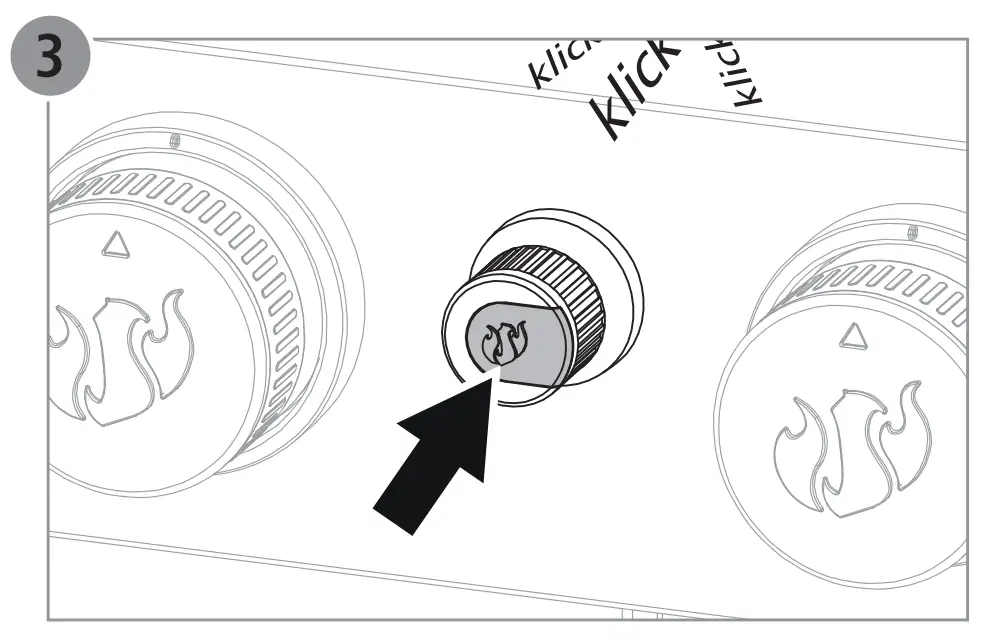
- Press the electronic ignition button (3). You should hear a clicking sound.
- Check whether the burner has been ignited. Carefully look through the cooking grill to see if flames come out of the burner.
- If the burner has not ignited, press the control knob and turn it back to the 0 position. Wait for 5 minutes to allow the gas in the combustion chamber to dissipate. Then repeat the ignition process.
- If the burner has ignited, repeat the above steps for the remaining burners.
![]() WARNING! Open the cover during the ignition process.
WARNING! Open the cover during the ignition process.
![]() WARNING! Do not bend over the cooking area when igniting the burners.
WARNING! Do not bend over the cooking area when igniting the burners.
![]() WARNING! Each burner must be ignited individually by pressing the electronic ignition.
WARNING! Each burner must be ignited individually by pressing the electronic ignition.
![]() WARNING! If the burner has not ignited, press the control knob and turn it back to the 0 position. Wait for 5 minutes to allow the gas in the combustion chamber to dissipate. Then repeat the ignition process.
WARNING! If the burner has not ignited, press the control knob and turn it back to the 0 position. Wait for 5 minutes to allow the gas in the combustion chamber to dissipate. Then repeat the ignition process.
Switching off the barbecue
- Close the gas supply on the gas cylinder (see operating manual).
- Press the control knob and turn it clockwise to the 0 position.
Notes on the side burner
Exclusively use cookware on the side burner that has been approved for use on gas cooking appliances.
To ensure the stability of the cookware, the diameter must not be less than stated:
| min. diameter | max. diameter |
| Ø 14 cm | Ø 22 cm |
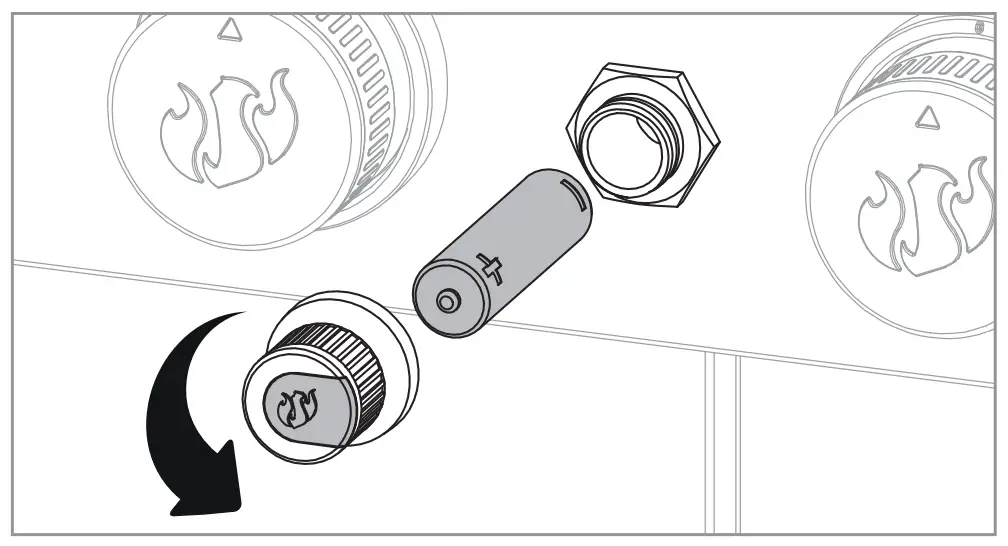
Replacing the electronic ignition battery
Turn the electronic ignition button anti-clockwise and insert or replace an AA battery.
Assembly Instructions
EC – Declaration of Conformity
We, LANDMANN Germany GmbH, hereby declare that the gas appliance described here complies with EU regulation 2016/426.
Conformity has been verified by a type examination according to EN 498:2012 and EN 484:2019.
The type examination was carried out by the notified body DBI (2531).
Product identification number: 2531CU-0061
Please contact our service department for further information.
Customer Support
LANDMANN Germany GmbH
Am Heisterbusch 1
19258 Gallin
Deutschland
Tel: +49 40 67573 190
E-Mail: [email protected]
Website: https://landmann.de
LANDMANN Ltd.
Unit 6
Blackstone Road
Stukeley Meadows Huntingdon
PE29 6EF
United Kingdom
Tel: +44 14 80 42 17 20
E-Mail: [email protected]
Website: https://landmann.com/uk
LANDMANN Germany GmbH
Bureau Commercial France
Tel: +33 1 64 69 12 14
E-Mail: [email protected]
Website: https://landmann.com/fr