SARGENT DX320-12 DC to DC Battery Charger

Overview
This DC-DC charger provides multi-stage charging of a leisure battery from the vehicle battery. The unit is compatible with smart or traditional alternator types and is able to charge most leisure vehicle batteries.
Key Features
- Selectable charging for Flooded, AGM, Gel & Lithium batteries
- 3-Stage charging profile for fast effective charging
- Fully automatic operation when vehicle is started
- Protected against overheating, overvoltage, short circuit, over-current
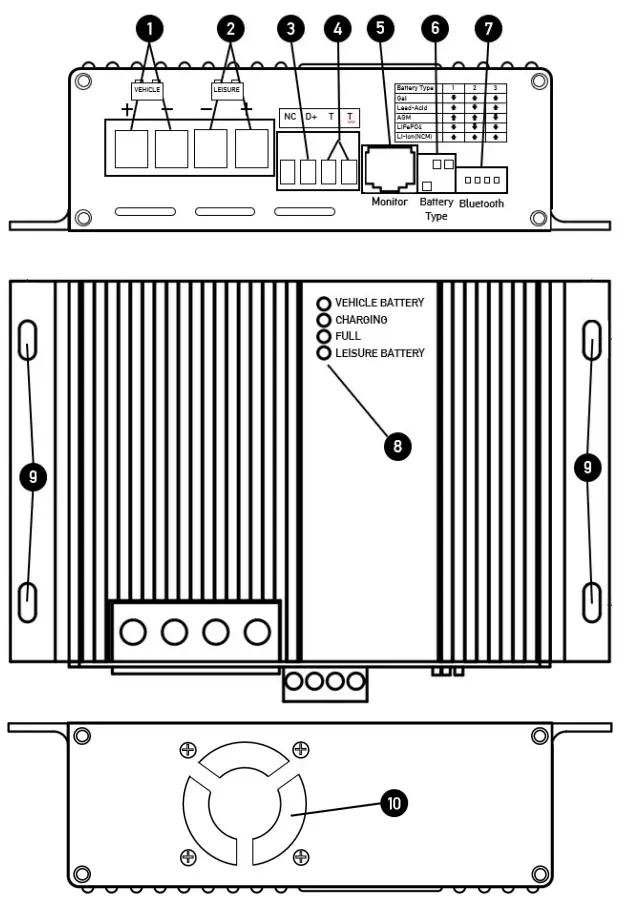
- Vehicle battery inputs
- Leisure battery outputs
- Engine running signal (D+)
- Temperature sensor inputs (optional)
- Display panel input (optional)
- Battery type selection switches
- Bluetooth module input (optional)
- Charge Status indicators
- Screw fixing points
- Cooling fan
Installation
The charger should be installed horizontally or vertically as close to the leisure battery as possible, ensuring the surrounding area is dust free and well ventilated. During operation the chargers cooling fan will exhaust warm air, so ensure there is at least 10cm clear around the charger at all times.
Wiring & Fusing
When fitting, try to keep cabling runs as short as possible and do not underrate, as this will lead to excessive voltage losses and reduced performance. Under full load the charger will draw a large amount of current and the input side will typically draw larger currents than the output by a factor of up to 25%. Please refer to the table to select a suitable wiring gauge, length and recommended fuse rating.
| Cable | Up to 3m | Up to 6m | Up to 10m | Fuse |
| from Vehicle battery | 4mm2 12AWG | 6mm2 l0AWG | 10mm2 7AWG | 30A |
| to Leisure battery | 3mm2 13AWG | 4mm2 12AWG | 6mm2 10AWG | 25A |
Connections
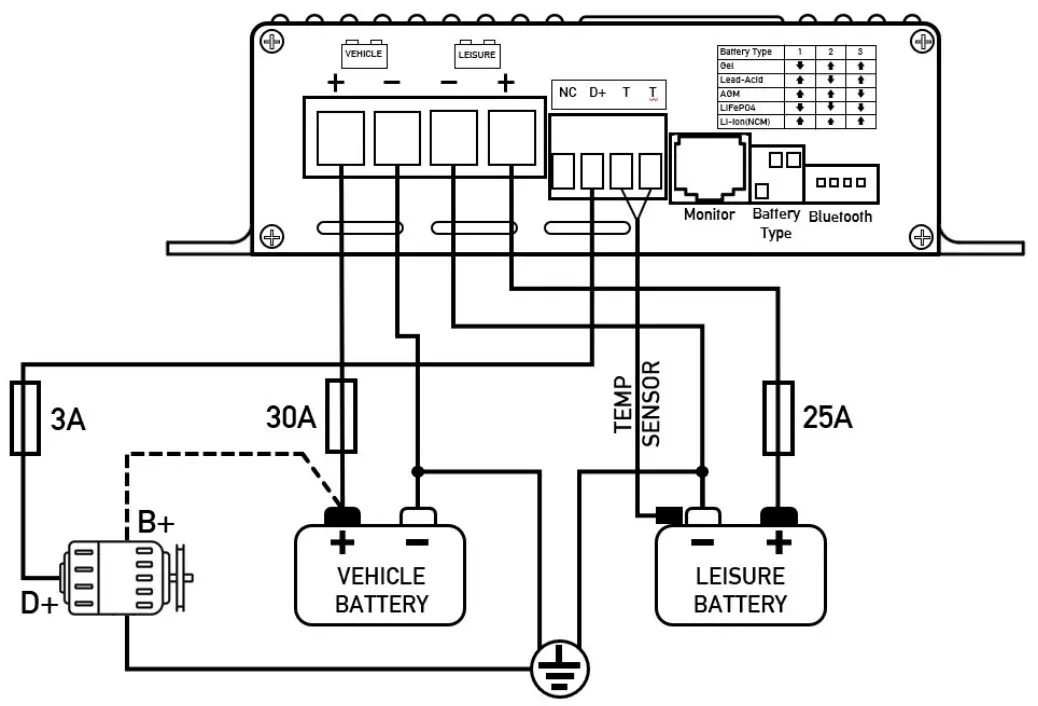
Note:- Reverse connection of the battery may blow internal fuses and cause damage to the unit.
Engine Running Signal (D+)
The D+ input is used to automatically turn on the charger when the engine is started. Connect a signal wire to the D+ terminal of the vehicles alternator as shown in the diagram. On vehicles with smart alternators it may not be possible to connect directly to the alternator, in which case consult the vehicle manufacturer for a suitable location. Alternatively the D+ input may be connected to a switched ignition circuit. Note:- If using this method care must be taken, as leaving the ignition in the On position with the engine Off may result in over discharge of the vehicle battery.
Temperature Sensor (optional)
With the optional temperature sensor fitted, the charger can adjust the rate of charge, depending on the ambient temperature. For example in winter the charge rate will be increased and in summer it will be reduced. It is recommended to install the sensor on the negative terminal of the Leisure battery or on the battery casing. Note:- The unit will use a default setting if the temperature sensor is not fitted.
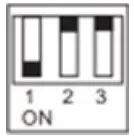
Battery Selection
Before using the charger, ensure the correct battery type has been set using the selector switches.
Setting | Battery Type |
 | Gel |
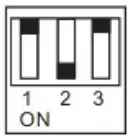 | Lead Acid |
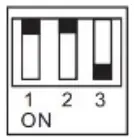 | AGM |
 | LiFeP04 |
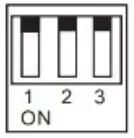 | Lithium Ion |
Note:- If an invalid selection is chosen, all status indicators on the unit will flash.
Charging profile
Depending on the battery type selected, the 3-stage charging profile will be adjusted to maximize charging performance.
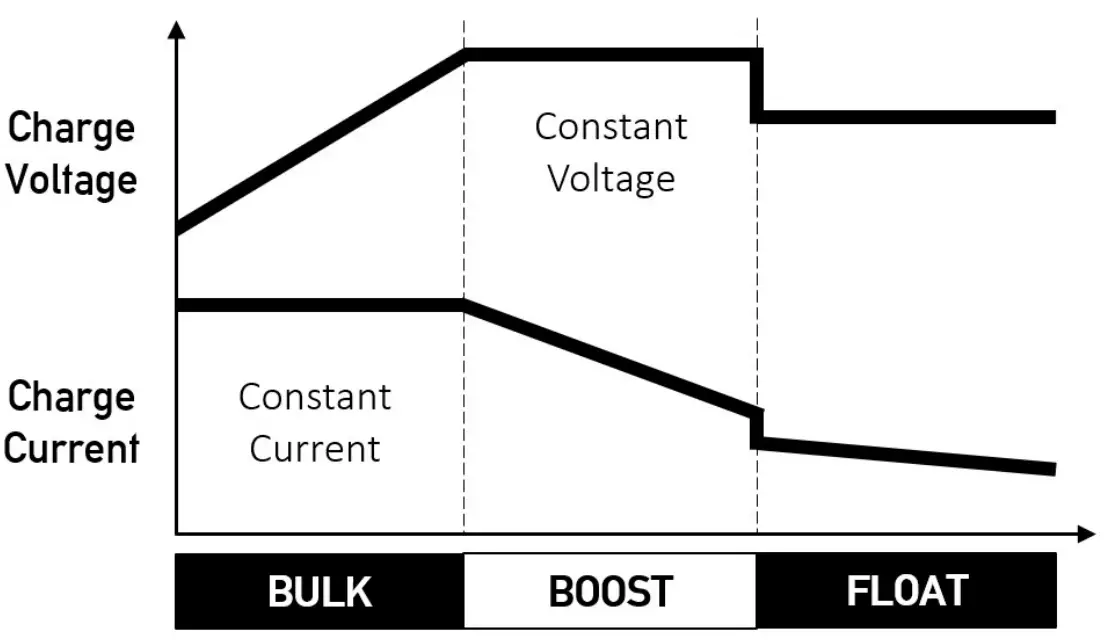
BULK | The battery is charged with maximum current, whilst the voltage climbs steadily, until the boost voltage setting is reached. |
BOOST | The battery voltage is held constant while the current gradually decreases, until the battery is becoming full. By default the boost stage will not exceed 2 hours to prevent overcharging. |
FLOAT | The voltage of the battery will reduce to the float voltage setting and current will reduce to a trickle charge to help offset any self-discharge. |
The following table shows voltages used for each battery type setting
Battery Type | Gel | Lead Acid I | AGM | LiFePO4 | Lithium Ion |
Equalize charge | – | 14.6V | 14.BV | – | – |
Boost charge | 14.3V | 14.4V | 14.7V | 14.4V | 12.6V |
Float charge | 13.BV | 13.5V | 13.5V | 13.BV | 12.5V |
Over voltage protect | 15.5V | 15.5V | 15.5V | 15.5V | 13.5V |
Low voltage alarm | 11.0V | 11.0V | 11.0V | 11.0V | 9.3V |
Boost charge time | 2hrs | 2hrs | 2hrs | 2hrs | 2hrs |
Safety charging volts | 12.BV | 12.BV | 12.BV | 13.0V | 12.0V |
High voltage recover | 13.7V | 13.7V | 13.7V | 14.BV | 12.BV |
| Boost voltage recover | 13.2V | 13.2V | 13.2V | 13.2V | 12.0V |
Operation
Indicators
During charging, indicators on top of the unit will show the current mode of operation, as shown in the following table
Indicator | Flashing | Status |
Vehicle Battery | Off | No O+ signal detected. charger is Off Vehicle battery voltage < 11.5V Vehicle battery voltage > 16V Vehicle battery voltage is normal |
Charging | Off | No charging Battery temperature too high or lithium temperature too low Charger has overheated Charging is normal |
Full | Off | No charging Bulk charging stage Boost charging stage Float charging stage (Fully charged) |
Leisure Battery | Slow | Leisure battery voltage is normal Leisure battery voltage is high Leisure battery voltage is low |
All | Fast | Battery selection error |
Note:- During power-on, all indicators will flash for 1 second then go out to confirm correct operation.
Power Derating
If the vehicle battery voltage becomes low, the output current will be reduced to avoid over discharge and vehicle starting problems.
Vehicle battery voltage | Charge Current | Recovery Voltage | Charge Current |
> 12.6V | 20A | – | – |
< 11.9V | 17A | > 12.25V | 20A |
< 11.7V | 13.5A | > 12.lV | 17A |
< 11.5V | l0A | > 12.0V | 13.5A |
< 11.2V | Stop charging | > 12.6V | 20A |
Note:- If the vehicle battery voltage falls below 11.2V then charging will be stopped until the battery is recharged above 12.6V
Protection
If there is a problem during charging, the unit will sound an alarm and may also shut down to protect itself. The following table shows the various protection modes.
Protection | Error | Action |
Leisure Battery over voltage |
| Turn off charging and sound alarm for 1 minute |
Leisure Battery low voltage | Battery voltage < Low voltage alarm | Sound alarm for 1 minute |
Vehicle Battery low voltage |
|
|
Over load | Battery current > 20A | Current limited to 20A |
Reverse polarity | Battery connections reversed | Internal fuse blows* |
Over Temperature |
|
|
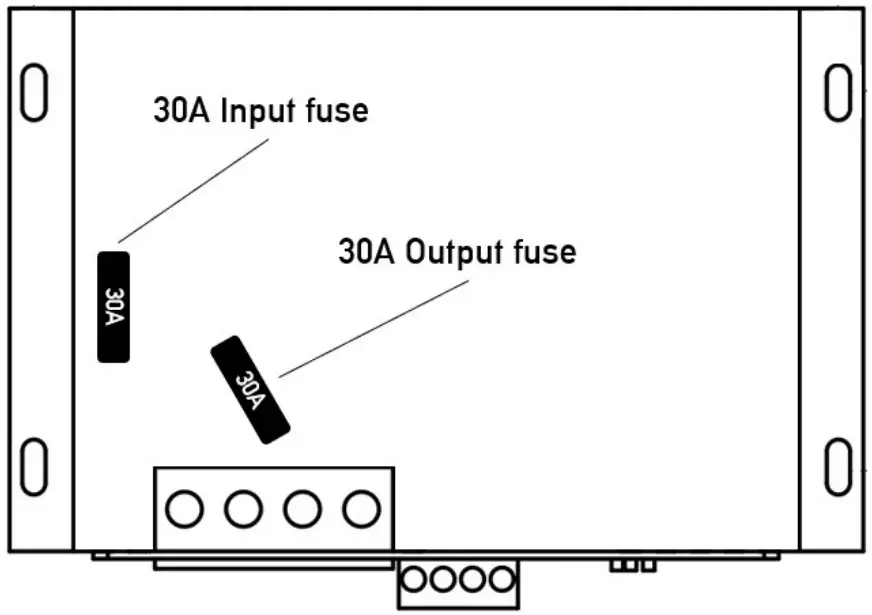
* – If an internal fuse blows, it can be replaced by removing the top cover.
To do this unscrew the uppermost 2 x screws on each end plate and the top cover can then be removed.
Specification
Model | DX320-12 |
| Battery types | Gel. Lead acid. AGM, LiFePO4. Lithium (NCM) |
| Battery voltage range | 8-16V |
| Battery capacity | 30 -180Ah |
| Unit voltage range | 10.5 – 16V |
| Power(max) | 260W |
| Current (max) | 20A |
| D+ signal voltage range | 8-16V |
| Temperature compensation | -3mV/°C |
| Standby current | 17mA (max) |
| Weight | 0.46kg |
| Dimensions | 147 x 118 x 41mm |
| Operating temperature | -20 – 50°c |
Sargent Electrical Services Ltd
Unit 39. Tokenspire Business Park. Beverley. East Yorks. HU17 OTB. UK
Phone, +44(0)1482 881655 I Fax, +44(0)1482 678987
Email: [email protected]
Tech Support, +44(0)1482 678981