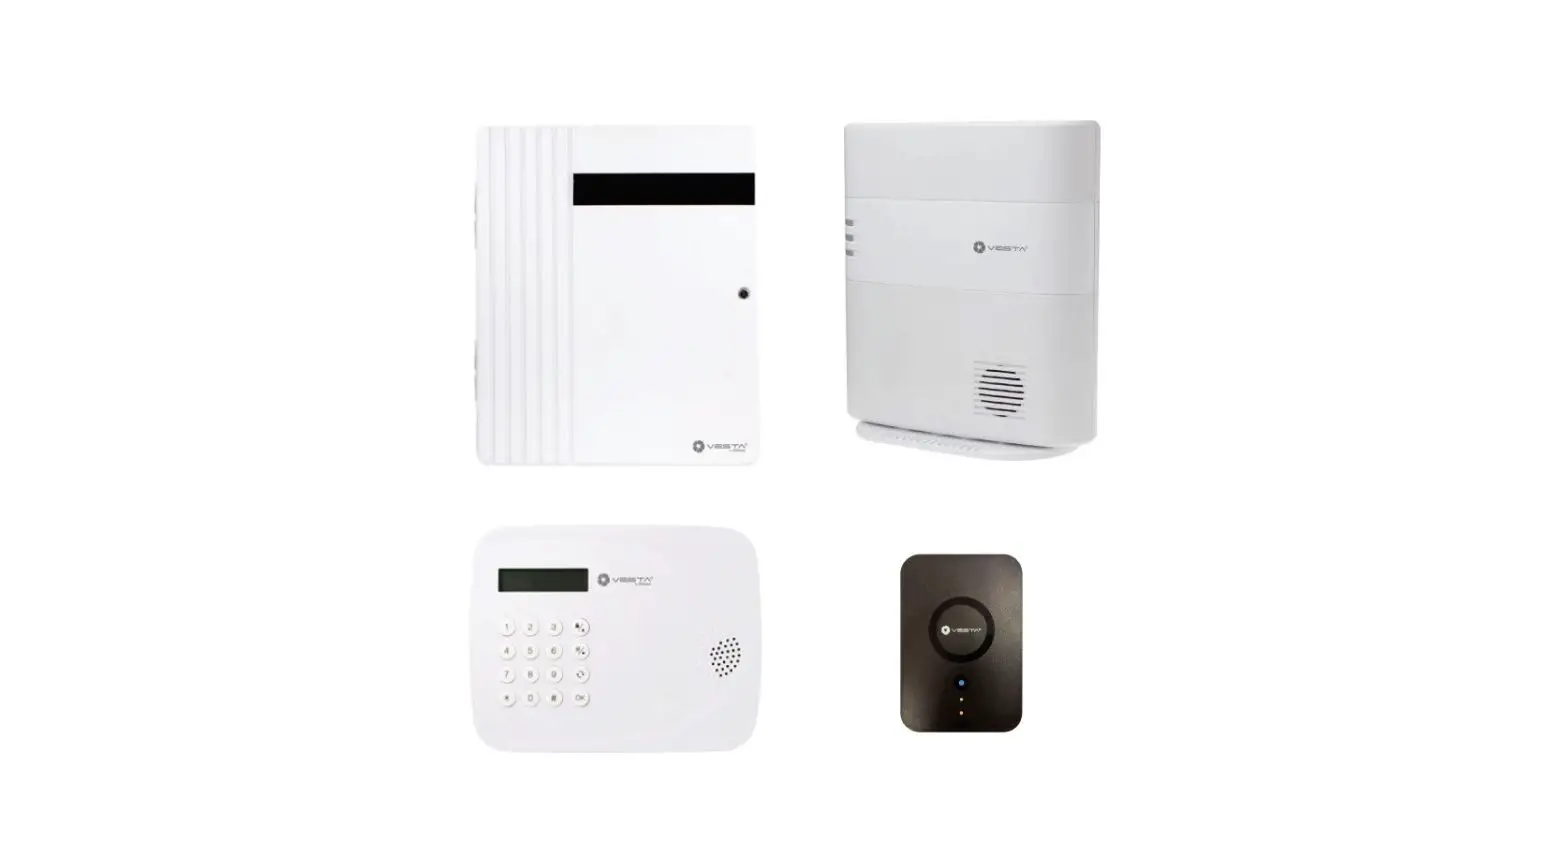
VESTA HSGW Series Alarm Centra
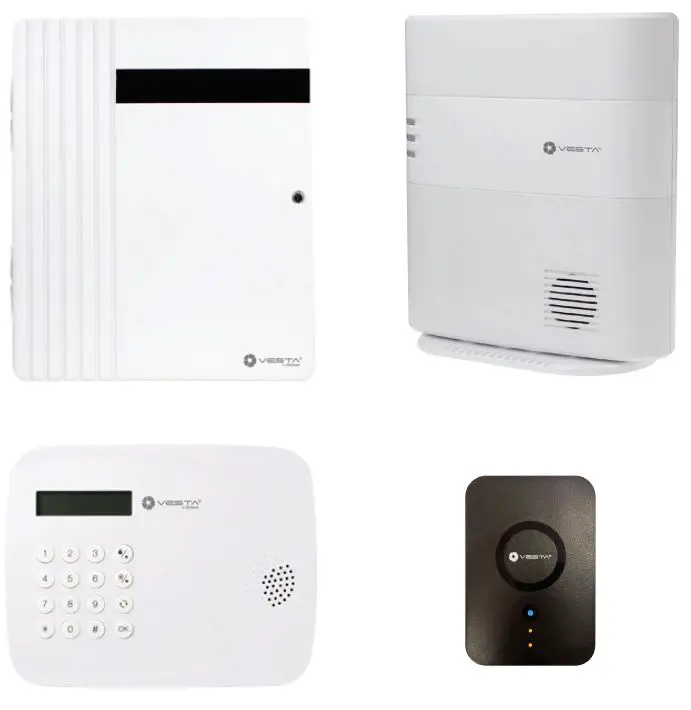
VESTA panel connection
Features and Commissioning of the VESTA panel: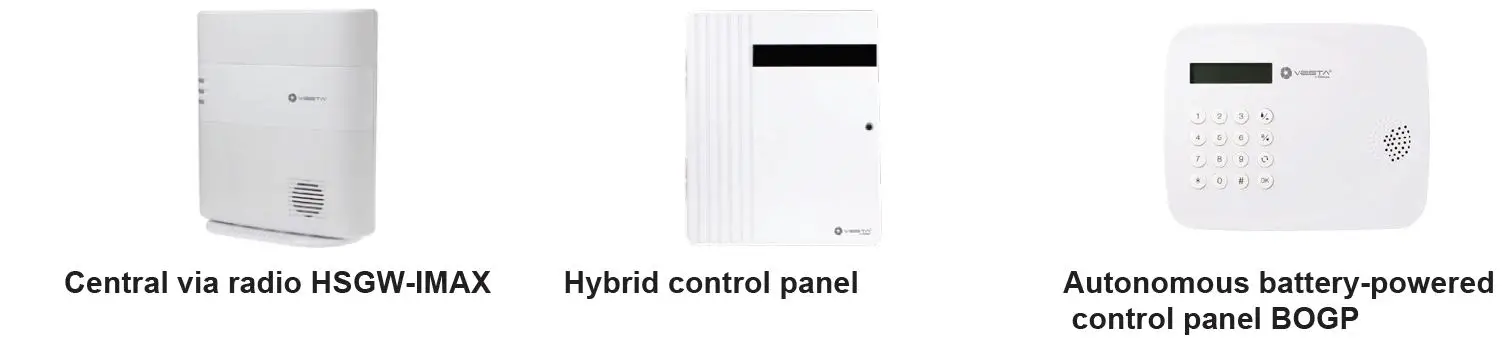
Central via radio HSGW-IMAX
- 320 Zones Via Radio F1 (2km)
- Built-in Z-Wave
- 2G/4G, ETHERNET
- Built-in siren / battery
- Grade 2 Certificate 2 EN-50131-1
Hybrid control panel
- Up to 320 zones
- Vía Radio F1 (2km)
- 16 on-board hardwired zones
- 2G/4G/WIFI, ETHERNET
- Optional: Z-WAVE and ZIGBEE
- Grade 3 Certificate
Autonomous battery-powered control panel BOGP
- 50-zone radio F1 (2km)
- Battery life: 1,2 years
- Communication: 2G/4G
- Built-in siren / keypad
- Grade 2 Certificate

- Insert SIM (2G, 3G, or 4G) “Optional”
- 2. Connect Ethernet cable
- Place the battery switch in the ON position
- Connect the DC adapter
- All LEDs will light up and after 10-15 seconds the gateway will be ready.
Register the panel from the APP or WEB
Once the panel is started for the first time, you have to Register to the Home portal Server. There are two ways:
- REGISTER PANEL FROM WEB
- REGISTER PANEL FROM APP: SmartHomeSec Available for iOS and Android
NOTE: If you are already registered and want to add more panels to your account, skip to step 2.2.2 If you are already registered and want to add more panels to your account, skip to step 3.5
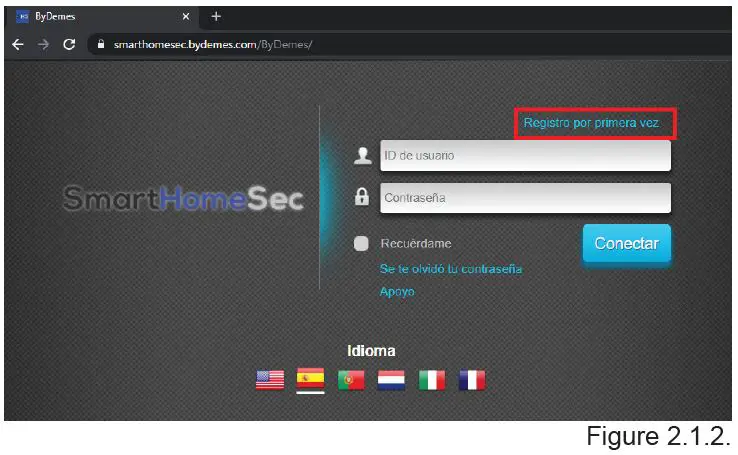
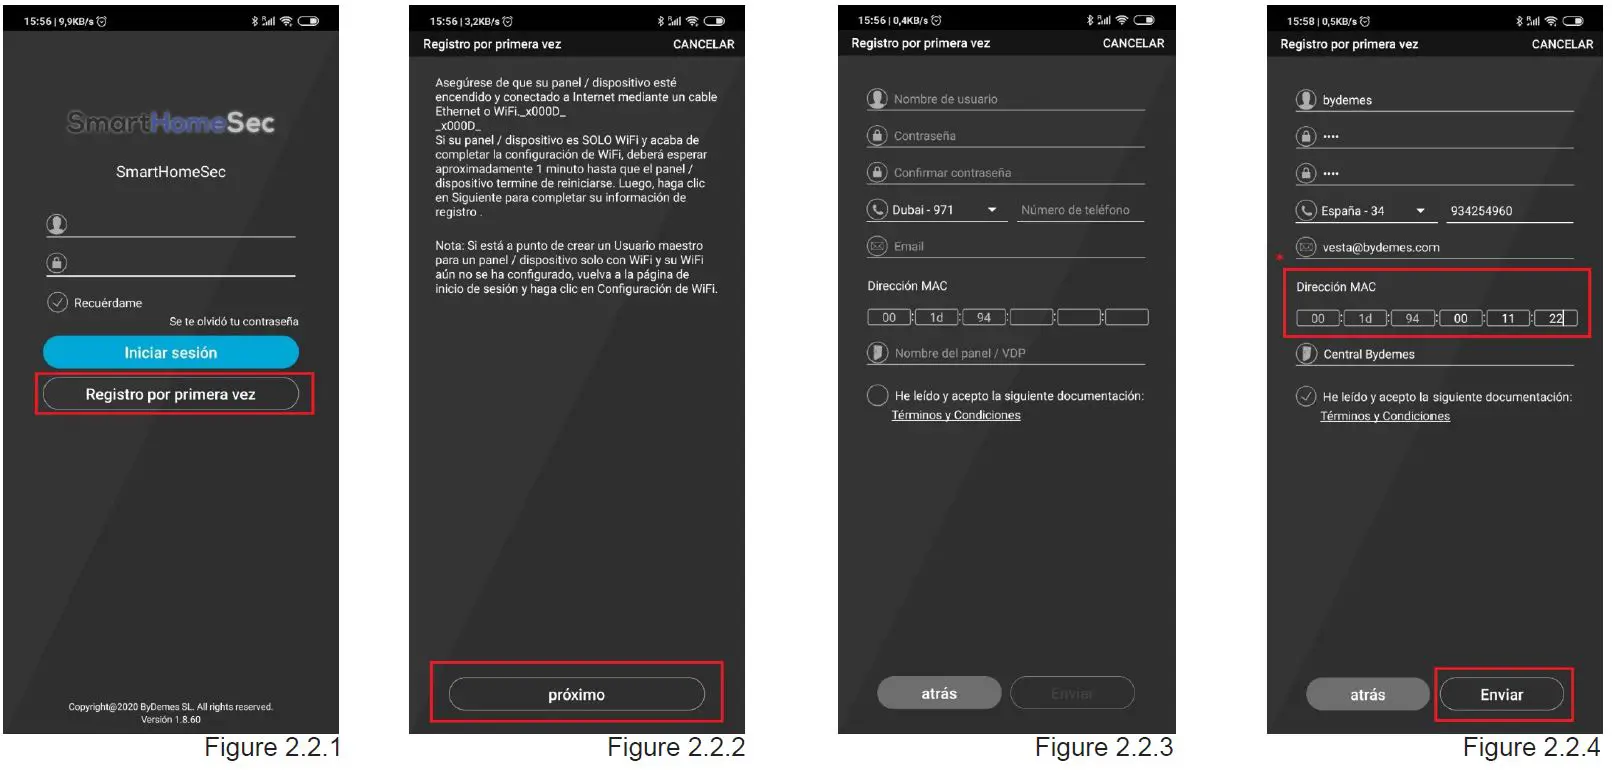
- Register the panel from the WEB 2.1.1. Navigate to the website SmartHomaeSec: https://smarthomesec.bydemes.com/ByDemes/


- Select First-time registration:
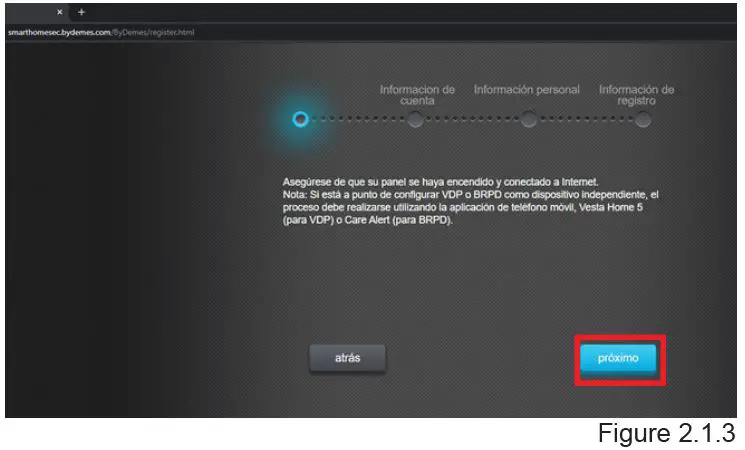
- Make sure your panel is ON and connected to the network:

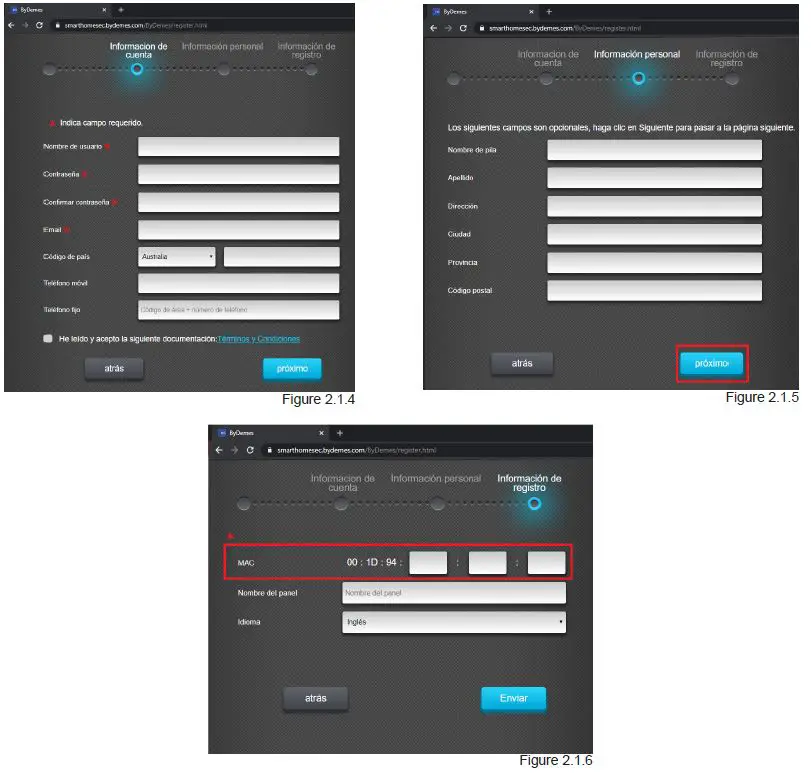
- Account info: Fill out the form with your data:
- Personal information: Fill in the form with your data:
- The MAC address is located on the side of your panel. Give your panel a name and select the desired language.
Once the process is finished you will receive a confirmation email, your panel is registered.
- Add more panels to your account:
- Navigate to the website SmartHomeSec: https://smarthomesec.bydemes.com/ByDemes/
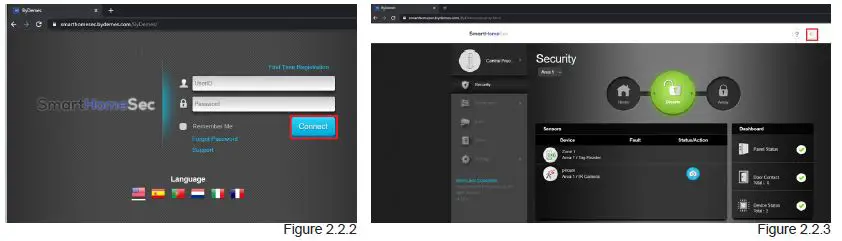
- Enter the registered user and password
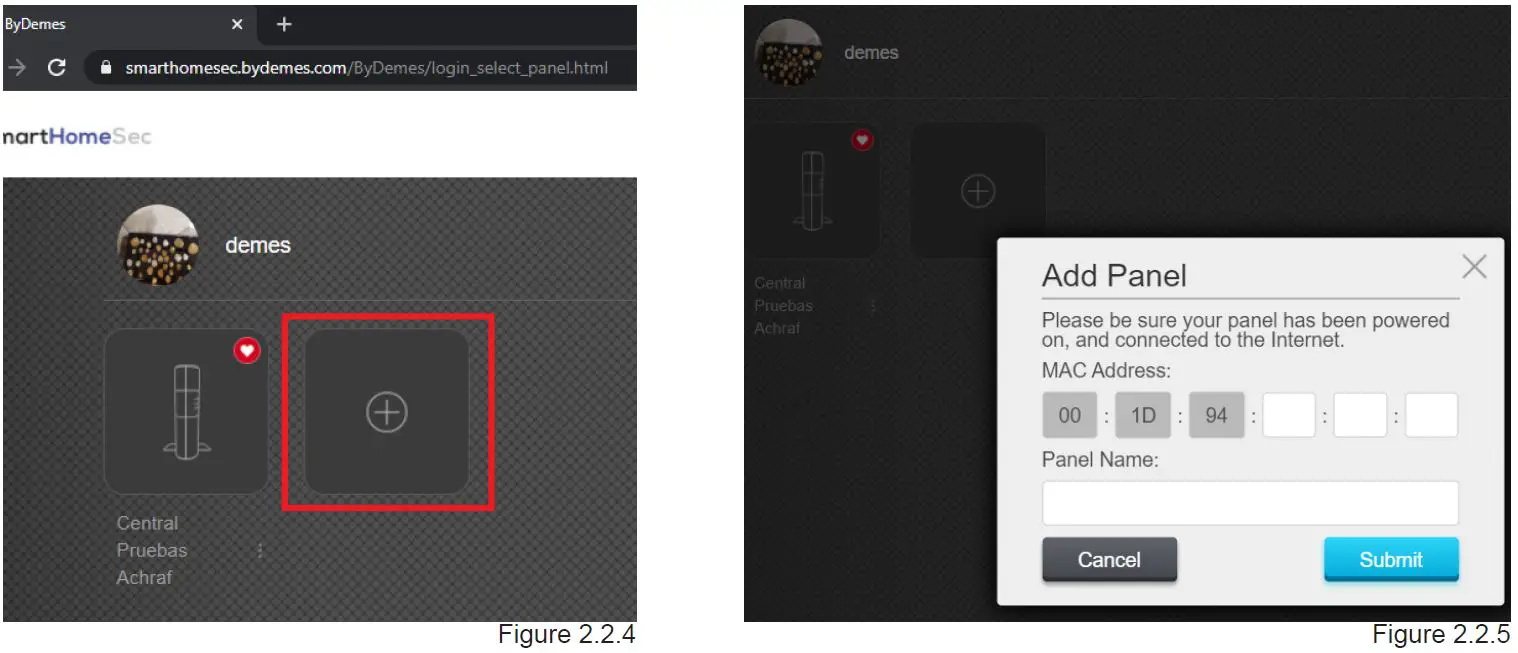
- Select: My panels

- Select: Add new panel
- The MAC address is located on the side of your panel. Give your panel a name and select the desired language.
Once the process is finished you will receive a confir-mation email, your panel is registered.
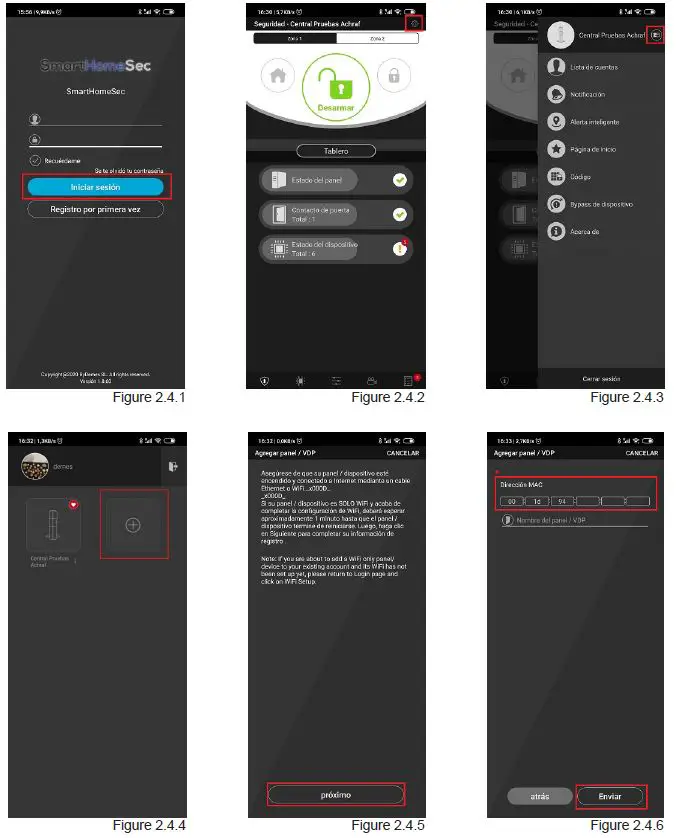
- 2.3. Register the panel from the APP
- Select: First-time registration.
- Make sure your panel is on and connected to the network
- Fill out the form
- . The MAC address is located on the side of your panel
- You receive a confirmation email.
The panel is now ready.
- 2.4. Add more panels to your account:
- Enter the registered user and password 2.4.2. Go to Settings
- Select: My panels
- Select: Add a new panel
- . Make sure your panel is on and connected to the network.
- The MAC address is located on the side of your panel
- Register the panel from the WEB 2.1.1. Navigate to the website SmartHomaeSec: https://smarthomesec.bydemes.com/ByDemes/
Add Devices
Navigate to the website SmartHomeSec: https://smarthomesec.bydemes.com/ByDemes/
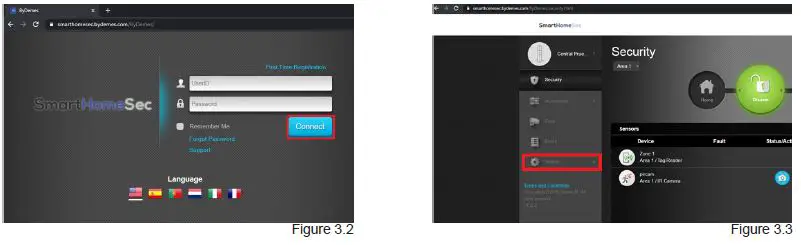
- Access with registered username and password.
- Select Setting.

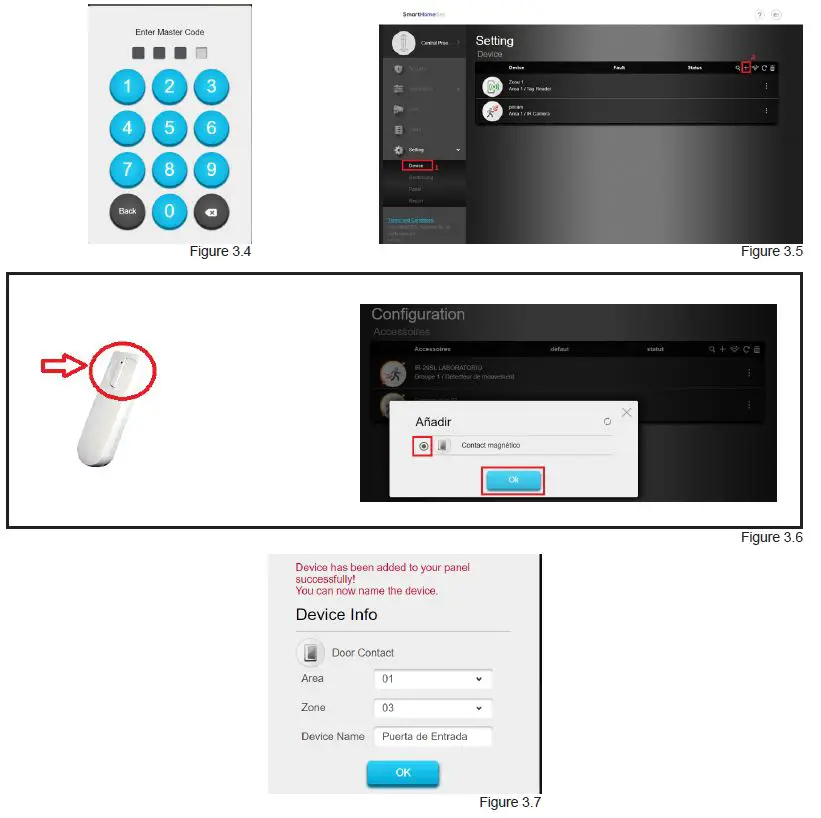
- Enter INSTALLER code
default [7982]. - Select Device [1] and Add device [2]. The panel is ready to add devices.
- . Press the enroll button on the device you want to add. Example: DC-16SL magnetic contact. Once detected in the panel, select the device and OK.
- . Select Area 1 / 2, and assign a name to the zone. The device is successfully added to the panel.
Zone configuration

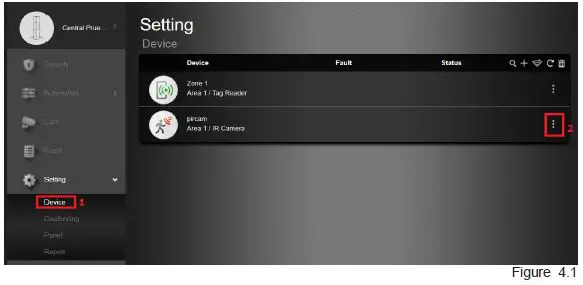
- To configure a device: enter Devices [1] and select device configuration [2].
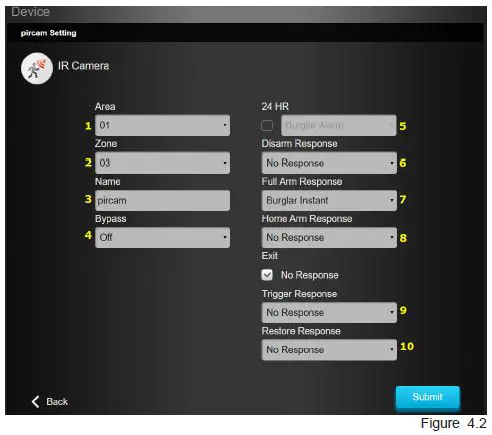
- Device configuration.
- Select Area [1/2]
- Select zone number from [1-80]
- Assign a zone Name [“PIR room”]
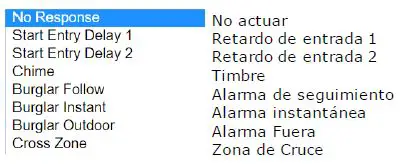
- Bypass ON -> When arming/disarming the system auto cancels the fault. Bypass OFF -> When arming / disarming the system notifies of faults (Door Contact: open)
- 24h zone
- Actions with the Disarmed panel
- Actions with the Armed panel
- Actions with the Home Armed panel

- Apply Scene when detecting
- Apply Scene when restoring
Geofence configuration on the WEB
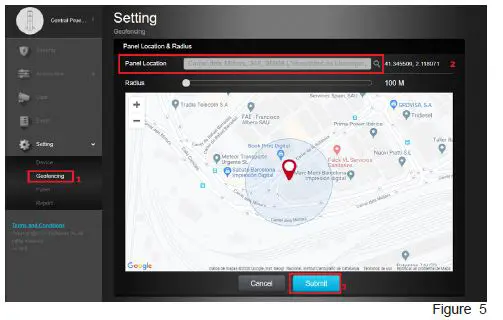
- Enter Settings and select: Geofencing [1]
- Select your location [2]
- Accept [3]
You can now use Geofence from the APP SmartHomeSec
Geofence configuration on the APP SmartHomeSec
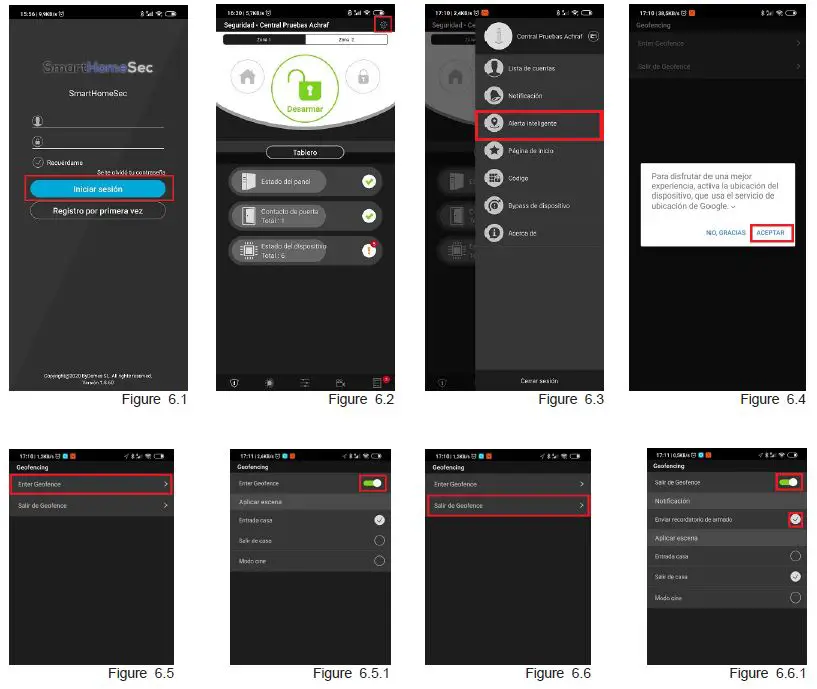
To configure geolocation on the mobile phone, enter the SmartHomeSec App:
- Enter the registered user and password.
- Go to Settings.
- Select Smart Alert.
- Accept permissions to GPS location.
- To configure the actions when entering Geofence:
- Enable Input and select Scene to apply.
- To configure actions when exiting Geofence:
- Enable the Output and select Scene to apply.
NOTE: When entering or leaving the Geofence zone, you can apply preconfigured scenarios on the panel. On stage we can have the panel assembled or disassembled, Turn lights on / off …
Scenes
Description
Scenes allow you to establish a group of actions that the Control Panel can carry out with your home automation devices. The user can program the scene to manually activate a set of devices, or automatically activate them using a pre-programmed rule (See Section 8 for more details on Rules.)
| SCENE ACTIVATION | DEVICES INVOLVED | DEVICE ACTION |
| The activation of the scenes can be in several ways such as: A scene selector, Geofence, with a device such as a detector / magnetic contact … etc or with Rules | Living Room Outlet | DELETE |
| House lights | DELETE | |
| Heating | ADJUST TEMPERATURE TO 22ºC | |
| TV | DELETE | |
| Panel: Mode Change | ARMED |
As can be seen in the Example, this scene can be operated with a device such as a detector, magnetic contact, Geofence, scene selector, APP / WEB, or rules … By activating the example scene, it will turn off the plugs, lights, adjust the temperature at 22ºC, it will turn off the TV and finally it will change the panel to ARMED mode. Therefore, with just one scene action we control the status of all the desired devices and adjust them to the desired needs.
SUMMARY: Activation of the scene = Activate the list of devices involved
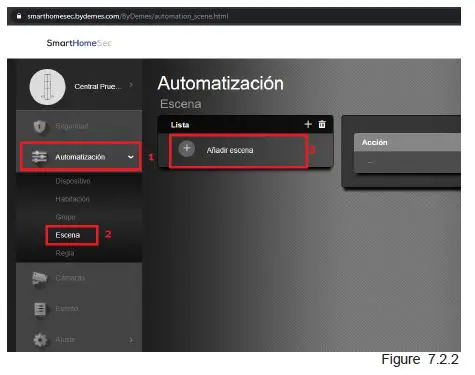
- Add a scene from (HomePortalServer)
- To create new Scenes from the WEB: https://smarthomesec.bydemes.com/ByDemes/

- Enter the panel with username and password and select: Automation [1] –> Scene [2] -> Add scene [3]

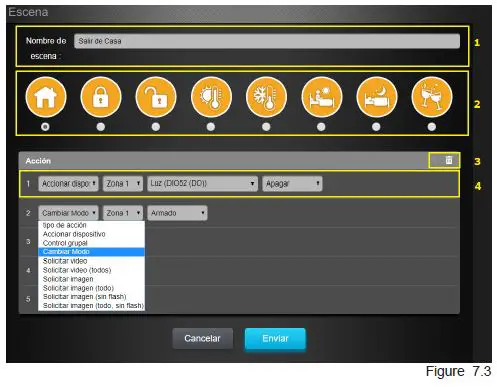
- Scene Parameters (HomePortalServer). A maximum of 10 Scenes can be created and each with a maximum of 5 different actions
- Assign a name to the Scene
- Select an Icon “Optional”
- Add/ Delete Action.
- Configuration of the action to be carried out:
- In the photo Ex.:
Action 1: Turn off the device light Action 2: Arm partition 1
To save the configuration select Submit.
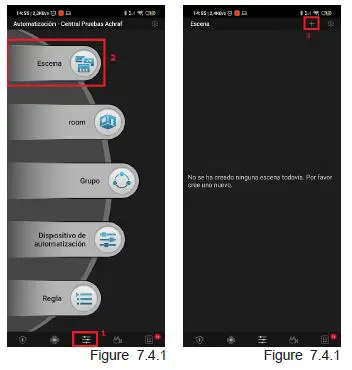
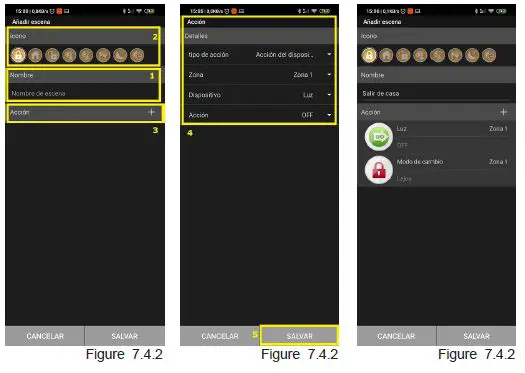
- Add a scene from APP (SmartHomeSec). A maximum of 10 Scenes can be created and each with a maximum of 5 different actions.
To create new Scenes from the APP:
- Enter the panel with username and password and select: Automation [1] –> Scene [2] -> Add scene [3]

- Scene Parameters (see directions).
- Assign a name to the Scene
- Select an Icon “Optional”
- Add/ Delete Action.
- Configuration of the actions to be carried out:
To save the configuration select Save / Submit.
- Enter the panel with username and password and select: Automation [1] –> Scene [2] -> Add scene [3]
- To create new Scenes from the WEB: https://smarthomesec.bydemes.com/ByDemes/
Rules
Description
The Rule subpage allows you to establish a list of rules under certain conditions. For example, you can determine which device will activate in a pre-program-med lux level range, temperature range, or calendar. You can also select the type of action to perform, or simply apply the scene previously created under the Scene subpage
| RULE ACTIVATION | CONDITIONS | ACTIONS TO BE TAKEN |
| The activation of the rule, can be done by calendar, sensors, mode change (Arming/disarming…), Motion detection for a time… In this example: Calendar – Monday to Friday at 6:00 p.m. | System: Armed | Activate the solenoid valve relay for 10 minutes |
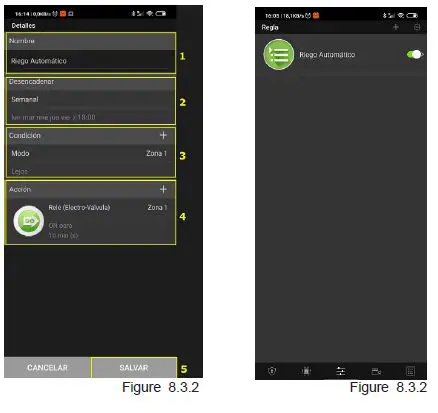
Example of Rule: AUTOMATIC WATERING
As can be seen in the Example, this Trigger Rule from Monday to Friday at 6:00 p.m., In conditions* is optional, in this case the rule will always be followed: it is a day from Monday to Friday at 6:00 p.m. and system or panel is armed, meaning that the solenoid valve relay will be activated for 10 minutes or some other desired time.
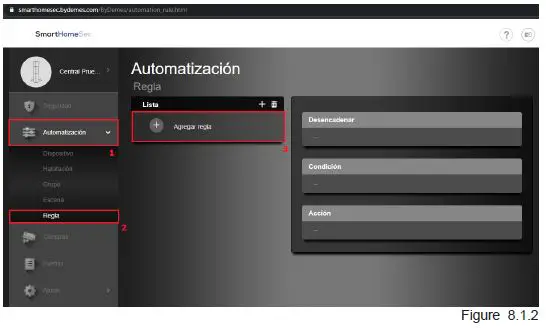
- Add a Rule from (HomePortalServer)
- Add a Rule from (HomePortalServer) 8.1.1. To create new Rules from the WEB: https://smarthomesec.bydemes.com/ByDemes/
- Enter the panel with username and password and select: Automation [1] –> Scene [2] -> Add scene [3]

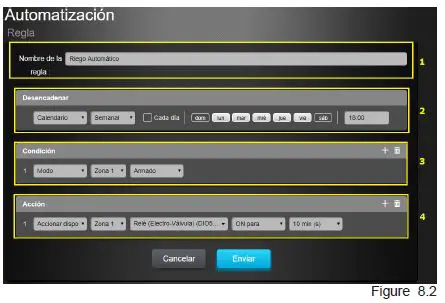
- Rule Parameters (HomePortalServer)

A maximum of 100 different rules can be created. 8.3. Add a Rule from the APP (SmartHomeSec). A maximum of 100 different rules can be created.- Assign name to the Rule
- Select how this rule will be activa-ted. Eg.: Calendar
- Conditions “Optional”
- Configuration of the actions to be carried out once the above conditions have been met.
Eg.: - Action 1: Activate the solenoid valve relay for 10 minutes. (Eg. Automatic Irrigation)
To save the configuration select Submit.
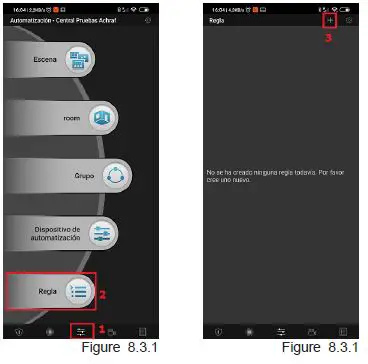
- Add a Rule from the APP (SmartHomeSec). A maximum of 100 different rules can be created.

- Enter the panel with username and password and select: Automation [1] –> Rule [2] -> Add Rule [3]

- Rule Parameters (see directions).
- Assign name to the Rule
- Activation of the Rule
- Conditions “Optional”.
- Configuration of the actions to be carried out.
Eg.: Activate solenoid valve for 10 minutes. - To save the configuration, select Submit/Save.
Add / Delete user codes
The panel allows: Maximum 30 users per Area. In total 60 users.
Add / Delete user codes from the web. 9.1.1. Navigate to the website SmartHomeSec: https://smarthomesec.bydemes.com/ByDemes/.
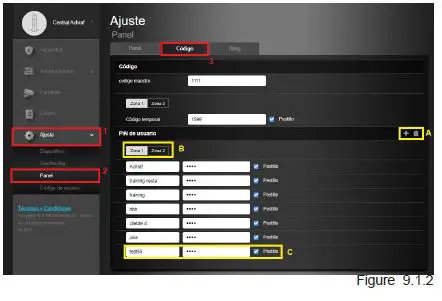
Enter with the Username and Password.
- Select Setting (Note: default Master code –> 1111)
- Enter Panel
- Select Code
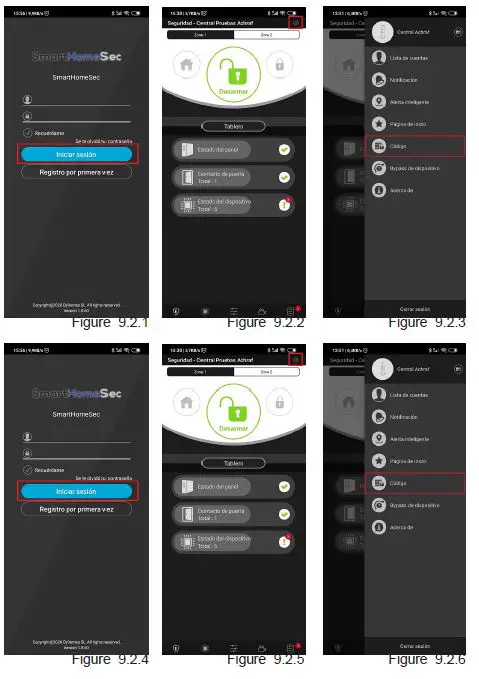
Add/Delete user codes: APP SmartHomeSec
 Go to Setting (Note: default Master code –> 1111)..
- Select Code.
- Default Master code: 1111.
- Select Add/Delete User and desired Area. 9.2.6. Assign username and code.
 Go to Setting (Note: default Master code –> 1111)..
Panel Configuration: Security
- Navigate to the website SmartHomeSec: https://smarthomesec.bydemes.com/ByDemes/
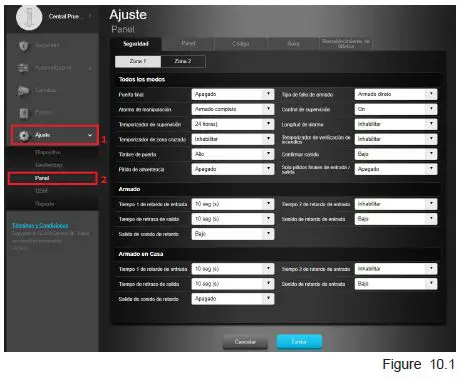 Within the Security sub-page, you can modify the security parameters:
- Entry delay time 1
- Entry delay time 2
- Exit delay time
- Alarm lenght “Siren activation time in case of alarm”
- Device tamper detection (With Armed panel or Always)
- Direct arming or Confirmation
- Volume of warnings
Enter with the username and password. [1] Select Setting (Note: default Installer code –> 7982) [2] Enter Panel
Panel Configuration: Panel
- Navigate to website SmartHomeSec: https://smarthomesec.bydemes.com/ByDemes/
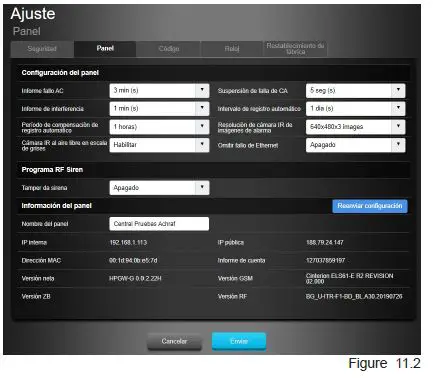
 Within the Panel sub-page, you can modify the panel parameters:
Time to notify: AC Power Failure- Time to Report: RF Interference
- Supervision time
- Test interval (The panel sends the test by the push to the APP and email)
- PIRCAM photo resolution
- Enable/disable siren tamper
- Change panel name
- Enter with the username and password. [1] Select Setting (Note: default Installer code –> 7982) [2] Enter Panel
 Within the Panel sub-page, you can modify the panel parameters:
Panel Configuration: Code
- Navigate to the website SmartHomeSec: https://smarthomesec.bydemes.com/ByDemes/
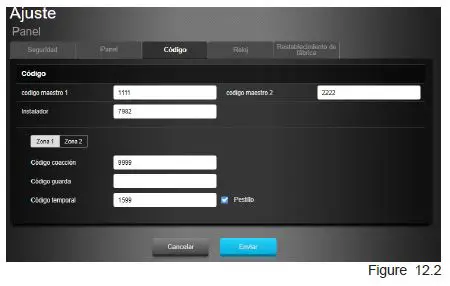
 Within the Code sub-page, you can modify the access parameters:
- Area 1 and Area 2 Master code
- Installer code
- Duress code “Silent Alarm”
- Guard code
- Temporary Code “Arming Only”
- Enter with the username and password. [1] Select Setting (Note: default Installer code –> 7982) [2] Enter Panel
 Within the Code sub-page, you can modify the access parameters:
Panel Configuration: Restore to Factory Settings
- Navigate to website SmartHomeSec: https://smarthomesec.bydemes.com/ByDemes/
- Enter with the username and password. [1] Select Setting (Note: default Installer code –> 7982) [2] Enter Panel

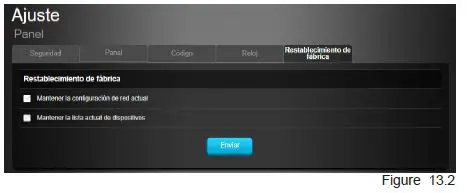
Within the Factory reset sub-page, you can restore your panel settings to factory settings:
- Check the Keep current network settings check box to keep current network settings. Otherwise, the sys-tem will reset its value to the factory default values.
- Check the Keep current device list box to keep current learned devices. Otherwise, the system will reset its value to the factory default values.
- Click “Submit” to restore factory settings.
GSM Configuration
- Navigate to website SmartHomeSec: https://smarthomesec.bydemes.com/ByDemes/
- Enter with the username and password. [1] Select Setting (Note: default Installer code –> 7982) [2] Enter GSM
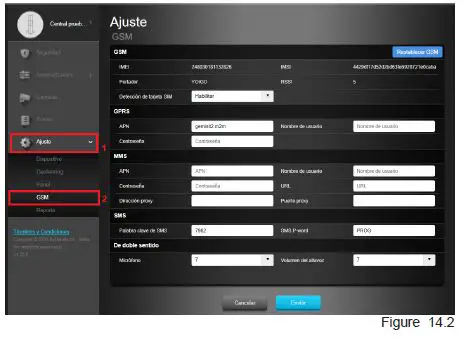
Within the GSM Page, you can modify the communication parameters by GPRS:
- It is very important to configure the APN in case you want a GPRS communication with a SIM card. You can consult your operator about the SIM APN and if you do not know it you can write:
- APN: internet
- User: Leave blank Password: Leave blank
- RSSI -> Signal level on a scale of [0 to 10]
- 0: Very bad signal
- 10: Very good signal
Report Configuration
- Navigate to website SmartHomeSec: https://smarthomesec.bydemes.com/ByDemes/
- Enter with the username and password. [1] Select Setting (Note: default Installer code –> 7982) [2] Enter Report

- Within the Report Page, you can configure the data of your receiver or event receiver.
- See the following pages for the permitted reporting format and group priority.
Report Settings: Report URL
This is used for the installer to program the reporting destinationsestinations.
- Manitou protocol via IP
Format: ip: // (Subscriber Number) @ (server IP) 🙁 Port) / MAN
Example: ip: //[email protected]: 8080 / MAN - Climax CID protocol via IP
Format: ip: // (Subscriber Number) @ (server IP) 🙁 Port) / CID
Example: ip: //[email protected]: 8080 / CID - IA DC-09 protocol via IP
Format: ip: // (Subscriber Number) @ (server IP) 🙁 Port) / SIA
Example: ip: //[email protected]: 8080 / SIA\ - SIA DC-09 protocol using CID event code via IP
Format: ip: // (Subscriber Number) @ (server IP) :(Port) / CID_SIA
Example: ip: //[email protected]: 8080 / CID_SIA - CSV protocol via IP
Format: ip // (Subscriber Number) @ (server IP) 🙁 Port) / CSV
Example: ip: //[email protected]: 8080 / CSV - MS via GSM
Format: sms: // telephone / CID or sms: // telephone / TEXT
Example: SMS: // 1234 @ 0987654321 - VOIP
Format: report via sip server: sip: username or sip: username @ server report via an: sip: ip address
Example: sip: john / sip: [email protected] sip: 192.196.0.10 sip:192.196.0.10
Report Settings: Report Events
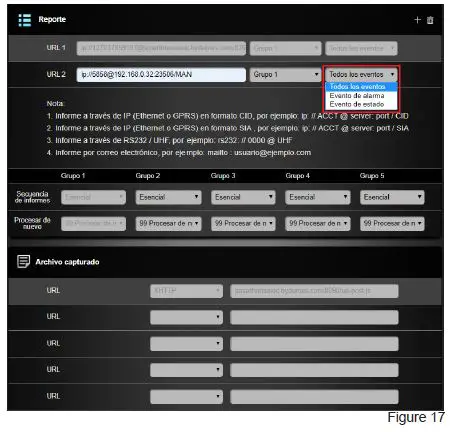
Select a Report condition:
All Events: The system will report all events to this destination.
Alarm events: The system will only report alarm events to this destination.
Status events: The system will only report status events (non-alarm events) to this destination.
Report Settings: Groups
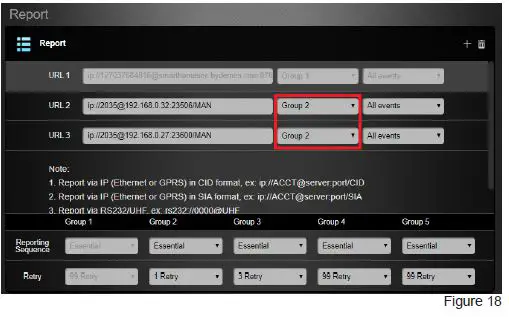
- In this case it reports in group 1 and jumps to URL2 group 2, if it reports correctly, it jumps to another group instead if it fails it reports to the next one in the same group in this case URL 3
- Select a group for the destination of your Receiver The system will make the report according to the following principle: The group with the highest priority will be informed first: Ex: Group 1 -> Group 2 -> Group 3 …
- If the report to the first destination in a group fails, the system will go to the next report destination in the group.
- If reporting one of the recipients in a group is successful, the system will consider this group successfully reported and will stop reporting to the other destinations in the same group. It will then proceed to report to the next group.
Example:
URL1: Group 1: Error -> URL2: Group 1
URL1 :Group 1: Reported -> URL3: Group 2
- Navigate to the website SmartHomeSec: https://smarthomesec.bydemes.com/ByDemes/

- Enter the username and password.
- Enter the panel name
- Enter Accounts List
- Select Add
- If you are a new client, select Create an account.
- Desired username
- Password for the user
- User email
- Once the account is created, an authentication email will be sent automatically.
- If the client already has other panels selected Link to exist account
- Existing username
- Password


