![]()
24 INCH INDOOR OUTDOOR REFRIGERATOR DRAWER TRF24U
COOK LIKE
A GOD
USE& CARE MANUAL
USE AND CARE MANUAL
24 INCH INDOOR OUTDOOR REFRIGERATOR DRAWER
TRF24U
APPLIANCE SAFETY
YOUR SAFETY AND THE SAFETY OF OTHERS ARE VERY IMPORTANT
We have provided many important safety messages in this manual and on your appliance. Always read and obey all safety messages![]() This is the Safety Alert Symbol. The symbol alerts you to potential hazards that can kill or injure you and others. All safety messages will follow the Safety Alert symbol and either the word DANGER or WARNING.
This is the Safety Alert Symbol. The symbol alerts you to potential hazards that can kill or injure you and others. All safety messages will follow the Safety Alert symbol and either the word DANGER or WARNING.![]() DANGER
DANGER ![]()
This is the Safety Alert Symbol. The symbol alerts you to potential hazards that can kill or injure you and others. All safety messages will follow the Safety Alert symbol and either the word DANGER or WARNING.![]() WARNING !
WARNING !
Warning means that failure to heed this safety statement may result in extensive product damage, serious injury, or death.
All safety messages will alert you about the potential hazard, tell you how to reduce the chance of injury, and let you know what can happen if the instructions are not followed.
IMPORTANT SAFEGUARDS
![]() Before the appliance is used, it must be properly positioned and installed as described in this manual, so read the manual carefully. To reduce the risk of fire, electrical shock or injury when using the appliance follow basic precautions, including the following.
Before the appliance is used, it must be properly positioned and installed as described in this manual, so read the manual carefully. To reduce the risk of fire, electrical shock or injury when using the appliance follow basic precautions, including the following.![]() DANGER
DANGER ![]()
Plug into a grounded 3 prong outlet, do not remove grounding prong, do not use an adapter, and do not use an extension cord.
Replace all panels before operating.
It is recommended that a seperate circuit serving only your appliance be provided. Use receptacles that cannot be turned off by a switch or pull chain.
Never clean appliance parts with flammable fluids. These fumes can create a fire hazard or explosion.
And do not store or use gasoline or other flammable vapors and liquids in the vicinity of this or any other appliance. The fumes can create a fire hazard or explosion.
Do not connect or disconect the electric plug when your hands are wet. Unplug the appliance or disconnect power before cleaning or servicing. Failure to do so can result in electric shock or death. Do not attempt to repair or replace any part of your appliance unless it is specifically recommended in this manual. All other servicing should be referred to a qualified technician.
FOLLOW WARNING CALLOUTS BELOW ONLY WHEN APPLICABLE TO YOUR MODEL
Use two or more people to mov and install appliance. Failure to do so can result in back or other injuries.
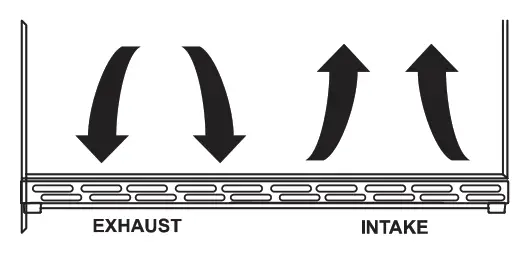
To ensure proper ventilation for your appliance, the front of the unit must be completely unobstructed.
Choose a well-ventilated area with temperatures above 50°F (10°C) and below 100.4 °F (38 °C). The appliance should ne be located next to the ovens, grils or other sources of high heat. The appliance must be installed with all electrical, water and drain connections in accordance with state and local codes. A standard electrical supply (115 V AC only, 60 Hz), properly grounded in accordance with the National Electrical Code and local codes and ordinances, is required.
Do not kink or pinch the power supply cord of the appliance.
The size of the fuse (or circuit breaker) should be 1.3 amperes. It is important that the appliance be leveled in order to work properly. You may need to make several adjustments to level it. All installations must be in accordance with local plumbing code requirements. Make certain that the pipes are not pinched, kinked or damaged during installation. Check for leaks after connection. Never allow children to operate, play with or crawl inside the appliance. Do not use solvent-based cleaning agents or abrasives on the interior. These cleaners may damage or discolor the interior. Use this appliance only for its intended purpose as described in this instruction manual. Kepp fingers out of the “pinch point” areas. Clearances between the door and cabinet are necessarily small. Be careful closing door when children are in the area.
RISK OF CHILD ENTRAPMENT!![]() DANGER
DANGER ![]()
Child entrapment and suffocation are not problems of the past. Junked or abandoned appliances are still dangerous, even if they will “just sit for a few days”
– SAVE THESE INSTRUCTIONS –
INSTALLATION INSTRUCTIONS
BEFORE USING YOUR APPLIANCE
Remove the exterior and interior packing. Before conecting the appliance to the power source, let it stand upright for approximately 24 hours. This will reduce the possibility of a malfunction in the cooling system from handling during transportation. Clean the interior surface with lukewarm water suing a soft cloth. Install the handle on the door, if it is not already attached (see page 7).
INSTALLATION OF YOUR APPLIANCE
Your outdoor drawers refrigerator have been designed for both built-in and free standing. When built-in, your refrigerator drawers do not require additional air space for top, side, or rear. The front grill must NOT be obstructed.
NOTE: It is recommended that you do not install the appliance near an oven, radiator or other heating source. And heat sources may increase electrical consumption. Don’t install in a location where the temperature will fall below 50°F (10°C). For best performace, do not install the appliance behind a cabinet door or block the base grille. Avoid locating the unit in moist areas. Plug the appliance into an exclusive, properly grounded wall outlet.
SITE PREPARATION
- Position the unit on a flat, level surface capable of supporting the entire weight of the unit. Remember the unit will be significantly heavier once it is fully loaded.
- Avoid connecting the unit to a GRound Fault interruptor (GFI). GFIs are prone to nuisance tripping which will cause the unit to shut down. GFIs are generally not used on circuits which power equipment that must run unattended for long periods of time.
- The unit must be installed according to your local codes and ordinances.
- ELECTROCUTION HAZARD!
 Electrical Grounding Required – This appliance is equipped with a three prong (grounding) polarized plug for your protection against possible shock hazards.
NEVER remove the round grounding prong from the plug.
NEVER use a two-prong grounding adapter.
NEVER use an extension cord to connect power to the unit.
Where a two-prong wall receptacle is encountered or a longer power cord is required, contact a qualified electrician to have it replaced in accordance with applicable electrical codes. - Position the unit to allow free air flow through the front grille.

- Wipe out inside of unit with a damp cloth.
- Be sure to install the Anti-Tip brakcet. Follow the instructions provided with the Anti Tip bracket kit.
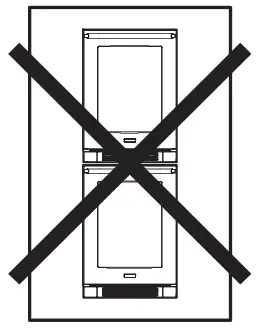
![]() The Anti-Tip Kit must be installed on this unit before it is used. Double stacking units may cause serious personal injury.
The Anti-Tip Kit must be installed on this unit before it is used. Double stacking units may cause serious personal injury.
INSTALLATION OF YOUR APPLIANCE
To reduce the risk of tipping the unit by abnormal usage or improper loading, the appliance must be secured by properly installing the anti-tip device packe with the appliance.
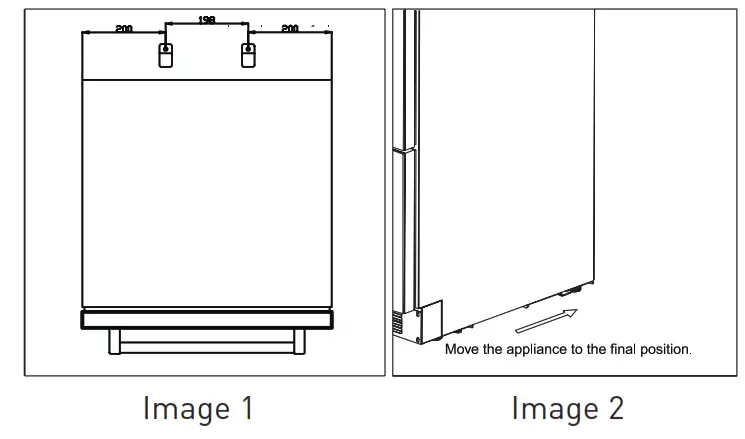
- Take the fixing bracket (2 pcs) and screws (2 pcs) out of the instruction packet.
- Drill holes into the floor according to the dimensions shown below. This will allow you to fix the brackets to the door. (image 1).
- Push the appliance into its place of installation. (image2).
- If he unit is not stable, pull out the appliance and repeat the previous step unitl the unit is stable.
NOTE: If the unit relocated, the bracket must be removed and installed in the new location.
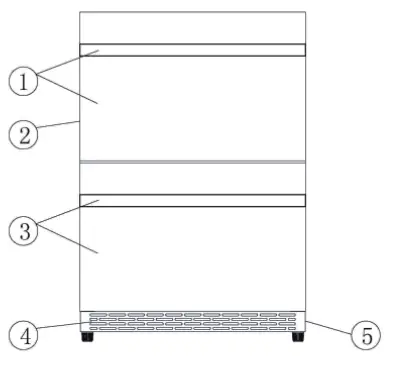
NAMES OF THE PARTS
- Upper drawer & handle
- Cabinet
- Lower drawer & handle
- Exhaust grill
- Compressor & power board (on the rear)
SPECIFICATIONS – MODEL #TRF24U
| Product Description | Built-In FRIDGE | ||
| Model No. | TRF24U | ||
| Unit Dimensions (inches) | Width | Height | Depth |
| 23.6″ | 34.25″ | 27.36″ (with handle) | |
| Net Weight (lbs) | 119 lbs | ||
Install the outdoor drawer refrigerator: Your product has been designed built-in for free standing installation. Cutout Dimensions Dimensions of the recess
| Height of housing | 34 41/64” | 880mm |
| Depth of housing | 25“ | 635mm |
| Width of housing | 24” | 610mm |
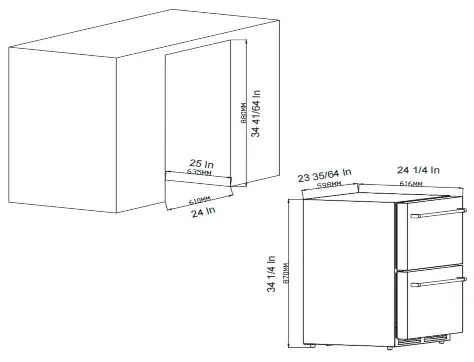
Attention: the ventilator shuold not be covered, or it will cause unpredictable breakdown: the fan and the return-airway shouldn not be covered or it will cause the temperature of the frige to not meet its set tempreture, and the temp of the cabinet will be uneven.
LEVELING THE UNIT
Position the unit ona flat, level surface capable of supporting the entire weight of the unit when full. This unit contains four (4) adjustable leveling legs. Turn the legs clockwise to raise and counterclockwise to lower.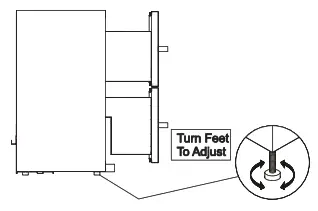
INSTALLING HANDLE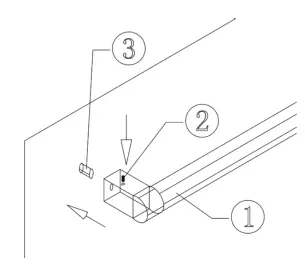 Locate the handle (1) over the pins (3) of the door and tighten the handle by screwing the Allen key grub screws (2)
ELECTRICAL CONNECTION![]() WARNING
WARNING
Improper use of the grounded plug can result in the risk of electrical shock. If the power cord is damaged, have it replaced by a qualified electrician or an authorized service center. This appliance should be properly grounded for your safety. The power cord of this appliance is equipped with a three-prong plug which mates with standard three-prong wall outlets to minimize the possibility of electrical shock.
Do not under any circumstances cut or remove the third (ground) prong from the power cord supplied.
For personal safety, this appliance must be properly grounded. Any questions concerning power and/or grounding should be directed toward a certified electrician or an authorized service center.
This appliance requires a standard 115/120Volt AC-60Hz three-prong grounded electrical outlet. Have the wall outlet and circuit checked by a qualified electrician to make sure the outlet is properly grounded. When a standard 2-prong wall outlet is encountered, it is your responsibility and obligation to have it replaced with a properly grounded 3-prong wall outlet. To prevent accidental injury, the cord should be secured behind the appliance and not left exposed or dangling.
The appliance should always be plugged into its own individual electrical outlet which has a voltage rating that matches the rating on the appliance. This provides the best performace and also prevents overloading house wiring circuits that could cause a fire hazard from overheating. Never unplug the appliance by pulling on the power cord. Always grip the plug firmly and pull straight out from the receptacle. Repair or replace immediately all power cords that have become frayed or otherwise damaged. Do not use a cord that shows cracks or abrasion damage along its length or at either end. When moving the appliance, be careful not to damage the power cord.
ELECTRICAL CONNECTION
Because of potential safety hazards under certain conditions, it is strongly recommended that you do not use an extension cord with this appliance. however, if you must use an extension cord it is absolutely necessary that it be a UL/CUL-Listed, 3-wire grounding type appliance extension cord having a grounding type plug and outlet and that the electrical rating of the cord be 115 Volts and at least 1.3 amperes
OPERATING YOUR APPLIANCE
It is recommended that you install the appliance in a place where the ambient temperature is between 50°F and 100°F (10°C – 38°C). If the ambient temperature is above or below the recommended temperatures, the performance of the unit may be affected. For example, placing your unit in extremely cold or hot conditions may cause interior temperatures to fluctuate. The operating temperature range may not be reached.
CONTROL PANEL
The setting should operate in the control panel.
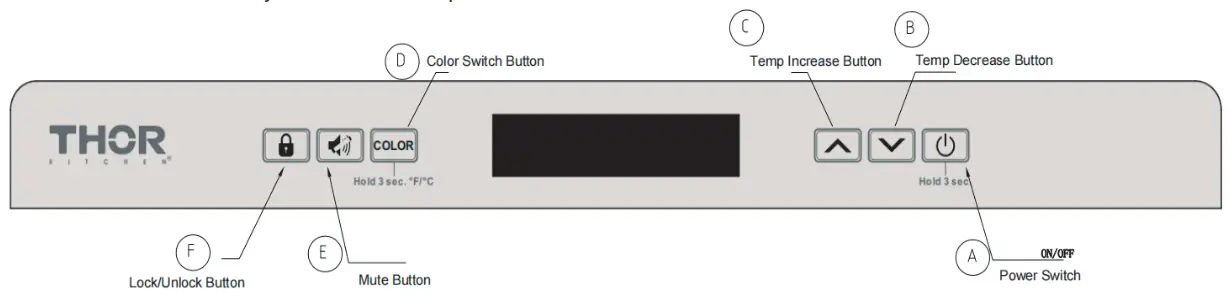
- Functions of each key in the control panel
 A. Power Switch: After you plug in the power cord, press power switch for 1 second, appliance will power on. To turn off the appliance, press power switch and hold it for 3 seconds, appliance will power off.
B. Temp Decreases Button: Used to lower (cool) the set temperature by 1°C or 1°F. When the screen is flashing, press it once, the temperature setting is down by 1°C or 1°F, the lowest setting temperature is 1°C (34°F).
C. Temp increase button: Used to raise (warm) the set temperature by 1°C or 1°F. When the screen is flashing, press it once, the temperature setting is up by 1°C or 1°F, the highest setting temperature is 8°C (46°F).
D. Color Switch Button:
1.Color can be switch to white or blue by pressing the button for once.
2. Press and hold the button for 3 seconds can switch the temperature display setting in
3. Fahrenheit or Celsius degree.
Lights would on when the drawer has been opened.
E. Mute Button:
1.Mute the alarming voice by press the button once.
2. Mute the pressing voice by press and hold the button for 3 seconds.
F. Lock/Unlock Button: Press and hold for 3 seconds can lock or unlock the appliance. Lock or unlock will show on the screen. Appliance will lock automatically when the appliance doesn’t have any move in 1 minute. - There is automatic storage memory when power off in this wine cooler, that means the setting temperature is memories automatically even in power off, so the setting temperature is the same as last setting when the wine cooler is running again.
- Defrosting: The unit defrosts automatically. The evaporator behind the rear wall of the unit defrosts automatically. The condensate collects in the drainage channel behind the rear wall of the unit, and flows through the drainage hole into the drip tray by the compressor where it evaporates. When the wine cooler run for some time, the wine cooler will enter to defrosting, the compressor stop running and the fan will keep running. The temperature will up to about 5°C when defrosting, then keep on running normally; It takes more time for the temperature to come up to 5°C when the setting temperature is low (for example the setting temperature is 1°C), and there are full of wines in the cabinet, and this is not a breakdown.
 A. Power Switch: After you plug in the power cord, press power switch for 1 second, appliance will power on. To turn off the appliance, press power switch and hold it for 3 seconds, appliance will power off.
CARE AND MAINTENANCE
ALARM AND ERROR CODE
- Door Alarm: Inernal fans will turn off once the doors were opened. Alarm will start to sound when doors have been opened over 60 seconds. however, if the noise disturbs you, you can turn off the alarm by pressing Button E which is the Mute Button, but the screen will keep flashing. Compressor and internal fans will stop working after doors have been opened over 60 seconds, both compressor and internal fans will activate again when doors have been closed.
Temperature Alarm: The alarm will sound and the temperature display will flash when there is a temperature error, you can mute the alarm by pressing Mute button, but the screen will keep flashing, there are two kinds of alarms which are shown below.
A. low Temperature Alerting: Alarm will sound when the temperature inside the cabinet is 4°C lower than the set temperature over 60 mins. The screen will show up “LL” and keep flashing.
B. High Temperature Alerting: Alarm will sound when temperature inside the cabinet is 8°C higher than the set temperature over 24 hours. the screen will show up “HH” and keep flashing.
ERROR CODE:
| CODE | Error |
| E1 | Internal temperature sensor broken circuit |
| E2 | Internal temperature sensor short circuit |
| E3 | Defrosting sensor which located at evaporator inside the cabinet broken circuit |
| E4 | Defrosting sensor which located at evaporator inside the cabinet short circuit |
| Normal Flashing | Door open alarm |
| HH | High temperature alarm |
| LL | Low temperature alarm |
Caution: Compressor, Fans and Defrosting System will shut down when the screen showing E1 or E2. For E3 or E4 are different, compressor and fans will shut down for 5
minutes when E3 or E4 show up, compressor and fans would back to work after 5 minutes.
CLEARING AND MAINTAINING YOUR APPLIANCE
Periodic cleaning and proper maintenance will ensure efficiency, top performance, and longevity. The maintenance intervals listed are based on normal conditions. You may want to shorten the intervals if you have pets or other special considerations.
Exterior Cleaning for your Stainless Steel Model.
- Your stainless steel model may discolor when exposed to chlorine gas, pool chemicals, salt water, or cleaners with bleach.
- Keep your stainless unit looking new by cleaning with a high quality, all-in-one stainless steel cleaner/ polish on a monthly basis. Frequent cleaning will remove surface contamination that could lead to rust. Some installations will require cleaning on a weekly basis.
- DO NOT CLEAN WITH STEEL WOOL PADS.
- DO NOT USE CLEANERS THAT ARE NOT SPECIFICALLY INTENDED FOR STAINLESS STEEL (this includes glass, tile and counter cleaners).
- If any surface discolors or rusting appears, clean it quickly with Bon-Ami or Barkeepers Friend Cleanser and a non-abrasive cloth. Always clean in the direction of the grain. Always finish this Always finish this process witha high quality, all-in-one stainless steel cleaner/polish to prevent further problems.
- USE OF ABRASIVE PADS SUCH AS SCOTCHBRITE WILL CAUSE THE GRAINING IN THE STAINLESS TO BECOME BLURRED.
- Rust that is allowed to linger can penetrate into the surface of the stainless steel and become impossible to remove.
![]() CAUTION
CAUTION ![]()
- Stainless steel model exposed to chlorine gas and moisture such as areas with spas or swimming pools, may have some discoloration of the stainless steel.
- NEVER USE CHLORIDE TO CLEAN STAINLESS STEEL.
POWER FAILURE
Most power failures are correcte within a few hours and should not affect the temperature of your appliance if you minimize the number of times the door is opened. If the power is going to be off for a longer period of time, you need to take the proper steps to protect the contents.
VACATION TIME
Short vacations: Leave the appliance operating during vacations of less than three weeks.
Long vacations: If the appliance will not be used for several months, remove all items and turn off the appliance. Clean and dry the interior thoroughly. To prevent odor and mold growth, leave the door slightly opened, blocking it if necessary.
MOVING YOUR APPLIANCE
- Remove all items.
- Securely tape down all loose items (shelves) inside your appliance.
- Turn the adjustable legs up to the base to avoid damage.
- Tape the door shut.
- Be sure the appliance stays secure in the upright position during transportation. Also protect the outside of the appliance with a blanket or similar item.
ENERGY SAVING TIPS
The appliance should be located in the coolest area of the room or outdoor location, away from heat producing appliances and out of direct sunlight. Ensure that the unit is adequately ventilated. Never cover air vents. Do not keep the door open any longer than necessary. Let hot foods cool to room temp before placing in the unit. Overloading the unit forces the compressor to run longer. Be sure to wrap foods properly, and wipe containers dry before placing them in the unit. This cuts down on frost build up
inside the unit. Unit shelves and storage bins should not be lined with aluminum foil, wax paper or paper toweling. Liners interfere with cold air circulation, making the unit less efficient. Organize and label stored items to reduce door openings and extended searches. Remove as any items as needed at one time, and close the door as soon as possible.
TROUBLE SHOOTING
You can solve many common problems easily, saving you the cost of a possible service call. Try the suggestions below to see if you can solve the problem before calling the servicer.
| PROBLEM | POSSIBLE CAUSE | REMEDY |
| Appliance does not operate. | Appliance is not connected to a power supply. The appliance is turned off. Tripped circuit breaker or a blown fuse. | Connect the appliance Switch on the appliance Switch on circuit breaker or replace fuse. |
| Appliance is not cold enough. | The temperature is not set correctly. The ambient tempreture could require a lower temperature setting. The door was opened too often. The door was not closed completely. Door is not ermetically sealed. The condenser is too dirty. The ventilation opening is blocked or too dusty. | Check the set temperature. Set a lower temperature. Do not open the door more often than necessary. Close door properly. Chck the door seal and clean or replace. Clean the condenser when necessary. Clear the obstructions and clean the dust. |
| Appliance turns itself on and off frequently. | The room temp is higher than average. A large amount of food as been added to the unit. The door is open too often. The door is not closed completely. The door gasket does not seal properly. | Put the appliance in a cooler place. Leave the appliance to work for a while until the set temp has been reached. Do not open the door more often than necessary. Close door properly. Check the door seal and clean or replace. |
| Vibrations | The appliance is not properly leveled. | Level the appliance with the adjustable feet |
| The appliance seems to make too much noise. | The rattling noise may come from the flow of the refrigerant, which is normal as each cycle ends, you may hear gurgling sounds caused by the flow of refrigerant in your appliance. If temp flucuations occur, the contraction and expansion of the inner walls may cause popping and cracking noises. | |
| The appliance is not properly leveled. | Level the appliance with the adjustable feet | |
| The door will not close properly. | The appliance is not properly level. The door was reversed and not properly installed. The gasket is dirty. The shelves are out of position. | Level the appliance with the adjustable feet. check the door hinge and reassemble correctly. Clean the door gasket. check the shelves and refit correctly. |
WARRANTY
This product has been manufactured by Thor Group, 4651 E Airport Drive, California 91761 For Customer Service, please call (877) 288 – 8099
For the most up to date warranty and service policy, please refer to our website
WWW.THORKITCHEN.COM/WARRANTY-REGISTRATION
For in-warranty service requests, please visit our website at
WWW.THORKITCHEN.COM/SERVICE
Please Note: You must provide proof of purchase or installation date for any in-warranty service requests
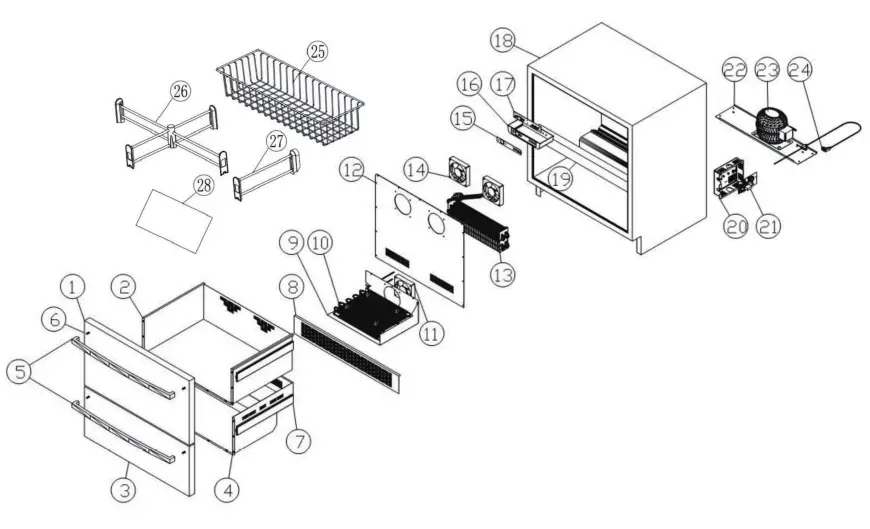
| 1 | Upper door panel | 15 | Control panel sticker |
| 2 | Upper drawer | 16 | Box of temperature control PCB |
| 3 | Lower door panel | 17 | Temperature control PCB |
| 4 | Lower drawer | 18 | Cabinet |
| 5 | Handle | 19 | Middle bar |
| 6 | Pins of handle | 20 | Box of power board |
| 7 | Slide rail | 21 | Power board |
| 8 | Exhaust grill | 22 | Base of compressor |
| 9 | Air duct panel of condensator | 23 | Compressor |
| 10 | Condensator | 24 | Power cord |
| 11 | AC fan | 25 | Wire basket |
| 12 | Air duct panel | 26 | On every frame |
| 13 | Evaporator | 27 | Under every Frame |
| 14 | DC fan | 28 | Rubber gasket |
For Any installation Inquiries, please call Thor Customer Service Support
# 877-288-8099, or email to
[email protected]
WELCOME
TO THE CLUB
You chose THOR Kitchen to enhance your culinary journey and we’re stoked to have you in the club. Think of it as a secret society of really savvy people, such as yourself, choosing professional power and performance at an affordable price.![]() Register your product by following the steps below.
Register your product by following the steps below.
WARRANTY REGISTRATION
 | ||
| Scan theQR code or visit thorkitchen.com/warranty | Input your product info and select register | You’re done. Let’s get cookin’. |
WARRANTY https://qrco.de/bc8xkY
NEED PARTS? https://qrco.de/bd83dz
thorkitchen.com
#COOKLIKEAGOD