IKEA TVÄTTAD Built In Washer Dryer Instructions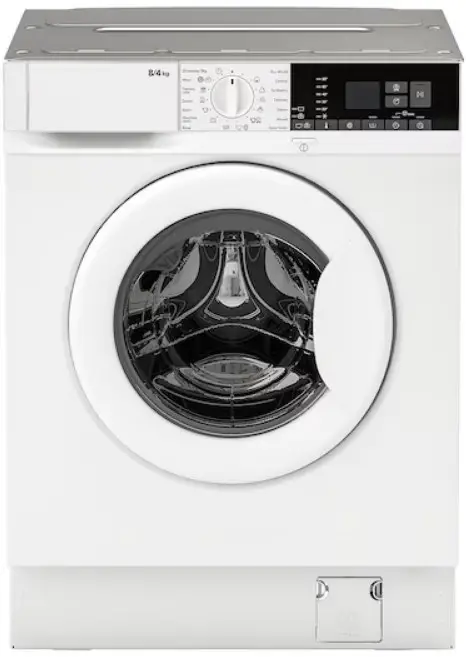
Installation
![]() Warning! Read the safety booklet and refer to assembly instruction.
Warning! Read the safety booklet and refer to assembly instruction.
The manufacturer does not accept any responsibility for damage or injury through failure to comply with the safety precaution.
- Make sure that all transit bolts are removed.
- Make sure that hoses and cable are correctly connected.
- At the end of installation you can connect the mains plug to the mains socket. Connect the appliance to an earthed socket. The rating plate and the ‘Technical Data’ chapter indicate the necessary electrical ratings. Make sure that they are compatible with the mains power supply.
Check that your domestic electrical installation can take the maximum load required, also taking into account any other appliances in use. For any electrical work required to install this appliance, contact our Authorised Service Centre.
The manufacturer does not accept any responsibility for damage or injury through failure to comply with the above safety precaution.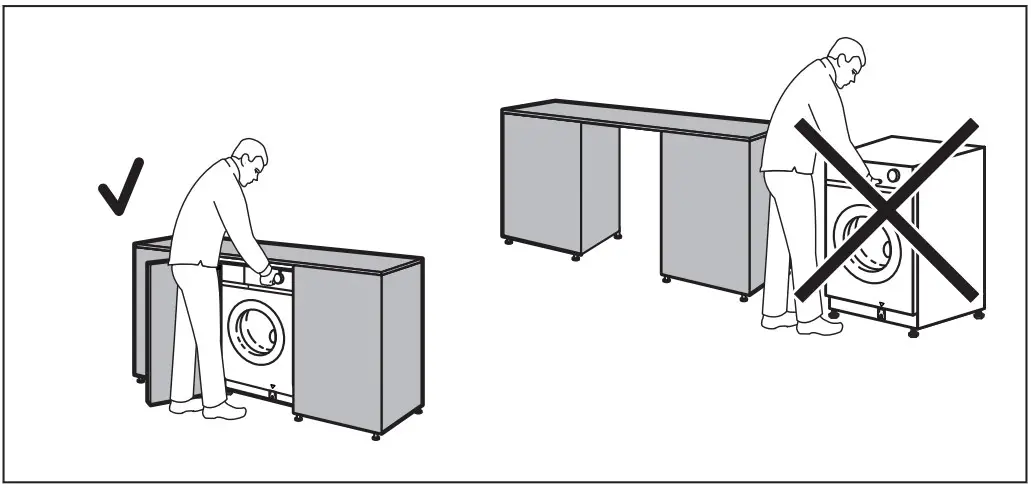
![]() Warning! Do not install the appliance as free standing.
Warning! Do not install the appliance as free standing.
Technical Data
| Dimension | Width/ Height/ Total depth | 59.6 cm /81.9 cm /55.3 cm | ||
| Electrical connection | Voltage Overall power Fuse Frequency | 230 V2000 W10 A50 Hz | ||
| Level of protection against ingress of solid particles and moisture ensured by the protective cover, except where the low voltage equipment has no protection against moisture | IPX4 | |||
| Water supply 1) | Cold water | |||
| Water supply pressure | Minimum Maximum | 0.5 bar (0.05 MPa) 10 bar (1.0 MPa) | ||
| Maximum wash load | Cotton | 8 kg | ||
| Maximum dry load | Cotton Synthetics | 4 kg3 kg | ||
| Spin Speed | Maximum spin speed | 1551 rpm | ||
Connect the water inlet hose to a water tap with a 3/4” thread.
Electrical connection
At the end of installation you can connect the mains plug to the mains socket.
The rating plate and the ‘Technical Data’ chapter indicate the necessary electrical ratings. Make sure that they are compatible with the mains power supply.
Check that your domestic electrical installation can take the maximum load required, also taking into account any other appliances in use.
Connect the appliance to an earthed socket.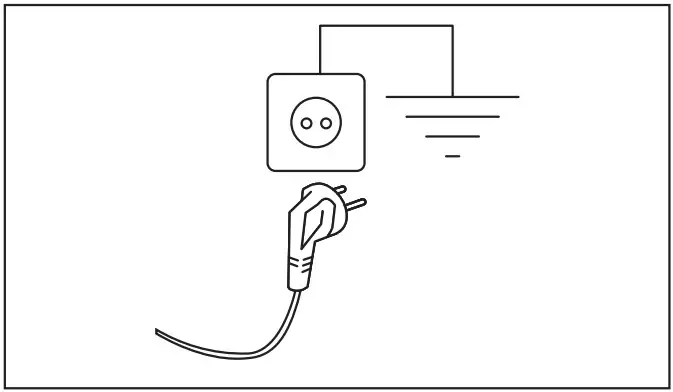
The power supply cable must be easily accessible after installing the appliance. For any electrical work required to install this appliance, contact our Authorised Service Centre.
The manufacturer does not accept any responsibility for damage or injury through failure to comply with the above safety precaution.
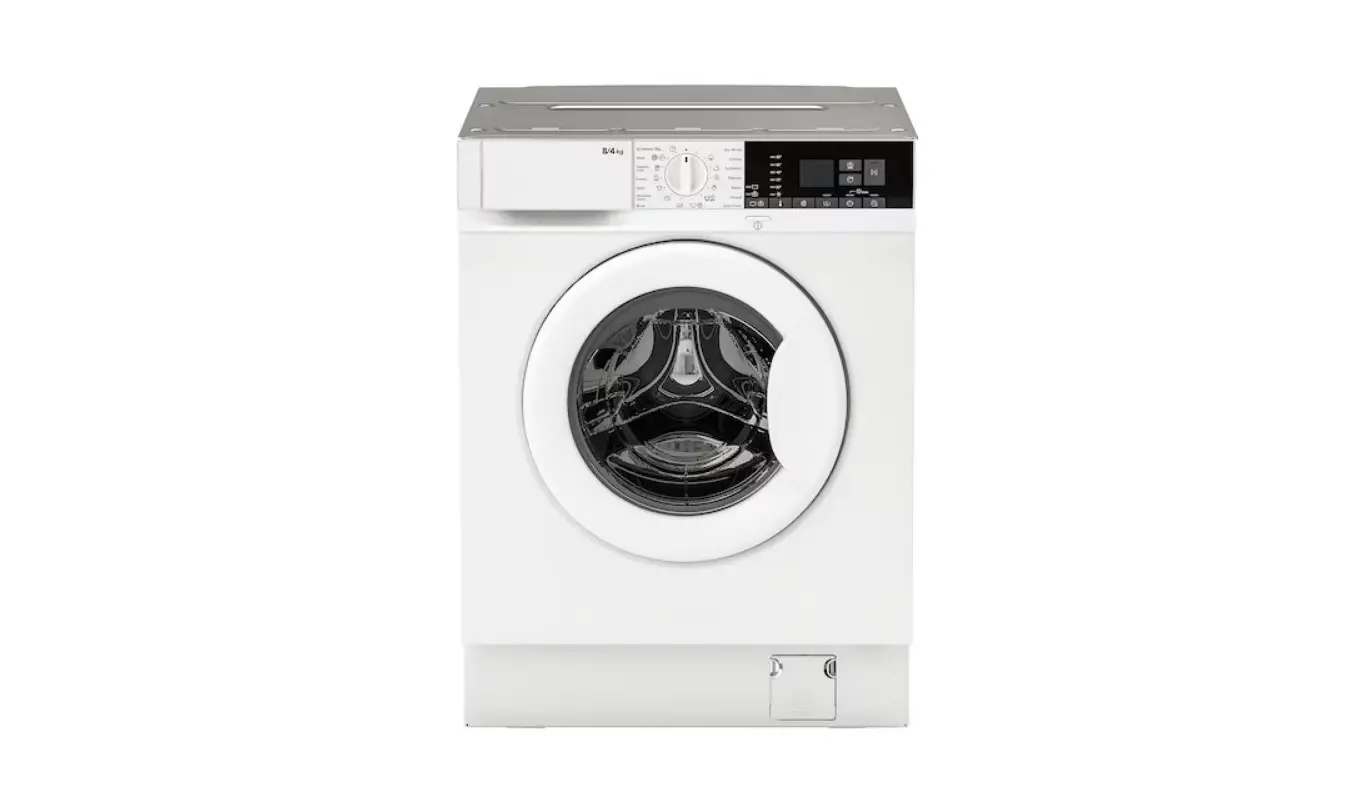
Appliance overview

- Detergent dispenser drawer
- Control panel
- Door handle
- Rating plate
- Drain pump filter
- Front feet for levelling the appliance
- Drain hose
- Inlet hose connection
- Mains cable
- Back feet for levelling the appliance
- Transit bolts
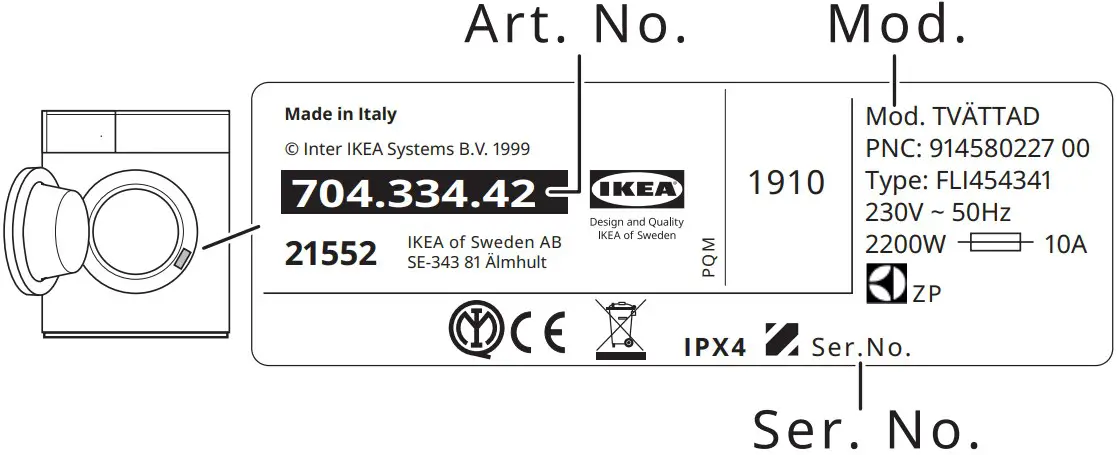
Rating plate position 4
The data in the following drawing are indicative only. Please check the rating plate of your appliance.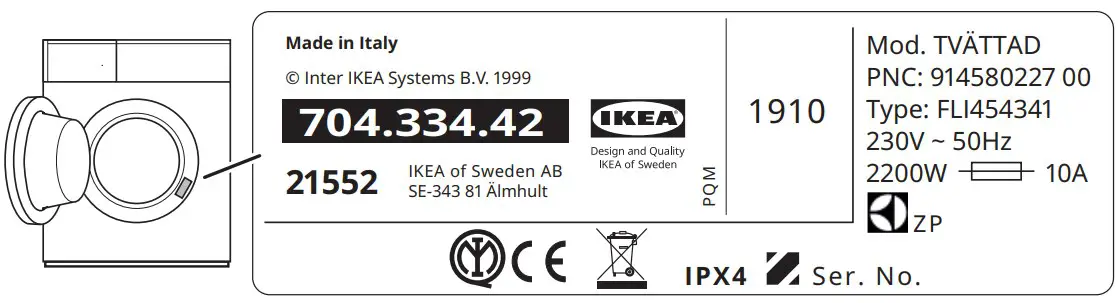
Inspection check list
![]() Warning! Refer to Safety chapters.
Warning! Refer to Safety chapters.
Please follow the inspection check list before using your appliance.
| Topics | If the answer is YES | If the answer is NO, please |
| All transit bolts are removed. | Refer to assembly instruc‐ tion. | |
| The appliance is built in the furniture following the as‐ sembly instructions. It is NOT positioned free-standings. | Install it in the furniture as required. Refer to assembly instruction. | |
| Open and close the deter‐ gent dispenser drawer: no collision with furniture. | Refer to ‘Filling the detergent and additives’ section. | |
| Drain hose correctly connec‐ ted to the drainage. | Refer to hoses connection description in the assembly instruction. | |
| No water leakage around the hose connections. | Refer to water connection warning in the assembly in‐ struction. | |
| The appliance is connected to an earthed socket. | Refer to ‘Electrical connec‐ tion’ section. | |
| The appliance is stable and levelled properly. | Refer to ‘Installation’ section. | |
| Hoses and mains cable are not kinked. | Refer to ‘Electrical connec‐ tion’ and ‘Water connection’ section. | |
| There is no carpet under the appliance. | Remove the carpet. |
Please write down the product model name, article number and serial number here below that you find in the rating plate and attach your receipt to this page
Model (Mod.): …………………
Article number (Art.No.): ………………………
Serial number (Ser.No.): ………………………….
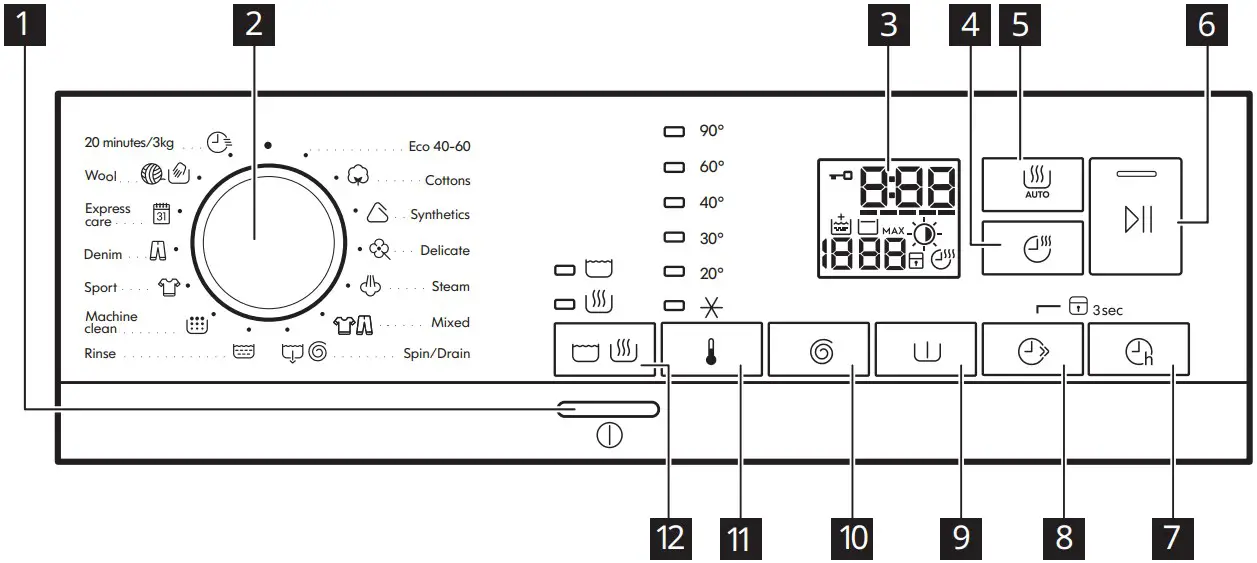
Control panel description
 The options/functions are not available with all washing programmes and an op‐ tion/function can exclude another one, in these case the appliance doesn’t allow an incompatible setting.
OnOff button
Press this button for a few seconds to activate or deactivate the appliance. Two different tunes sound while switching the appliance on or off.
Programme knob
Turn the selector knob to select the desired programme.
Eco 40-60 (Wash only mode): Maximum load 8 kg. White cotton and fast-coloured cotton. Normally soiled items.
According to Commission Regulation EU 2019/2023. This programme at default temperature and spin speed, in washing only mode, with rated capacity 8 kg is able to clean normally soiled cotton laundry declared to be washable at 40 °C or 60 °C, together in the same cycle.
For the reached temperature in the laundry, the programme duration and other data, please refer to ‘Consumption Values’ chapter. The most efficient programmes in terms of energy consumption are generally those that perform at lower temperatures and longer duration
Eco 40-60 + Cupboard dry level (Wash & Dry mode): Maximum load 4 kg. White cotton and fast-coloured cotton. Normally soiled items.
According to Commission Regulation EU 2019/2023. This programme at default temperature and spin speed, in washing and drying mode, with rated capacity 4 kg and with Cupboard dry level performs the wash and dry cycle able to clean normally soiled cotton laundry declared to be washable at 40 °C or 60 °C, together in the same cycle and, after drying phase, the laundry can be immediately stored in a cupboard.
Eco 40-60 + Cupboard dry level (Dry only mode): Maximum load 4 kg. White cotton and fast-coloured cotton.
 Cottons: Maximum load 8 kg. White cotton and coloured cotton.
 Synthetics: Maximum load 3 kg. Synthetic items or mixed fabric items.
![]() Delicate: Maximum load 2 kg. Delicate fabrics such as acrylics, viscose, polyester items.
Delicate: Maximum load 2 kg. Delicate fabrics such as acrylics, viscose, polyester items.
 Steam: Maximum load 1 kg. Cotton and synthetic items. This programme reduces creases, odours and relaxes the fibres. Do not use any detergent!
![]() Mixed : Maximum load 3 kg. Synthetic fabrics like polyester, polyamide and their blends.
Mixed : Maximum load 3 kg. Synthetic fabrics like polyester, polyamide and their blends.
![]() Spin/Drain: Maximum load 8 kg. To spin the laundry and to drain the water in the drum. All fabrics, except woollens and delicate fabrics. If you set the No Spin option, the appliance performs draining only.
Spin/Drain: Maximum load 8 kg. To spin the laundry and to drain the water in the drum. All fabrics, except woollens and delicate fabrics. If you set the No Spin option, the appliance performs draining only.
![]() Rinse: Maximum load 8 kg. All fabrics, except woollens and very delicate fabrics. Programme for rinsing and spinning.
Rinse: Maximum load 8 kg. All fabrics, except woollens and very delicate fabrics. Programme for rinsing and spinning.
![]() Machine clean: Empty drum. Maintenance cycle for drum cleaning. Pour a cup of chlorine bleach or a washing machinecleaner in the washing phase compartment. After the drum cleaning, run a further rinse cycle with empty drum and no detergent to remove any residue of bleach.
Machine clean: Empty drum. Maintenance cycle for drum cleaning. Pour a cup of chlorine bleach or a washing machinecleaner in the washing phase compartment. After the drum cleaning, run a further rinse cycle with empty drum and no detergent to remove any residue of bleach.
 Sport: Maximum load 3 kg. Sportswear.
 Denim: Maximum load 3 kg. Denim clothing.
![]() Express care: Maximum load 3 kg. Synthetic items or mixed fabric items.
Express care: Maximum load 3 kg. Synthetic items or mixed fabric items.
![]() Wool: Maximum load 1.5 kg. Machine washable wool, hand washable wool and other fabrics with «hand washing» care symbol.
Wool: Maximum load 1.5 kg. Machine washable wool, hand washable wool and other fabrics with «hand washing» care symbol.
 20 minutes/3kg: Maximum load 3 kg. Cotton and synthetic items lightly soiled or worn only once.
Display
 Door locked indicator:
- Indicator on: the door cannot be opened. The appliance is working or has stopped with water left in the tub.
- Indicator off the door can be opened. The programme is finished or the water has been emptied out.
 The digital indicator can show: reset position (
  ); programme duration (e. g.
  washing and/or drying cycle); delay time (e. g.
  ); cycle end (
  ); warning code (e.g.
  ); error indicator ( ).
- FlexTime indicator
- FlexTime indicator.
 Extra Rinse indicator.
 Spin speed indicator. No Spin indicator. Spin phase is off.
 Rinse Hold indicator.
- MAX After the AutoAdjust System detection, it flashes when the laundry load exceeds the maximum declared load of the selected programme. Refer to “The AutoAdjust System load detection ” paragraph.
 Auto Dry indicator: Iron dry,
Cupboard dry,Extra dry. Child safety lock indicator.
 Time Dry and Non-Stop programme indicator.
 Spin speed indicator.
 ![]() Time Dry touch button
Time Dry touch button
Touch this button to set the time that suits the fabrics you have to dry (refer to “Timed drying” table). The display shows the set value.
Each time you touch this button the time value increases by 5 minutes.
![]() You cannot set all time values for different types of fabrics.
You cannot set all time values for different types of fabrics.
| Dryness Level | Type of fabric | Load (kg) | Spin speed (rpm) | Suggested du‐ ration (mins) |
| Extra Dry For towelling materials | Cottons and Linen(bathrobes, bath towels, etc) | 4 | 1600 | 170 – 190 |
| 2 | 1600 | 110 – 120 | ||
| 1 | 1600 | 65 – 75 | ||
| Denim garments | 3 | 1200 | 165 – 175 | |
| 1 | 1200 | 75 – 85 | ||
| Cupboard Dry For items to be stored | Cottons and Linen(bathrobes, bath towels, etc) | 4 | 1600 | 160 – 180 |
| 2 | 1600 | 100 – 110 | ||
| 1 | 1600 | 55 – 65 | ||
| Synthetics and mixed fabrics (jumpers, blouses, underwear, house‐ hold and bed linen) | 3 | 1200 | 135 – 150 | |
| 1 | 1200 | 45 – 55 | ||
| Delicates(acrylics, viscose and delicate mixed fabrics) | 2 | 1200 | 155 – 165 | |
| 1 | 1200 | 95 – 105 | ||
| Wool(woollen jumpers) | 1 | 1200 | 80 – 100 | |
| Denim garments | 3 | 1200 | 155 – 165 | |
| 1 | 1200 | 65 – 75 | ||
| Iron Dry Suitable for ironing | Cottons and Linen(sheets, tablecloths, shirts, etc) | 4 | 1600 | 110 – 125 |
| Dryness Level | Type of fabric | Load (kg) | Spin speed (rpm) | Suggested du‐ ration (mins) |
| 2 | 1600 | 65 – 75 | ||
| 1 | 1600 | 40 – 50 |
![]() Auto Dry touch button
Auto Dry touch button
Touch this button to set one the automatic dryness levels proposed by the appliance.
On the display the relevant dryness indicator goes on:
- Iron dry: laundry to be ironed.
- Cupboard dry: laundry to be put in store.
- Extra dry: laundry to be fully dried.
You can not set all automatic levels for each type of fabrics.
Drying level
| Dryness Level | Type of fabric | Load |
Extra DryFor towelling materials | Cottons and Linen(bathrobes, bath towels, etc) | up to 4 kg |
| Denim garments | up to 3 kg | |
Cupboard DryFor items to be stored | Cottons and Linen(bathrobes, bath towels, etc) | up to 4 kg |
| Synthetics and mixed fab‐ rics(jumpers, blouses, under‐ wear, household and bed lin‐ en) | up to 3 kg | |
| Delicate fabrics(acrylics, viscose and delicate mixed fabrics) | up to 2 kg | |
| Wool items(woollen jumpers) | up to 1 kg | |
| Denim garments | up to 3 kg | |
| Iron DrySuitable for ironing | Cottons and Linen (sheets, tablecloths, shirts, etc) | up to 4 kg |
![]() Start/Pause
Start/Pause
This button allows you to start or to pause the selected washing programme.
![]() Delay Start
Delay Start
With this option you can delay the start of a program in a more convenient time
![]() FlexTime
FlexTime
With this option reduces the programme duration depending on the load size and the degree of soiling.
When you set a washing programme, the display shows the default duration and the dashes ![]() .
.
Tap on this button to reduce the programme duration according to the level of garments soil. The display shows the new programme duration and a number of dashes will decrease accordingly. The shortest is the cycle the smallest should be the load.
![]() When setting a steam programme, this button allows to chose three steam levels and the programme duration is reduced accordingly
When setting a steam programme, this button allows to chose three steam levels and the programme duration is reduced accordingly
 Permanent Child Lock option
Hold pressed the button for 3 seconds to set the Child Lock option . ![]() This option prevents children from playing with the control panel: all controls are disabled. To deactivate this option, hold this button pressed for 3 seconds.
This option prevents children from playing with the control panel: all controls are disabled. To deactivate this option, hold this button pressed for 3 seconds.
![]() Prewash
Prewash
This option adds a prewash phase to a washing program. Ideal to remove particulate soil like mud and clay
Spin and additional options
When you set a programme, the appliance automatically sets the default spin speed allowed. Touch repeatedly this button to:
- Change the spin speed. The display shows only the spin speeds available for the set programme.
- Set the No Spinspin options . Set this option to deactivate all spin phases. The appliance performs the only draining phase of the selected washing programme. Set this option for very delicate fabrics. The rinses phase uses more water for some washing programmes
- Activate the Rinse Hold option. The final spin is not performed. The water of the last rinse is not drained out to prevent the fabrics from creasing. The washing programme ends with water in the drum.
The indicator ![]() is on display. The door stays locked and the drum turns regularly to reduce creasing. You must drain the water to unlock the door.
is on display. The door stays locked and the drum turns regularly to reduce creasing. You must drain the water to unlock the door.
If you touch the button ,  the appliance performs the spinning phase and drains the water.
![]() The appliance empties the water out automatically after18 hours approximately.
The appliance empties the water out automatically after18 hours approximately.
![]() Temperature
Temperature
When you select a washing programme, the appliance automatically proposes a defaulttemperature. With this option you can change the temperature.
The indicator ![]() = cold water.
= cold water.
![]()

Thanks to this button, a cycle can perform:
- Only washing: indicator is on (default mode).
- Washing and drying: andindicators are on.
- Only drying: indicator is on.
Acoustic signals
This appliance has different acoustic signals.
To activate/deactivate some of the acoustic
signals when the programme is completed, touch the and the buttons simultaneously for about 2 seconds. The display shows On or Off.
Warning! Read the safety booklet.
Before the very first use, pour 2 litres of water into the detergent compartment marked by ![]() . Pour 2 litres of water into the detergent compartment marked by .
. Pour 2 litres of water into the detergent compartment marked by .![]() Pour a small quantity of detergent into the compartment marked by .
Pour a small quantity of detergent into the compartment marked by . ![]() Set and start a programme for cotton at the highest temperature without any laundry in the drum. This removes all possible dirt from the drum and the tub.
Set and start a programme for cotton at the highest temperature without any laundry in the drum. This removes all possible dirt from the drum and the tub.
- Make sure that the mains plug is connected to the mains socket.
- Make sure that the water tap is open.
- Load the laundry.
- Pour the detergent and other treatments in the proper compartment of the detergent dispenser.
- Push the button to switch the appliance on.
- Turn the programme dial to set the desired programme. The appliance defaults to the washing only mode and the indicator of the button is on. If you wish to run a washing and drying cycle, tap on the Mode button once to activate also the drying function. Both indicators and are on. The indicator appears on the display. You can change the drying level by means of
 button or the drying time by means by
  button. If you wish to run a drying only cycle, tap on the Mode button twice to activateo the drying function only. Only the indicator is on. The indicator appears on the display. You can change the drying level by means of button or the drying time by means by button.
 - Set the desired options by means of the corresponding touch buttons. The relevant indicator comes on.
- To start the programme, touch the
 button.
 - The appliance starts or, if you have set the
 option, the countdown starts. When programme starts, thanks to the AutoAdjust System, the appliance automatically adjusts – in 30 seconds – the programme duration to the load to achieve perfect washing results in the minimum possible time.
 - At the end of the programme, remove the laundry. If you set an option that ends with water in the tub, drain the water to unlock the drum.
- Push the
 button to switch the appliance off.
 - Close the water tap.
The Stand-by function may automatically deactivates the appliance to reduce the energy consumption. Press the button to activate the appliance again.
Hints and tips
- Sort the laundry as follows: white, coloured, synthetics, delicates and wool.
- Follow the washing instructions on the laundry care labels.
- Button up pillowcases, close zippers, hooks and poppers. Tie up belts.
- Turn multilayered fabrics, wool and items with printed illustrations inside out
- Pre-treat tough stains. With adequate pretreatment, stains and limited soiling can be removed; the laundry can then be washed at a lower temperature. Do not spray stain remover on garments near the appliance as it is corrosive to the plastic parts.
- Wash heavy soil stains with a special detergent.
- Be careful with curtains. Remove the hooks and put the curtains in a washing bag or pillowcase.
- Use a washing bag to wash small and/or delicate items (e.g. underwired bras, belts, tights, etc. ).
- Avoid washing garments full of long animal hair or poor quality garments releasing lots of fluff that could block the drain circuit and therefore requiring the Service assistance.
- Powder detergents for all types of fabric, excluding delicate. Prefer powder detergents containing bleach for whites and laundry sanitization. At temperature higher than 60 °C the use of powder detergent is recommended.
- Liquid detergents, preferably for low temperature wash programmes (60 °C max) for all types of fabric, or special ones for woollens only.
- The choice and quantity of detergent will depend on: type of fabric (delicates, woollens, cottons, etc), the colour of clothes, size of the load, degree of soiling, wash temperature and hardness of the water used.
- Follow the instructions that you find on packaging of the detergents or other treatments without exceeding the indicated maximum level ( max).
- Do not mix different types of detergents.
- Use less detergent if washing a small loads, the laundry is lightly soiled or there is large amounts of foam during washing.
- When using detergent tabs or pods, always put them inside the drum, not in the detergent dispenser.
- Normally soiled laundry may be washed without prewash in order to save detergent, water and time (the environment is protected too!).
- Loading the appliance to the maximum capacity indicated for each programmes helps to reduce energy and water consumption.
- To use the correct quantity of detergent, refer to the quantity suggested by the detergent producer and check the water hardness of you domestic system.
- When you dry the laundry, obey the indications on the labels of the manufacturers.
- The drying time can change depending on speed of the last spin, dryness level, type of laundry, weight of the load.
- If, at the end of the drying programme, the laundry is still damp, set a short drying cycle again.
- To avoid creasing and shrinkage do not over dry the laundry. Refer to the «Drying programmes» table to find the average drying times.
Alarm Codes and Possible failures
The appliance does not start or it stops during operation. First try to find a solution to the problem (refer to the tables).
![]() Warning! Deactivate the appliance before carrying out any check.
Warning! Deactivate the appliance before carrying out any check.
With some problems, the display shows an alarm code and the ![]() button may flBsh continuously:
button may flBsh continuously:
| Problem | Possible solution |
The appliance does not fill with water properly. |
|
 The appliance does not drain the water. |
|
The appliance door is open or not closed cor‐ rectly. |
|
| Internal fail. No com‐ munication between electronic elements of the appliance. |
|
 The mains supply is unstable. |
|
We recommend the use of original spare parts. After the check, switch on the appliance and press the button to restart the programme.
If the problem remains, contact your Authorised Service Centre. The necessary data for the service centre is on the rating plate. Refer to ‘Inspection check list’ chapter.
In case of failures not linked to a warning code, please refer to the complete version of the user manual available in the web
Consumption values
Introduction
See the web link www.theenergylabel.eu for detailed information about Energy Label.
The QR code on the energy label supplied with the appliance provides a web link to the information related to the performance of the appliance in the EU EPRELdatabase. Keep the energy label for reference together with the user manual and all other documents provided with this appliance.
It is also possible to find the same information in EPREL using the link https://eprel.ec.europa.eu and the model name and product number that you find on the rating plate of the appliance. Refer to ‘Product description’ chapter for the position of the rating plate.
Legend
| kg | Laundry load. | h:mm | Programme duration. |
| kWh | Energy consumption. | °C | Temperature in the laundry. |
| Litres | Water consumption. | rpm | Spin speed. |
| % | Remaining moisture at the end of the cycle. The higher is the spin speed, the high‐ er is the noise and the lower is the remaining moisture at the end of washing cy‐ cle. | ||
Values and programme duration may differ depending on different conditions (e.g. room temperature, water temperature and pressure, load size and type of laundry, supply voltage) and also if you change the default setting of a programme.
According to Commission Regulation Eu 2019/2023
Washing only
| Eco 40-60 pro‐ gramme | kg | kWh | Litres | h:mm | % | °C | rpm1) |
| Full load | 8 | 1.085 | 60 | 3:30 | 50 | 46 | 1551 |
| Half load | 4 | 0.675 | 45 | 2:40 | 50 | 40 | 1551 |
| Eco 40-60 pro‐ gramme | kg | kWh | Litres | h:mm | % | °C | rpm1) |
| Quarter load | 2 | 0.375 | 35 | 2:40 | 54 | 33 | 1551 |
1) Maximum spin speed.
Wash and dry cycle
| Eco 40-60 pro‐ gramme and Cup‐ board dry level | kg | kWh | Litres | h:mm | % | °C | rpm1) |
| Full load | 4 | 3.215 | 68 | 6:15 | 0 | 41 | 1551 |
| Half load | 2 | 1.825 | 48 | 4:35 | 0 | 37 | 1551 |
1) Maximum spin speed.
Power consumption in different modes
| Off (W) | Stand-by (W) | Delay start (W) |
| 0.48 | 0.48 | 4.00 |
| Time to Off/Standby mode is 15 minutes maximum. | ||
Common programmes – Washing only
These values are indicative only
| Programme | kg | kWh | Litres | h:mm | % | °C | rpm1) |
| Cottons 2)90°C | 8 | 1.75 | 85 | 3:45 | 44 | 85 | 1600 |
| Cottons 60°C | 8 | 0.75 | 80 | 3:30 | 44 | 55 | 1600 |
| Cottons 3)20°C | 8 | 0.25 | 80 | 2:50 | 44 | 20 | 1600 |
| Synthetics 40°C | 3 | 0.65 | 75 | 2:20 | 35 | 40 | 1200 |
| Delicate 4)30°C | 2 | 0.30 | 50 | 0:50 | 35 | 30 | 1200 |
| Wool 30°C | 1.5 | 0.25 | 60 | 1:05 | 30 | 30 | 1200 |
- Reference indicator of the spin speed.
- Suitable for washing heavily soiled textiles.
- Suitable for washing lightly soiled cottons.
- It also performs as quick washing cycle for lightly soiled laundry
These values are indicative only
| Programme | kg | kWh | Litres | h:mm | % | °C | rpm1) |
| Synthetics 40°C | 3 | 2.00 | 75 | 4:00 | 1 | 40 | 1200 |
1) Reference indicator of the spin speed.