
BOSCH 8750000018 Smart Home Motion Detector Instruction
Start making your home smart!
Please be sure to install the Bosch Smart Home Controller first.
- Ensure that you have a Bosch Smart
- Home Controller and the Bosch Smart
- Home App, and that you have set both of them up successfully.
 You can also use the explanatory video on our website to help you install your Bosch Smart Home Motion Detector more easily: www.bosch-smarthome.com/installation
Set up your product in just three steps
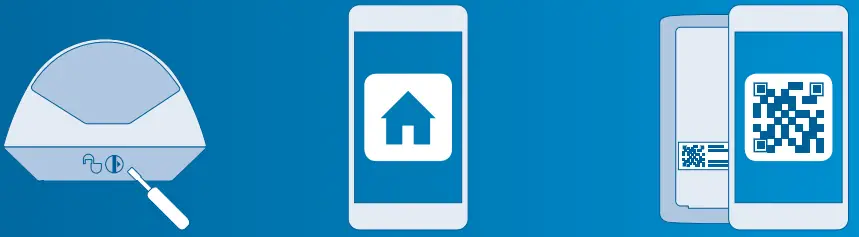
- Separating the housing and mounting bracket
- Start the Bosch Smart Home App and select “Add device”
- Scan the QR code and follow the instructions
Dear customer,
Congratulations on purchasing your Bosch Smart Home Motion Detector. It will help you to make your home even safer and smarter. It reliably detects movement using passive infrared technology, an additional temperature sensor and an intel-ligent algorithm. Thanks to the integrated pet immunity function, false alarms trig-gered by pets weighing up to 25 kg can easily be avoided. The Bosch Smart Home App immediately warns you in the event of unauthorized entry into your home or if the Motion Detector is tampered with. The Motion Detector is quickly integrated into your system via the Bosch Smart Home Controller.
We hope you enjoy your new product, The Bosch Smart Home Team
PRODUCT DESCRIPTION
The network-enabled Motion Detector with passive infrared technology
(PIR) is equipped with the following components:
- Lens with 7 x 11 segments
- 90° and 12 m detection range
- Sneak-by guard or pet immunity
- Theft protection
- One long-life, replaceable battery
The device reliably warns you in the event of unauthorized entry into your house or your apartment. The app provides information on the room and the time of the alarm.
Intended use
The product must only be used together with original Bosch Smart Home compo-nents, and is for indoor use only.
- Follow the safety instructions and the directions in this manual and the Bosch Smart Home App to ensure that the product is set up correctly
- Please note the details in
the Technical Data section - Avoid installing in areas prone to high amounts of dust, direct sunshine or heat
Do not modify the product in any way. Any other use is considered unintended use. We will not assume liability for any resulting damage.
IN THE BOX
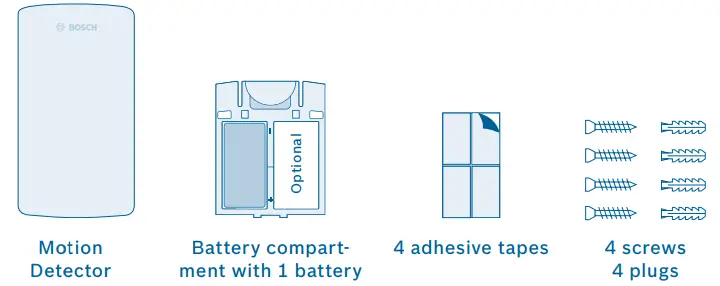
- The scope of delivery includes a battery (123A) with a typical service life of around five years. For a longer service life, you can also insert a second battery into the battery compartment.
- To operate the Motion Detector you will require the app, a Controller and an internet connection.
WARNING NOTICES
Explanation of symbols
- Warning.
This alerts you to danger. - Info.
Indicates important information.
Safety instructions
Proper handling of batteries
- Take the batteries out of the device if it is not used for a prolonged period of time
- The enclosed batteries are not suitable for charging
THE MOTION DETECTOR
Product overview
| Item | Part | Explanation |
|
1 | LED indicator | Status/fault |
| Red | Fault, functional test | |
| Orange | Configuration process, update | |
| Green | Configuration successful | |
| 2 | Sensor area | With lens |
| 3 | Sneak-by guard | Increased security |
Motion Detector – front side of housing 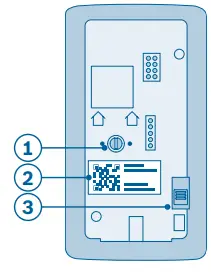
| Item | Part | Explanation |
| 1 | Green rotary switch | For setting pet immunity/sneak-by guard |
| 2 | QR code | Scan for device identification |
| 3 | Contact switch | For device resetting and theft protection |
Motion Detector – rear side of housing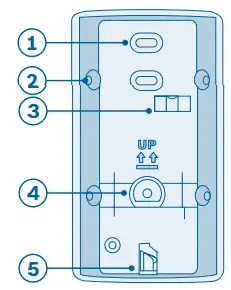
| Item | Part | Explanation |
| 1 | Pre-punched holes | For wall mounting |
| 2 | Pre-punched holes | For corner mounting |
| 3 | Bubble level | Aid for alignment |
| 4 | Theft protection | Remains on wall in case of theft and sends signal |
| 5 | Turn lock | For separating the housing and mounting bracket |
Motion Detector – front side of mounting bracket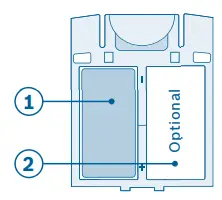
| Item | Part | Explanation |
| 1 | Battery | One inserted 123A battery |
| 2 | Battery compartment with placeholder | Option for another battery |
Motion Detector – battery compartment
INSTALLATION AND SETUP
Before you start
Ensure that you have a Bosch Smart Home Controller and the Bosch Smart Home App, and that you have set both of them up successfully.
You can also use the explanatory video on our website to help you install your Bosch Smart Home Motion Detector more easily: www.bosch-smarthome.com/installation
Separating the housing and fixing bracket
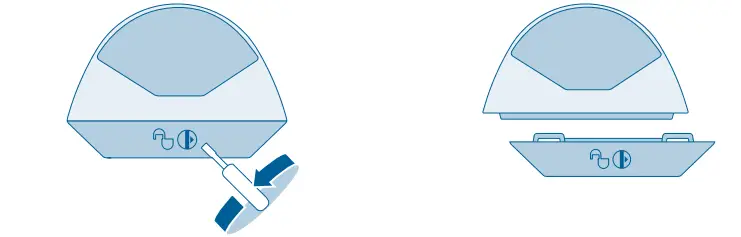
- Separate the Motion Detector’s housing from the mounting bracket. To do so, use a screwdriver to twist the turn lock on the underside of the
- Motion Detector counterclockwise by 180°, and simultaneously pull away the housing from the mounting bracket.
Starting the app and scanning the QR cod
Now start the Bosch Smart Home App and select “Add device”. From this point, the app guides you through the installation process. You will find a detailed description in this instruction manual.
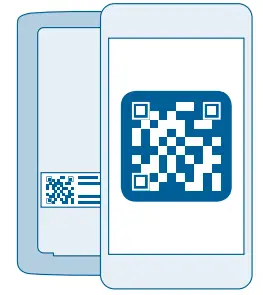 The app will prompt you to scan the QR code on the product. You will find the QR code on the back of the housing (see p.15).
Inserting the battery compartment
Insert the battery compartment from above into the Motion Detector’s housing. The LED will start to flash orange. A battery is included in the scope of delivery. In order to double the service life, you can also insert a second battery into the battery com-partment. To do so, remove the placeholder from the battery compartment.
Configuring the device
As soon as the battery is inserted, the Motion Detector connects to the Controller. The Motion Detector’s LED indicates the status of the configura-tion attempt using the following flash codes:
The app informs you if the configura-tion was successful.
| LED state | Explanation |
| Flashes green once | Successful configuration attempt |
| Flashes red | Unsuccessful configuration attempt |
FIXING
Fixing instructions
Prevailing regulations must be observed when installing the product. Failure to comply with the regulations can lead to material damage and/or physical injury.
- Check that the scope of delivery is intact. Only install parts that are in immaculate condition
- Observe the instructions regarding the installation location
- Pay attention to the direction of movement when installing (lateral motion detection)
- You can find more information in the online FAQs at: www.bosch-smarthome.com/faq
Observe the following mounting instructions: 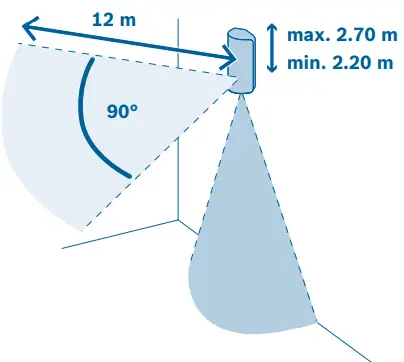
- Mount the Motion Detector at a height of minimum 2.20 m to maximum 2.70 m, as desired
- The product has a detection range of 90° and 12 m
- In addition the sneak-by guard can be activated

- There must not be any windows in the detection area of the Motion Detector
- Avoid direct or indirect sunlight in the detection area of the Motion Detector
- Do not block the detection area with objects
- Do not install the Motion Detector near rotating objects (e.g. fans) or independently moving objects
- Do not install the near sources of heat or cold
 Do not place any objects on which pets can climb in the detection area
- Place the Motion Detector in the part of the room which is most frequently walked through (e.g. near the door)
Take the Motion Detector to your chosen mounting location. Before mounting, use the app to perform a communication test in order to check the signal strength.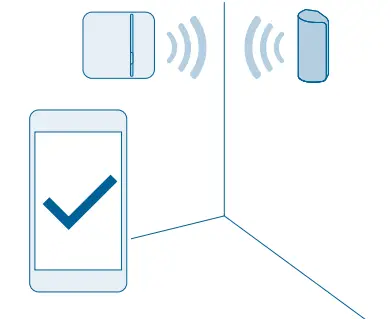
- The connection with the Bosch Smart Home Controller needs to be sufficiently strong (you can perform a communication test using the app)
Choosing the type of fixing
The Motion Detector can be mounted in a corner or on a straight wall. In both cases, you can either mount the device with screws or with adhesive tape.
 The device’s theft protection function can only be guaranteed if the Motion Detector is installed with screws.
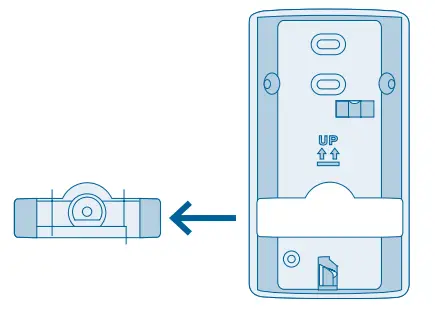 If the Motion Detector is forcibly removed, the theft protection remains on the wall and emits a signal.
Corner fixing with screws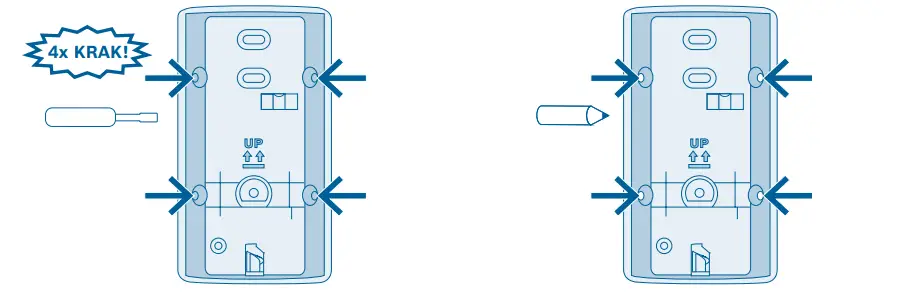
- Punch through the four pre-punched screw holes in the Motion Detector’s mounting bracket.
- Hold the mounting bracket against the desired position on the wall and mark the drill holes.
When choosing a fixing location and when drilling, pay attention to potential electrical lines and/or supply lines that could be behind the wall.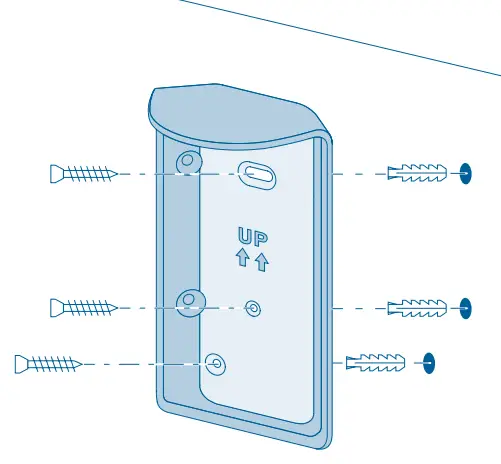 Mount the Motion Detector with screws and plugs.
Corner fixing with adhesive tape
When fixing the Motion Detector with adhesive strips, the theft protection function cannot be guaranteed.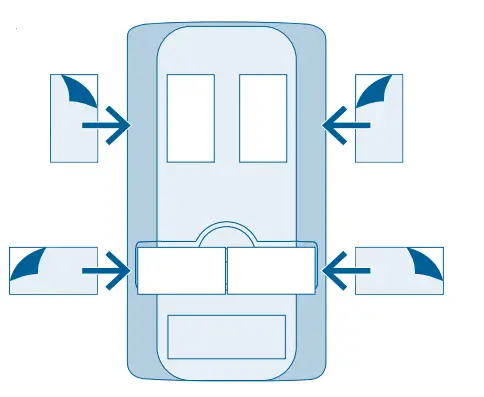
- Attach the adhesive tapes to the beveled surfaces of the Motion Detector’s mounting bracket and peel off the second protective film.
Place the Motion Detector in the de-sired position and press it down firmly.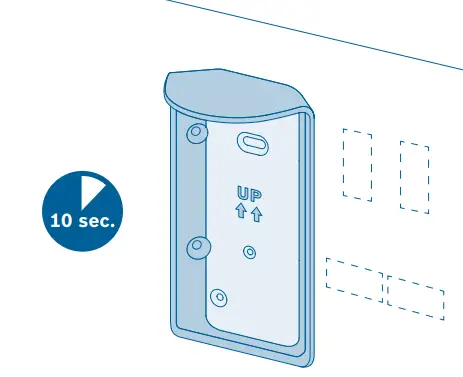
Wall fixing with screws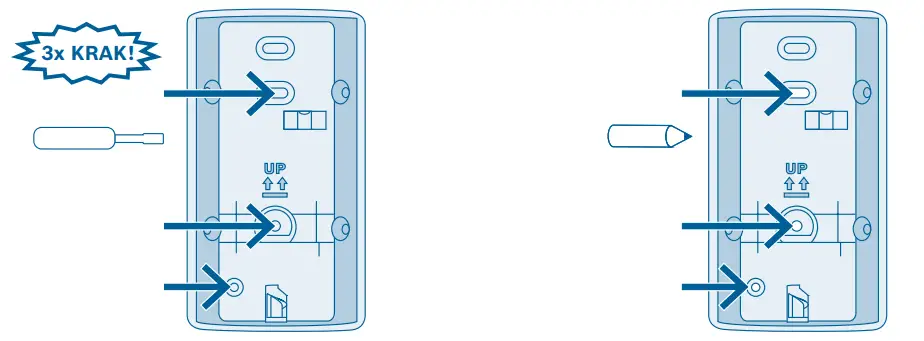
- Punch through the three pre-punched screw holes in the Motion Detector’s mounting bracket.
- Hold the mounting bracket against the desired position on the wall and mark the drill holes.
When choosing a fixing location and when drilling, pay attention to potential electrical lines and/or supply lines that could be behind the wall.
Fix the Motion Detector using screws and plugs.
Wall fixing with adhesive tape
When attaching the Motion Detector with adhesive strips, the theft protec-tion function cannot be guaranteed.
- Attach the adhesive tapes to the back of the Motion Detector’s mounting bracket and peel off the second protective film.
- Place the Motion Detector in the de-sired position and press it down firmly.
Selecting pet immunity or sneak-by guard Set the desired sensitivity level on the Motion Detector. When doing so, you can choose between the pet immunity and sneak-by guard functions. Upon delivery, the product is set to pet immunity with the rotary switch on the rear side of the housing turned to the left. For the sneak-by guard, turn the rotary switch to the right.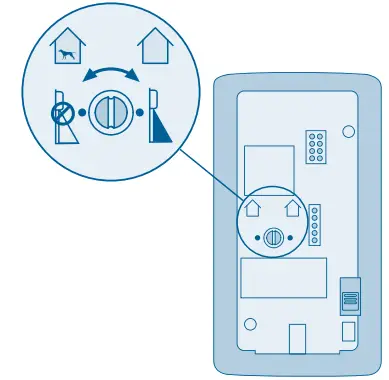
If pet immunity is activated, small ani-mals (< 25 kg) ignored by the Motion Detector’s front sensor. The sensor directed downwards is then switched off. When pet immunity is activated, the sneak-by guard is deactivated.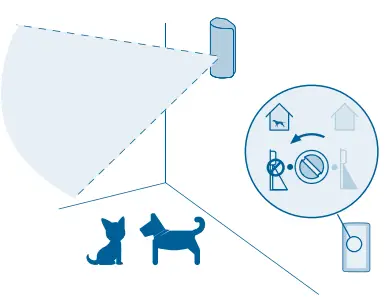 When pet immunity is switched off, the sneak-by guard is activated, making it also possible to detect people who are beneath the Motion Detector. As a result, there is a possible risk of false alarms if you have pets.
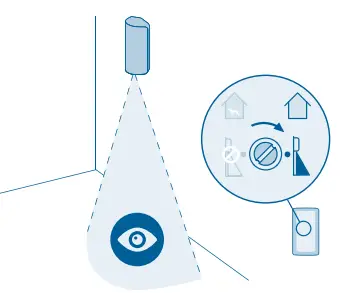
Inserting the Motion Detector into the mounting bracket
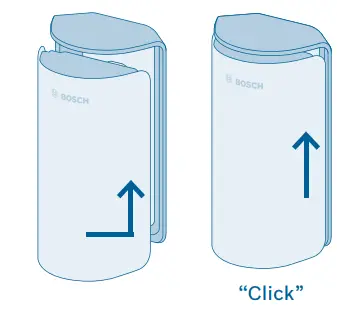 Insert the Motion Detector into the mounting bracket from the bottom up until you hear it click into place.
FUNCTIONAL TEST
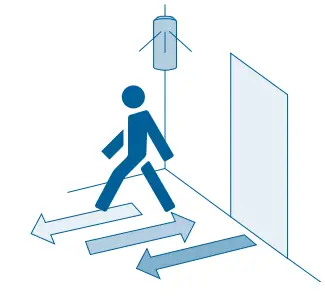 When crossing the room, pay attention to the route that a trespasser would be most likely to take.
MAINTENANCE AND CARE
PRODUCT DETAILS
| Device type name | Bosch Smart Home Motion Detector RFPR-ZB-SH-EU |
| Batteries | 123A |
| Battery life | Up to 5 years1) |
| Radio frequency | 2.4 GHz |
| Max. transmission power | 8 dBm |
| Protocol | Based on ZigBee HA1.1 with extended encryption technology |
1) 5 years, based on typical storage temperature (-10 to 55°C), ambient temperature, 160 motion detections/day and 2 software renewals of the device/year. High temperatures over 50 °C shorten the lifetime.
| Radio range in free-field conditions | > 50 m |
| Protection class | IP20 |
| Ambient temperature | 0 °C to +50 °C |
| Humidity (non-condensing) | 0% to 93% |
| Software class | Class A |
| Housing dimensions (W × H × D) | 60 mm × 108 mm × 42 mm |
| Weight (including battery compartment) | 114 g |
| Detection range | 90° and 12 m |
| Lense | 7 × 11 |
| Mounting height | 2.20 m × 2.70 m |
Declaration of conformity
 Electrical and electronic equipment that is no longer usable and defective or used batteries must be separated from other waste and recycled in an environmentally friendly manner (European Directive on waste electrical and electronic equipment).To dispose of electrical and electronic equipment or batteries, use your country-specific return and collection systems.
FURTHER INFORMATION
Before you transfer or sell your device, delete your personal information. To do this, reset the device to its factory settings (see online FAQs).
More at www.bosch-smarthome.com

70565 Stuttgart, Germany
Mon–Fri 7:00 am–8:00 pm
Sat 8:00 am–6:00 pm
[email protected]


