![]() PRF315300HW Defrost Top Freezer Mini Refrigerator
PRF315300HW Defrost Top Freezer Mini Refrigerator
Instruction Manual Service manual
Model: PRF315300HW
PRF315300HW Defrost Top Freezer Mini Refrigerator
| BRAND: | Pjq¡¡u¡ Lqvqllp | |
| MODEL: | PRF315300HW | |
| PRODUCT DESCRIPTION: | M¡µ¡ Bpj, glp33 3hqlvq3, cjy3Ępl cj¡3pqj, jqcq33qd hpµdlq | |
| Coloj | White | |
| LOADING QTY/4OHQ | 274 | |
| PRODUCT DIMENSION (W*D*H mm) | 48O*5OO*85O | |
| PACKING DIMENSION (W*D*H mm) | 5OO*54O*885 | |
| PRODUCT WEIGHT (Kg): | Gjo33 Wq¡ghĘ (G.W) | NqĘ Wq¡ghĘ (N.W) |
| 26 | 24 | |
| ToĘpl Gjo33 Cpppc¡Ęy (Cu.FĘ) | 87 | |
| ToĘpl NqĘ Cpppc¡Ęy (Cu.FĘ) | 85 | |
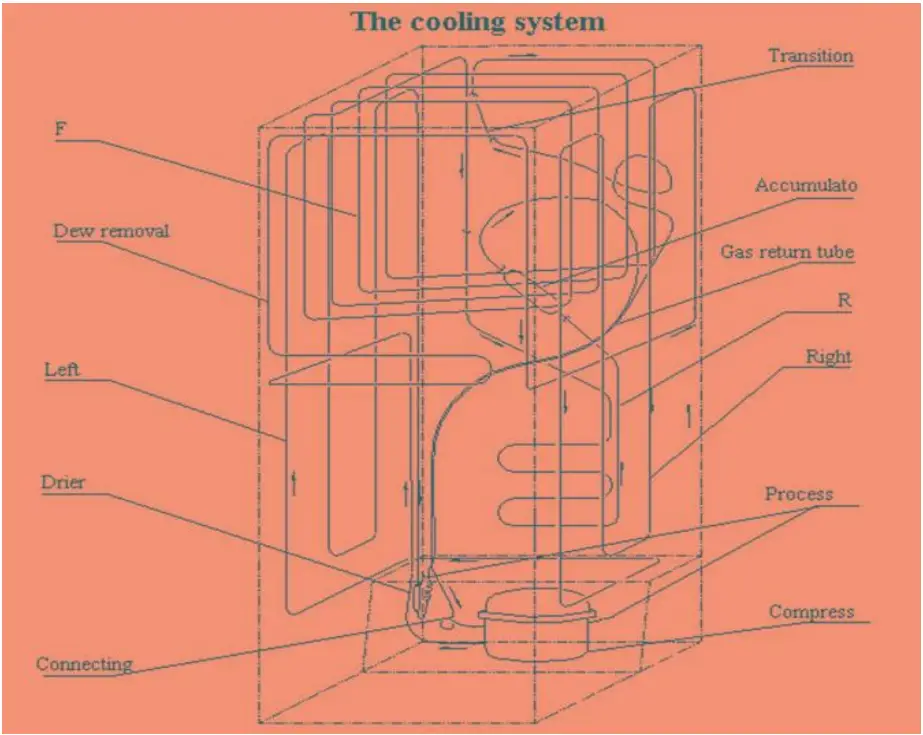
The cooling system
General exploded view
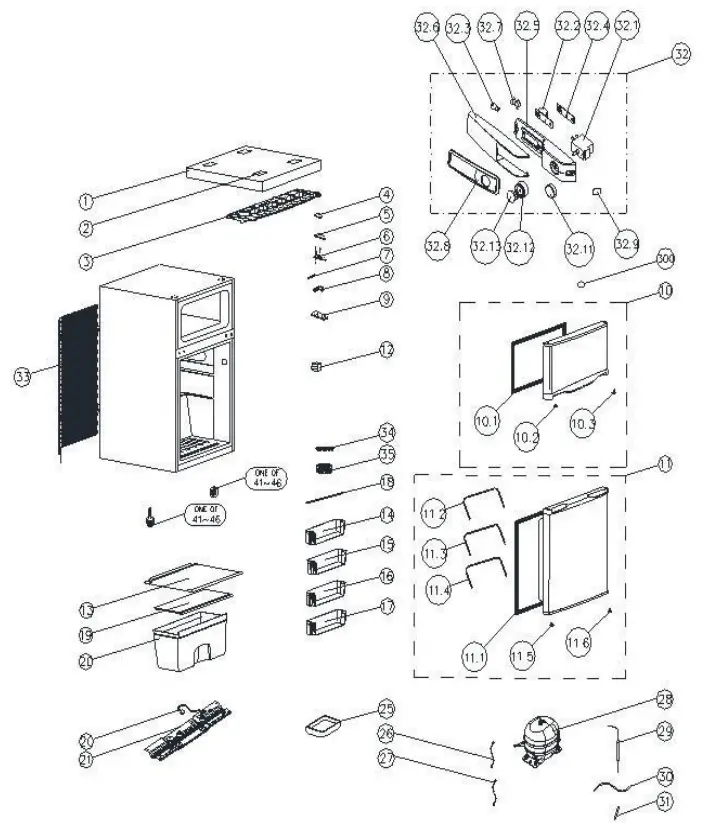
| No. | stoma Code | Description of Spare Part | Quantity |
| 4 | 20122080036 | Door hinge screw cover | 1 |
| 5 | 20122080091 | Door hinge cover | 1 |
| 6 | 3031400148 | Upper door hinge | 1 |
| 7 | 2208101188 | Middle hinge washer | 1 |
| 8 | 3031400116 | Middle door hinge | 1 |
| 9 | 3031400067 | Lower door hinge | 1 |
| 10 | 2100152587 | Upper door | 1 |
| 10.1 | 30204430145 | Upper door gasket | 1 |
| 10.2 | 20122090005 | Right Aid Closer Of Upper Door | 1 |
| 10.3 | 20122090011 | Left Aid Closer Of Upper Door | 1 |
| 11 | 2100152588 | Lower door | 1 |
| 11.1 | 3020400146 | Lower door gasket | 1 |
| 11.2 | 3031500031 | Door joist, straight | 1 |
| 11.3 | 3031500044 | Door joist, curved | 1 |
| 11.4 | 3031500011 | Lower door joist | 1 |
| 11.5 | 20122090162 | Right Aid Closer Of Lowe Door | 1 |
| 12.6 | 20122090179 | LeftAid CloserOf Lower Door | 1 |
| 12 | 2501100002 | Door switch | 1 |
| 13 | 20120020226 | Ridge shelf assembly | 1 |
| 17 | 3031500055 | Botde rack for drinks | 1 |
| 18 | 3020500092 | Upper door joist | 1 |
| 19 | 2207400523 | Crisper drawer assembly | 1 |
| 20 | 20120030010 | Cover of crisper drawer | 1 |
| 21 | 3050100117 | Power supply cord | 1 |
| 22 | 3039900264 | Compressor bracket | 1 |
| 25 | 20122990039 | Drain pan | 1 |
| 26 | 3050200095 | Earthing wire of compressor | 1 |
| 28 | 2400100282 | Compressor | 1 |
| 29 | 3040500011 | Drier filter | 1 |
| 30 | 20114070006 | Connecting tube | 1 |
| 31 | 3040600005 | Process tube | 1 |
| 32 | 20120010085 | Thermostat controller | 1 |
| 32. | 2400200005 | Thermostat | 1 |
| 32. | 20122010037 | Thermostat Knob | 1 |
| 32. | 2500500002 | Light Bulb | 1 |
| 33. | 20122010002 | Controller Shell | 1 |
| 33. | 20122010048 | Lamp Cover | 1 |
| 33. | 2500600001 | Light Holder | 1 |
| 42 | 20122990019 | Higher Leveling Foot | 1 |
| 44 | 20122990006 | Shorter Leveling Foot | 1 |
| 300 | 2700501337 | Trademark | 1 |
| 301 | 2700117929 | Carton | 1 |
Trouble shooting guide
| No | Problem | Possible Cause | What To Do |
| 1 | Refrigerator room temperature Ok and compressor running Fan not working Freezer room temperature not enough cold No air in the freezer air outlets | the fan motor failure | I- Open the cover board of the air duct in the freezer room and check the fan 2-If not running. measure the voltage between the red wire and black wire of fan 3-If the voltage is 12V, the fan motor is failure and replace it with a new one |
| the failure of the inner wire to fan connector | 1-Measure Me voltage between the CN2 red and black wire of PCB 2-If the voltage is 12v. check from the inner wire to fan connector | ||
| the PCB failure | 1-Measure the voltage between the CN2 red and black wire of PCB 2-If the voltage is zero. then the PCB failure and change a new PCB | ||
| .) 2 | No defrost Freezer room temperature* not cold enough Refrigerator room- duct and ice formation on the evaporator | the drainpipe contains impurity | 1-Disconnect power, and let the ice melt and drain pipe the 2-2 If not. check if there is impurity and dean the drain pipe |
| the sensor failure a PCB failure | 1-Check the fuse 2-If the fuse is melted, it means that the sensor failure or PCB failure 3-Change the sensor or PC | ||
| the defrost heater is broken or PCB failure | 1-Check the CN4 defrost heater two oonnector 2-If the heater is OK then is the PCB failure and change the PCB | ||
| 3 | The temperature of the freezer and refrigerator is not cold enough The temperature can not be adjusted by the potentiometer (thermostat) | the potentiometer failure | 1-Inspect the potentiometer (thamoStan 2-Measure the resistance value by adjusting the potentiometer (thermostat) 3-The resistance value is not changed by adjusting the potentiometer (thermostat) |
| the sensor failure | 1-If the potentiometer (thermostat) setting is below 3 degrees. the compressor will be running 20 minutes and then stop 30 minutes 2-If the potentiometer (thermostat) setting is more than 3 degrees. the compressor will be running 30 minutes and then stop 20 minutes 3-If the compressor works like the above situation. it means the sensor failure 4-Open the back of the refrigerator and change the sensor of the refrigerator evaporate |
| 4 | LED light is not worlung | the led failure | 1-Open the refrigerator door and measure the voltage of CN3 in the PCB 2-If dae voltage is zero then it means the connecting wire failure 3-If the voltage is 12V. it means the led failure |
| the switch circuit failure | 1-If the CN3 voltage is not 12V. then check the CN4 voltage 2-If the CN4 voltage is not changed by clovng and opening the door. it means the switch circuit failure | ||
| s | Compressor not start running | no problem | 1-The time between two starting is shorter than 12min 2-The refrigerator room temperature is lower than the set temperature 3-In this case. it is no problem. Please wait for longer |
| PCB failure | PCB has automatic self-examination 1-Open the cover of PCB at the back Of the product. plug-in power and Puth the $W101. switch 3 seconds and the PCB begin automatic self-examination program 2-Then the led. compressor. fan and defrost heater will work for two seconds and then stop and quit the automatic self-examination program. After that. the program will reset to the original setting 3-If the automatic self-examinant:0 program is not working. it means the PCB failure and needed to be changed | ||
| compressor wire failure or compressor damage | 1-Measure the voltage of compressor input connector 2-If it is OK then check the starting and relay of the compressor 3-Also check the wire if it Es OK | ||
| 6 | Not woeldng at all | the PCB failure | 1-Check the power by multimeter 2-If Me input voltage is 220V-240V. but the led. COmPressor fan. and defrost heater are all not working. it means the PCB failure and needed to be changed |
![]()


