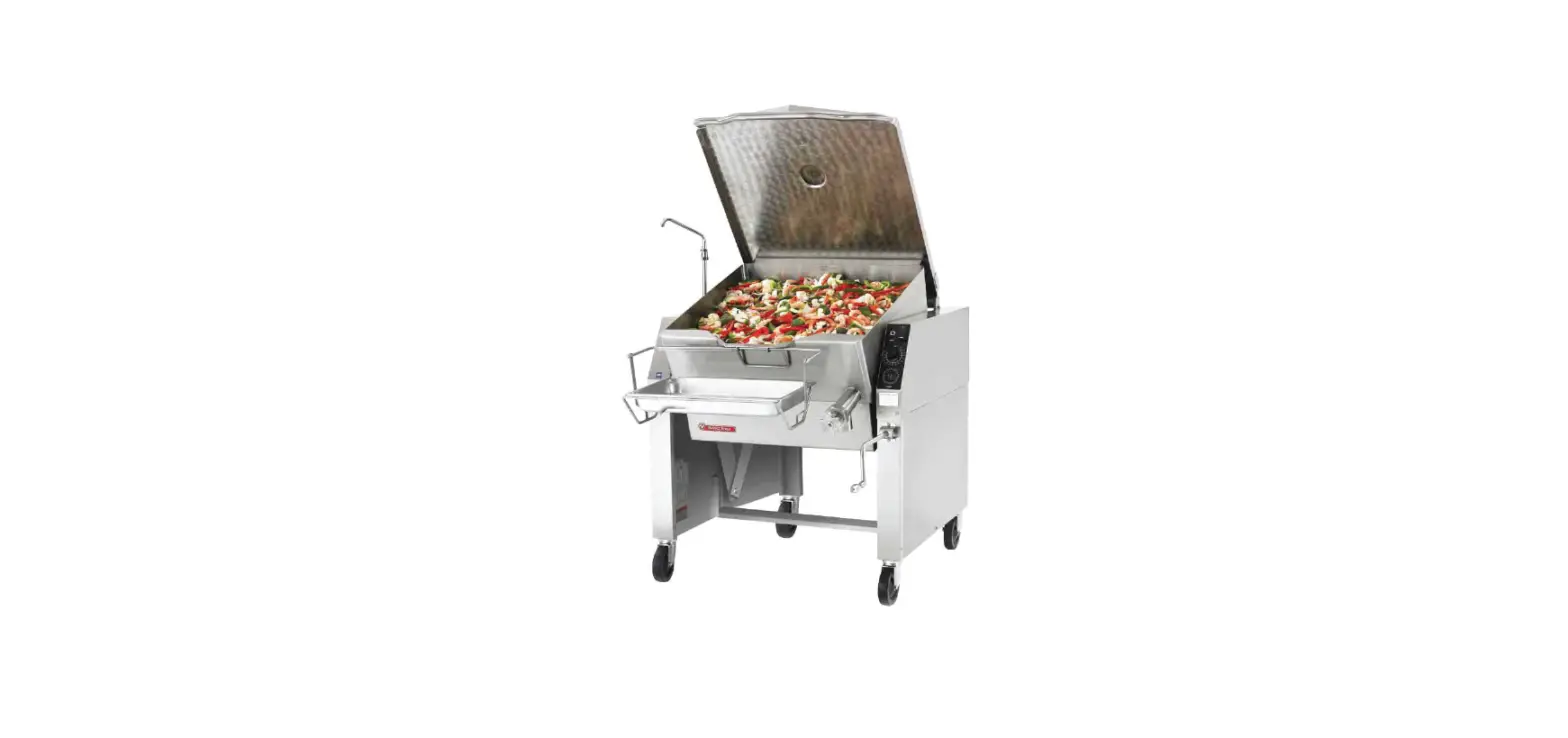
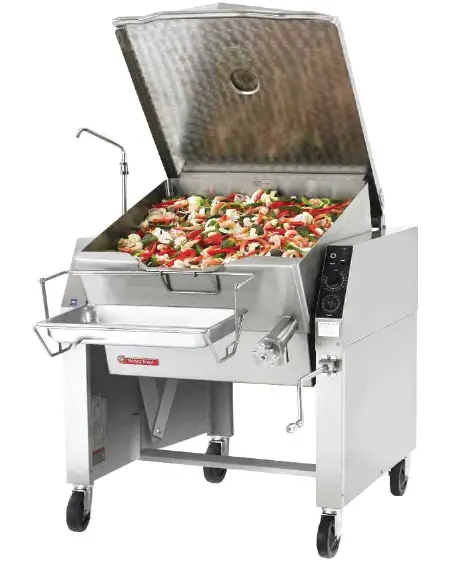
MARKET FORGE 40P-STEL Tilting Skillet Electric 40 Gallon Capacity
Product Information
The Electric Tilting Skillets are commercial-grade kitchen equipment manufactured by Crown Food Service Equipment, a Middleby Company, located in Toronto, Canada. The tilting skillets come in two models: 30P-STEL with an open leg base and 30P-STEM with a closed base. Both models have a 12 kW power capacity and can be purchased with an optional drain pan assembly. The skillets are intended for commercial use only and should not be used in households.
Product Usage Instructions
Safety Precautions: Before installing and operating the Electric Tilting Skillets, ensure that all operators are fully trained and aware of the precautions. The following symbols found in the manual indicate potentially dangerous conditions to the operator, service personnel, or equipment:
- DANGER: Warns of immediate hazards that will result in severe injury or death
- WARNING: Refers to potential hazard or unsafe practice that could result in injury or death
- CAUTION NOTICE: Refers to potential hazard or unsafe practice that could result in injury, product damage, or property damage
- IMPORTANT NOTES FOR INSTALLATION AND OPERATION: Refers to information that needs special attention or must be fully understood, even though not dangerous.
Installation: Improper installation, adjustment, alteration, service or maintenance can cause property damage, injury or death. Read the installation, operating, and maintenance instructions thoroughly before installing or servicing this equipment. Ensure adequate clearances are maintained for servicing and proper operation.
Operation: Do not attempt to operate this unit in the event of a power failure. For safety reasons, do not store or use gasoline or other flammable vapors or liquids in the vicinity of this or any other appliance.
Maintenance: Follow the maintenance procedures outlined in the installation and operation manual. Retain the manual for future reference.
WARNING
Improper installation, adjustment, alteration, service or maintenance can cause property damage, injury or death. Read the installation, operating and maintenance instructions thoroughly before installing or servicing this equipment.
CROWN FOOD SERVICE EQUIPMENT
A Middleby Company 70 Oakdale Road, Downsview (Toronto) Ontario, Canada, M3N 1V9
Telephone: 919-762-1000 www.crownsteamgroup.com
SAFETY PRECAUTIONS
Before installing and operating this equipment, be sure everyone involved in its operation is fully trained and aware of precautions. Accidents and problems can be caused by failure to follow fundamental rules and precautions.
The following symbols, found throughout this manual, alert you to potentially dangerous conditions to the operator, service personnel, or to the equipment.
DANGER
- This symbol warns of immediate hazards that will result in severe injury or death.
- This symbol refers to a potential hazard or unsafe practice that could result in injury or death.
- This symbol refers to a potential hazard or unsafe practice that could result in injury, product damage, or property damage.
- This symbol refers to information that needs special attention or must be fully understood, even though not dangerous.
IMPORTANT NOTES FOR INSTALLATION AND OPERATION
- WARNING This is the safety alert symbol. It is used to alert you to potential personal injury hazards. Obey all safety messages that follow this symbol to avoid possible injury or death.
- WARNING FOR YOUR SAFETY: Do not store or use gasoline or other flammable vapors or liquids in the vicinity of this or any other appliance.
- WARNING Improper installation, operation, adjustment, alteration, service or maintenance can cause property damage, injury or death. Read the installation, operating and maintenance instructions thoroughly before installing, operating or servicing this equipment.
- NOTICE Do not attempt to operate this unit in the event of a power failure.
- NOTICE Adequate clearances must be maintained for servicing and proper operation
- NOTICE This product is intended for commercial use only. NOT FOR HOUSEHOLD USE
- NOTICE This manual should be retained for future reference
Service Connections
30P-STEL AND 40P-STEL SHOWN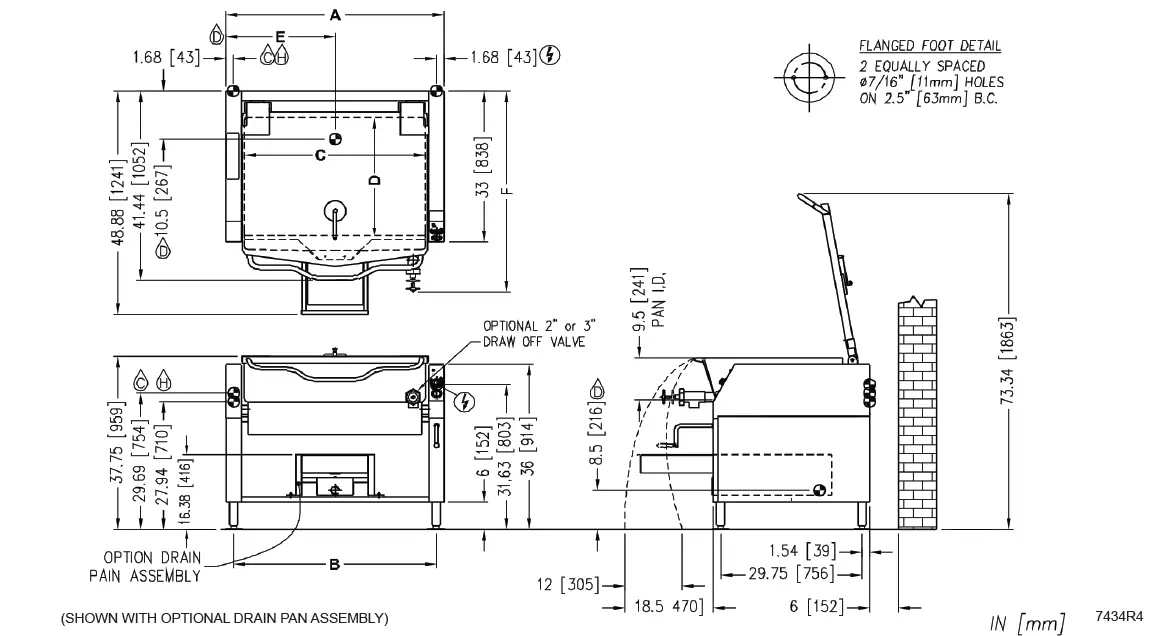
SERVICE CONNECTIONS
- ELECTRICAL CONNECTION : To be as specified on data plate.
- COLD WATER: 3/8” (10 mm) O.D. tubing to faucet (Optional)
- HOT WATER: 3/8” (10 mm) O.D. tubing to faucet (Optional)
- DRAIN: 1-1/2” NPT (Optional Drain Pan Assembly)
ELECTRICAL CHARACTERISTICS
| Model | kW | Phase | Amps Per Line | ||||||
| 208V | 220V | 240V | 380V | 415V | 480V | 600V | |||
| 30P-STEL (LX) 30P-STEM (LX) | 12 | 1 | 57.7 | 54.5 | 50.0 | N/A | N/A | N/A | N/A |
| 3 | 33.3 | 31.5 | 28.9 | 18.2 | 16.7 | 14.4 | 11.5 | ||
| 40P-STEL (LX) 40P-STEM (LX) | 18 | 1 | 86.5 | 81.8 | 75.0 | N/A | N/A | N/A | N/A |
| 3 | 50.0 | 47.2 | 43.3 | 27.3 | 25.0 | 21.7 | 17.3 | ||
DIMENSION
| Model | Shipping Weight | Capacity | Units | A | B | C | D | E | F | |
| Ø2 | Ø3 | |||||||||
| 30P-STEL (LX) 30P-STEM (LX) | 515 lbs (234 kg) 545 lbs (248 kg) | 30 Gallons (114 Liters) | Inches mm | 36 914 | 32.63 829 | 27.88 708 | 25.75 654 | 18 457 | 38.25 972 | 42.75 1086 |
| 40P-STEL (LX) 40P-STEM (LX) | 630 lbs (286 kg) 660 lbs (300 kg) | 40 Gallons (152 Liters) | Inches mm | 46 1168 | 42.63 1083 | 37.88 962 | 25.75 654 | 23 584 | 38.25 972 | 42.75 1086 |
DISCLAIMER
Terry System Cartridge Changes / Installation – “2-3 gallons of water MUST be purged at each cartridge change or new installation prior to water supply being fed to the steamer. Failure to do so can result in component damage within the steamer which is not covered under warranty. For additional guidance on proper installation, refer to install documentation provided with each Terry System and Replacement Cartridge Set.”
Introduction
This manual contains general information, installation, operation, principles of operation, troubleshooting guide and maintenance information for the electrically operated UniVerse Tilting Skillet.
Description
The Market Forge Industries UniVerse Models 30P-STEL (12 kW input) and 40P-STEL (18 kW input) are electrically operated skillets, tilting type, with 30- and 40-gallon capacities, respectively. They are equipped with a solid-state thermostat and high-limit control with a 100 °F to 450 °F temperature scale.
Basic Functions
The UniVerse Tilting Skillet is a very versatile cooking appliance. It can perform basic cooking functions, such as braising meat, sautéing, pan-frying chicken, steaming vegetables, boiling, and simmering. Refer to – Cooking Guidelines Section, which gives detailed information on the various types of food products that can be cooked in the skillet.
Basic Operation
- Ensure that electric power connection has been made correctly and that branch circuit breaker at building supply box is ON.
- Ensure that skillet is in full down position and clean before using.
NOTICE Electric power automatically shuts off when skillet is tilted more than 10̊ above normal horizontal cooking position - Set thermostat at desired temperature by turning thermostat control knob clockwise. See Cooking Guidelines Section for thermostat settings.
- Preheat to desired temperature (with cover down) before grilling, pan-frying, or any other method of cooking except boiling.
NOTICE For best results, allow unit to cycle ON/OFF once. - Ensure that cover is up for most types of cooking except for simmering, braising, or boiling. Cover has drip-lip at rear to direct condensate into skillet.
- Remove cooked food immediately to prevent over-cooking. Tilt skillet by turning hand crank clockwise or pushing tilt switch.
- Lower skillet by turning hand crank counterclockwise or pushing tilt switch.
Turn thermostat control knob counterclockwise to OFF when no further heating is desired.
Unit must be cleaned after each use. Proceed as follows:
- When all food has been removed from skillet, add water to loosen/dissolve any remaining food.
- Wash skillet using mild detergent, water and nylon brush. If food is stuck to skillet surface, soak and apply heat to loosen food.
CAUTION Do not get water on wiring or in controls. Be sure to wash inside of skillet pan, inside of cover including under drip-lip, and pouring spout area. - Rinse and dry entire unit.
Installation
Unpacking
Immediately after unpacking, check for possible shipping damage. If the tilting skillet is found to be damaged, save the packaging material and contact the carrier within 15 days of delivery. Before installing, verify that the electrical service agrees with the specifications on the rating plate located on the right side panel as you face the front of the skillet. If the supply and equipment requirements do not agree, contact your dealer.
Location
The installation location must allow adequate clearances for servicing and proper operation. A minimum front clearance of 36”, and rear clearance of 6” is required.
Installation Codes and Standards
Your Tilting Skillet must be installed in accordance with:
- Provincial and local codes, or in the absence of local codes, with: C.S.A. C22.1 Canadian Electrical Code, Part 1, or in the U.S.A. state and local codes, or in the absence of local codes, with the National Electrical Code ANSI/NFPA-70 (latest edition).
- ANSI NFPA Standard #96, “Vapor Removal from Cooking Equipment,” (latest edition), available from the National Fire Protection Association, Batterymarch Park, Quincy, MA, 02269.
Levelling and Anchoring Tilting Skillet
- Place skillet in the installation position.
- Place a carpenter’s level on top of the skillet pan and turn the adjustable feet to level skillet side-to-side and front-to back.
- Mark hole locations on the floor through the anchoring holes provided in the rear flanged adjustable feet.
- Remove the skillet from the installation position and drill holes in locations marked on the floor. (See Installation Diagram on page 4.) Insert proper anchoring devices (not supplied).
- Place the skillet back in the installation position.
- Place carpenter’s level on top of skillet and re-level side-to-side and front-to-back.
- Bolt and anchor the skillet securely to the floor.
- Seal bolts and flanged feet with Silastic or equivalent compound.
- If the faucet is provided, connect water supply and check the operation.
- Turn the power on and check for proper operation.
ELECTRICAL GROUNDING INSTRUCTIONS
Electrical and grounding connections must comply with the applicable portions of the National Electrical Code and/or other local codes.
Electrical Connections
WARNING
Before performing any maintenance disconnect the electrical power supply and place a tag at the disconnect switch to indicate that you are working on the circuit
NOTICE
Do not install in such a manner that a service person cannot remove the control box cover
Connect unit to a branch circuit having a voltage and circuit type specified on name plate and of sufficient size to carry a load. The amps per line wire for the various voltage ratings are shown in a table on page 4.
NOTICE
Supply wires must be suitable for temperatures of at least 90 °C (200 °F). Additionally, all wiring must conform to the requirements of local and national electric codes. Conduit and fittings must be watertight
- Connect ground wire from electrical service to ground lug.
- Ensure that skillet is firmly seated on frame before checking connection and functioning of controls.
NOTICE
Unit is equipped with an interlock switch that shuts off current to heating elements when skillet pan is more than (10°) above normal horizontal cooking position.
Switch on current supply to unit. Check for proper functioning of controls and heating elements (see Operation Section).
Service Connections
- All internal wiring for the skillet is complete.
- Make service connections as indicated on page 4 and electrical connections above.
- If a faucet is provided, connect the water supplies and check for proper operation.
Operation
WARNING
The tilting skillet and its parts are hot. Use care when operating, cleaning and servicing the tilting skillet
Before First Use
Using a non-corrosive, grease-dissolving commercial cleaner, clean the protective metal oils from all surface parts and the interior of the tilting skillet. Follow the cleaner manufacturer’s directions. Rinse thoroughly and drain the pan. Wipe dry with a soft clean clot
Controls
- TEMPERATURE LIGHT (RED) Illuminates when heating elements are supplying heat to the tilting skillet.
- THERMOSTAT Turns tilting skillet ON and maintains set temperature by controlling power supply.
- Temperature settings range from 100 °F to 450 °F. (See COOKING GUIDELINES in this manual for temperature settings.)
- HAND CRANK To raise and lower pan.
- TILT SWITCH (OPTIONAL) Push UP to raise pan; push DOWN to lower tilting braising pan.
- TIMER 1 hour mechanical timer (Time Cooking Time).
Start-Up Procedure
- Ensure that the skillet pan is in the DOWN position.
- Turn THERMOSTAT dial to desired temperature (reference Cooking Guidelines, Page 9). The red TEMPERATURE light will come on.
- When skillet pan has reached set temperature, the red TEMPERATURE light will go off and the heating elements will shut off. The heating elements will cycle on and off thereafter to maintain set temperature. The red TEMPERATURE light will cycle on and off with the heating elements.
- Preheat skillet pan and allow it to cycle to equalize heat across the entire surface.
- Water will boil faster with the lid down.
- Turn THERMOSTAT to OFF when skillet is not in use.
Daily Shutdown Procedure
To turn tilting skillet off, turn THERMOSTAT dial to OFF.
Tilting the Skillet
- DO NOT try to tilt skillet with lid down.
- Make sure the receiving pan is in place.
- Turn hand crank clockwise or for power tilt, push and hold TILT SWITCH in the UP mode until desired pan position has been reached. The pan will empty when raised to the top tilt position. When the braising pan is raised 10̊ or more, the heating elements will be turned off automatically.
- Food is poured through the removable strainer into a food receiving pan positioned under the lip of the pouring spout.
- To lower pan, turn hand crank counterclockwise or push and hold TILT SWITCH in the DOWN mode
COOKING GUIDELINES
All Modular and Tubular Leg Models The UniVerse Skillet is one of the most versatile pieces of equipment to be found in any restaurant or institutional kitchen. It enables the cook to stew, simmer, pan-fry, braise, grill, or sauté, and all with a very uniform heat pattern. The figures given below are suggested quantities and temperature settings and estimated numbers of orders per load and per hour. When two temperatures are given, the first is to start the product, the second to finish the product. The following temperatures should be used:
| Cooking Method | Temperature (°F) | Thermostat Setting |
| Simmering | 200 Maximum | 1 – 4 |
| Sautéing | 225 – 275 | 5 – 6 |
| Searing | 300 – 350 | 7 – 8 |
| Frying | 325 – 375 | 8 – 9 |
| Grilling | 350 – 425 | 9 – 10 |
| Item | Portion Size | Thermostat Settings (°F) | Batches Per Hour | 30 Per Load | 40 Per Load | ||
| Qty. | Portions | Qty. | Portions | ||||
| BREAKFAST FOODS | |||||||
| Bacon | 3 slices | 350 | 12 | 2 lb | 10 | 3 lb | 15 |
| Eggs | |||||||
| – Boiled – Hard | 1 egg | 225 | 5 | 50 eggs | 50 | 75 eggs | 75 |
| – Boiled – Soft | 1 egg | 225 | 8 | 50 eggs | 50 | 75 eggs | 75 |
| – Fried | 1 egg | 400 | 4 | 30 eggs | 30 | 45 eggs | 45 |
| – Poached | 1 egg | 225 | 5 | 36 eggs | 36 | 60 eggs | 60 |
| – Scrambled | 1-1/2 eggs | 300-200 | 1 | 18 gal. | 720 | 28 gal. | 1100 |
| French Toast | 3 slices | 450 | 7 | 35 slices | 12 | 50 slices | 17 |
| Regular Oatmeal | 1/2 cup | 250 | 2 | 20 lb (100 cups) | 500 | 40 lb (200 cups) | 1000 |
| Pancakes | 2 each | 400 | 10 | 30 each | 15 | 50 each | 25 |
| FISH | |||||||
| Clams | 1 pint | 400 | 10 | 10 quarts | 20 | 15 quarts | 30 |
| Fish Cakes | 2 – 3 oz | 400 | 5 | 70 – 3 oz | 35 | 110 – 3 oz | 55 |
| Haddock Fillet | 4 oz | 400 | 4 | 60 – 4 oz | 60 | 90 – 4 oz | 90 |
| Halibut Steak | 5 oz | 450 | 3 | 60 – 4 oz | 60 | 90 – 4 oz | 90 |
| Lobster | 1 – 1 lb | 350 | 4 | 20 – 1 lb | 20 | 30 – 1 lb | 30 |
| Swordfish | 5 oz | 450 | 3 | 50 – 5 oz | 50 | 75 – 5 oz | 75 |
| SAUCES, GRAVIES, SOUPS | |||||||
| Brown Gravy | 1 oz | 350 – 200 | 2 | 18 gal. | 2300 | 35 gal. | 4500 |
| Cream Sauce | 2 oz | 250 – 175 | 1 | 18 gal. | 1150 | 35 gal. | 2250 |
| Cream Soup | 6 oz | 200 | 1 | 18 gal. | 375 | 35 gal. | 725 |
| French Onion Soup | 6 oz | 225 | 1 | 18 gal. | 350 | 35 gal. | 700 |
| Meat Sauce | 4 oz | 350 – 200 | 1 | 18 gal. | 575 | 35 gal. | 1100 |
| VEGETABLES | |||||||
| CANNED | 3 oz | 400 | 6 | 30 lb | 125 | 45 lb | 200 |
| FRESH | |||||||
| Beans, Wax,Green | 3 oz | 400 | 3 | 25 lb | 125 | 50 lb | 250 |
| Beets | 3 oz | 400 | 1 | 30 lb | 125 | 60 lb | 300 |
| Item | Portion Size | Thermostat Settings (°F) | Batches Per Hour | 30 Per Load | 40 Per Load | ||
| Qty. | Portions | Qty. | Portions | ||||
| VEGETABLES (continued) | |||||||
| FRESH (continued) | |||||||
| Broccoli | 3 oz | 400 | 3 | 25 lb | 125 | 40 lb | 200 |
| Cabbage | 3 oz | 400 | 5 | 20 lb | 80 | 30 lb | 125 |
| Carrots | 3 oz | 400 | 2 | 35 lb | 150 | 70 lb | 300 |
| Cauliflower | 3 oz | 250 | 5 | 15 lb | 75 | 25 lb | 125 |
| Corn | 1 ear | 400 | 8 | 50 ears | 50 | 75 ears | 75 |
| Potatoes | 3 oz | 400 | 2 | 40 lb | 200 | 60 lb | 300 |
| Spinach | 4 oz | 250 | 10 | 40 lb | 200 | 9 lb | 35 |
| Turnips | 4 oz | 400 | 2 | 20 lb | 100 | 30 lb | 150 |
| FROZEN | |||||||
| Beans, French Green | 3 oz | 400 | 6 | 15 lb | 60 | 22-1/2 lb | 90 |
| Lima Beans | 3 oz | 250 | 4 | 15 lb | 60 | 22-1/2 lb | 90 |
| Broccoli | 3 oz | 400 | 8 | 12 lb | 50 | 18 lb | 75 |
| Sliced Carrots | 3 oz | 250 | 6 | 15 lb | 60 | 22-1/2 lb | 90 |
| Small Whole Carrots | 3 oz | 250 | 3 | 15 lb | 50 | 22-1/2 lb | 90 |
| Corn | 3 oz | 250 | 18 | 15 lb | 50 | 22-1/2 lb | 90 |
| Small Whole Onions | 3 oz | 250 | 7 | 15 lb | 50 | 22-1/2 lb | 90 |
| Peas | 3 oz | 400 | 10 | 15 lb | 75 | 22-1/2 lb | 110 |
| Spinach | 3 oz | 400 | 3 | 15 lb | 75 | 22-1/2 lb | 110 |
| DESSERTS, PUDDINGS, SWEET SAUCES | |||||||
| Butterscotch Sauce | 1 oz | 200 | 1 | 18 gal. | 2300 | 35 gal. | 4500 |
| Cherry Cobbler | 3 oz | 200 | 1 | 18 gal. | 750 | 35 gal. | 1500 |
| Chocolate Sauce | 1 oz | 200 | 1 | 18 gal. | 2300 | 35 gal. | 4500 |
| Cornstarch Pudding | 4 oz | 200 | 1 | 18 gal. | 575 | 35 gal. | 1100 |
| Fruit Gelatin | 3 oz | 250 | 2 | 18 gal. | 750 | 35 gal. | 1500 |
| MEAT-POULTRY | |||||||
| BEEF | |||||||
| American Chop Suey | 6 oz | 400 – 225 | 2 | 18 gal. | 350 | 35 gal. | 700 |
| Beef Stew | 8 oz | 300 | – | 18 gal. | 280 | 35 gal. | 560 |
| Corned Beef Hash | 5 oz | 400 | 5 | 16 lb | 50 | 25 lb | 75 |
| Cheeseburger | 3 oz | 300 | 12 | 7 lb | 35 | 10 lb | 50 |
| Hamburger | 3 oz | 300 | 15 | 7 lb | 35 | 10 lb | 50 |
| Meatballs | 1 oz | 400 – 225 | 3 | 12-1/2 lb | 65 | 18 lb | 100 |
| Pot Roast | 2 oz | 350 – 200 | 120 lb | 500 | 180 lb | 750 | |
| Salisbury Steak | 5 oz | 400 | 3 | 16 lb | 50 | 24 lb | 75 |
| Sirloin Steak | 6 oz | 400 | 5 | 15 lb | 40 | 22-1/2 lb | 60 |
| Swiss Steak | 4 oz | 300 – 200 | 1 | 25 lb | 110 | 40 lb | 160 |
| CHICKEN | |||||||
| Pan Fried | 2-1/4’s | 350 | 3 | 50 pieces | 25 | 80 pieces | 40 |
| Whole | 2 oz | 350 – 200 | 16 – 5 lb | 200 | 24-5 lb | 265 | |
| Item | Portion Size | Thermostat Settings (°F) | Batches Per Hour | 30 Per Load | 40 Per Load | ||
| Qty. | Portions | Qty. | Portions | ||||
| MEAT-POULTRY (continued) | |||||||
| FRANKFURTERS | |||||||
| Grilled | 2 oz | 300 | 8 | 22 lb | 176 | 33 lb | 264 |
| Boiled | 2 oz | 250 | 12 | 16 lb | 128 | 25 lb | 200 |
| PORK | |||||||
| Bacon | 3 slices | 350 | 12 | 2 lb | 10 | 3 lb | 15 |
| Ham Steak | 3 oz | 400 | 8 | 10 lb | 50 | 15 lb | 75 |
| Pork Chops | 5 oz | 350 | 4 | 15 lb | 50 | 25 lb | 75 |
| Sausage Links | 3 links | 350 | 7 | 30 lb | 120 | 45 lb | 180 |
| TURKEY | |||||||
| Off Carcass | 2 oz | 400 – 200 | – | 3 26-30 lb | 200 | 4 26-30 lb | 275 |
| On Carcass | 2 oz | 400 – 200 | – | 4 16-20 lb | 175 | 6 16-20 lb | 265 |
| MISCELLANEOUS | |||||||
| Grilled Cheese Sandwich | 1 sand. | 400 | 8 | 35 sand. | 35 | 50 sand. | 50 |
| Macaroni & Cheese | 8 oz | 200 | 2 | 18 gal. | 300 | 35 gal. | 525 |
| Rice | 4 oz | 350 – 225 | 1 | 20 lb raw | 320 | 40 lb raw | 650 |
| Spaghetti | 4 oz | 350 – 225 | 2 | 8 lb raw | 200 | 12 lb raw | 300 |
Cleaning
Cleaning Instructions
- WARNING
Disconnect the power supply to the appliance before cleaning or servicing. - CAUTION
The equipment and its parts are hot. Use care when operating, cleaning and servicing. - WARNING
Never spray water into electric controls or components! - CAUTION
Do not use cleaning agents that are corrosive.
Before cleaning allow the tilting skillet to cool and then clean it. Keep exposed cleanable areas of the tilting skillet clean at all times. Do not get water in electrical box or any electrical component.
- Thoroughly wash pan, pouring spout, lid and exterior surfaces with detergent and warm water. If necessary, soak pan to remove food that is stuck to pan surface. Rinse thoroughly and wipe dry with a soft clean cloth.
- Clean removable strainer and receiving pan support with detergent and warm water. Rinse thoroughly and wipe dry with a soft clean cloth.
What To Do If Surface Rust Appears
Metal utensils should never be used as they will scratch the surface of the equipment and rust may begin to form. To remove surface accumulation of rust from the inadvertent use of such utensils, the following procedure may be used
CAUTION
Improper use of this procedure may damage your appliance
- Use undiluted white vinegar with a non-abrasive scouring pad (plastic) or cloth on the affected area to remove the rust stain. The appliance should not be heated and remain at room temperature during the entire cleaning process.
- If the stain resists removal, additional exposure time with vinegar may be required, to a maximum of one hour.
- Thoroughly wash all of the vinegar away with fresh clear water. Dry the surface completely and allow one hour before using the appliance to cook.
Following daily and period maintenance procedures will prolong the life for your equipment. Climatic conditions – salt air – may require more thorough and frequent cleaning or the life of the equipment could be adversely affected
Stainless Steel
- To remove normal dirt, grease or product residue from stainless steel, use ordinary soap and water (with or without detergent) applied with a sponge or cloth. Dry thoroughly with a clean cloth. Never use vinegar or any other corrosive cleaner.
- To remove grease and food splatters or condensed vapours that have baked on the equipment, apply cleanser to a damp cloth or sponge and rub cleanser on the metal in the direction of the polishing lines. Rubbing cleanser as gently as possible in the direction of the polished lines will not mar the finish of the stainless steel. NEVER RUB WITH A CIRCULAR MOTION.
- Soil and burn deposits which do not respond to the above procedure can usually be removed by rubbing the surface with SCOTCH-BRITE™ scouring pads or STAINLESS scouring pads. DO NOT USE ORDINARY STEEL WOOL as any particles left on the surface will rust and further spoil the appearance of the finish. NEVER USE A WIRE BRUSH, STEEL SCOURING PADS (EXCEPT STAINLESS), SCRAPER, FILE OR OTHER STEEL TOOLS. Surfaces which are marred collect dirt more rapidly and become more difficult to clean. Marring also increases the possibility of corrosive attack. Refinishing may then be required.
- TO REMOVE HEAT TINT: Darkened areas sometimes appear on stainless steel surfaces where the area has been subjected to excessive heat. These darkened areas are caused by thickening of the protective surface of the stainless steel and is not harmful. Heat tint can normally be removed by the foregoing, but tint which does not respond to this procedure calls for a vigorous scouring in the direction of the polish lines using SCOTCH-BRITE™ scouring pads or a STAINLESS scouring pad in combination with a powdered cleanser. Heat tint action may be lessened by not applying or by reducing heat to equipment during slack periods. All food contact surfaces must be thoroughly drained and flushed prior to cooking in the kettle.
- CONTROL PANEL: The textured control panel should be cleaned with warm water and mild soap. Never use an abrasive cloth or steel wool. Never use cleaning solvents with a hydrocarbon base
Maintenance
- NOTICE
Contact the factory, the factory representative or a local service company to perform maintenance and repairs. - WARNING
The tilting skillet pan and its parts are hot. Use care when operating, cleaning and servicing the tilting skillet. - WARNING
Disconnect electrical power supply and place a tag at the disconnect switch to indicate that you are working on the circuit before performing any maintenance.
Adjustments
- All tilting skillets are adjusted at the factory.
- At least twice a year, have an authorized service person clean and adjust the tilting skillet for maximum performance.
Troubleshooting
| Problem | Probable Cause | Remedy |
| UNEVEN HEATING. | • Defective element. • Uneven torque of element block nuts.
• Temperature control out of calibration or defective. | • Replace element. • Re-torque element block nuts on bottom of skillet. Torque the first nuts evenly to 30 inch – lb. Holding first nut, torque the second nut to 100 inch – lb. • Calibrate or replace. |
| SIGNAL LIGHT OUT. | • Burnt out bulb. • Defective temperature control or thermocouple. • Loose electrical connection. | • Replace. • Replace. • Repair. |
| UNIT FAILS TO HEAT. | • Circuit breaker is off. • Malfunction of interlock switch. • Contactor does not pull in. • Defective temperature control or thermocouple. | • Reset circuit breaker. • Adjust or replace. • Replace contactor. • Replace temperature control or thermocouple. |
A product with the Market Forge name incorporates the best in durability and low maintenance. We all recognize, however, that replacement parts and occasional professional service may be necessary to extend the useful life of this appliance. When service is needed, contact a Market Forge Authorized Service Agency, or your dealer. To avoid confusion, always refer to the model number, serial number, and type of your appliance.
CROWN FOOD SERVICE EQUIPMENT
A Middleby Company
70 Oakdale Road, Downsview (Toronto) Ontario, Canada, M3N 1V9
Telephone: 919-762-1000
www.crownsteamgroup.com


