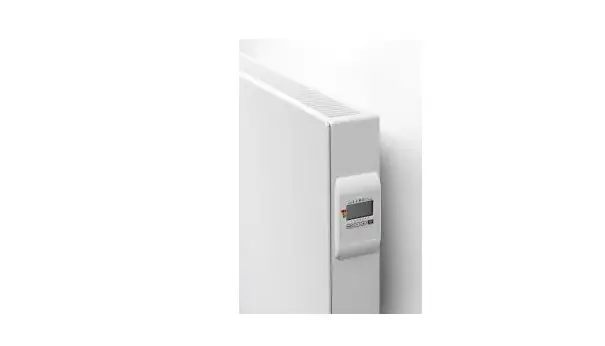
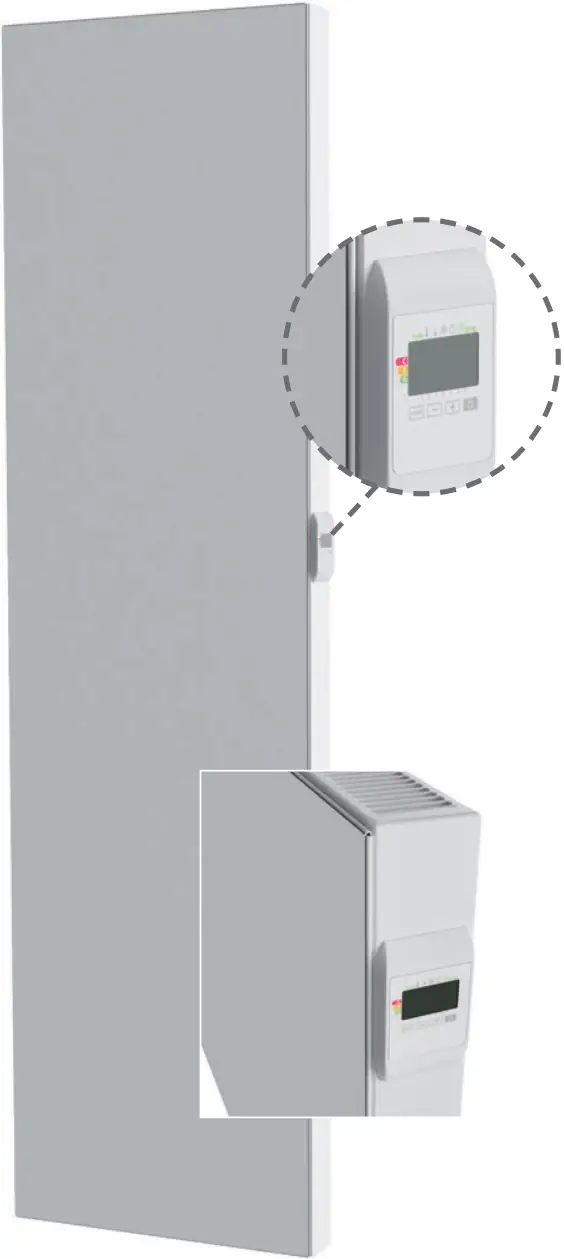
CONTROLLER
ELECTRICAL
PANEL
RADIATOR
USER AND
INSTALLATION MANUAL
SAFETY INSTRUCTIONS
 This appliance can be used by children aged from 8 years and above and persons with reduced physical, sensory or mental capabilities or lack of experience and knowledge if they have been given supervision or instruction concerning use of the appliance in a safe way and understand the hazards involved. Children shall not play with the appliance. Cleaning and user maintenance shall not be made by children without supervision.
Children of less than 3 years should be kept away unless continuously supervised.
Children aged from 3 years and less than 8 years shall only switch on/off the appliance provided that it has been placed or installed in its intended normal operating position and they have been given supervision or instruction concerning use of the appliance in a safe way and understand the hazards involved. Children aged from 3 years and less than 8 years shall not plug in, regulate and clean the appliance or perform user maintenance.
CAUTION — Some parts of this product can become very hot and cause burns. Particular attention has to be given where children and vulnerable people are present.
The radiator may not be mounted directly beneath a power socket.
It should be possible, at all times, to turn off the radiator. If it is a plug connector, it should have an external power-off switch. In the case of a corded, fixed connection, the electric circuit should be correctly fused.
When mounting the radiator, please follow the local/national regulations for the cabling installation and adhere to our general terms and conditions.
WASTE DISPOSAL ACCORDING TO THE EUROPEAN UNION (2012/19/EU) DIRECTIVE ON WEEE (WASTE FROM ELECTRICAL AND ELECTRONIC EQUIPMENT)
 The symbol on the ID plate of the radiator states that the radiator may not be disposed of as household waste, but should be separated out, to facilitate recycling. Once the radiator is end-of-life, it should be taken to a waste collection point for electrical and electronic goods. For more information about recycling and waste collection points, please contact your local authority/district council or waste collection service in those countries where the directive has been transposed into national law.
TECHNICAL SPECIFICATIONS
– Working voltage: 230 VAC 50 Hz
– Maximum power output of 2000W, resistive load
– Power cable, class II, 1350 mm:![]() a) a model with no plug socket, 2 power cables. The black (hidden and shielded) cable is a communication cable that only applies in France. On no account may it be connected to the earth and it should be shielded at all times.
a) a model with no plug socket, 2 power cables. The black (hidden and shielded) cable is a communication cable that only applies in France. On no account may it be connected to the earth and it should be shielded at all times.
b) a version with a Schuko plug socket.
If the power cable is damaged, please contact your installation engineer.
 – Power consumption in stand-by mode: <0.5W
– Electronic, relay-controlled PID controller
– IPX4
– Class II, post-installation, for which the installer is liable (to EN60335-1)
– THE CONTROLLER MUST NOT BE OPERATED OR CONNECTED BY AN EXTERNAL
CONTROL/OPERATING SIGNAL!
WRITTEN DECLARATION FROM THE MANUFACTURER
 We hereby declare, at our own risk, that the products described in this instruction manual are CE-certified and meet all the essential requirements of the following directives and harmonised standards:
– EMC: EN55014-1: 2006 + A1: 2009 + A2: 2011 / EN55014-2: 2015 / EN61000-3-2: 2014 / EN61000-3-3: 2013
– LVD: EN 60335-1: 2012 + A11: 2014 / EN 60335-2-30: 2009 + A11: 2012 / EN62233: 2008
– ROHS: EN 50581: 2012
and that the products were manufactured according to certified processes, to ISO 9001 V2015.
This appliance complies with the European directive ECO Design Directive 2015/1188 :
Information requirements for electrical appliances for local space heating | |||
| Parameter | Symbol | Value | Unit |
Warmteafgifte | |||
| Nominal heat output | P nom | 0,5 → 2 | kW |
| Minimal heat output | P min | 0,5 | kW |
| Maximal continuous heat output | P max,c | 2 | kW |
Additional electricity consumption | |||
| At nominal heat output | el max | 0,000 | KW |
| At minimal heat output | el min | 0,000 | kW |
| In stand-by mode | el sb | 0,0005 | kW |
Type of heat output/control of room temperature | |||
| Electronic control of the room temperature plus a week-time switch | |||
Other control options | |||
| Control of room temperature, including automatic detection of open windows | |||
| With optional remote control, if applicable for this appliance (see catalog) | |||
| With optional remote control | |||
Contact details | |||
| See ID plate on the radiator | |||
Warranty conditions: go to
www.kermi.com
www.vasco-group.eu
OPERATION

- Comfort mode
- Eco-mode
- Frost Protection Mode
- Heating on / Standby Mode
- Time and Day Setting mode
- Programming Mode
- Keypad locked
- Heating indicator
- Days of the week
- Power on/heating on standby feature
- Plus and Minus buttons used to set temperatures, times, days and programmes
- Modes selection and set up validation
- Energie consumption
- Indicator pilot wire is active (ONLY FOR FRANCE) or programming
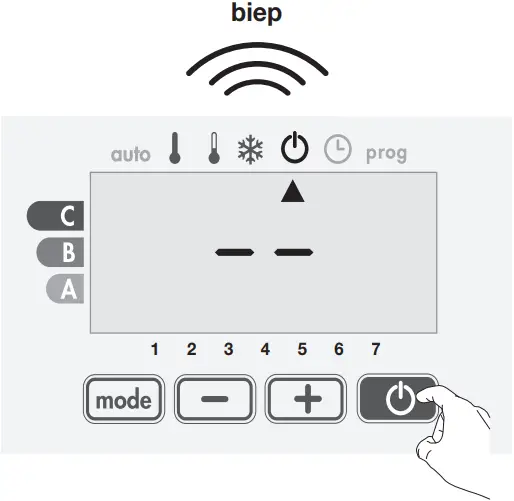
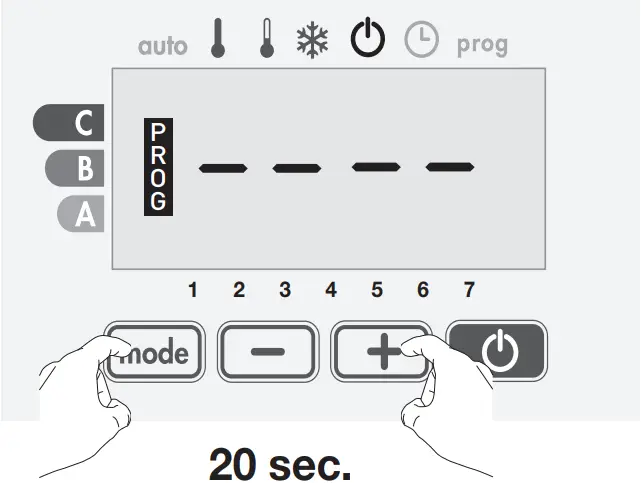
SETTING THE POWER OUTPUT
Before using it for the first time, the power output of the radiator has to be set. This power output is shown on the ID plate. If the power output is not set correctly, we cannot guarantee the proper functioning of the radiator.
1- Press the ![]() key while the power is switched off.
key while the power is switched off.
Trip switch


2- Keep the ![]() key depressed and switch on the power.
key depressed and switch on the power.
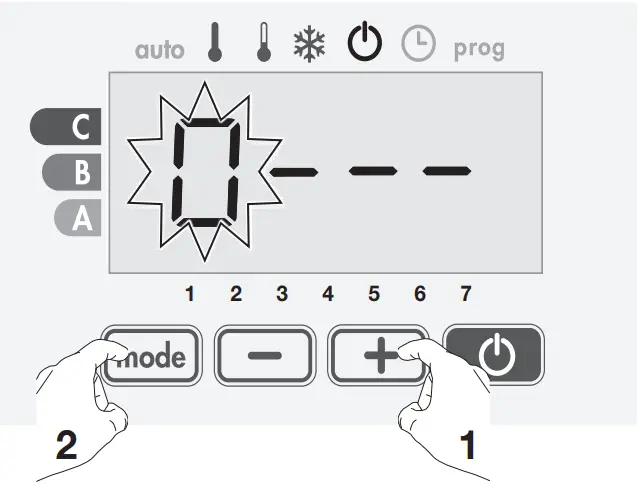
The coefficient which stands for a certain power output is, by default, “B00”.
Trip switch
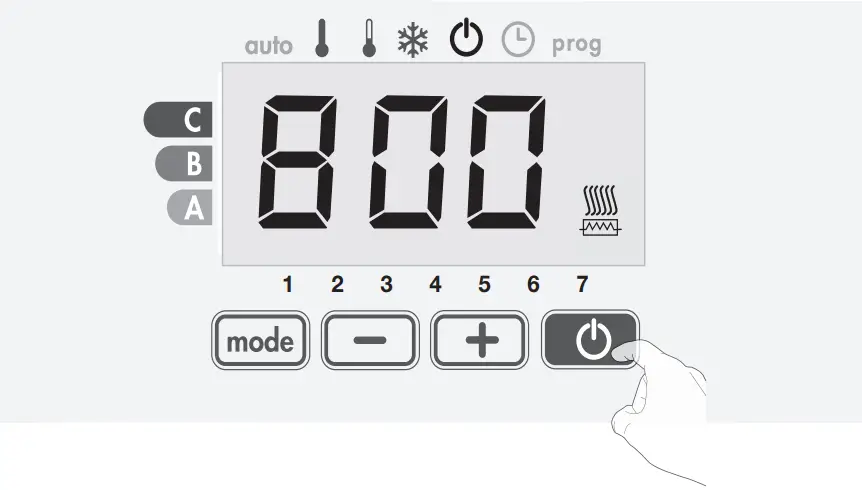

3- Take your finger off the ![]() key.
key.
4- Using the ![]() and
and ![]() keys, select the coefficient that corresponds to the power output of the radiator (see ID plate)
keys, select the coefficient that corresponds to the power output of the radiator (see ID plate)
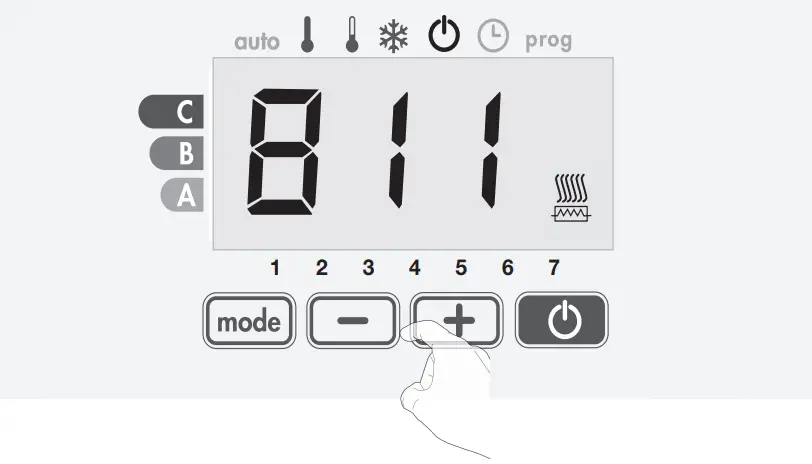
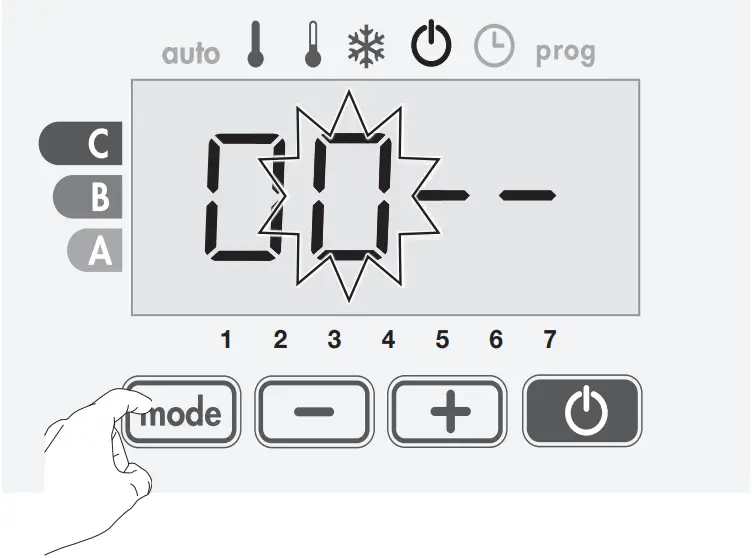
Power output (W) | Coëfficient |
| 500 | B01 |
750 | B04 |
| 1.000 | B06 |
1.250 | B08 |
| 1.500 | B09 |
1.750 | B10 |
| 2.000 | B11 |
5- To confirm, press the ![]() key.
key.
The radiator will come on in ‘Auto’ mode and you’ll hear 2 short beeps.

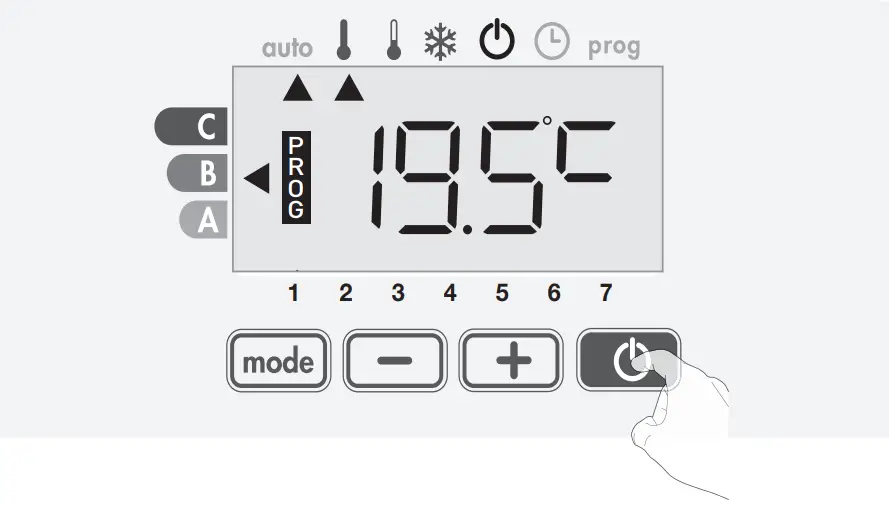
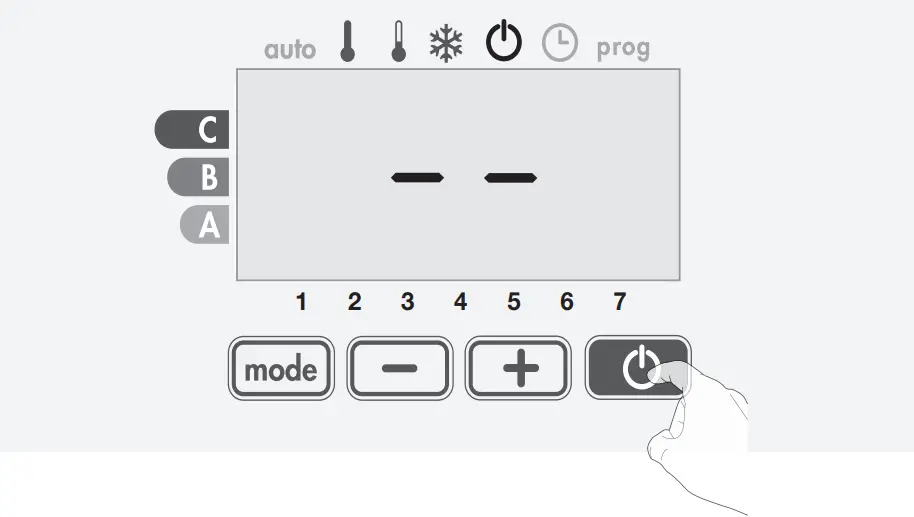
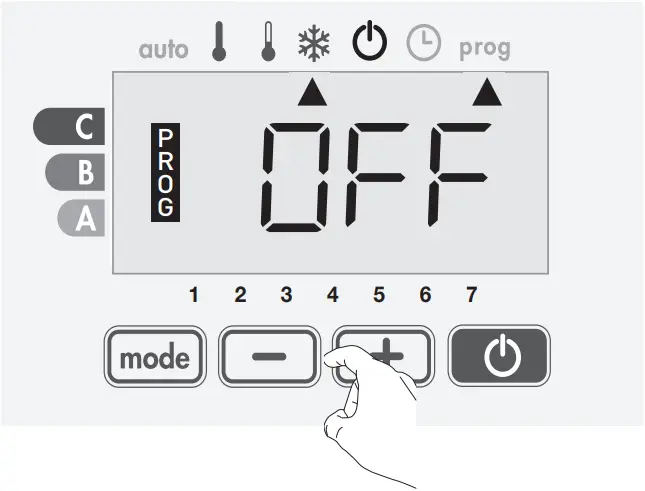
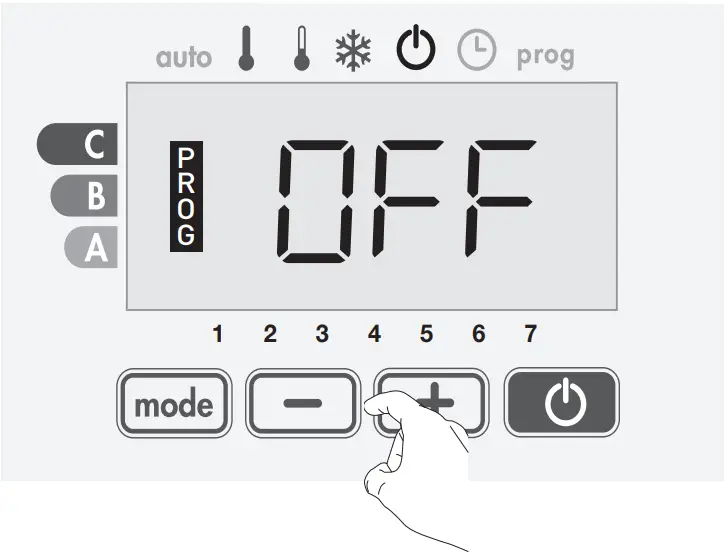
POWER ON/STANDBY MODE
Press the ![]() button to put the radiator in operation, in Auto mode.
button to put the radiator in operation, in Auto mode.
Press the ![]() button again to put the radiator in standby mode.
button again to put the radiator in standby mode.


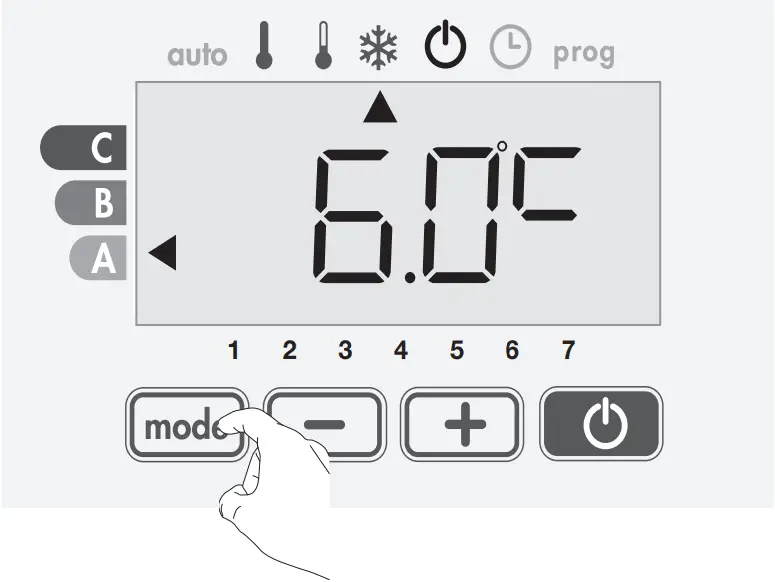
OPERATING MODE SAFETY INSTRUCTIONS
Press the ![]() button to select the required mode.
button to select the required mode.
auto ![]()
![]()
![]()
![]()
![]()
![]()
Auto Comfort Eco Frost Protection
- auto Automodus (3 situations)
[1] Week program has been set
If a week program has been set, the radiator will automatically switch between Comfort and Eco mode.
In case of a power failure of more than 3 hours, the day and time must be reset, the week program remains permanently in memory.
[2] Programming by pilot wire (only for France)
[3] No week program has been set
If the week program is not set, the radiator works permanently in Comfort mode.
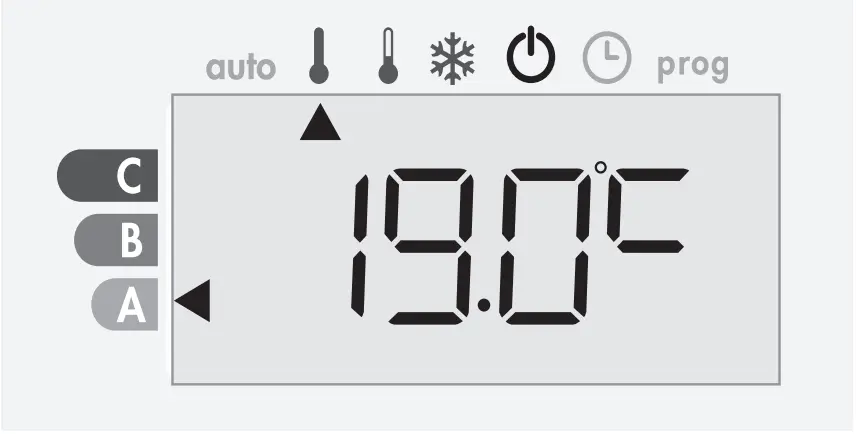
 Comfort mode
Non-stop Comfort mode. The radiator will operate 24 hours a day to achieve the temperature which has been set (e.g. 19°C).
The Comfort mode temperature level can be set by the user.
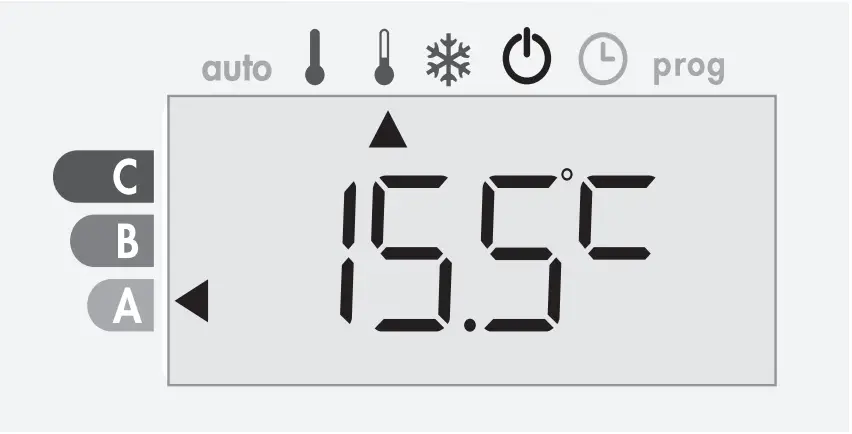
 Eco mode
Eco, which means the Comfort Mode temperature minus 3.5°C. This enables you to lower the temperature without having to reset the Comfort Mode temperature. Select this mode for short term absences (between 2 and 24h ) and during the night.
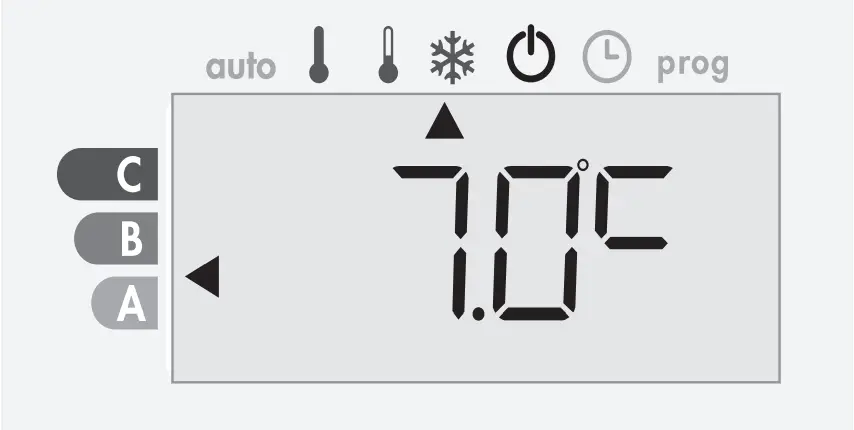
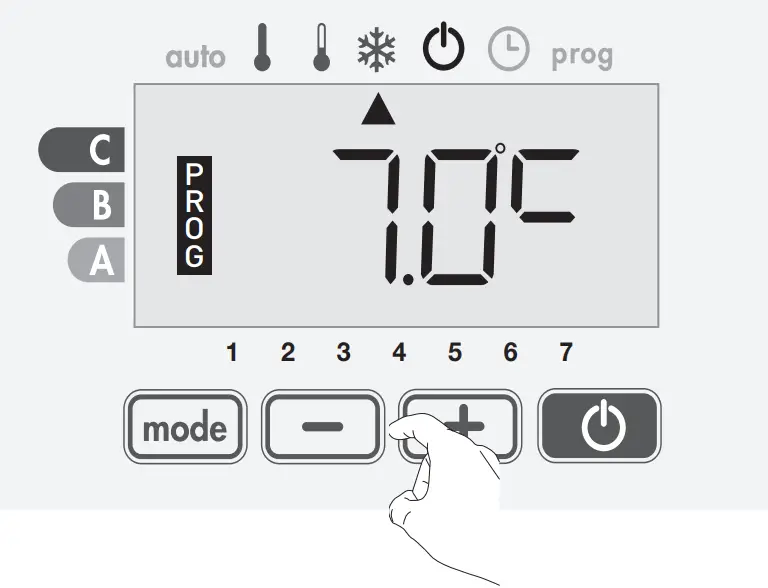
 Frost protection mode
This mode enables you to protect your home against the effects of cold weather (frozen pipes, etc.), by maintaining a minimum temperature of 7°C in it at all times. Select this mode when you will be away from your home for a long time (more than 5 days).
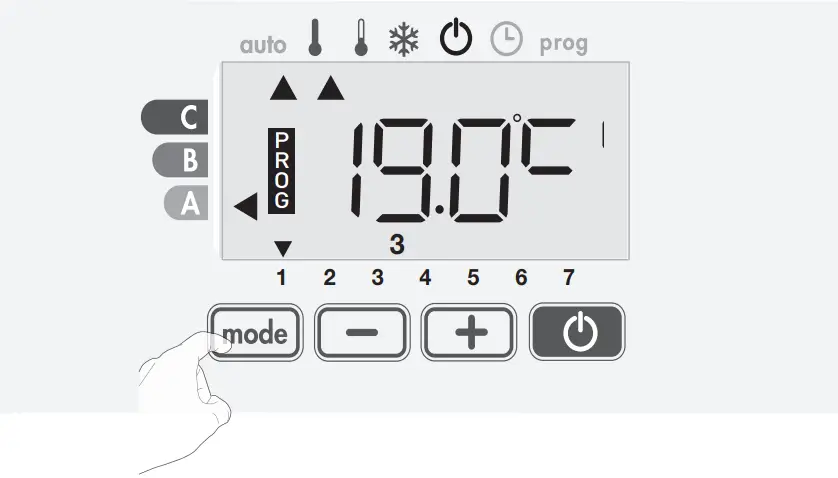
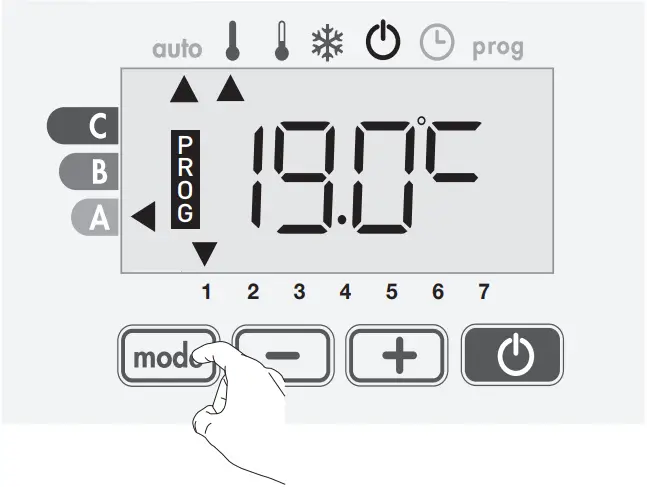
SETTING THE COMFORT TEMPERATURE
You can access the Comfort temperature set up from the Auto and Comfort Mode.
It is preset to 19°C.
Using ![]() and
and ![]() you can adjust the temperature from 7°C to 30°C by intervals of 0.5° C.
you can adjust the temperature from 7°C to 30°C by intervals of 0.5° C.
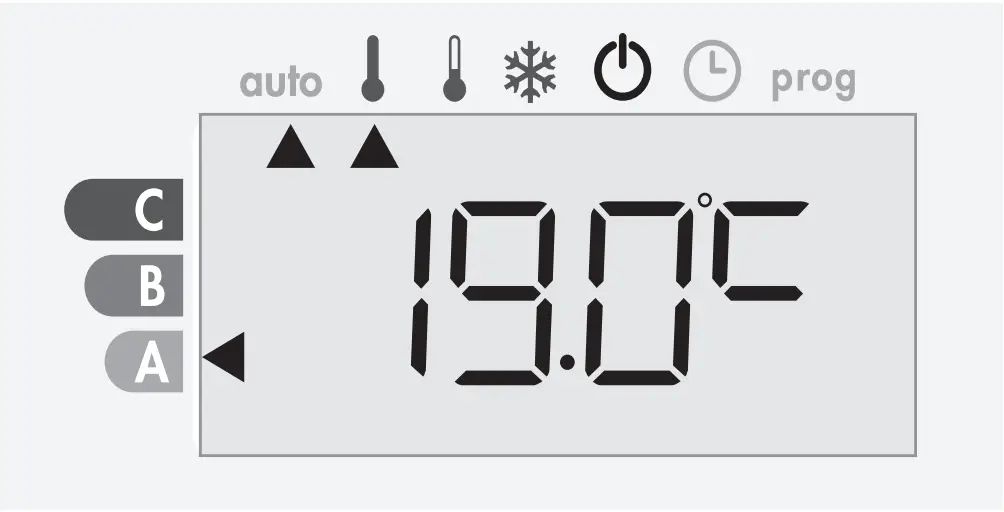
ENERGY CONSUMPTION
A selector indicates the energy consumption level by positioning it in front of the colour: red, orange or green.
The gauge appears in Standby mode and whatever the temperature level.
C – Red | Setting temperature > 22°C | 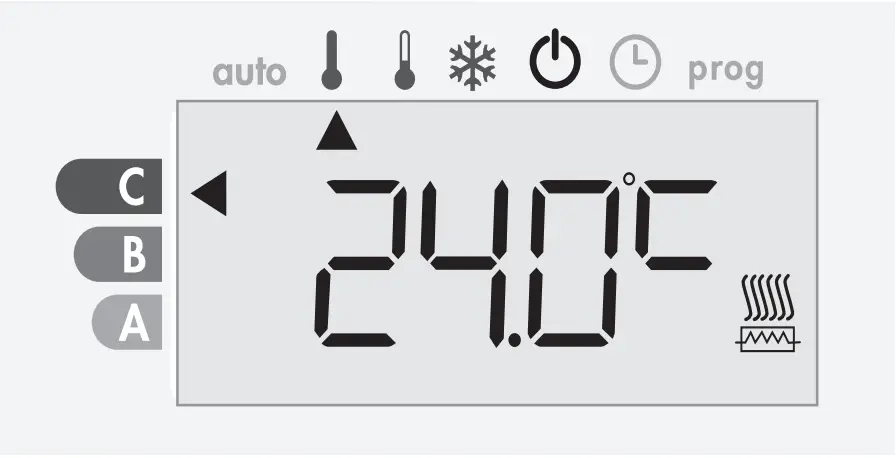 |
| B – Orange average consumption | 19°C < Setting temperature ≤ 22°C | 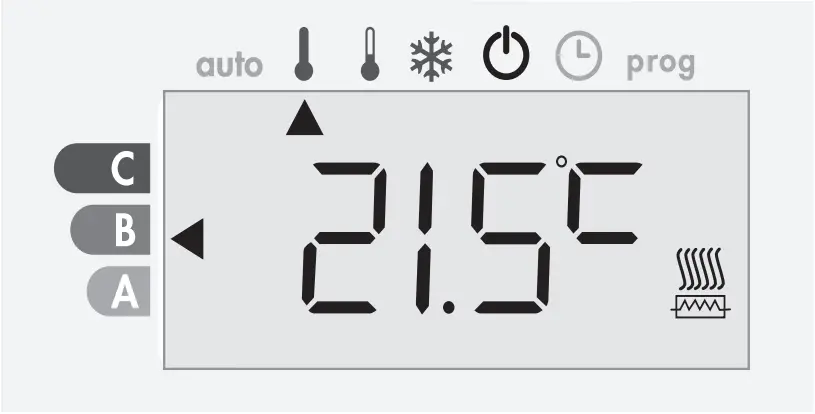 |
A – Green | Setting temperature ≤ 19°C | 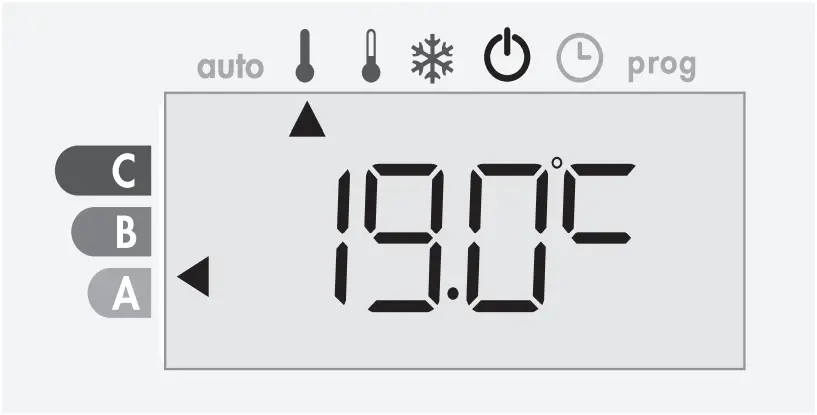 |
- Display of the estimated power consumption in kWh
To see this estimation, from Standby mode, then press ![]() .
.
To exit the display mode of consumption: press any button, the radiator is automatically in the previous active mode.
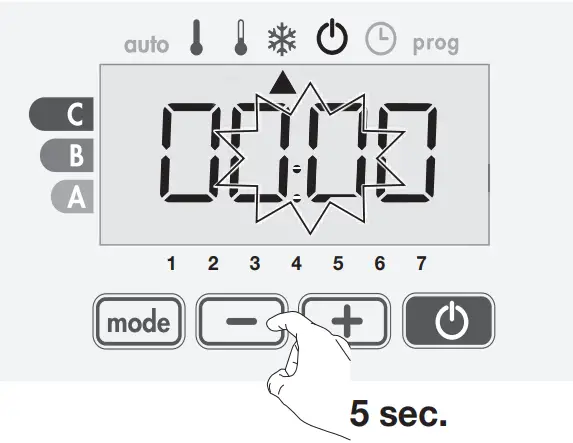
- Resetting the energy meter
To reset the energy meter, from Standby mode then proceed as follows.
1- Press ![]() .
.
2- Press simultaneously ![]() and
and ![]() more than 5 seconds. To exit resetting the energy meter, press any button, the radiator is automatically in the previous active mode.
more than 5 seconds. To exit resetting the energy meter, press any button, the radiator is automatically in the previous active mode.
KEYPAD LOCK/UNLOCK
- Keypad lock
To lock the keypad, press the ![]() and
and ![]() buttons and hold them down for 10 seconds.
buttons and hold them down for 10 seconds.
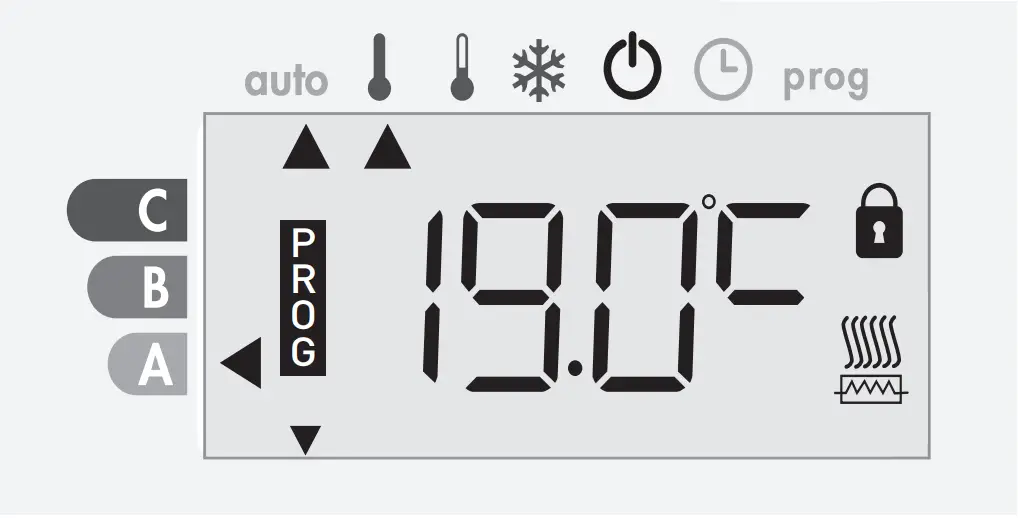
The padlock symbol ![]() appears on the display, the keypad is locked.
appears on the display, the keypad is locked.
- Keypad unlock
To unlock the keypad, press the ![]() and
and ![]() buttons hold them down for 10 seconds again.
buttons hold them down for 10 seconds again.
The padlock symbol ![]() disappears from the display, keypad is unlocked.
disappears from the display, keypad is unlocked.
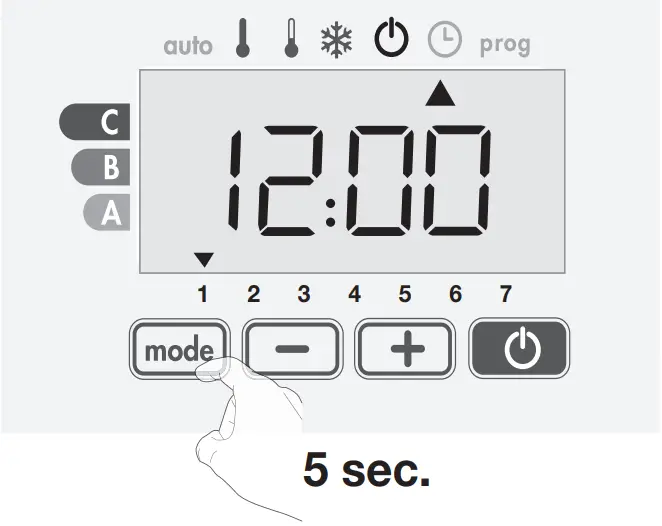
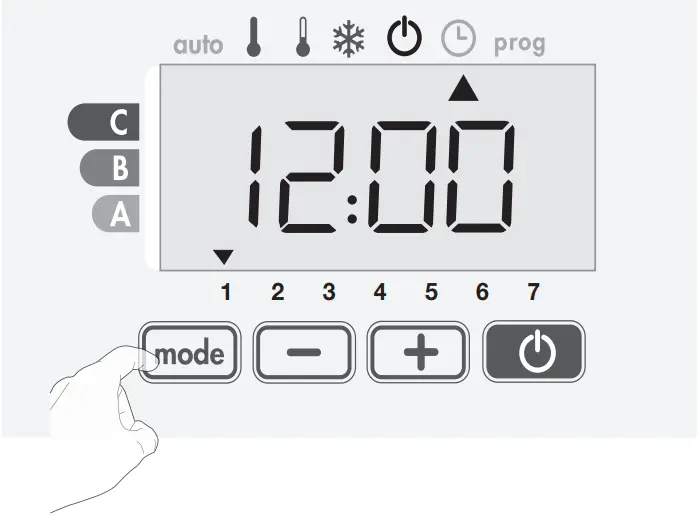
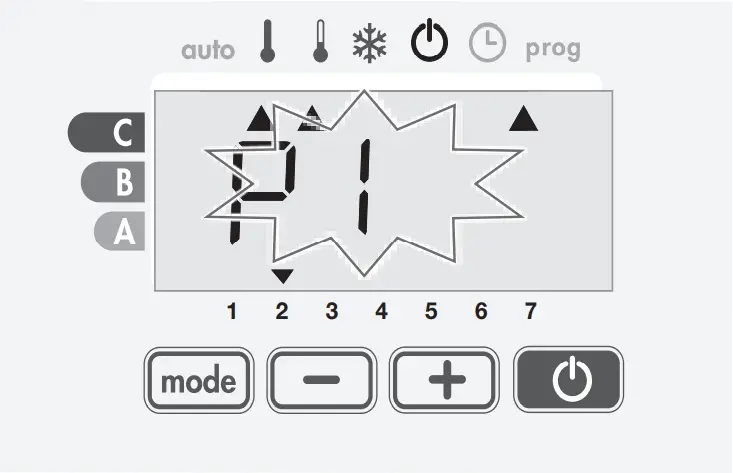
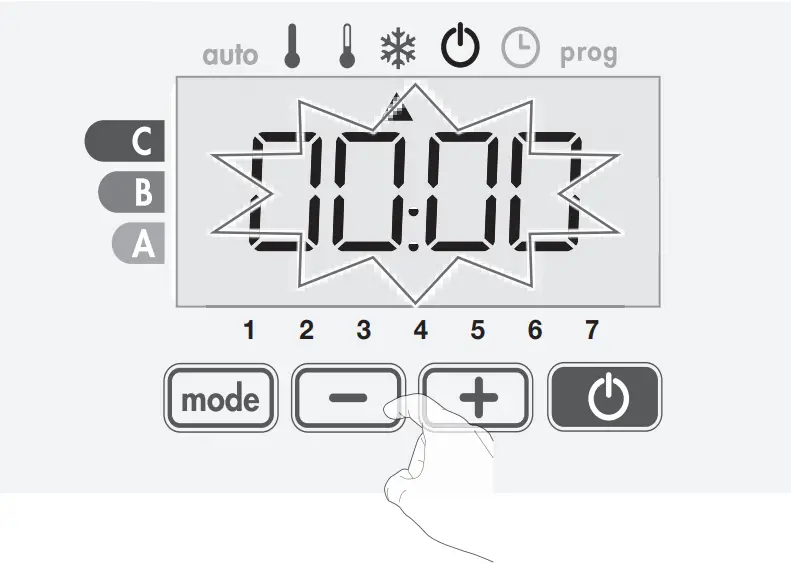
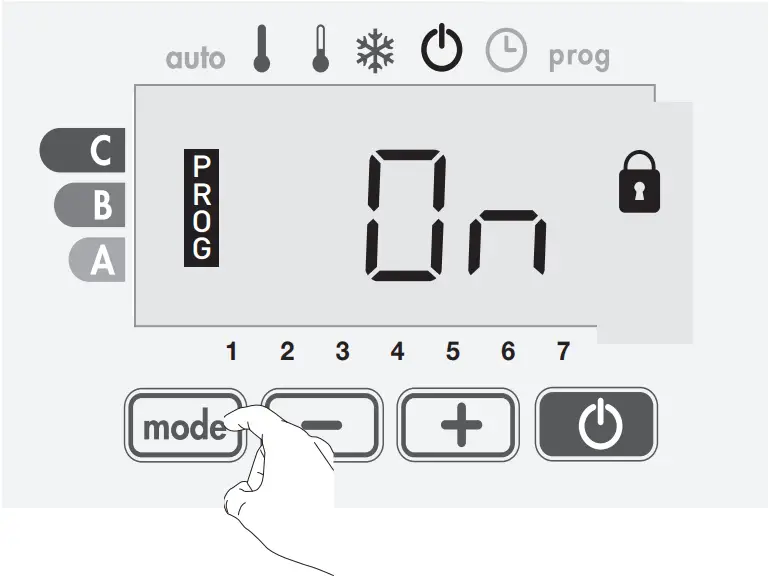
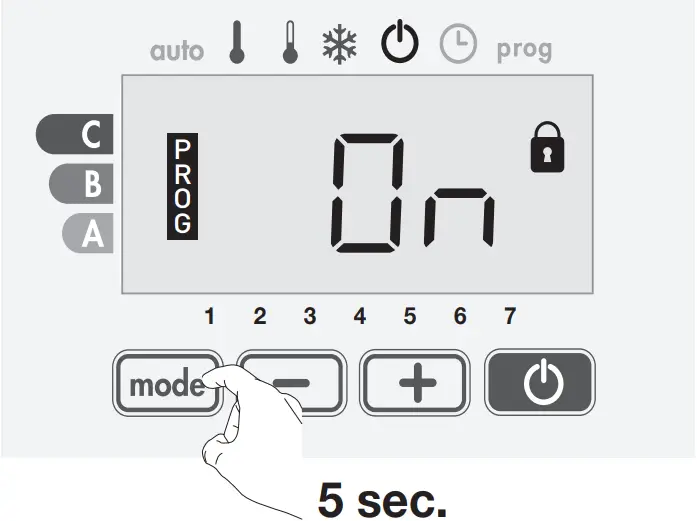
SETTING TIME AND DAY
1- From the Standby mode, press ![]() for 5 seconds.
for 5 seconds.
The cursor moves to the setting day and time mode.
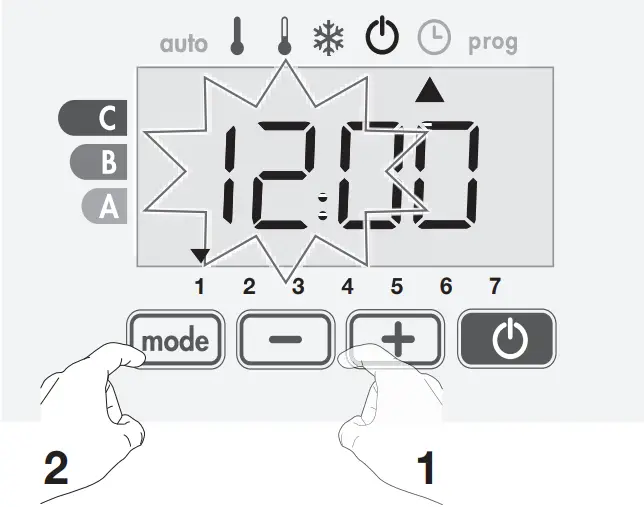
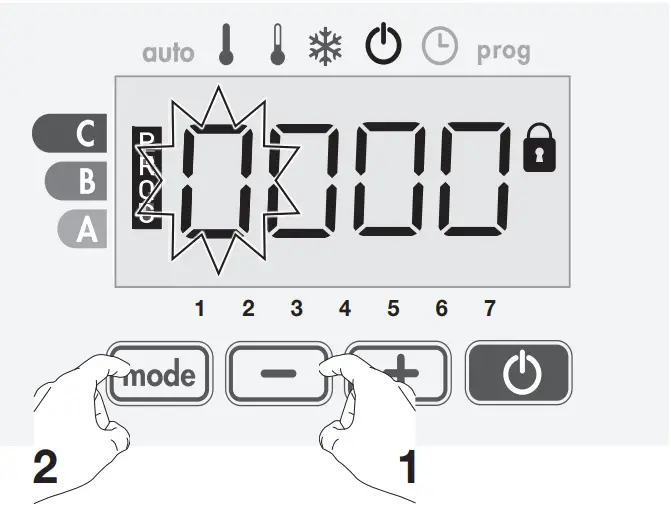
2- Select using ![]() or
or ![]() . The two hour figures will flash.
. The two hour figures will flash.
The hours will scroll quickly, if you press the ![]() or
or ![]() and hold them.
and hold them.
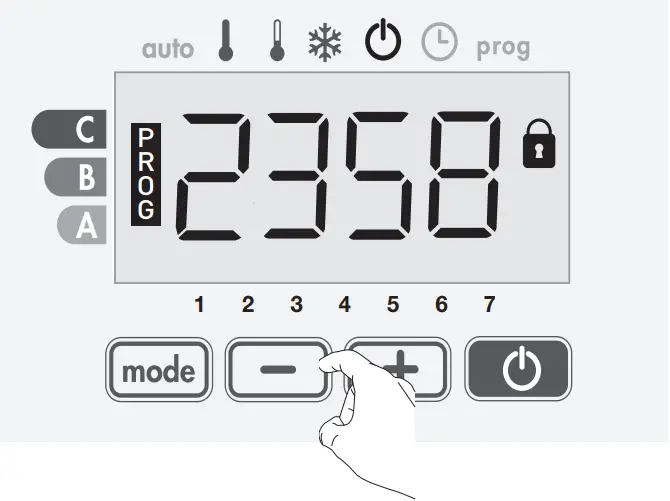
Save by pressing ![]() .
.
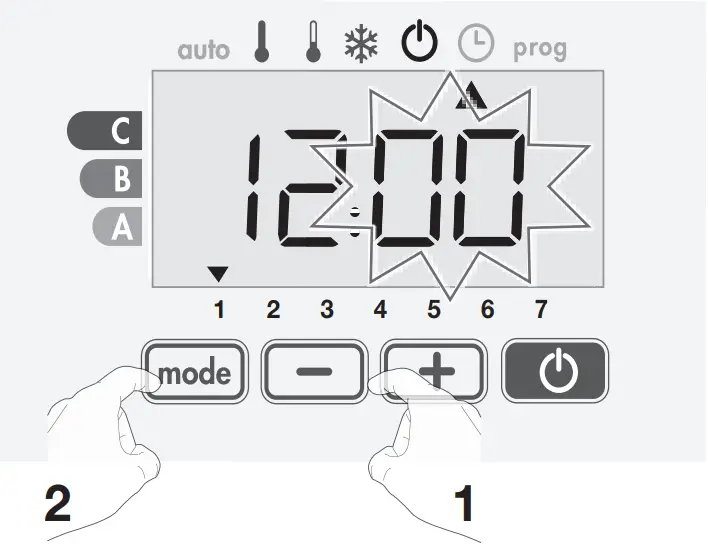
3- The two minute figures will flash.
Select using ![]() or
or ![]() .
.
Save by pressing ![]() .
.
4- The cursor above the number 1 (which represents the Monday) will flash.
Select the date using ![]() or
or ![]() .
.
Save by pressing ![]() .
.
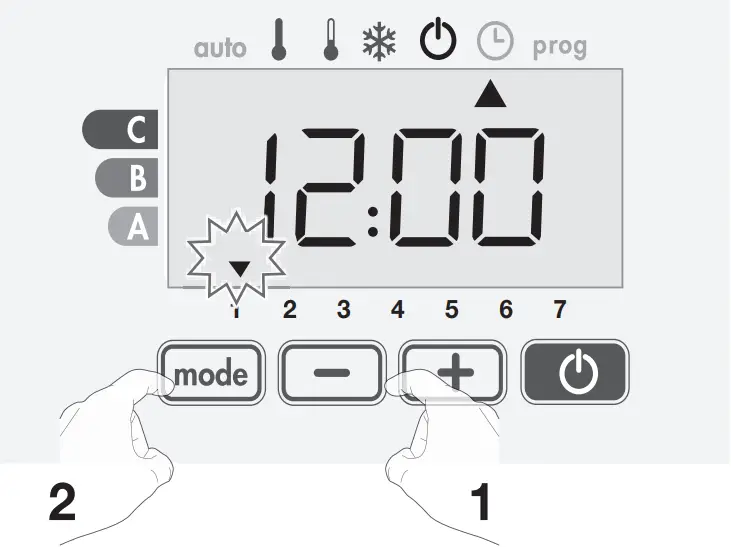
| Monday | 1 | Friday | 5 |
| Tuesday | 2 | Saturday | 6 |
| Wednesday | 3 | Sunday | 7 |
| Thursday | 4 |
5- To change and/or allocate programmes press ![]() .
.
To exit the setting the time and day mode, press ![]() 5 seconds.
5 seconds.
OVERVIEW OF THE PROGRAMS
Comfort ![]() Eco
Eco ![]() P1
P1 ![]() P2
P2 ![]() P3
P3
The radiator is always set to Comfort for 7 days a week as standard.
– Comfort: the radiator will operate in Comfort mode, 24 hours a day, as regards each day selected.
– Eco: the radiator will operate 24 hours a day in Eco mode.
Note: You can set the temperature-lowering parameters (see user settings).
– P1: the radiator will operate in Comfort mode for 1 time block eg: from 06:00 to 22:00 (and in Eco mode from 22:00 to 06:00).
– P2: the radiator will operate in Comfort mode for 2 time blocks eg: from 06:00 to 09:00 and from 16:00 to 22:00 (and in Eco mode from 09:00 to 16:00 and from 22:00 to 06:00).
– P3: your device will operate in Comfort mode for 3 time blocks eg: from 06:00 to 08:00, from 12:00 to 14:00 and from 18:00 to 23:00 (and in Eco mode from 23:00 to 06:00, from 08:00 to 12:00 and from 14:00 to 18:00).
Note: If the standard times of P1, P2 and P3 do not suit you, you can change them, but then this time applies to all days of the week on which P1, P2 or P3 is set.
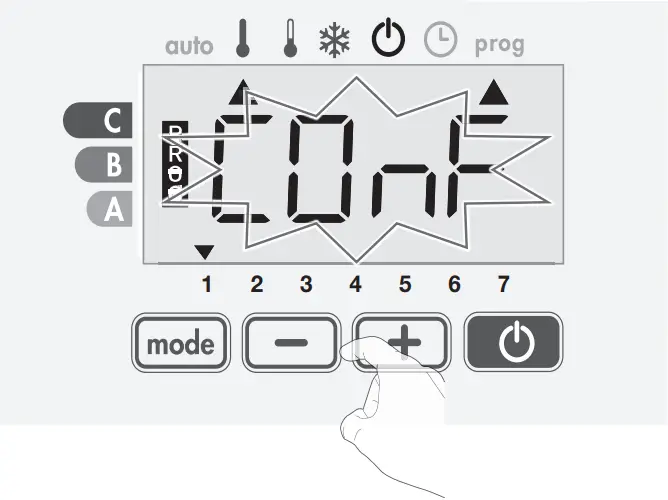
SET A WEEK PROGRAM
1- From the Standby mode, press ![]() for 5 seconds.
for 5 seconds.
When the cursor moves under the setting time symbol ![]() , press
, press ![]() shortly.
shortly.
2- Press ![]() or
or ![]() .
.
The cursor moves under prog.
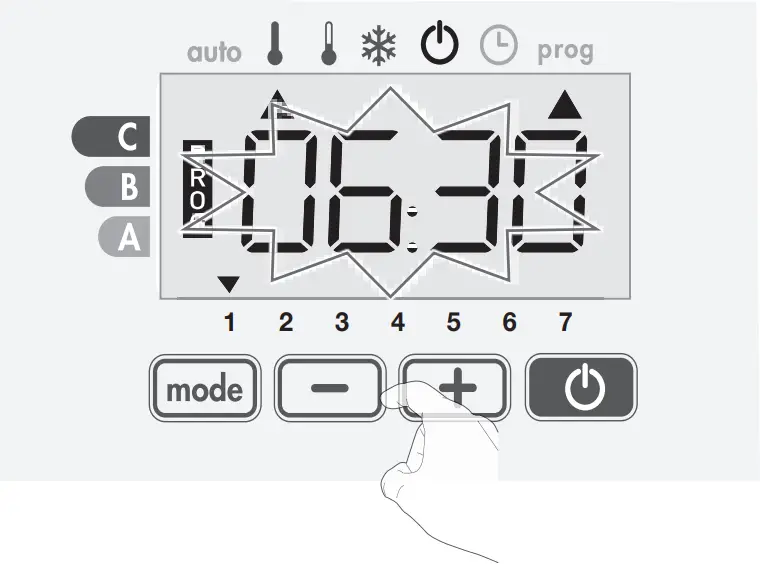
3- Select the desired program with ![]() or
or ![]() . If desired, the standard times can be adjusted: press
. If desired, the standard times can be adjusted: press ![]() for at least 5 seconds.
for at least 5 seconds.
If the standard times apply: press ![]() to set the next day
to set the next day
(go to step 4)

3.1 The start time flashes and with ![]() or
or ![]() you can change this time at 30 minute intervals.
you can change this time at 30 minute intervals.
Press ![]() to save.
to save.
3.2 The end time flashes and with ![]() or
or ![]() you can change this time at 30 minute intervals.
you can change this time at 30 minute intervals.
Press ![]() to save.
to save.
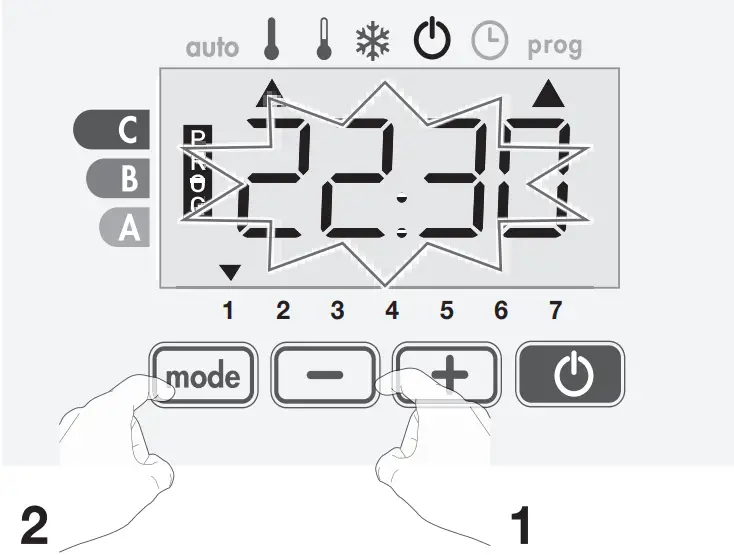
4- The second day (Tuesday) flashes.
Repeat the procedure described above for every day of the week.
5- Once you have chosen a programme for each day, confirm your selection by pressing ![]() . The days of the week will successively scroll on display with the programmes that you set for them (P1, P2, P3, CONF or ECO).
. The days of the week will successively scroll on display with the programmes that you set for them (P1, P2, P3, CONF or ECO).
To exit the Programming mode, press ![]() twice.
twice.
VIEW THE WEEK PROGRAM
– From the Standby mode, press ![]() for 5 seconds.
for 5 seconds.
Press ![]() twice, the programme for each day of the week (Comfort, Eco, P1, P2 or P3) will scroll on display in front of you.
twice, the programme for each day of the week (Comfort, Eco, P1, P2 or P3) will scroll on display in front of you.
– To exit the programme viewing mode, press ![]() twice.
twice.
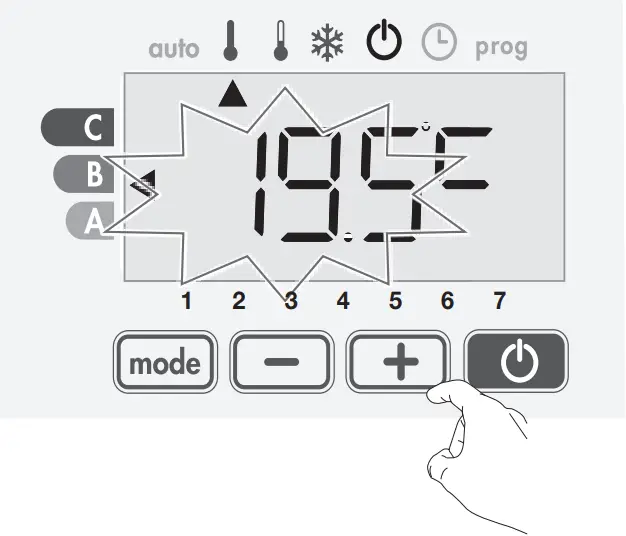
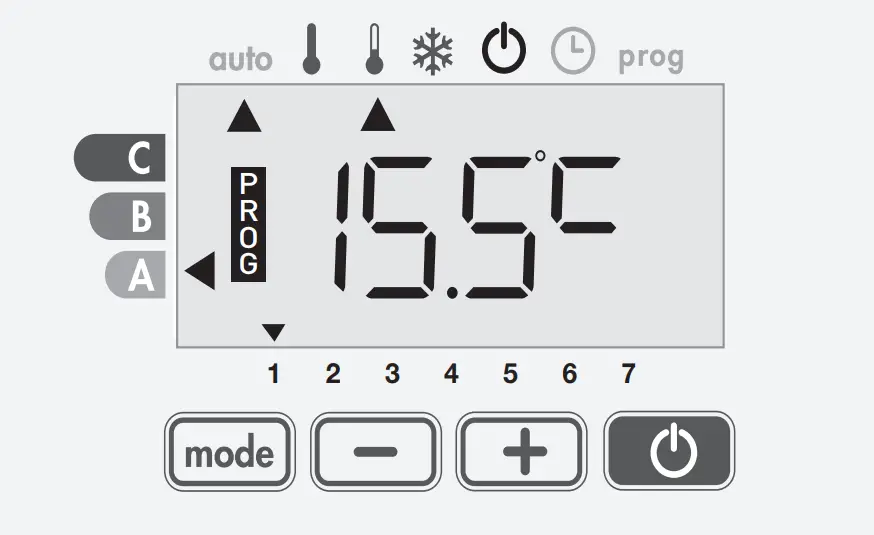
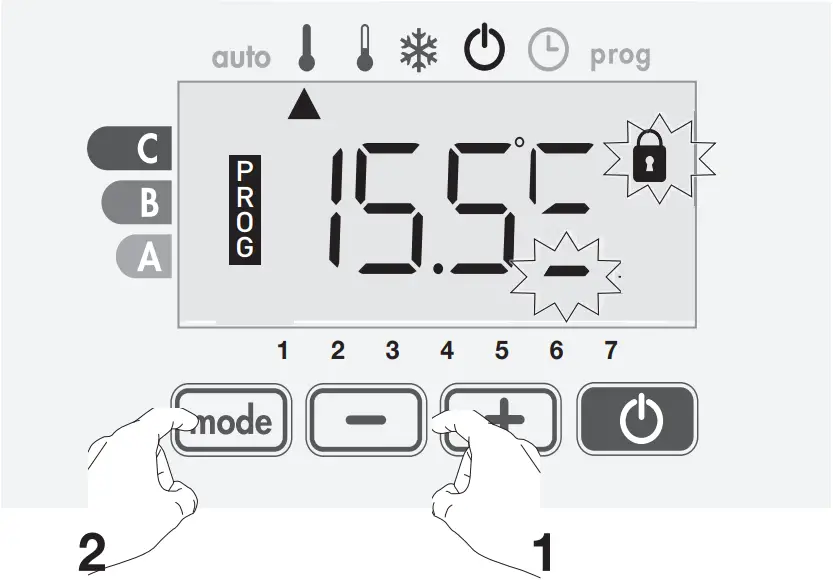
TEMPORARILY OVERWRITE THE WEEK PROGRAM
This function allows you to change the setting temperature temporarily until the next scheduled change in temperature or the transition to 0:00.
Example:
1- The radiator is in Auto mode, the running programme is Eco 15,5°C.
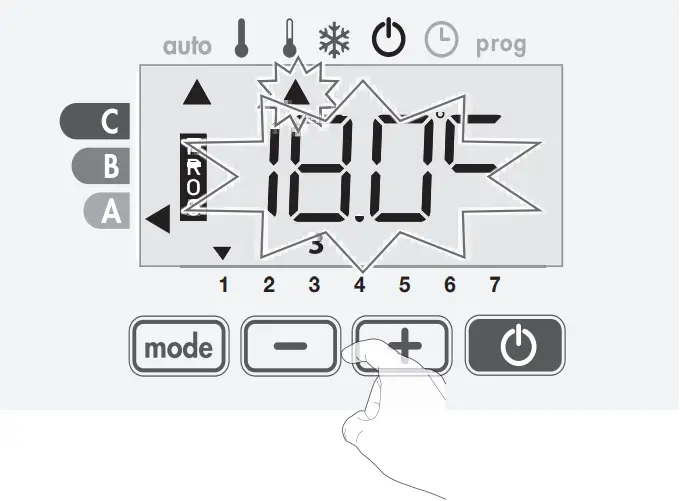
2- By pressing ![]() or
or ![]() , you can change temporarily the desired temperature up to 18°C for example.
, you can change temporarily the desired temperature up to 18°C for example.
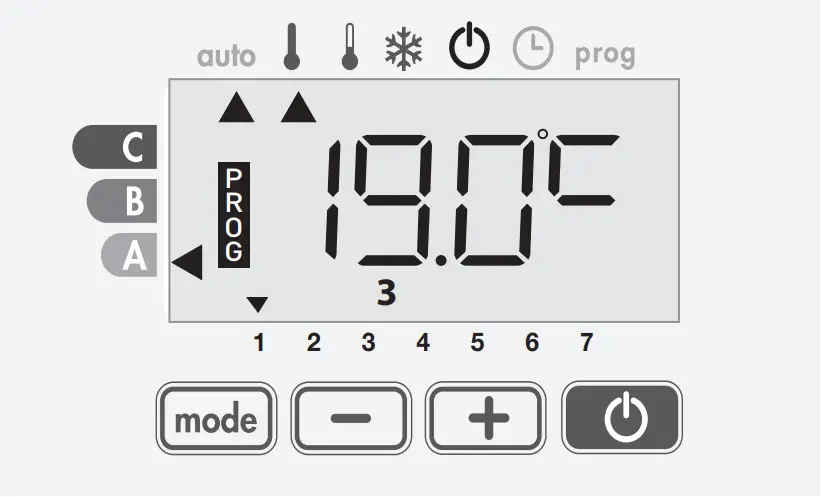
3- This change will be automatically cancelled at the next change of programme or transition to 0:00.
OPEN WINDOW DETECTION
The open window detection is sensitive to temperature fluctuations. The controller responds to open windows according to various parameters: temperature setting, rise and fall of the room temperature, outside temperature, location of the radiator, etc.
If the controller is close to a front door, the detection air can be disturbed opening the door. If this is a problem, we recommend you disable the open window detection (see installer settings). When the controller proceeds to a temperature reduction cycle (frost protection mode) by opening a window, a frost protection counter appears on the display to show the cycle duration.
The counter is automatically reset to zero the next time the Frost Protection is switched on. By pressing a button, the frost protection mode is deactivated.
If a temperature rise is detected, the controller will automatically return to the previous mode.
USER SETTINGS
UPPER AND LOWER COMFORT TEMPERATURE LIMIT
You can limit the setting temperature range by introducing a maximum thrust and / or minimum abutment, preventing unintentional changes in temperature beyond it.
1- Select comfort mode with the key ![]() .
.

2- Press simultaneously on ![]() and
and ![]() for 8 seconds.
for 8 seconds.
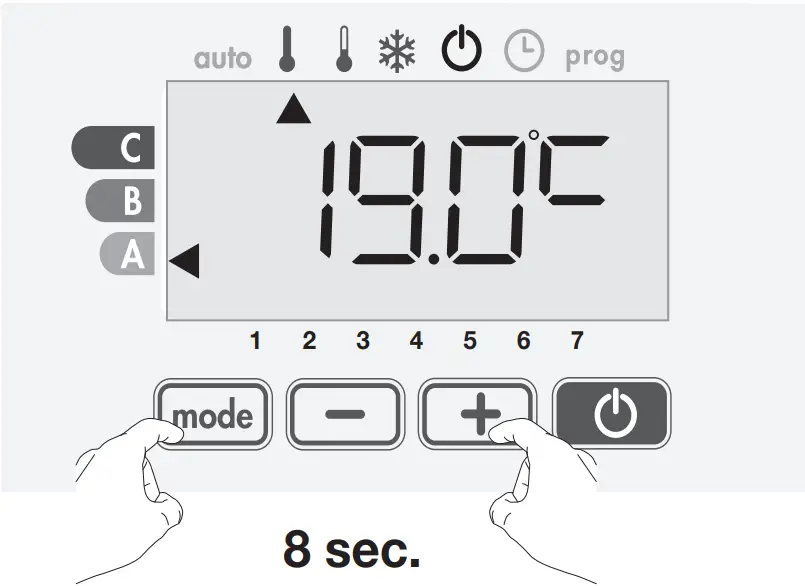
- Lower limit
The minimum abutment is preset to 7°C. You can vary from 7°C to 15°C by intervals of 1°C.
To change the minimum abutment, press or ![]() and
and ![]() confirm by pressing
confirm by pressing ![]() .
.
If you do not want to change it, press ![]() : the device proposes you automatically to set the maximum abutment.
: the device proposes you automatically to set the maximum abutment.
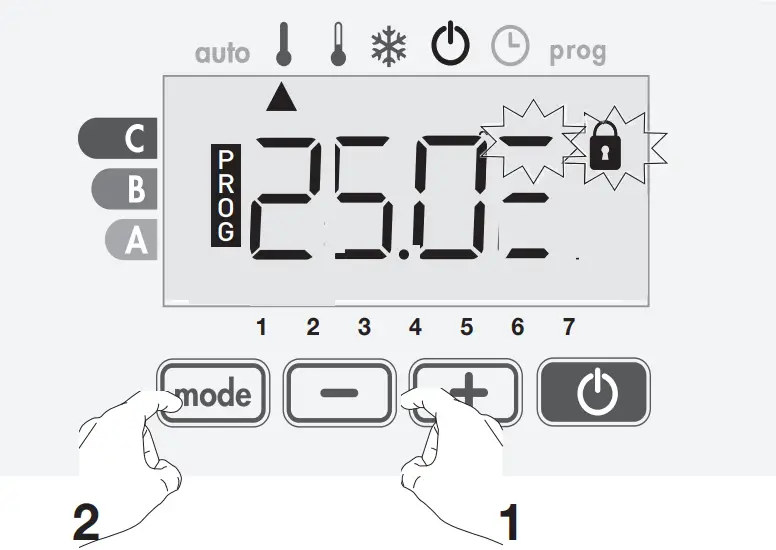
- Upper limit
The maximum abutment is preset to 30°C. You can vary from 19°C to 30°C by intervals of 1°C.
If you do not want to change it, press ![]() to exit the setting and return to the Comfort mode.
to exit the setting and return to the Comfort mode.
To change the maximum temperature setting, press ![]() or
or ![]() .
.
To save and exit the adjustment, press the button ![]() .
.
ECO REDUCTION LEVEL
The drop in temperature is set at -3.5°C. You can re-set it anywhere between -1°C and -8°C, in 0.5°C increments.
Important: whatever the lowered level set, the Eco setting temperature never exceed 19°C.
1- By pressing the button ![]() , successively several times, position the arrow beside the Eco mode.
, successively several times, position the arrow beside the Eco mode.
2- Press on ![]() and
and ![]() simultaneously for 8 seconds to enter in the setting mode.
simultaneously for 8 seconds to enter in the setting mode.
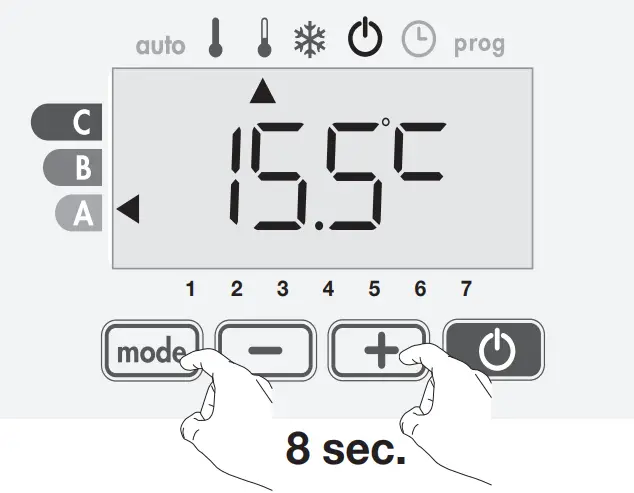
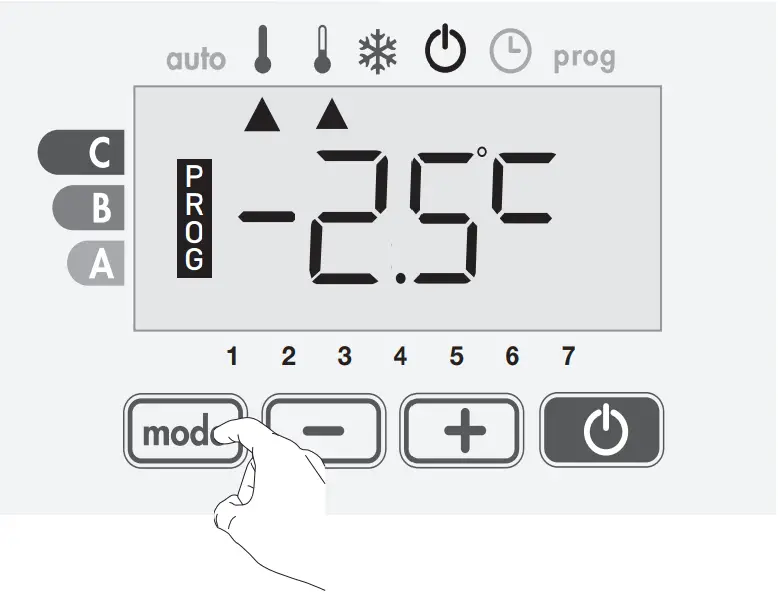
3- Press on ![]() or
or ![]() button to obtain the temperature value you require.
button to obtain the temperature value you require.
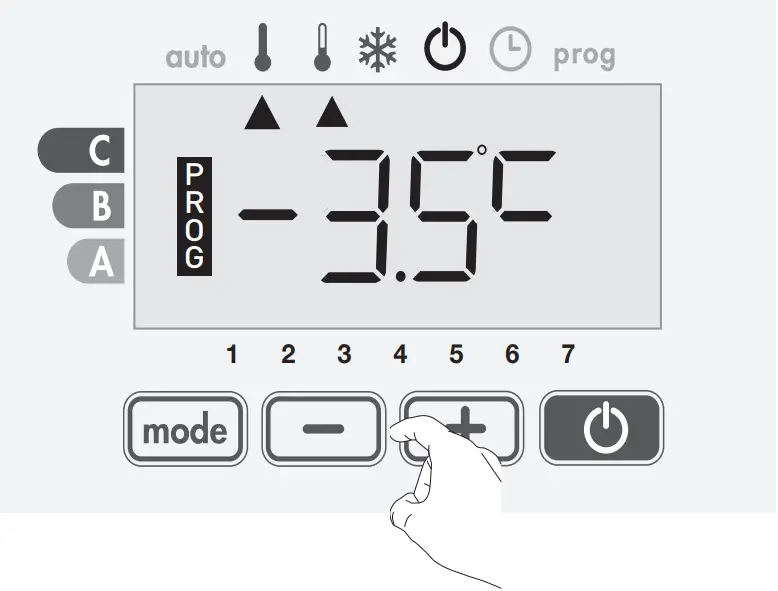
4- Save by pressing ![]() .
.
FROST PROTECTION
The module is pre-set at 7°C. You can re-set Frost protection temperature anywhere between 5°C and 15°C, in 0.5°C increments.
1- By pressing the button ![]() , successively several times, position the arrow beside the the Frost protection mode.
, successively several times, position the arrow beside the the Frost protection mode.
2- Press the ![]() and
and ![]() button simultaneously for 8 seconds to enter in the setting mode.
button simultaneously for 8 seconds to enter in the setting mode.
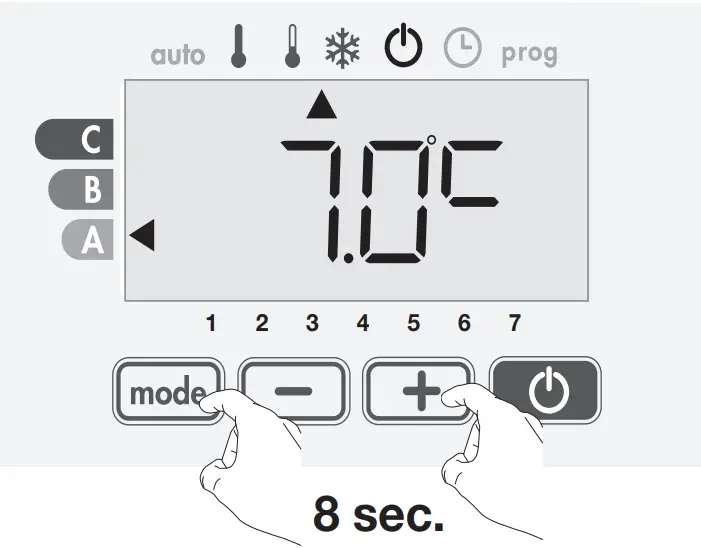
3- Press on ![]() or
or ![]() button to obtain the temperature value you require.
button to obtain the temperature value you require.
4- Save by pressing ![]() .
.
OPEN WINDOW DETECTION
From Auto, Confort or Eco Modes:
1- Press on ![]() button for 5 seconds.
button for 5 seconds.
The display blinks and the Frost protection mode duration appears on screen.
2- Press again 5 seconds on ![]() button to enter in setting mode of the opened window detection.
button to enter in setting mode of the opened window detection.
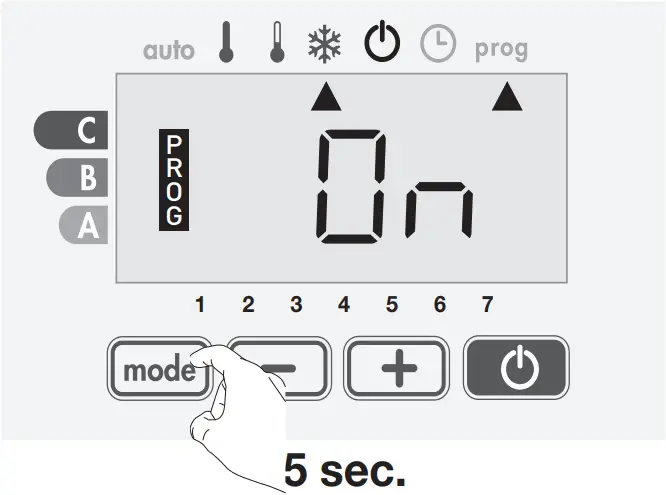
3- Press on ![]() or
or ![]() .
.![]() = automatic mode enabled
= automatic mode enabled![]() = automatic mode disabled
= automatic mode disabled
4- To save press ![]() .
.
BACKLIGHT
1- Select the heating on / standby feature by pressing ![]() .
.

2- Press down the buttons ![]() and
and ![]() simultaneously, during 2 seconds then release it. You are in backlight setting mode.
simultaneously, during 2 seconds then release it. You are in backlight setting mode.
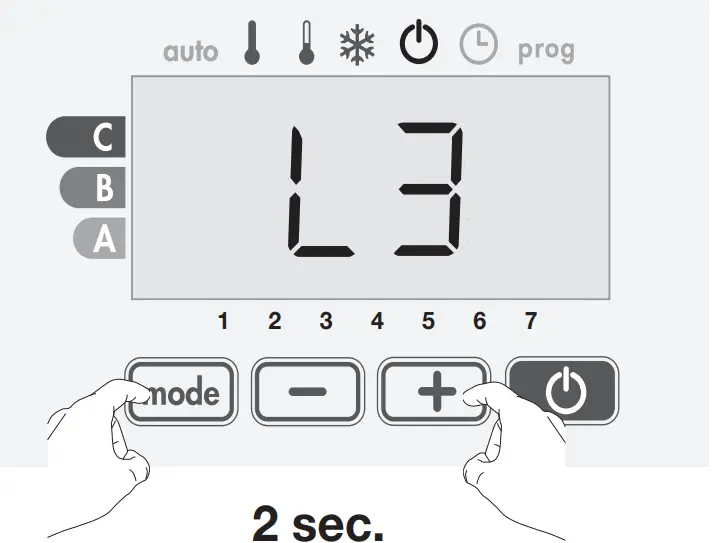
3- Three options are available:![]() = Temporary backlighting: Backlight of the screen when a button is pressed.
= Temporary backlighting: Backlight of the screen when a button is pressed.
![]() = Non-stop backlighting: Backlight of the screen everytime..
= Non-stop backlighting: Backlight of the screen everytime..
![]() = Idem as option L1.
= Idem as option L1.
L3 is set by default.
Press on button ![]() or
or ![]() to choose the setting you wish.
to choose the setting you wish.
4- Press on ![]() to save and exit.
to save and exit.
INSTALLER SETTINGS
PIN LOCK CODE
- Overview
You can set the 4-digit pin code yourself which, when activated, makes the following functions unavailable:
– Selecting the Comfort mode: only the Auto, Eco and Frost protection modes are available.
– Setting the Comfort and Eco and Frost protection temperature.
– Changing the week program.
– Setting the open window detection.
- Code PIN initialisation
By default, the PIN code is not enabled. The setting access is available in standby mode only.
1- Select standby mode by pressing the key ![]() .
.
2- Simultaneously press the ![]() and
and ![]() for at least 20 seconds.
for at least 20 seconds.
3- By default registered CODE PIN is 0000.
Press ![]() or
or ![]() to select 0.
to select 0.
It is blinking, save and press ![]() to exit.
to exit.
4- For others numbers, select 0 by press ![]() .
.
When 0000 appears, press again on ![]() to save and exit.
to save and exit.
The PIN code is initialized, the next setting automatically appears: PIN Code activation.
- Activation/deactivation of the PIN Code
1- ![]() appears on screen.
appears on screen.
Press on ![]() or
or ![]() to activate PIN code.
to activate PIN code.![]() = PIN code enabled.
= PIN code enabled.![]() = PIN code disabled.
= PIN code disabled.
2- Press on ![]() to save and go back to standby heating feature.
to save and go back to standby heating feature.
- Customizing the PIN code
Repeat step described page 6 (Code PIN initialization, paragraph 1).
1- When ![]() appears, press on
appears, press on ![]() for at least 5 seconds.
for at least 5 seconds.
2- The 0000 code appears and the first number blinks.
Press ![]() or
or ![]() , to select the first wished number then press on
, to select the first wished number then press on ![]() to save and exit.
to save and exit.
Repeat this operation for remaining 3 numbers.
3- Press on ![]() to confirm.
to confirm.
The new code is now registered.
4- Press again on ![]() to exit setting PIN Code mode and go back to standby mode..
to exit setting PIN Code mode and go back to standby mode..

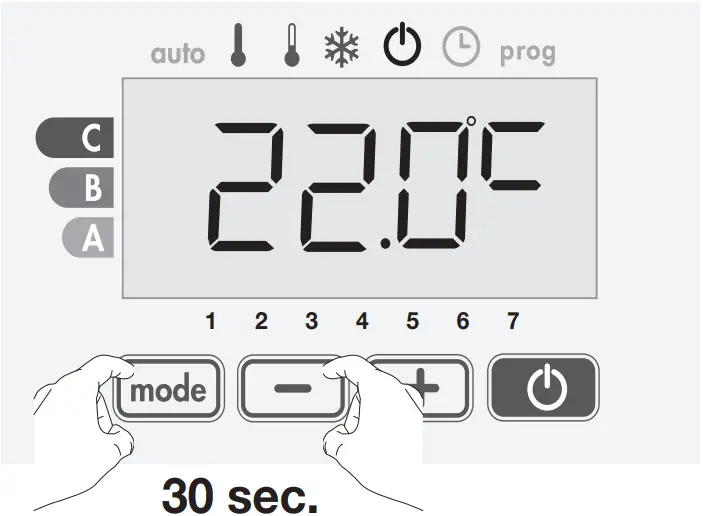
TEMPERATURE SENSOR CALIBRATION
- Overview
Important: This operation is reserved for professional installers only; any wrong changes would result in control anomalies.
calibration adjusts the temperature measured by the ambient temperature sensor to compensate for a deviation from + 5°C to – 5°C by increments of 0.1°C.
Important: Before carrying out the calibration it is recommended to wait for 4h after the setting temperature modification to insure that the ambient temperature is stabilized.
- Calibration
1- If the room temperature difference is negative, example:
Setting temperature (what you want) = 20°C.
Ambient temperature (what you read on a reliable thermometer) = 18°C.
Difference measured = 2°C.
To correct, simultaneously press the ![]() and
and ![]() buttons for 30 seconds.
buttons for 30 seconds.
Sensor temperature = 24°C
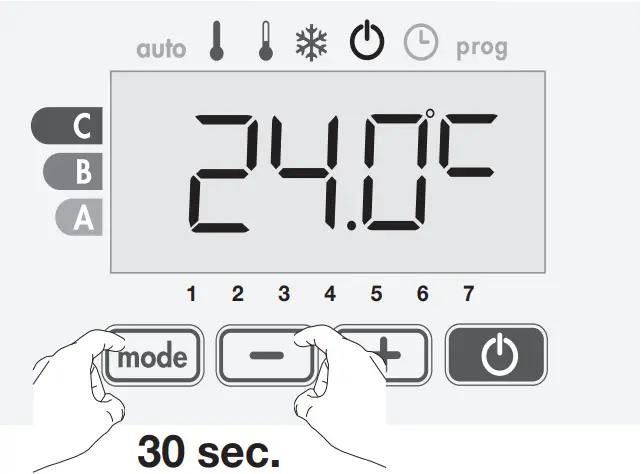
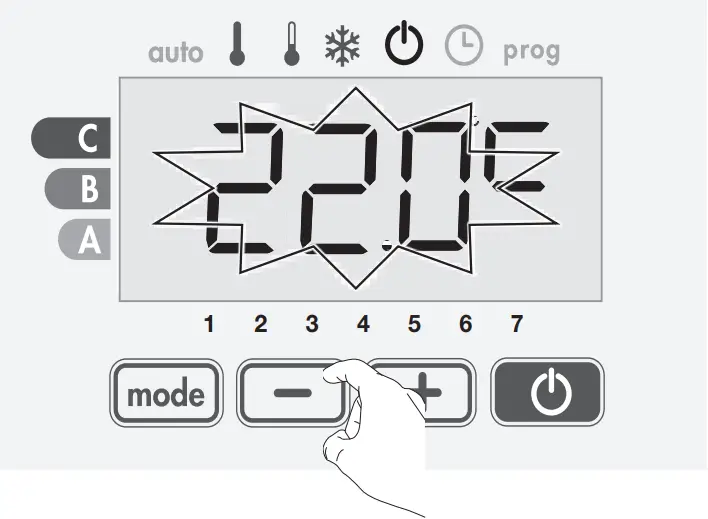
Decrease the temperature measured by the ambient temperature sensor by 2°C by pressing ![]() .
.
In our example the measured temperature by the sensor goes from 24°C to 22°C.
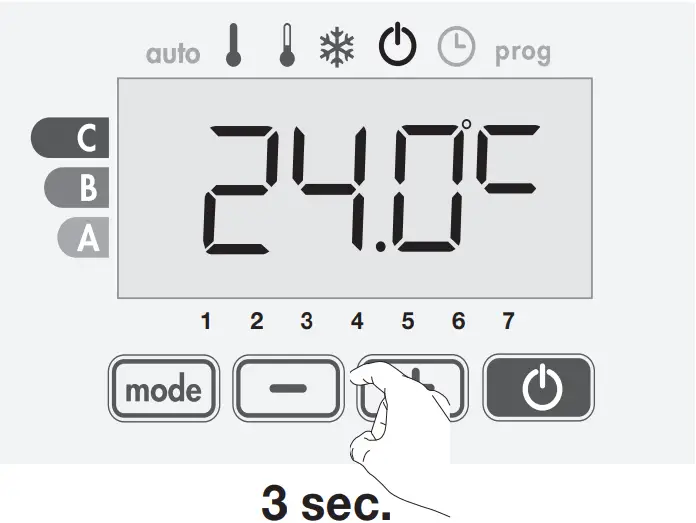
2- If the room temperature difference is positive, example:
Setting temperature (what you want) = 19°C.
Ambient temperature (what you read on a reliable thermometer) = 21°C.
Difference measured = +2°C.
To correct, simultaneously press the ![]() and
and ![]() buttons for 30 seconds.
buttons for 30 seconds.
Sensor temperature = 21°C
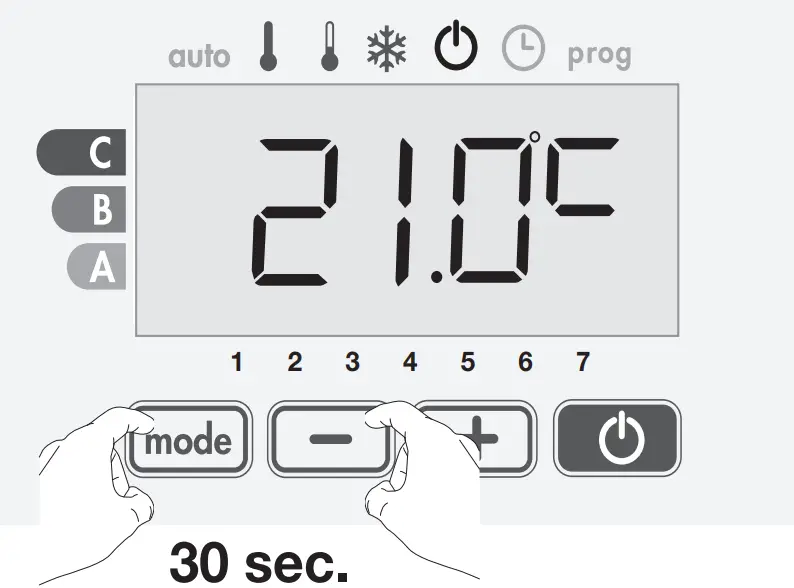
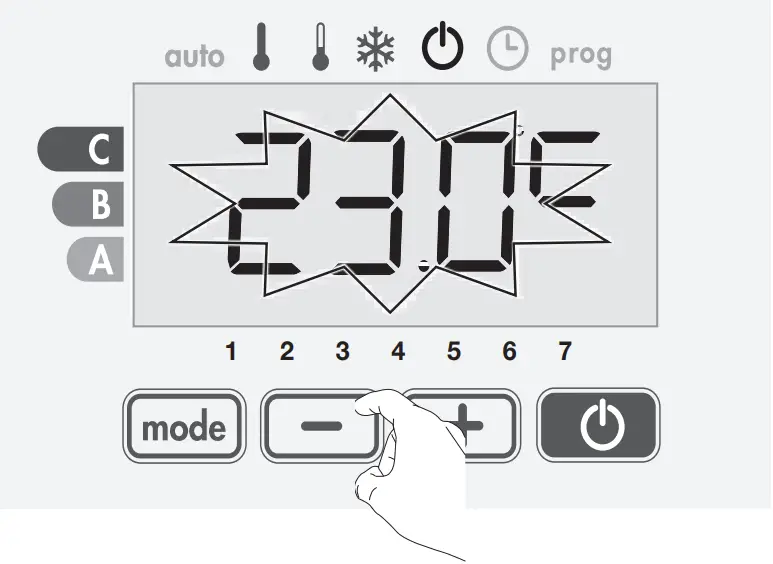
Increase the temperature measured by the ambient temperature sensor by 2°C by pressing ![]() .
.
In our example the measured temperature by the sensor goes from 21°C to 23°C.
To validate, save the new value and exit the mode, press ![]() .
.
- The reset to zero of the probe calibration
To put the value of the correction to “0”, do the following:
1- Simultaneously press the ![]() and
and ![]() for 30 seconds.
for 30 seconds.
2- When the temperature measured by the probe appears, do a press on ![]() or
or ![]() for at least 3 seconds.
for at least 3 seconds.
3- Press ![]() to exit the probe calibration mode.
to exit the probe calibration mode.
RESTORING FACTORY SETTINGS
In order to a coming back to factory settings, you must hold simultaneously for 8 seconds on ![]() ,
, ![]() and
and ![]() .
.
User settings | |
| Comfort temperature | 19 °C |
| Eco-temperature | -3,5 °C |
| Frost protection temperature | 7 °C |
| Lower limit Comfort temperature | 7 °C |
| Upper limit Comfort temperature | 30 °C |
| Open window detection | Activated |
| Backlight | L3 |
Installer settings | |
| PIN code lock | Deactivated |
| PIN code | 0000 |
| Temperature sensor calibration | 0,0 |
ERROR CODES ON DISPLAY
– Er: Room temperature sensor defective

Kruishoefstraat 50
B-3650 Dilsen
T. +32 (0)89 79 04 11
F. +32 (0)89 79 05 00
[email protected]
www.vasco.eu
90.LR700001.A


