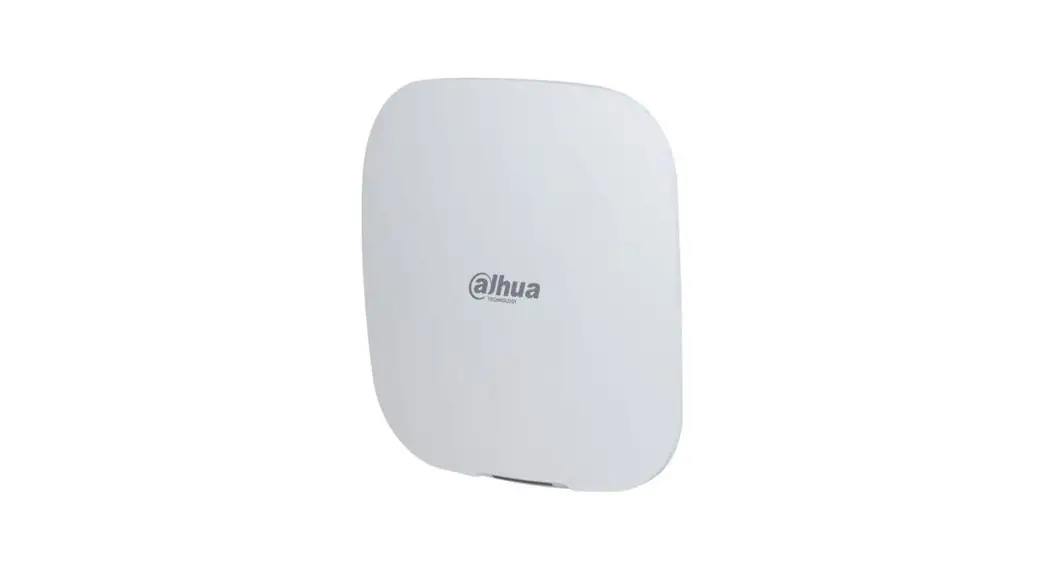
![]() ARC3000H-FW2 Alarm Hub
ARC3000H-FW2 Alarm Hub
User Manual
Introduction
The alarm hub is a central device in the security system, which controls the operation of all connected accessories, including wireless keyfob, siren, door detector, and PIR detector. If the security system detects the presence, entry, or attempted entry of an intruder into the armed area, the hub will receive the alarm signals from the detectors, and then alert users.
Checklist
Check the package according to the following checklist. If you find anything damaged or lost, contact customer service.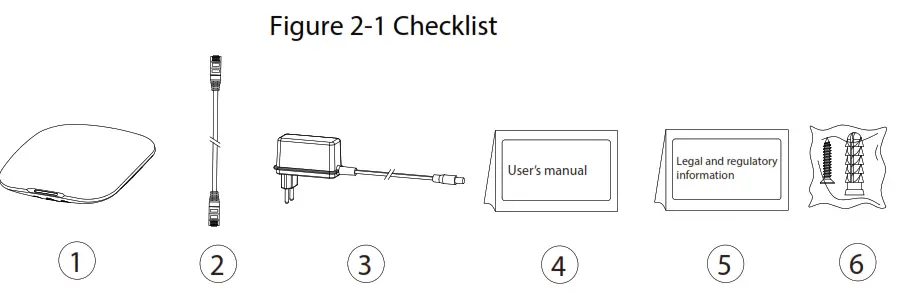
Table 2-1 Checklist
| No. | Item Name | Quantity | No. | Item Name | Quantity |
| 1 | Alarm hub | 1 | 4 | User’s manual | 1 |
| 2 | Cable | 1 | 5 | Legal and regulatory information | 1 |
| 3 | Adapter | 1 | 6 | Screw package | 1 |
Design
3.1 Appearance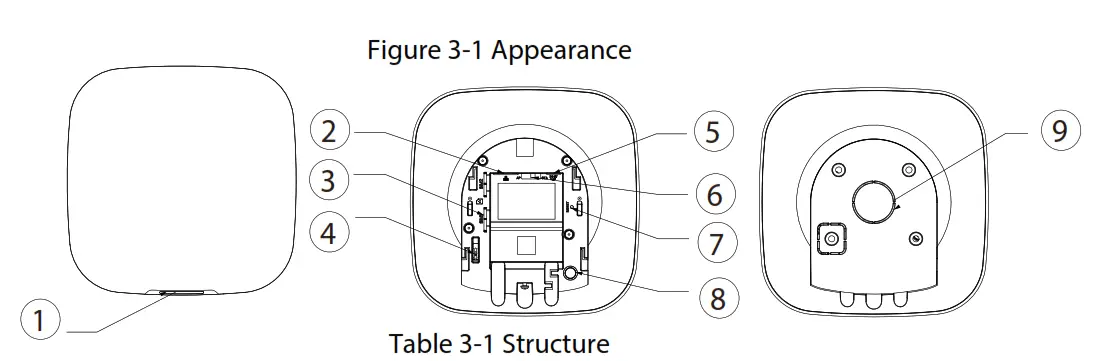
Table 3-1 Structure
No. | Name | Description |
| 1 | Indicator | •Flashes green: The hub starts working. •Solid yellow: Configuring network. •Solid green: Disarming mode. •Solid blue: Arming mode. •Flashes red: Alarm event is triggered. •Flashes yellow: Malfunction is detected. |
| 2 | Ethernet cable socket | Connect the hub to the Ethernet. |
| 3 | Slot for micro SIM 1/2 | Install the main card to the first slot, and the standby card to the second slot. •Support dual SIM cards and single standby. •SIM cards will not work until network configuration has been completed. •SIM function is only available on select models. |
| 4 | Tamper button | The tamper mode of the hub reacts to the detachment of the body. |
| 5 | Power cable socket | Insert power cable. |
| 6 | AP | Turn on AP, the phone will connect to the hotspot from the hub, and then sync the Wi-Fi username and password to the hub. |
| 7 | Reset button | Press and hold the button for 10 s to restart the hub and restore the factory default settings. |
| 8 9 | Power button Lid | Press and hold the button for 2 s to turn on or turn off the hub. ● Lid closed: Normal status. ● Lid opens Abnormal status. |
3.2 Dimensions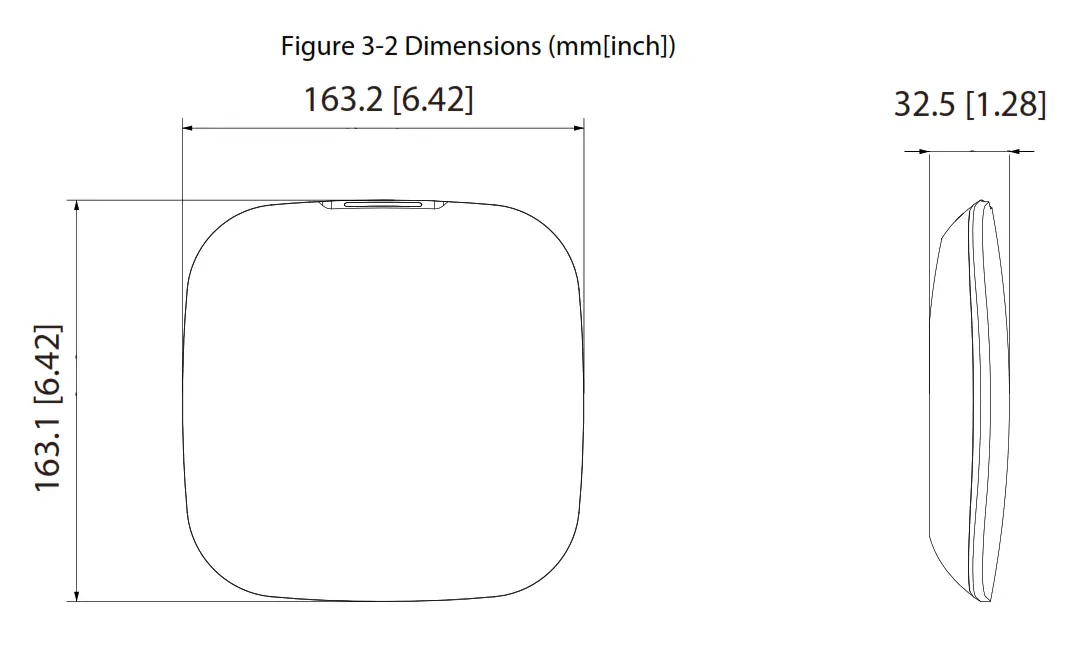
Downloading DMSS App
The security system is configured and controlled through DMSS App. You can access to DMSS applications on iOS and Android. This section takes iOS as an example. Search for the DMSS App in the app market, download it and create an account to log in. Alternatively, you can scan the QR code on the packing box to download the app.![]() Make sure that you have installed the latest version of the app.
Make sure that you have installed the latest version of the app.
Adding the Hub
Make sure that your phone has enabled the Wi-Fi function.
5.1 Adding Alarm Hub through Wi-Fi
Step 1 Open DMSS App, and enter your username and password to log in.
Step 2 Scan QR code at the bottom of the hub.
● On the Home interface, tap at the upper-right corner to scan the QR code and then tap Next.
● Manually enter SN to add the hub, and then tap Next.
Step 3 Configure AP.
Figure 5-1 AP configuration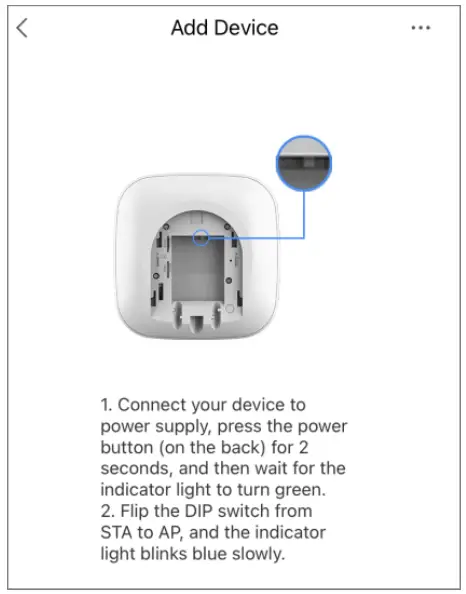 Step 4 Connect to the hub hotspot.
1) Search for the hub hotspot, and then tap Join.
2) Connect to the hub hotspot.
Step 5 Initialize the hub.
1) Configure the hub username and password, and then tap Next.
2) Configure the time zone, and then tap OK to complete initialization.
Step 6 Connect to the network.
1) Search for nearby Wi-Fi available, and then enter the Wi-Fi password.
2) Flip the DIP switch from AP to STA.
3) Wait for hub network configuration.
Step 7 Add the hub to the app.
1) Configure the hub name, and then tap Save.
2) Configure the time zone as needed, and then tap Completed.
3) Go to the Home interface, the hub is added to the device list now.
5.2 Adding Alarm Hub through Wired Network![]() Make sure that your phone and the hub are connected to the same network.
Make sure that your phone and the hub are connected to the same network.
Step 1 Connect the Ethernet cables to the appropriate sockets.
Step 2 Go through steps 1 to step 2 in “5.1 Adding Alarm Hub through Wi-Fi”.
Step 3 Connect to the wired network.
1) On the Add Device interface, tap.
2) Tap Switch to wired network configuration.
Figure 5-2 Switch to wired network configuration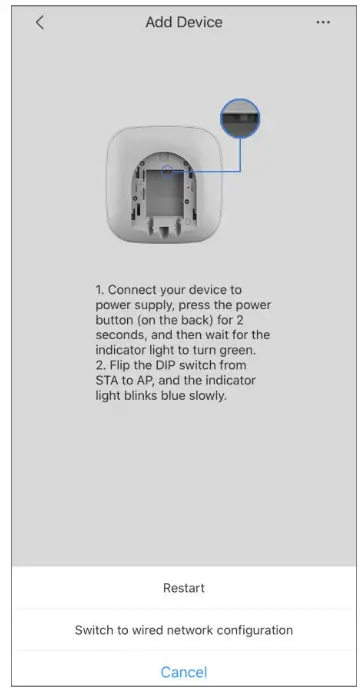 3) Follow on-screen instructions, and then tap Next.
Step 4 Initialize the hub and add it to the app. Go through steps 5 and step 7 in “5.1 Adding Alarm Hub through Wi-Fi”.
Pairing with Accessories
You can add multiple accessories, including a wireless keyfob, siren, door detector, and PIR detector, into the hub. The section takes the door detector as an example.![]() Up to 6 sirens and 64 keyfobs can be added to a hub.
Up to 6 sirens and 64 keyfobs can be added to a hub.
Step 1 On the Home interface, tap at the upper-right corner and then scan the QR code at the bottom of the door detector.
Step 2 Tap Next.
Step 3 Follow on-screen instructions and switch the door detector to on, and then tap Next to add it to the hub.
Step 4 Wait for the pairing.
Step 5 Customize the name of the door detector and select the area, and then tap Completed.
 Delete the accessory: Go to the Hub interface, select the accessory from the list, and then swipe left to delete it.
- Up to 32 areas can be created in a hub.
Installation
Prior to installation, insert the SIM card or the network cable, connect to the power supply and turn on the hub switch, and make sure that you have completed the network configuration. We recommend installing the hub with expansion screws. Do not place the hub in the following areas:
- Outdoors.
- Places close to metal objects cause attenuation and shielding of the radio signal.
- Places with a weak GSM signal.
- Places close to radio interference sources that are less than 1 meter from the router and power cables.
- Places where the temperature and humidity exceed allowed limits.
Figure 7-1 Installation
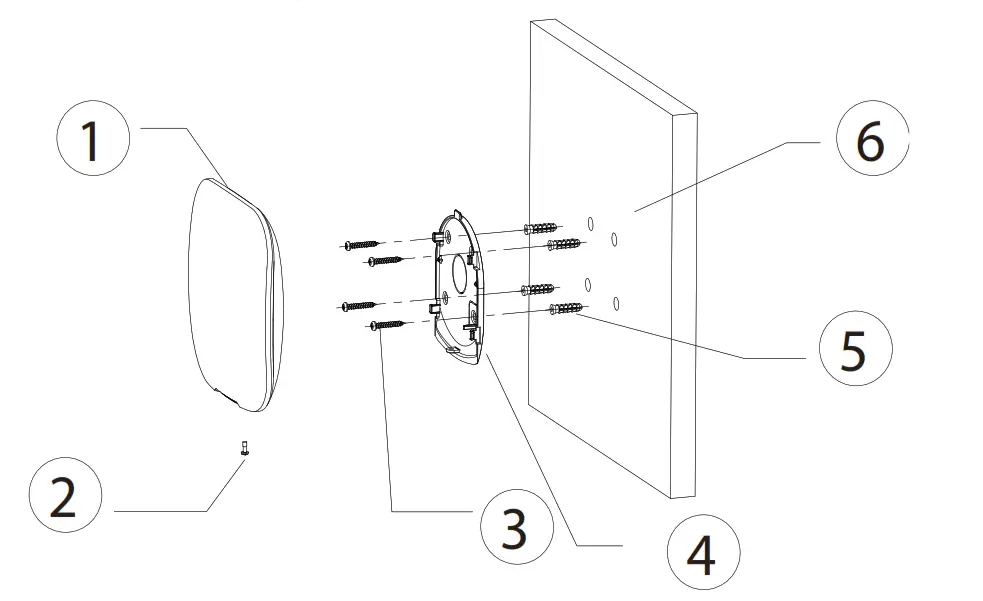
Table 7-1 Installation items
| No. | Item Name |
| 1 | Hub |
| 2 | M3 × 8 mm countersunk head screw |
| 3 | ST4 × 25 mm self-tapping screw |
| 4 | Mounting plate |
| 5 | Expansion bolt |
| 6 | Wall |
Step 1 Confirm the position of the screw holes, and then drill them on the mounting plate.
Step 2 Put the expansion bolts into the holes.
Step 3 Put the mounting plate into the wall, and then align the screw holes on the plate with the expansion bolts.
Step 4 Fix the mounting plate with ST4 × 25 mm self-tapping screws.
Step 5 Put the alarm hub into the mounting plate from top to bottom.
Step 6 Fix the alarm hub and mounting plate with M3 × 8 mm countersunk head screws.
Hub General Settings
On the Hub interface,![]() tap, and then you can view and edit general information about the hub.
tap, and then you can view and edit general information about the hub.
Table 8-1 Parameter description
| Parameter | Description |
| Device Configuration | ● View device name, type, and SN. ● Edit the device name, and then tap Save to save the configuration. |
| Notifications | Tap |
| Hub Status | For details, see “8.2 Viewing Hub Status”. |
| Hub Setting | For details, see “8.1 Configuring the Hub”. |
| Time Zone | Tap to select your time zone, and enable DST (daylight saving time) if necessary. ● Time zone: Select the time zone in which the hub operates. ● DST: Select date or week, and then select start time and end time. |
| Network Configuration | Show your present network information. |
| Device Sharing | ● Tap Share to User to share the status of the hub with the other users. ● Tap Entrust to Company to share the status of the hub with the company. |
| Cloud Update | An update is not allowed when the hub is in armed status or the battery level is low. |
8.1 Configuring the Hub
On the Hub interface, select ![]() > Hub Setting to configure the hub parameters.
> Hub Setting to configure the hub parameters.
Table 8-2 Hub parameter description
| Parameter | Description |
| Global Arming/Disarming | Arm or disarm all the detectors in all the areas with one tap. |
| Schedule Arming/Disarming | Arm or disarm the areas by schedule. ● Area: Select the area in which the hub operates. ● Command setting: Select an armed mode as needed by tapping Home, Away, or Disarm. ● Time: Select the time period in which the hub operates. ● Repeat: Copy the arming or disarming schedule. |
| Ringtone Setting | The ringtone when entering or exiting the arming mode. |
| Phone Number Management | ● Add and manage the phone number. ● You can be notified of all events (alarm, fault, operation) through push notifications, SMS messages, and calls (if activated). |
| Test Mode | Tap Start to test the status of the accessories connecting to the hub in different areas, and then tap Stop to complete detection. |
| Heartbeat | Configure the hub-detector ping interval. The settings determine how frequently the hub communicates with the accessories and how quickly the loss of connection is detected. ● Detector Ping Interval: The frequency of connected accessories operated by the hub is configured in the range of 12 s to 300 s (60 s by default). The shorter the detector ping interval, the shorter the life span of the battery. ● Number of undelivered packets to determine connection failure: A counter of undelivered packets is configured in the range of 3 to 60 (15 packets by default). The smaller the number, the more frequently the offline status of accessories is detected and reported. |
| Anti-tampering Speaker | Alert with a siren if the lid of accessories and hub is open. |
| System Integrity Check | If enabled, the hub checks the status of all detectors before arming, such as battery charge, tampers, and connection. If problems are detected, warnings will be displayed. ● For the keyfob, flashes green first and then turns to red. ● For the app, an alarm message will pop up. |
8.2 Viewing Hub Status
On the Hub interface, select![]() > Hub Status to view the hub status.
> Hub Status to view the hub status.
Table 8-3 Hub parameter description
| Parameter | Description |
| GSM Signal Strength | The signal strength of the mobile network for the active SIM card. • • •  : Moderate. : Moderate.•  : High. : High.• |
| Wi-Fi Signal Strength | Internet connection status of the hub via Wi-Fi. For greater reliability, we recommend installing the hub in places with a signal strength of at least 2 bars. •  : Ultra-low. : Ultra-low.•  : Low. : Low.•  : Moderate. : Moderate.•  : High. : High.•  : No. : No. |
| Storage Battery | Show the remaining electricity of the battery. • • • • |
| Anti-tampering | The tamper mode of the accessory reacts to the detachment of the body. |
| Main Power Status | Show main power status. |
| GSM Connection Status | Internet connection status of the hub via SIM card, Wi-Fi, and Ethernet. • •  : Disconnected. : Disconnected. |
| Wi-Fi Connection Status | |
| Network Cable Connection Status | |
| SIM Card Status | Connection status of the SIM card. •  SIM card 1 is active. SIM card 1 is active.•  SIM card 2 is active. SIM card 2 is active.•  : No SIM card. : No SIM card. |
| Program Version | The program version of the hub. |
Arming the Accessory
After the accessories have been added to the hub, you can arm and disarm them. Only wireless door detectors and PIR detectors can be armed.
9.1 Types of Arming Modes
There are three types of arming modes.
- Home: Enable the home mode, and then the selected accessories under the hub will be armed. Make sure that home mode has been activated for the selected detectors. For details, see Wireless
PIR Detector_User’s Manual and Wireless Door Detector_User’s Manual. - Away: Enable the away mode, and then all the accessories under the hub will be armed.
- Disarm: Enable the disarm mode, and then all the accessories under the hub will be disarmed.
9.2 Operations
You can arm and disarm the detectors in a single area or all the areas through manual or scheduled operations.
- Single Arming and Disarming: Arm and disarm the detectors in a single area.
- Global Arming and Disarming: Arm and disarm the detectors in all areas.
- Manual Arming and Disarming: Arm the security system through DMSS App or keyfob.
- Schedule Arming and Disarming: Arm and disarm the detectors by schedule.
9.2.1 Single Arming and Disarming
Step 1 Go to the Hub interface.
Step 2 Tap, ![]() and then select Home, Away, Disarm and Disable in the white box to switch arming modes. For details, see “9.1 Types of Arming Modes”.
and then select Home, Away, Disarm and Disable in the white box to switch arming modes. For details, see “9.1 Types of Arming Modes”.
Figure 9-1 Switch arming mode 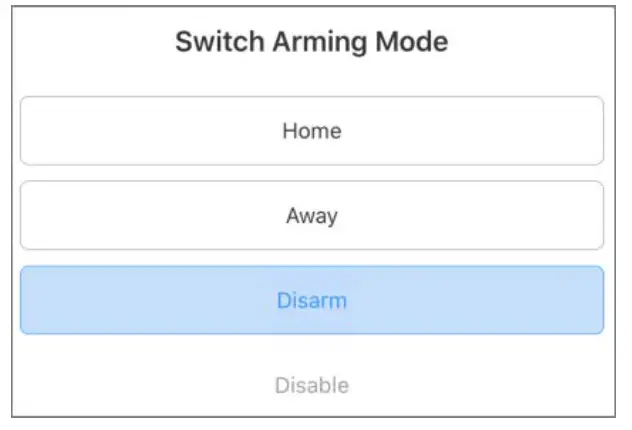
![]() Disable: Close the current interface.
Disable: Close the current interface.
9.2.2 Global Arming and Disarming
Step 1 On the Hub interface, tap![]() , and then tap Hub Setting.
, and then tap Hub Setting.
Step 2 Enable Global Arming and Disarming. For details, see “8.1 Configuring the Hub”.
Step 3 Go back to the Hub interface.
Step 4 Select Home, Away, and Disarm at the upper of the box.
Figure 9-2 Select mode
9.2.3 Manual Arming and Disarming
You can arm the security system through DMSS App or keyfob.
- To arm and disarm the detectors in a single area or all the areas, see “9.2.1 Single Arming and Disarming” and “9.2.2 Global Arming and Disarming”.
- To operate on the keyfob, you need to assign the control permissions over the areas to the keyfob first.
9.2.4 Scheduled Arming and Disarming
You can arm and disarm the accessories in the selected areas by schedule.
Step 1 On the Hub interface, tap![]() , and then tap Hub Setting.
, and then tap Hub Setting.
Step 2 Tap Scheduled Arming and Disarming, and then configure scheduled arming and disarming. For details, see “8.1 Configuring the Hub”.
Appendix 1 Cybersecurity Recommendations
Cybersecurity is more than just a buzzword: it’s something that pertains to every device that is connected to the internet. IP video surveillance is not immune to cyber risks, but taking basic steps toward protecting and strengthening networks and networked appliances will make them less susceptible to attacks. Below are some tips and recommendations on how to create a more secure security system.
Mandatory actions to be taken for basic device network security:
- Use Strong Passwords
Please refer to the following suggestions to set passwords:
• The length should not be less than 8 characters;
• Include at least two types of characters; character types include upper and lowercase letters, numbers, and symbols;
• Do not contain the account name or the account name in reverse order;
• Do not use continuous characters, such as 123, abc, etc.;
• Do not use overlapped characters, such as 111, aaa, etc.; - Update Firmware and Client Software in Time
• According to the standard procedure in Tech-industry, we recommend keeping your device (such as NVR, DVR, IP camera, etc.) firmware up-to-date to ensure the system is equipped with the latest security patches and fixes. When the device is connected to the public network, it is recommended to enable the “auto-check for updates” function to obtain timely information of firmware updates released by the manufacturer.
• We suggest that you download and use the latest version of the client software.
“Nice to have” recommendations to improve your device network security:
- Physical Protection
We suggest that you perform physical protection on devices, especially storage devices. For example, place the device in a special computer room and cabinet, and implement well-done access control permission and key management to prevent unauthorized personnel from carrying out physical contacts such as damaging hardware, the unauthorized connection of removable devices (such as USB flash disk, serial port), etc. - Change Passwords Regularly
We suggest that you change passwords regularly to reduce the risk of being guessed or cracked. - Set and Update Passwords Reset Information Timely
The device supports a password reset function. Please set up related information for password reset in time, including the end user’s mailbox and password protection questions. If the information changes, please modify it in time. When setting password protection questions, it is suggested not to use those that can be easily guessed. - Enable Account Lock
The account lock feature is enabled by default, and we recommend you to keep it on to guarantee account security. If an attacker attempts to log in with the wrong password several times, the corresponding account and the source IP address will be locked. - Change Default HTTP and Other Service Ports
We suggest you to change the default HTTP and other service ports into any set of numbers between 1024~65535, reducing the risk of outsiders being able to guess which ports you are using. - Enable HTTPS
We suggest you to enable HTTPS, so that you visit Web service through a secure communication channel. - MAC Address Binding
We recommend you to bind the IP and MAC address of the gateway to the device, thus reducing the risk of ARP spoofing. - Assign Accounts and Privileges Reasonably
According to business and management requirements, reasonably add users and assign a minimum set of permissions to them. - Disable Unnecessary Services and Choose Secure Modes
If not needed, it is recommended to turn off some services such as SNMP, SMTP, UPnP, etc., to reduce risks.
If necessary, it is highly recommended that you use safe modes, including but not limited to the following services:
• SNMP: Choose SNMP v3, and set up strong encryption passwords and authentication passwords.
• SMTP: Choose TLS to access the mailbox server.
• FTP: Choose SFTP, and set up strong passwords.
• AP hotspot: Choose WPA2-PSK encryption mode, and set up strong passwords. - Audio and Video Encrypted Transmission
If your audio and video data contents are very important or sensitive, we recommend that you use an encrypted transmission function, to reduce the risk of audio and video data being stolen during transmission.
Reminder: the encrypted transmission will cause some loss in transmission efficiency. - Secure Auditing
• Check online users: we suggest that you check online users regularly to see if the device is logged in without authorization.
• Check device log: By viewing the logs, you can know the IP addresses that were used to log in to your devices and their key operations. - Network Log
Due to the limited storage capacity of the device, the stored log is limited. If you need to save the log for a long time, it is recommended that you enable the network log function to ensure that the critical logs are synchronized to the network log server for tracing. - Construct a Safe Network Environment
In order to better ensure the safety of the device and reduce potential cyber risks, we recommend:
• Disable the port mapping function of the router to avoid direct access to the intranet devices from the external network.
• The network should be partitioned and isolated according to the actual network needs. If there are no communication requirements between two sub-networks, it is suggested to use VLAN, network GAP, and other technologies to partition the network, so as to achieve the network isolation effect.
• Establish the 802.1x access authentication system to reduce the risk of unauthorized access to private networks.
• Enable the IP/MAC address filtering function to limit the range of hosts allowed to access the device.
![]() ENABLING A SAFER SOCIETY AND SMARTER LIVING
ENABLING A SAFER SOCIETY AND SMARTER LIVING
ZHEJIANG DAHUA VISION TECHNOLOGY CO., LTD.
Address: No.1199 Bin’an Road, Binjiang District, Hangzhou, P. R. China
Website: www.dahuasecurity.com
Postcode: 310053
Email: [email protected]
Fax: +86-571-87688815
Tel: +86-571-87688883


