YAMAHA R-S202BL Stereo Receiver
IMPORTANT SAFETY INSTRUCTIONS
- Read these instructions.
- Keep these instructions.
- Heed all warnings.
- Follow all instructions.
- Do not use this apparatus near water.
- Clean only with dry cloth.
- Do not block any ventilation openings. Install in accordance with the manufacturer’s instructions.
- Do not install near any heat sources such as radiators, heat registers, stoves, or other apparatus (including amplifiers) that produce heat.
- Do not defeat the safety purpose of the polarized or grounding-type plug. A polarized plug has two blades one wider than the other. A grounding type plug has two blades and a third grounding prong. The wide blade or the third prong is provided for your safety. If the provided plug does not fit into your outlet, consult an electrician for the replacement of the obsolete outlet.
- protect the power cord from being walked on or pinched particularly at plugs, convenience receptacles, and the point where they exit from the apparatus.
- Only use attachments/accessories specified by the manufacturer.
- Use only with the cart, stand, tripod, bracket, or table specified by the manufacturer, or sold with the apparatus. When a cart is used, use caution when moving the cart/apparatus combination to avoid injury from tip-over.
- Unplug this apparatus during lightning storms or when unused for long periods of time.
- Refer all servicing to qualified service personnel. Servicing is required when the apparatus has been damaged in any way, such as power-supply cord or plug is damaged, liquid has been spilled or objects have fallen into the apparatus, the apparatus has been exposed to rain or moisture, does not operate normally, or has been dropped.
Product information, such as the model name (product number), manufacturing code (serial number), and power requirements, are displayed on or in the vicinity of the nameplate on the product (Rear panel). We recommend that you fill in the following space with the model name and serial number, and store this document in a safe place so that the information will help you identify your product in case you lose the product. Model Name
IMPORTANT SAFETY INSTRUCTIONS
- Read these instructions.
- Keep these instructions.
- Heed all warnings.
- Follow all instructions.
- Do not use this apparatus near water.
- Clean only with dry cloth.
- Do not block any ventilation openings. Install in accordance with the manufacturer’s instructions.
- Do not install near any heat sources such as radiators, heat registers, stoves, or other apparatus (including amplifiers) that produce heat.
- Do not defeat the safety purpose of the polarized or grounding-type plug. A polarized plug has two blades one wider than the other. A grounding type plug has two blades and a third grounding prong. The wide blade or the third prong is provided for your safety. If the provided plug does not fit into your outlet, consult an electrician for the replacement of the obsolete outlet.
- protect the power cord from being walked on or pinched particularly at plugs, convenience receptacles, and the point where they exit from the apparatus.
- Only use attachments/accessories specified by the manufacturer.
- Use only with the cart, stand, tripod, bracket, or table specified by the manufacturer, or sold with the apparatus. When a cart is used, use caution when moving the cart/apparatus combination to avoid injury from tip-over.
- Unplug this apparatus during lightning storms or when unused for long periods of time.
- Refer all servicing to qualified service personnel. Servicing is required when the apparatus has been damaged in any way, such as power-supply cord or plug is damaged, liquid has been spilled or objects have fallen into the apparatus, the apparatus has been exposed to rain or moisture, does not operate normally, or has been dropped.
Product information, such as the model name (product number), manufacturing code (serial number), and power requirements, are displayed on or in the vicinity of the nameplate on the product (Rear panel). We recommend that you fill in the following space with the model name and serial number, and store this document in a safe place so that the information will help you identify your product in case you lose the product. Model Name Serial Number
PRECAUTIONS
Please read these precautions carefully before proceeding. Be sure to follow the instructions Please carefully read and observe the following precautions to avoid harm to people or damage to your personal property. After reading this document thoroughly, please retain it in a location that anyone using the product can access at any time.
- Contact the following customer center for inspection or repair.
- The store you purchased the product
- Yamaha dealer
- This product is intended for use as a general household device. Do not use it in any field or activity requiring a high degree of reliability in relation to human lives or valuable assets.
- Please note that Yamaha cannot accept any liability for any losses resulting from improper use or unauthorized modification of the product.
WARNING These precautions alert you to the possibility of death or serious injury to yourself or others. If you notice any abnormality
- If any of the following abnormalities occur, immediately shut down the power.
- The power cord or plug becomes damaged.
- Unusual smells, noise or smoke are emitted from the product.
- An object or some water has been dropped into the product.
- Cracks or other damage appear on the product.
- There is a sudden loss of sound during use of the product. Follow the steps below to shut down the power.
- Turn off the power to this product.
- Disconnect the power cord plug from the AC outlet. Continuing to use the product as-is may result in fire, electrical shock or damage to the product. Request inspection or repair immediately.
Power supply
- Do not damage the power cord.
- Do not place the power cord near heat sources such as heaters.
- Do not forcefully bend or modify the power cord.
- Do not damage the power cord.
- Do not place heavy objects on the power cord.
- Do not staple the power cord. Using a frayed power cord with the core wire exposed may result in fire, electrical shock or damage to the product.
- During lightning or electrical storms, do not touch this product, power plug or power cord. Otherwise, electrical shock may be caused.
- Use the voltage specified for this product. Using an incorrect voltage may result in fire, electrical shock or damage to the product.
- Check the power cord plug periodically and remove any dirt or dust that may have accumulated. Otherwise, fire or electrical shock may be caused.
- Be sure to fully insert the power cord plug into an AC outlet. Otherwise, electrical shock or fire or damage to the product due to short circuit may be caused.
- Insert the power cord plug into the AC outlet that is visible and easily accessible. If some trouble or malfunction occurs, you should be able to immediately disconnect the plug from the AC outlet easily. Even when the power switch is turned off, as long as the power cord is not unplugged from the wall AC outlet, the product is not disconnected from the power source completely.
- If you plan not to use the product for a long period of time, remove the power cord plug from the AC outlets. Otherwise, fire or damage to the product may be caused.
Installation Secure the speaker cables onto the wall. Otherwise, the cables might be caught by a foot or hand, and the product may fall or tip over, resulting in injuries or damage to the product. Do not disassemble Do not modify or disassemble this product. Oth rwise, fire, electrical shock, injury or damage to the product may be caused. Water warning
- Do not use this product in damp or wet conditions, such as a bathroom or rainy outdoor location.
- Do not place on this product any containers (such as vases or medicine bottles) that contain liquids. If liquid spills into the product, fire, electrical shock or damage to the product may be caused.
- Do not insert the power cord plug into or remove it from the AC outlet with wet hands. Do not handle this product with wet hands. Otherwise, electrical shock or damage to the product may be caused.
Fire warning
- Do not handle open flames near this product. Otherwise, fire may be caused.
Handling
- Do not drop this product or apply any strong impact to the product. Otherwise, fire, electrical shock or damage to the product may be caused.
Batteries
- Do not swallow batteries.
- Keep batteries away from children.
Otherwise, they may swallow the batteries by accident. Leaking battery liquid may cause loss of vision or inflammation. If the battery case on this product is not completely sealed, stop using the product and keep it away from children. If someone has swallowed a battery by accident, consult a physician immediately. If a battery is swallowed, it can cause serious chemical burns or melting of body tissue within two hours, leading to possible death.
- Do not throw batteries into an open fire.
- Do not expose batteries to high temperatures, such as direct sunlight or an open fire. Otherwise, they may explode, resulting in fire or injury.
- If battery liquid is leaking, do not touch the liquid. Otherwise, loss of vision or chemical burns may be caused. If you touch the battery liquid, wash it away with water immediately, and consult a physician.
- Do not use batteries other than the specified type.
- Do not use old and new batteries together.
- Do not use different types of batteries together.
- Do not insert batteries in an orientation opposite from the polarity indication.
- Do not break down the battery.
- do not charge non-rechargeable dry cell batteries. Otherwise, they may explode or battery liquid may leak, resulting in fires, burns, loss of vision, inflammation, or damage to the product. If you touch the battery liquid, wash it away with water immediately, and consult a physician.
- Do not carry the batteries in a pocket or bag or store them along with a piece of metal. Otherwise, the batteries may short-circuit, leading to an explosion or leaking liquid, which could result in fires, loss of vision, or injuries.
- If you plan not to use the product for a long period of time, or if the batteries are completely discharged, remove them from the remote control. Otherwise, battery liquid may leak, possibly resulting in loss of vision, inflammatory injury, or damage to the product.
- Before you store or discard the batteries, apply a piece of tape to the connectors to insulate them. If the battery connectors come into contact with other batteries or metallic objects, they may explode or battery liquid may leak, possibly resulting in fire, burns, loss of vision, or inflammatory injury.
- Wireless unit
- Do not use this product in an area where the use of radio waves is restricted, such as near medical devices. Otherwise, radio waves emitted from this product may affect the operation of medical electric equipment.
- Do not use this product within 15 cm (6 in) of a person with a heart pacemaker implant or a defibrillator implant. Otherwise, radio waves emitted from this product may affect the operation of the pacemaker implant or the defibrillator implant.
CAUTION These precautions alert you to the possibility of physical injury to yourself or others. Power supply
- If the power cord plug inserted into the AC outlet is wiggly or loose, do not use that outlet. Otherwise, fire, electrical shock or burns may be caused.
- When removing the power cord plug from the product or an outlet, always hold the plug itself and not the cord. Otherwise, the power cord may be damaged, resulting in fire or electrical shock. Installation
- Do not place this product in an unstable position or a location subject to vibration. Otherwise, the product may fall or tip over, resulting in injuries or damage to the product.
- Do not block the heat dissipation of this product when installing it.
- Do not cover the product with a cloth or table cloth.
- Do not install the product on a carpet or rug.
- Do not block the vents (heat dissipation slits).
- Make sure that the top surface faces up. Do not install the product on its sides or upside down.
- Do not use the product in a confined, poorly-ventilated location. Inadequate ventilation may result in overheating inside the product, possibly causing damage and fire or malfunction. Make sure that there is adequate space around the product at least 30 cm (11 3/4 in) above, 20 cm (7-7/8 in) at the sides and 20 cm (7-7/8 in) behind.
- Install this product in accordance with the instructions described in the following manual. Owner’s Manual Otherwise, the product may fall or tip over, resulting in injuries or damage to the product.
- During earthquakes, stay away from this product. Otherwise, the product may fall or tip over, resulting in injuries.
- Do not install the product in a place where it may come into contact with salt air, corrosive gases, oily fume or steam. Otherwise, the product may fall or tip over, resulting in injuries or damage to the product.
- Before moving this product, be sure to turn off the power switch and remove all connected cables. Otherwise, the cables might be caught by a foot or hand, and the product may fall or tip over, resulting in injuries or damage to the product.
Connections If you plan to connect external devices, first read the owner’s manual for each device, and connect them in accordance with the instructions. If you do not follow the instructions correctly, injury or damage to the product may be caused. Hearing loss
- Do not expose yourself to high volume sound for an extended period of time. Otherwise, hearing loss may be caused. If you experience any hearing abnormality, consult a physician.
- If you plan to connect this product to any other devices, first turn off the power to all devices. Otherwise, hearing loss, electrical shock or damage to the product may be caused.
- Before turning on the power to or using this product, do not raise the volume level too high. Before turning off the power to this product, setthe volume levels of this product and all connected devices to minimum. Otherwise, hearing loss or damage to the product may be caused.
- When turning on the power to the audio system, always turn on thepower to the power amplifier LAST. When turning off the power to the audio system, turn off the power to the power amplifier FIRST. Otherwise, hearing loss or damage to the product may be caused.
Maintenance Before cleaning the product, be sure to remove the power cord plug from the AC outlet. Otherwise, electrical shock may be caused. Handling
- Do not touch the surface to which this label is attached. The surface may become heated during use of this product, and touching the surface may result in burns.
- Do not drop a foreign object, such as a piece of metal or paper, into any gap on this product. Otherwise, fire, electrical shock or damage to the product may be caused.
- Keep small parts away from infants. Otherwise, they may swallow them by accident.
- Do not apply the following excessive force to this product.
- Resting your weight on this product
- Placing heavy objects on this product
- Stacking up this product
- Applying excessive force to the buttons, switches, or I/O connectors Otherwise, injury or damage to the product may be caused.
- Do not pull connected cables. Otherwise, the product may fall or tip over, resulting in injuries or damage to the product.
Precautions for use
NOTICE Follow the precautions below to avoid malfunction and damage to this product and to prevent the loss of data. Power supply
- If you plan not to use this product for a long period of time, remove the power cord plug from the AC outlet. Even when the [A] (Standby/On) switch is turned off, a small amount of current still flows through this product. Installation
- Depending on the environment in which you use the product, a phone, radio or TV may generate noise. In that case, change the product location or orientation, or the surrounding environment.
- Do not install this product in a place subject to:
- Direct sunlight
- Extremely high or low temperatures
- Excessive dust Otherwise, malfunction or damage to the product may be caused.
- Do not install this product in a place where condensation can form due to rapid, drastic changes in ambient temperature. Using the product while condensation is present may cause damage to the product. If there is a reason to believe that condensation might have occurred on or in this product, leave it for several hours without turning on the power. You can start using the product when the condensation has completely dried.
- Do not install this product in the vicinity of a:
- Metal wall or desk
- Microwave oven
- Wireless LAN device
- Wireless microphone transmitter Otherwise, the quality of the radio waves may be degraded, resulting in unstable wireless communication.
Handling Do not place any vinyl, plastic or rubber products on this product. Otherwise, the panel may be discolored or deteriorate. Maintenance Use a dry, soft cloth to clean this product. Do not use benzine, thinner, detergent or chemical rag to clean the surface of the product. Otherwise, the surface may be discolored or deteriorate.
Important information
NOTE This section describes precautions to be observed during use, functional restrictions, and supplemental information that may be helpful for you. FCC INFORMATION (U.S.A.)
- IMPORTANT NOTICE: DO NOT MODIFY THIS UNIT! This product, when installed as indicated in the instructions contained in this manual, meets FCC requirements. Modifications not expressly approved by Yamaha may void your authority, granted by the FCC, to use the product.
- IMPORTANT: When connecting this product to accessories and/or another product use only high-quality shielded cables. Cable/s supplied with this product MUST be used. Follow all installation instructions. Failure to follow instructions could void your FCC authorization to use this product in the USA.
- NOTE: This product has been tested and found to comply with the requirements listed in FCC Regulations, Part 15 for Class “B” digital devices. Compliance with these requirements provides a reasonable level of assurance that your use of this product in a residential environment will not result in harmful interference with other electronic devices. This equipment generates/uses radio frequencies and, if not installed and used according to the instructions found in the user’s manual, may cause interference harmful to the operation of other electronic devices. Compliance with FCC regulations does not guarantee that interference will not occur in all installations. If this product is found to be the source of interference, which can be determined by turning the unit “OFF” and “ON”, please try to eliminate the problem by using one of the following measures:
- Relocate either this product or the device that is being affected by the interference.
- Utilize power outlets that are on different branch (circuit breaker or fuse) circuits or install AC line filter/s.
- In the case of radio or TV interference, relocate/reorient the antenna. If the antenna lead-in is 300 ohm ribbon lead, change the lead-in to co-axial type cable.
If these corrective measures do not produce satisfactory results, please contact the local retailer authorized to distribute this type of product. If you can not locate the appropriate retailer, please contact Yamaha Corporation of America, 6600 Orangethorpe Ave, Buena Park, CACA90620, USA. The above statements apply ONLY to those products distributed by Yamaha Corporation of America or its subsidiaries. Disposal or transfer
- If you plan to transfer ownership of this product, include this document and the supplied accessories along with the product.
- Follow the rules of your local authority to dispose of this product and its accessories.
- Follow the rules of your local authority to dispose of used batteries.
USEFUL FEATURES
This unit allows you to:
- Enjoy clear audio sound wirelessly using Bluetooth technology (see page 13).
- listen to FM and AM radio stations (see page 15).
- Use the remote control of this unit to operate a Yamaha CD player (see page 7).
- Save power by using the AUTO POWER STANDBY function (see page 19).
SUPPLIED ACCESSORIES
Please check that you received all of the following parts.
- Remote control

- FM antenna * One of the above is supplied depending on the region of purchase.

- AM antenna

- Batteries (x2) (AA, R6, UM-3)


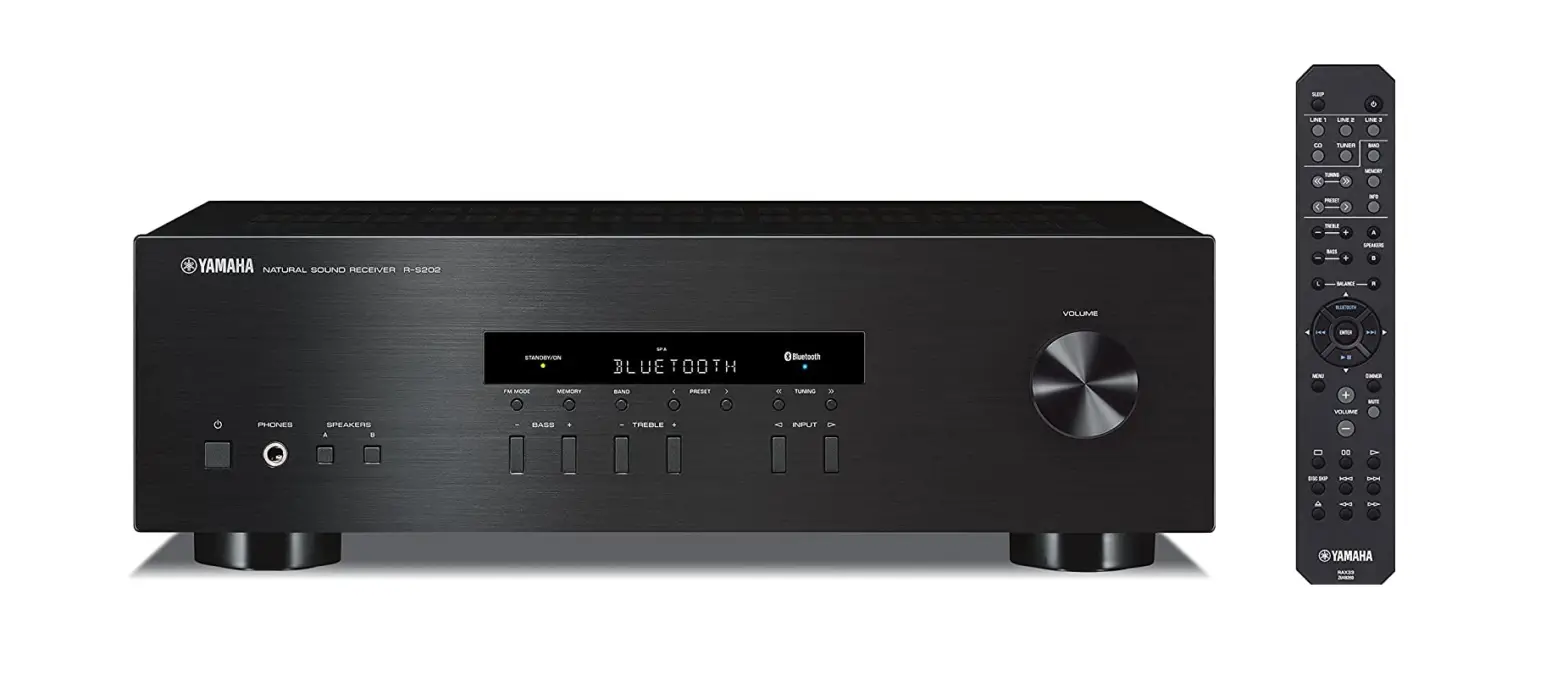
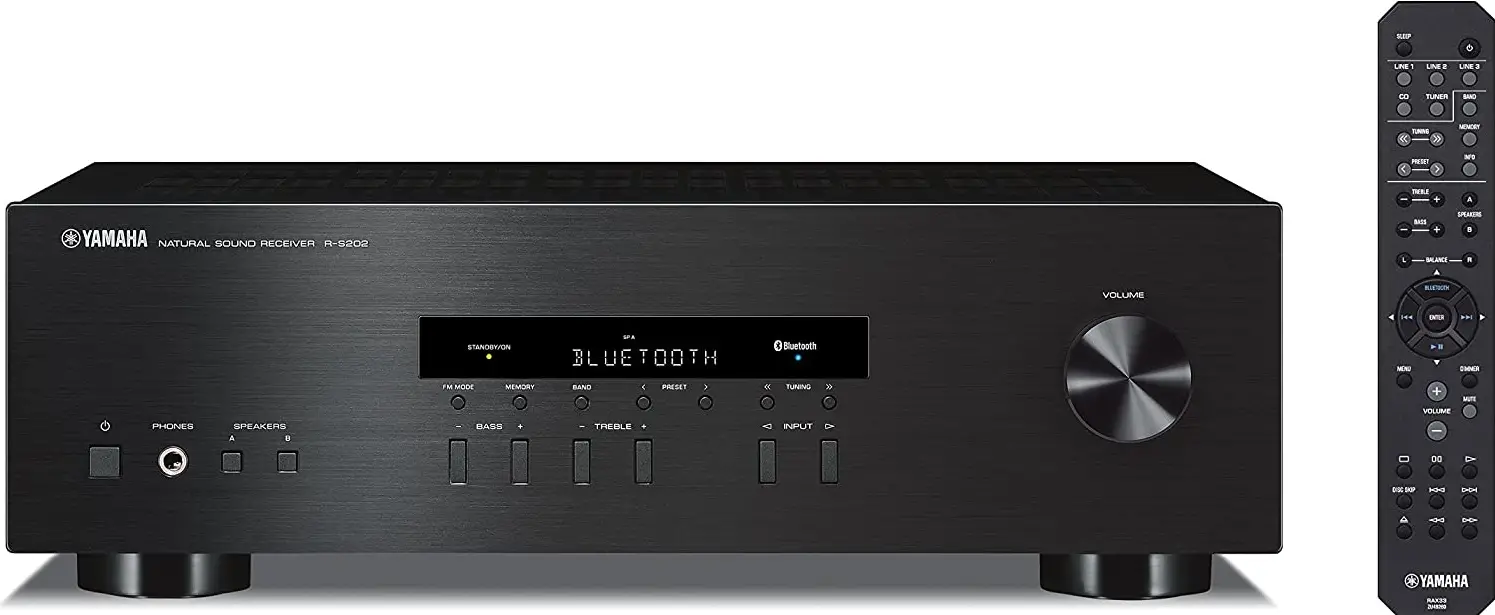
CONTROLS AND FUNCTIONS
Front panel
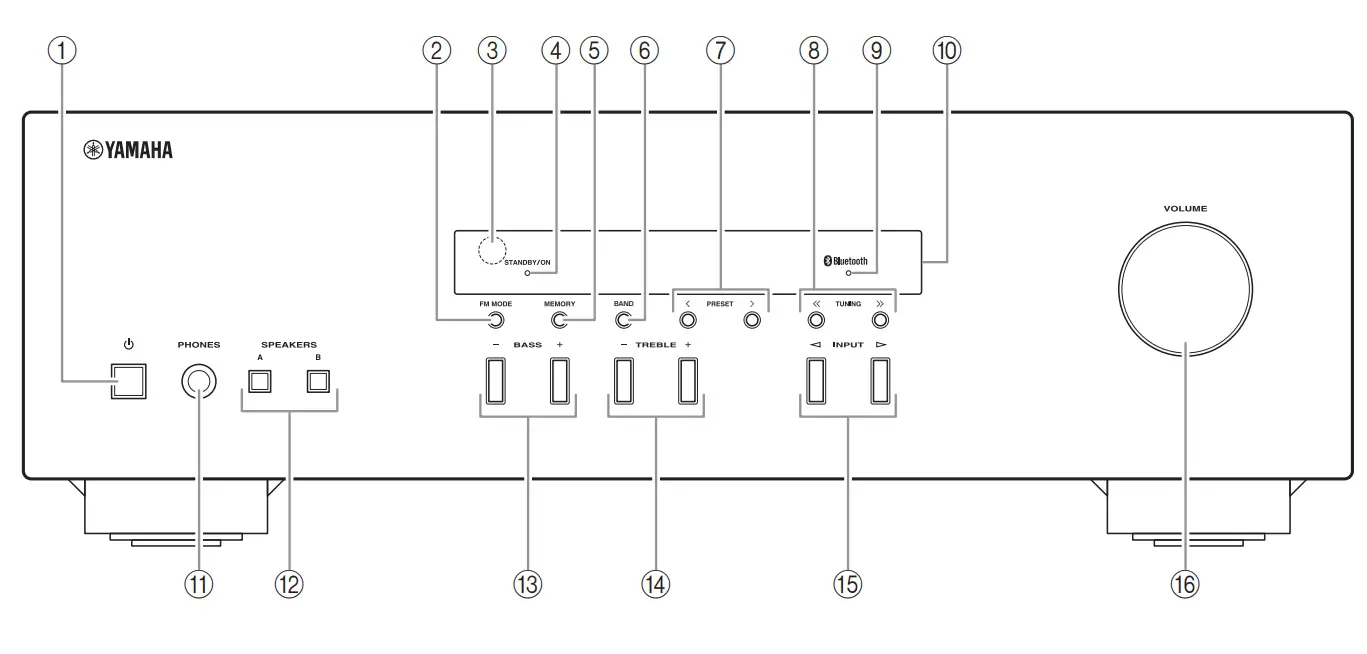
- power Turns this unit on, or sets it to standby mode.
- FM MODE Changes the FM radio wave reception mode (stereo or monaural) when TUNER is selected as the input source (see page 15).
- Remote control sensor Receives infrared signals from the remote control.
- STANDBY/ON indicator
Indicator Status Brightly lit The power of this unit is “on”. Dimly lit This unit is in “standby” mode. Off The power of this unit is “off”. To turn off this unit, disconnect the power cable from an AC wall outlet. - MEMORY Stores the current radio station as a preset when TUNER is selected as the input source (see page 16).
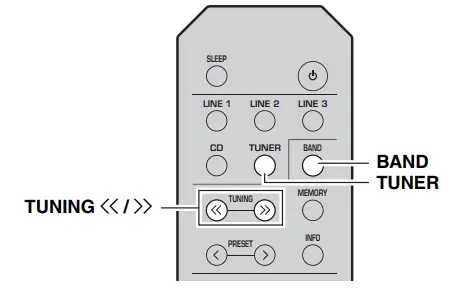
- BAND Sets the radio tuner band when TUNER is selected as the input source (see page 15).
- PRESET Selects a preset radio station when TUNER is selected as the input source (see page 17).
- TUNING Selects the tuning frequency when TUNER is selected as the input source (see page 15).
- Bluetooth indicator Indicates the status of the connection with the Bluetooth device (see page 13).
- Front panel display Shows information about the operational status of this unit (see page 4).
- PHONES jack For connecting headphones.
 Press SPEAKERS A/B so that the SP A/B indicators (see page 4) turn off before you connect your headphones to the PHONES jack.
 - SPEAKERS A/B Turns on or off the speaker set connected to the SPEAKERS A and/or SPEAKERS B terminals on the rear panel each time the corresponding button is pressed (see page 12).
- BASS –/+ Increases or decreases the low-frequency response. Control range: –10 dB to +10 dB
- TREBLE –/+ Increases or decreases the high-frequency response. Control range: –10 dB to +10 dB
- INPUT Selects the input source you want to listen to.
- VOLUME control Increases or decreases the sound output level.
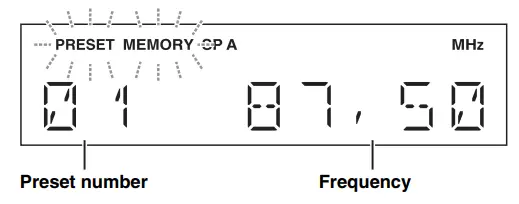
Front panel display
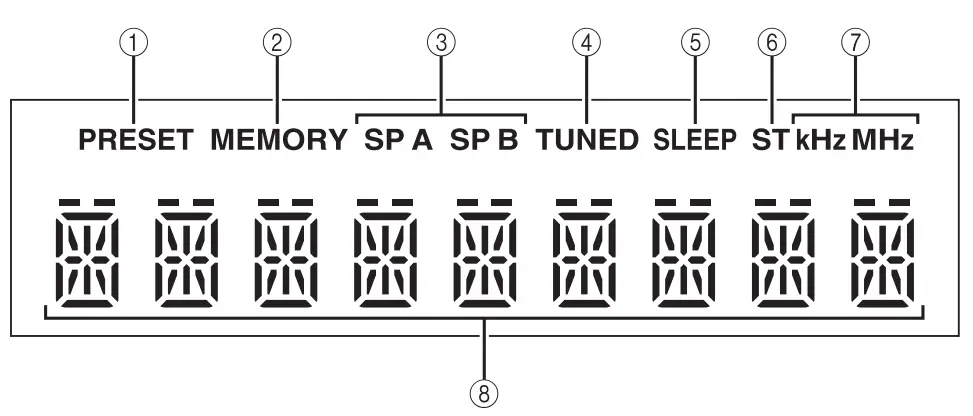
- PRESET indicator Lights up or blinks when using the preset function (see page 16).
- MEMORY indicator Lights up or blinks when registering radio stations as presets (see page 16).
- SP (SPEAKERS) A/B indicators Light up according to the set of speakers selected. Both indicators light up when both sets of speakers are selected.
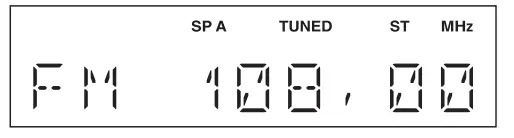
- TUNED indicator Lights up when this unit is tuned in to an FM or AM station with a strong signal.
- SLEEP indicator Lights up when the sleep timer is turned on (see page 12).
- ST indicator Lights up when this unit is in stereo mode and tuning in an FM station with a stereo broadcast.
- kHz/MHz indicators Lights up according to the current broadcast frequency. kHz: AM MHz: FM
- Multi-information display Shows information when adjusting or changing settings.
Rear panel
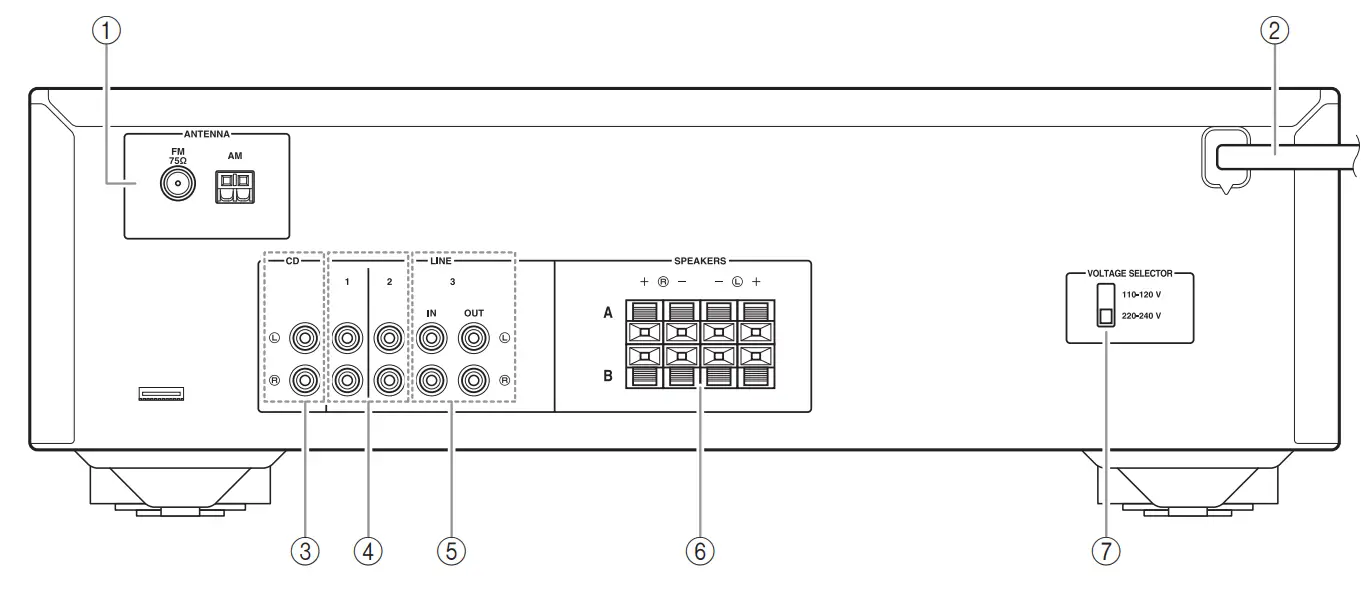
- ANTENNA terminals Used to connect the radio antennas (see page 11).
- Power cable For connecting this unit to an AC wall outlet (see page 11).
- CD jacks Used to connect a CD player (see page 9).
- LINE 1-2 jacks Used to connect audio components (see page 9).
- LINE 3 jacks IN jacks Used to connect to audio output jacks of an audio component (see page 9). OUT jacks Used to connect to audio input jacks of an audio component (see page 9).
- SPEAKERS terminals Used to connect speakers (see page 9).
- VOLTAGE SELECTOR (Only for General model)
Remote control
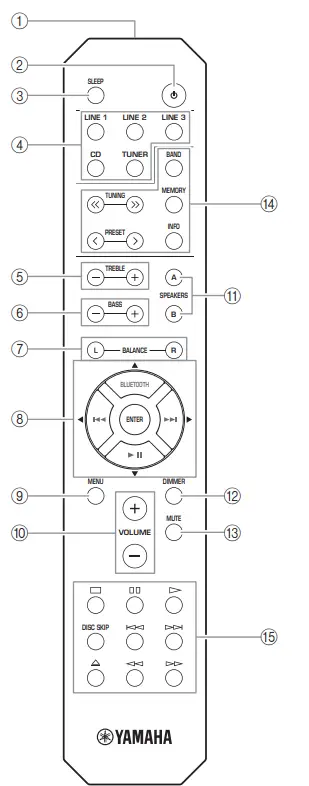
Common controls The following parts and controls can be used no matter which input source is selected.
- Infrared signal transmitter Sends infrared signals.
- A (power) Turns this unit on, or sets it to standby mode.
- SLEEP Sets the sleep timer (see page 12).
- Input selector buttons Select the input source you want to listen to. The input source names correspond to the names of the connection jacks on the rear panel.
- TREBLE –/+ Increases or decreases the high-frequency response. Control range: –10 dB to +10 dB
- BASS –/+ Increases or decreases the low-frequency response. Control range: –10 dB to +10 dB
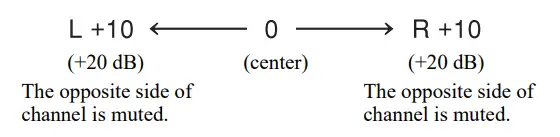
- BALANCE L/R Adjusts the sound output balance of the left and right speakers to compensate for sound imbalances. Control range:

- ENTER Selects and confirms items in the Options menu (see page 19).
- MENU Turns the Options menu on and off (see page 19).
- VOLUME +/– Increases or decreases the sound output level.
- SPEAKERS A/B Turns on or off the speaker set connected to the SPEAKERS A and/or SPEAKERS B terminals on the rear panel each time the corresponding button is pressed (see page 12).
- DIMMER Select the brightness level of the front panel display from 3 levels by pressing this button repeatedly.
- This setting is retained even if you turn off this unit.
- The default setting is the brightest.
- MUTE Mutes the sound output. Press again to restore the sound output to the previous volume level. Radio function controls The following buttons can be used when TUNER is selected as the input source.
- TUNING Selects the tuning frequency (see page 15). PRESET Selects a preset radio station (see page 17). BAND Switches the radio tuner band. MEMORY Stores the current radio station as a preset (see page 16). INFO Only for Europe model: Switches information is shown on the front panel display. Yamaha CD player controls The following buttons can be used to control a Yamaha CD player.
- Yamaha CD player control buttons
 Note Even when using a Yamaha CD player, certain components and features may not be available. Refer to your component’s owner’s manual for more information. Bluetooth controls The following buttons can be used to control a Bluetooth device.
 - Bluetooth control buttons
 Note Yamaha does not guarantee the operation of all Bluetooth devices.
 Note Even when using a Yamaha CD player, certain components and features may not be available. Refer to your component’s owner’s manual for more information. Bluetooth controls The following buttons can be used to control a Bluetooth device.
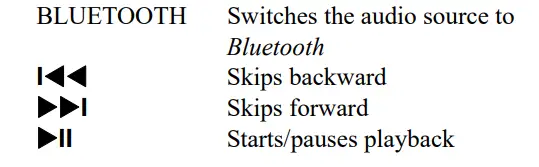 Note Yamaha does not guarantee the operation of all Bluetooth devices.
Using the remote control
Installing batteries Change all batteries if you notice the operation range of the remote control narrows. Before inserting new batteries, wipe the battery compartment clean.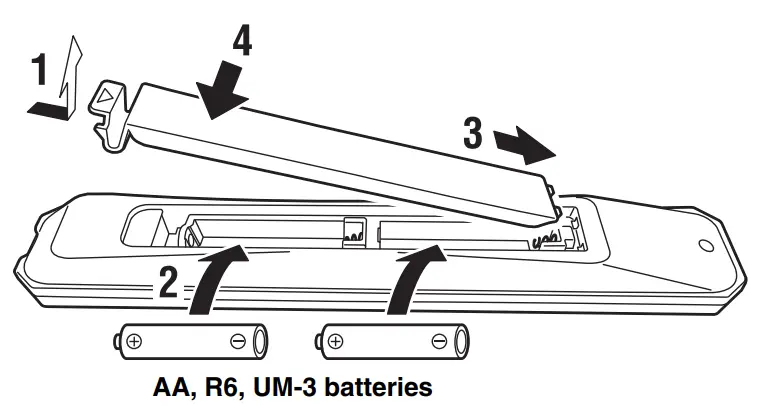 Operation range Point the remote control at the remote control sensor on this unit and remain within the operating range shown below. The area between the remote control and this unit must be clear of large obstacles.
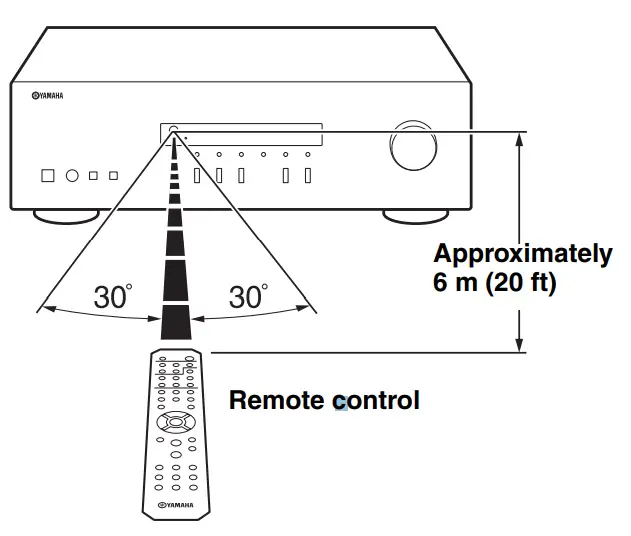 CAUTION
- Be careful not to drop the remote control.
- If the batteries run out, immediately remove them from the remote control to prevent an explosion or acid leak.
- If you find leaking batteries, discard the batteries immediately, taking care not to touch the leaked material. If the leaked material comes into contact with your skin or gets into your eyes or mouth, rinse it away immediately and consult a doctor. Clean the battery compartment thoroughly before installing new batteries.
- Do not use old batteries together with new ones. This may shorten the life of the new batteries or cause old batteries to leak.
- Do not use different types of batteries (such as alkaline and manganese batteries) together. Batteries that look the same may have different specifications.
- Dispose of batteries according to your regional regulations.
- Keep the batteries in a location out of reach of children. Batteries can be dangerous if a child were to put in his or her mouth.
- If you plan not to use this unit for a long period of time, remove the batteries from this unit. Otherwise, the batteries will wear out, possibly resulting in a leakage of battery liquid that may damage this unit.
CONNECTIONS
Connecting speakers and source components
Make sure to connect L (left) to L, R (right) to R, “+” to “+” and “–” to “–”. If the connections are faulty, no sound will be heard from the speakers, and if the polarity of the speaker connections is incorrect, the sound will be unnatural and lack bass. Refer to the owner’s manual for each of your components. Make sure to use RCA cables to connect audio components. CAUTION
- Do not connect this unit or other components to the main power until all connections between components are complete.
- Do not let bare speaker wires touch each other or any metal part of this unit. This could damage this unit and/or the speakers.

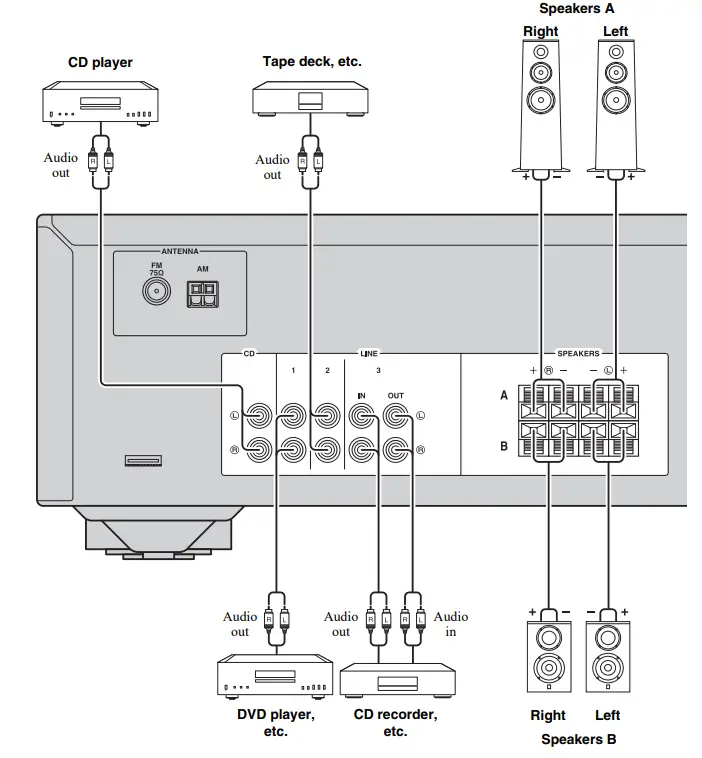
OUT jacks
- The OUT jacks output audio signals of the currently selected input (except when LINE 3 is selected).
- Volume level, tone control and balance settings do not affect the OUT jacks.
Connecting speaker cables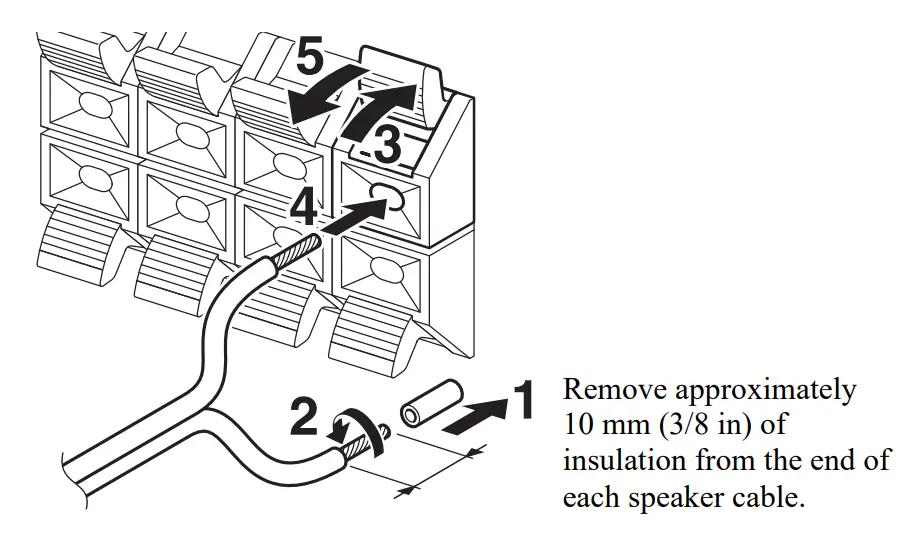 Note When inserting speaker cables into the speaker terminals, insert only the bare speaker wire. If the insulated cable is inserted, the connection may be poor and sound may not be heard. CAUTION Connect the speakers with an impedance as shown below. If you connect speakers with an excessively low impedance, this unit may overheat.
| Speaker connection | Speaker impedance |
| SPEAKERS A or SPEAKERS B | 8 W or higher |
| SPEAKERS A and SPEAKERS B | 16 W or higher (except for North America model) |
| Bi-wiring | 8 W or higher |
Bi-wire connection Bi-wire connection separates the woofer from the combined midrange and tweeter sections. A bi-wire compatible speaker has four binding post terminals. These two sets of terminals allow the speaker to be split into two independent sections. With these connections, the mid and high-frequency drivers are connected to one set of terminals and the low-frequency driver to another set of terminals.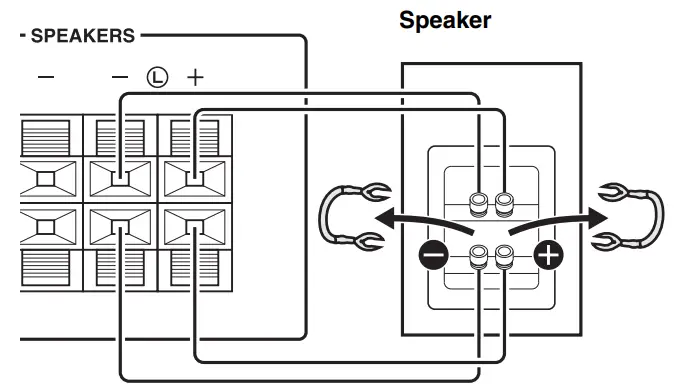 Connect the other speaker to the other set of terminals in the same way. Note When making bi-wire connections, remove the shorting bridges or cables on the speaker. To use the bi-wire connections, press SPEAKERS A and SPEAKERS B so that both SP A and B light up on the front panel display.
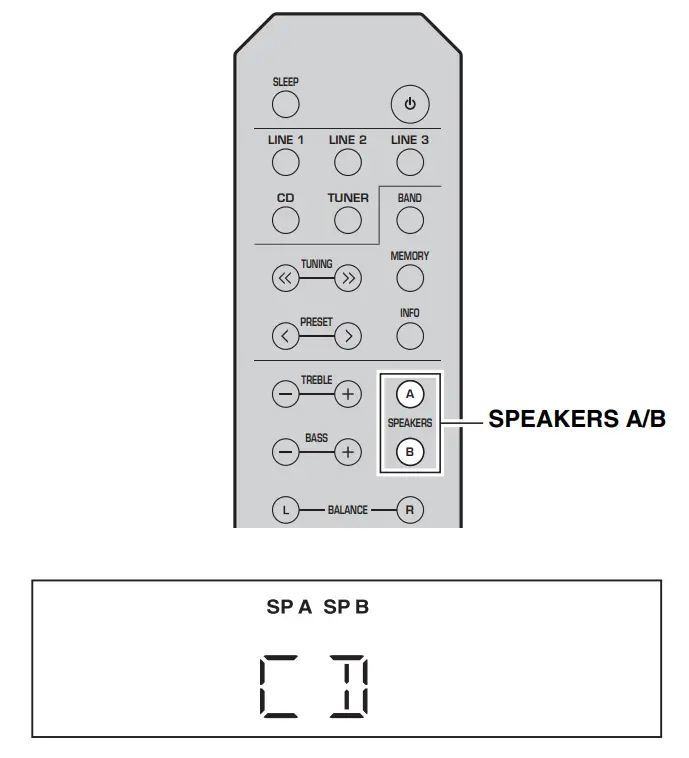 Connecting the FM/AM antennas Connect the supplied FM/AM antenna to this unit. Fix the end of the FM antenna to a wall, and place the AM antenna.
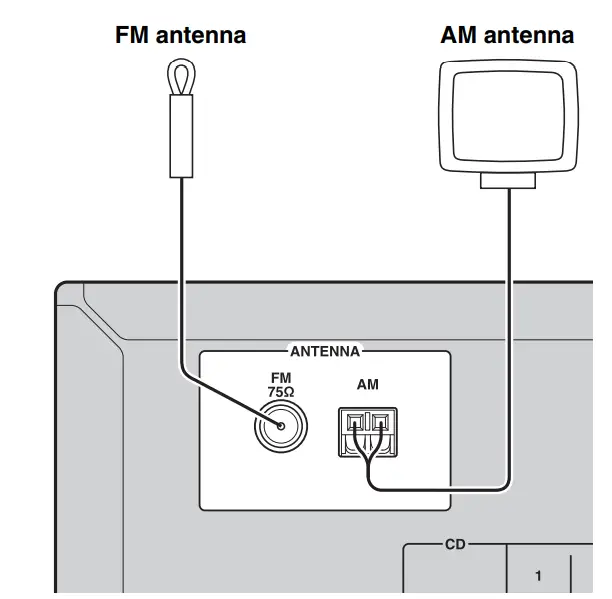 Notes
Notes
- If you experience poor reception quality, install an outdoor antenna.
- Unwind only the length of cable needed from the AM antenna unit.
- The wires of the AM antenna have no polarity.
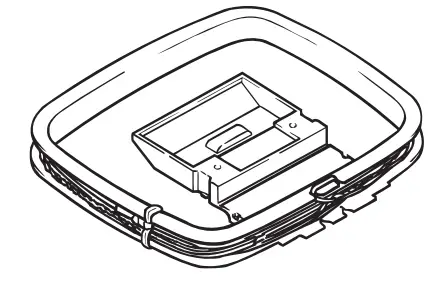
Assembling the AM antenna 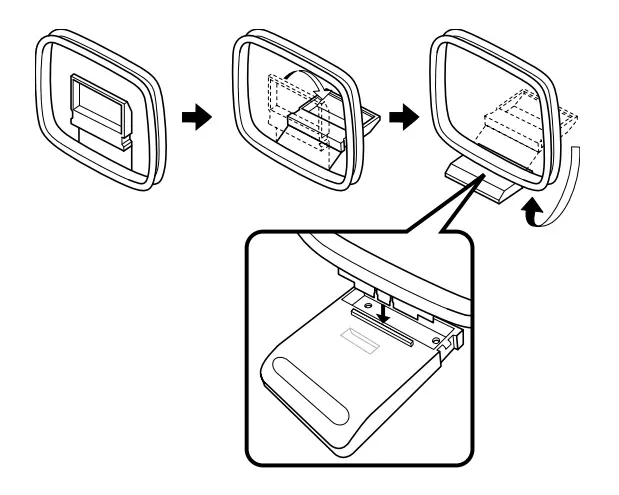 Connecting the wire of the AM antenna
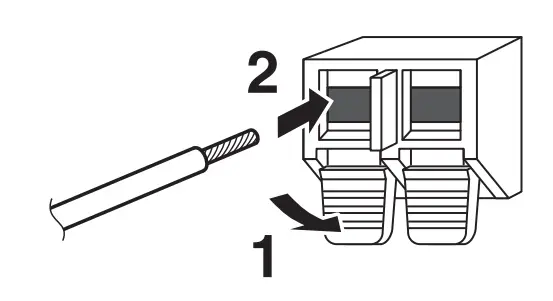 Connecting power cable Plug the power cable into an AC wall outlet after all other connections are complete. CAUTION Only for the General model: Before connecting the power cable, make sure you set the VOLTAGE SELECTOR of this unit according to your local voltage. Improper setting of VOLTAGE SELECTOR may cause fire and damage to this unit.
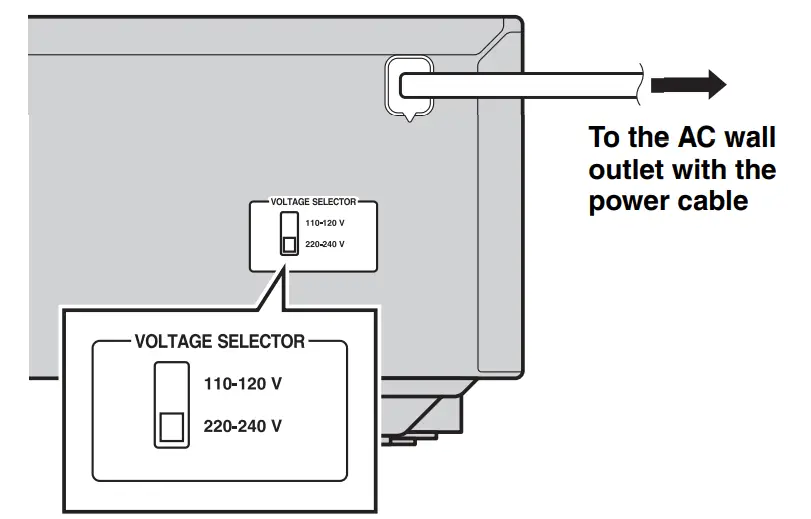
PLAYBACK
Playing a source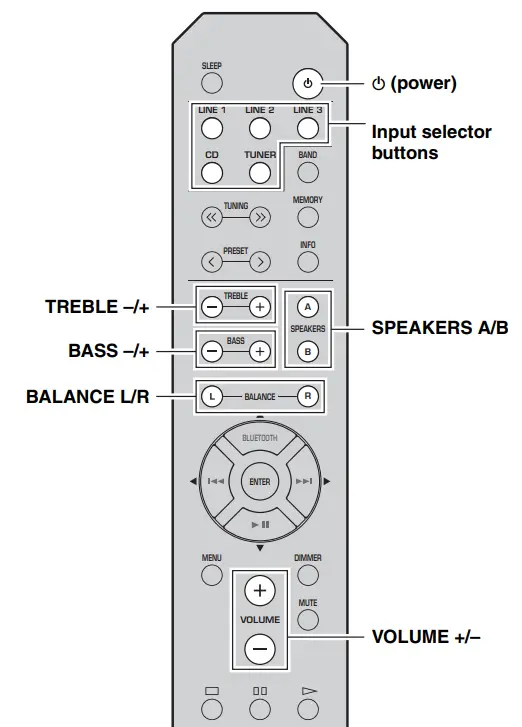
- Press A (power) to turn on this unit.
- Press one of the Input selector buttons to select the desired input source.
- Press SPEAKERS A and/or SPEAKERS B to select the desired speaker(s).
- When one set of speakers is connected using bi-wire connections, or when using two sets of speakers simultaneously (A and B), make sure SP A and SP B are displayed on the front panel display.
- When listening with headphones, turn off the speakers.
- Play the source.
- Press VOLUME +/– to adjust the sound output level. You can adjust the tonal quality by using BASS –/+ and TREBLE –/+, and the left/right sound balance of speakers by using BALANCE L/R (see page 6).
- When finished listening, press A (power) to set this unit to standby mode. Press A (power) to turn this unit on again.
- You can also use the buttons or knobs on the front panel if they have the same or similar names as those on the remote control.
- For recording, see page 5.
Using the sleep timer
Use this feature to automatically set this unit to standby mode after a certain amount of time. The sleep timer is useful when you are going to sleep while this unit is playing or recording a source. Press SLEEP repeatedly to set the time duration until the unit enters standby mode. Each time you press SLEEP, the time duration indicated on the front panel display changes cyclically as shown below.
 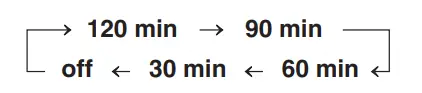 The SLEEP indicator blinks while setting the amount of time for the sleep timer.
 If the sleep timer is set, the SLEEP indicator on the front panel display lights up. To cancel the sleep timer, do one of the following:
- Select “SLEEP OFF”.
- press A (power) to set this unit to standby mode.
LISTENING TO MUSIC FROM YOUR Bluetooth® DEVICE
This unit provides Bluetooth functionality. You can enjoy wireless music playback from your Bluetooth device (mobile phone, digital audio player, etc.). Please also refer to the owner’s manual of your Bluetooth device.
Playing back from your Bluetooth device
You’ll need to perform the pairing operation the first time you use your Bluetooth device with this unit, or if the pairing settings have been deleted. Pairing is an operation that registers the Bluetooth device with this unit. If pairing is not successful, refer to the item “Bluetooth” in “TROUBLESHOOTING” (see page 21). Notes
- Yamaha does not guarantee all connections between this unit and the Bluetooth device.
- This unit can be paired with up to 8 Bluetooth devices. When pairing with the 9th device has succeeded, pairing data for the device with the oldest connection date will be deleted.
- While connecting to the Bluetooth device and performing the pairing with another device, the current Bluetooth connection will be canceled.

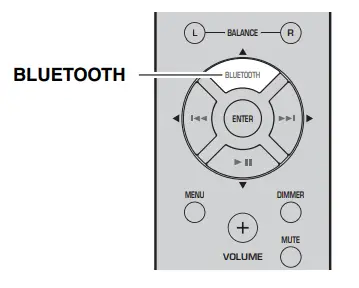
- Press the BLUETOOTH source button for more than 3 seconds to enter pairing mode.
- Pairing mode lasts for 5 minutes.
- In pairing mode, the front panel display of this unit will indicate “PAIRING,” and the Bluetooth indicator will blink. You can also enter pairing mode in either of the following two ways:
- Press and hold down INPUT l or h on this unit for three seconds.
- Select “PAIRING” from the Options menu, and then press ENTER (see page 19).
- Turn on the Bluetooth function on the Bluetooth device. For details refer to the owner’s manual of the Bluetooth device.
- From the Bluetooth connection list of the Bluetooth device, choose this unit (R-S202 Yamaha).
- When pairing has been completed, the front panel display of this unit will indicate “COMPLETED”.
- When the Bluetooth device is connected, the front panel display of this unit will indicate “CONNECTED” and the Bluetooth indicator will light up. If you are asked to enter a password, enter the numeral “0000”.

- Play back music from the Bluetooth device. Notes
- Take care that the volume setting of this unit is not too high. We recommend that you adjust the volume on the Bluetooth device.
- If Bluetooth is selected as the audio source, this unit will automatically turn off when 20 minutes have elapsed without any Bluetooth connection nor any operation performed. You can use the Bluetooth control buttons on the remote control to control playback (see page 7).

Connecting an already-paired device via Bluetooth
Once pairing has been completed, connecting Bluetooth will be easy the next time. Connecting from the Bluetooth device
- In the Bluetooth settings of the Bluetooth device, turn Bluetooth on.
- From the Bluetooth connection list of the Bluetooth device, choose this unit (R-S202 Yamaha). The Bluetooth connection will be established, and the front panel display of this unit will indicate “CONNECTED”. Note Bluetooth connections cannot be established from the Bluetooth device when this unit is on standby. You can use the Bluetooth control buttons on the remote control to control playback (see page 7).
Disconnecting a Bluetooth connection
If any of the following operations are performed while a Bluetooth connection is being used, the Bluetooth connection will be disconnected.
- Switch the audio source other than Bluetooth.
- Press A (power) to set this unit to standby mode.
- Turn off the Bluetooth setting of the Bluetooth device.
FM/AM TUNING
You can tune in to a radio station by specifying its frequency or selecting from registered radio stations. Notes
- The radio frequencies differ depending on the country or region where this unit is being used. Front panel display illustrations shown in this section are based on Europe model.
- Only for Asia and General models: Be sure to set the tuner frequency step according to the frequency spacing in your area before you tune in to a radio station (see page 19).

- Press TUNER to select the tuner as the input source.
- Press BAND to select the FM/AM band.
- Press and hold TUNING to begin tuning. Press
 to tune in to a higher frequency. Press
 to tune in to a lower frequency. When this unit tunes in to a station, the TUNED indicator lights up on the front panel display.
 Note If the tuning search does not stop at the desired station because the station signals are weak, press TUNING repeatedly to tune in to the desired station. You can also use the buttons on the front panel if they have the same or similar names as those on the remote control.
 Note If the tuning search does not stop at the desired station because the station signals are weak, press TUNING repeatedly to tune in to the desired station. You can also use the buttons on the front panel if they have the same or similar names as those on the remote control.
Improving FM reception If the signal from the station is weak and the sound quality is not good, set the FM band reception mode to monaural mode to improve reception. Front panel Press FM MODE, and then make sure the ST indicator is turned off (see page 4). Remote control Enter FM MODE from the Options menu to select MONO (monaural mode) (see page 19).
Using preset functions
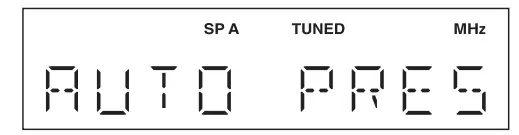
You can register up to 40 radio stations as presets. Once you have registered stations, you can easily tune in to them by recalling the presets. You can automatically register FM stations that have strong signals. If the FM stations you want to store have weak signals, you can register them manually (see page 16). Presetting stations automatically (Only for FM stations) Notes
- If a station is registered to a preset number that already has a station registered to it, the previously registered station is overwritten.
- Only for Europe model: Only Radio Data System broadcasting stations can be preset automatically. FM stations registered as presets using the automatic preset registration feature will be heard in stereo.

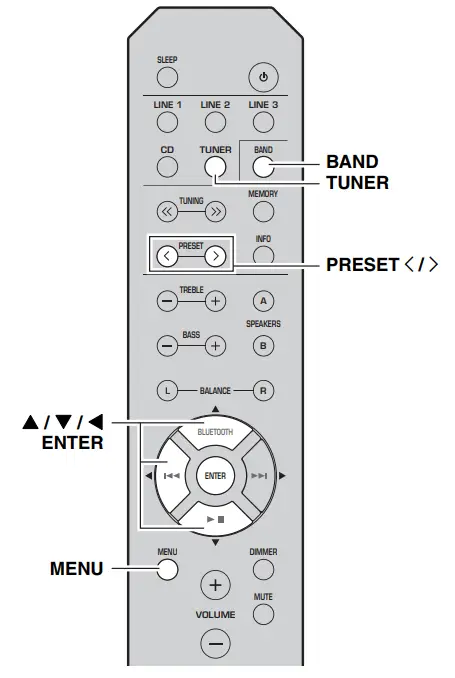
- Press TUNER to select the tuner as the input source.
- Press BAND to select the FM band.
- Press MENU to enter the Option menu. The Option menu for TUNER is displayed (see page 19).
- Press
 to select “AUTO PRESET”, and then press ENTER. This unit starts scanning the FM band about 3 seconds later from the lowest frequency upwards.
- Before scanning begins, you can specify the first preset number to be used by pressing PRESET

- To cancel scanning, press

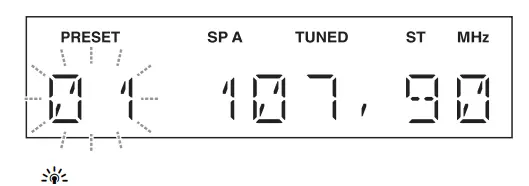
 When a station to preset is found, information is displayed on the front panel display as shown in the illustration above. When scanning is complete, “FINISH” is displayed, and then the display returns to the Options menu. To return the display to its original state, press MENU.
- Before scanning begins, you can specify the first preset number to be used by pressing PRESET
 When a station to preset is found, information is displayed on the front panel display as shown in the illustration above. When scanning is complete, “FINISH” is displayed, and then the display returns to the Options menu. To return the display to its original state, press MENU.
Presetting stations manually You can manually register the desired radio stations.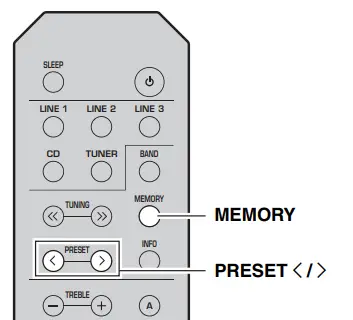
- Tune in to the desired FM/AM station. See page 15 for tuning instructions.
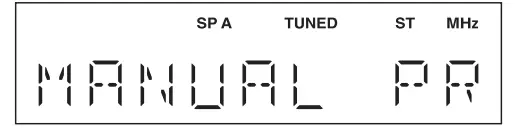
- Press MEMORY. “MANUAL PRESET” is displayed briefly on the front panel display, and then the preset number to which the station will be registered is displayed.
 By holding down MEMORY for more than 2 seconds, you can skip the following steps and automatically register the selected station to an empty preset number (i.e., the preset number following the last preset number used).
 - Press PRESET to select the preset number to which the station will be registered. When you select a preset number to which no station is registered, “EMPTY” is displayed. When you select a preset number to which a station has already been registered, the frequency of the station is displayed.

- Press MEMORY. When registration is complete, the display returns to the original state.
- To cancel the registration, switch input or band, or do not perform any operations for about 30 seconds.
- You can also preset stations manually by pressing buttons on the front panel with the same names as the remote control.
 By holding down MEMORY for more than 2 seconds, you can skip the following steps and automatically register the selected station to an empty preset number (i.e., the preset number following the last preset number used).
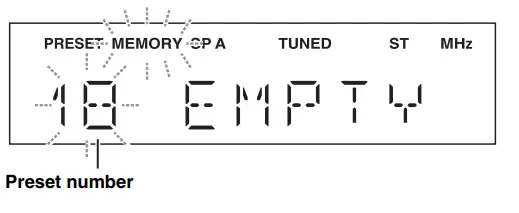
Recalling a preset station You can recall preset stations that were registered by presetting automatically or manually.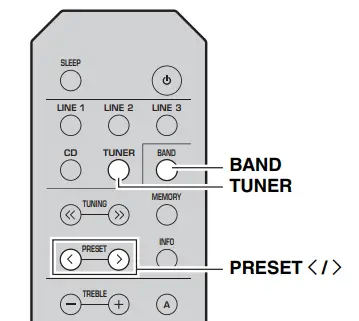
- Press TUNER to select the tuner as the input source.
- Press BAND to select the FM/AM band.
- Press PRESET to select a preset number. Preset numbers to which no stations are registered are skipped.
- If this unit does not have any preset stations, “NO PRESET” is displayed.
- If the station signals that you want to recall are weak, try tuning in to a station manually.
- You can also recall a preset station by pressing PRESET on the front panel.
Clearing a preset station Follow the steps below to clear a preset station.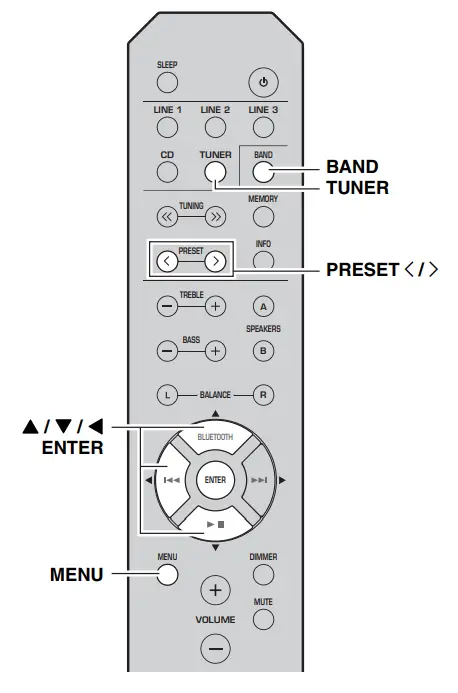
- Press TUNER to select the tuner as the input source.
- Press BAND to select the FM/AM band.
- Press MENU to enter the Option menu. The Option menu for TUNER is displayed (see page 19).
- Press to select “CLEAR PRESET”, and then press ENTER.
- Select the desired preset station number by pressing repeatedly. The selected preset number blinks on the front panel display.

- You can also use PRESET instead.
- To cancel clearing the preset station, press or leave this unit without any operations for about 30 seconds.
- Press ENTER again to confirm. “CLEARED” is displayed on the front panel display. Then, another preset station is shown on the front panel display. When there is no more preset station, “NO PRESET” is displayed, and then the display returns to the Option menu. To return the display to the original state, press MENU.
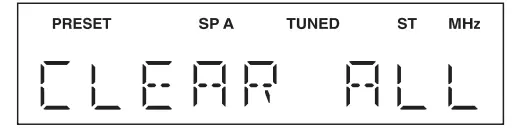
Clearing all preset stations Follow the steps below to clear all preset stations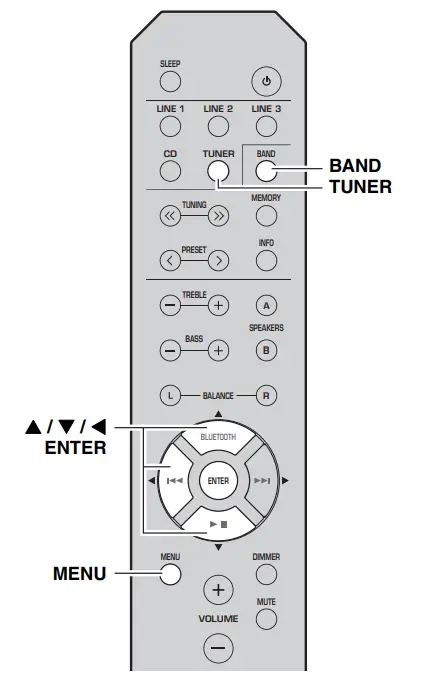
- Press TUNER to select the tuner as the input source.
- Press BAND to select the FM/AM band.
- Press MENU to enter the Options menu. The Option menu for TUNER is displayed (see page 19).
- Press to select “CLEAR ALL PRESET”, and then press ENTER.
 To cancel the operation and return to the Options menu, press
 - Press to select “CLEAR OK”, and then press ENTER.
 To cancel without clearing the presets, select “ CLEAR NO”. When all presets have been cleared, “CLEARED” is displayed, and then the display returns to the Option menu. To return the display to its original state, press MENU.
 To cancel the operation and return to the Options menu, press
 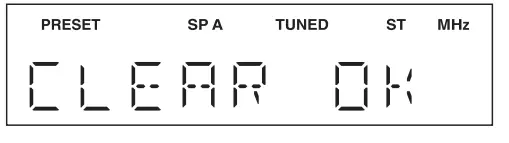 To cancel without clearing the presets, select “ CLEAR NO”. When all presets have been cleared, “CLEARED” is displayed, and then the display returns to the Option menu. To return the display to its original state, press MENU.
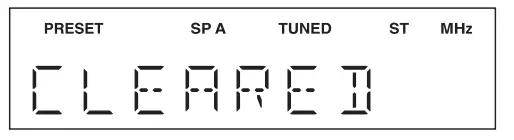
The Options menu allows you to configure various settings for each input source and recall those settings automatically when an input source is selected.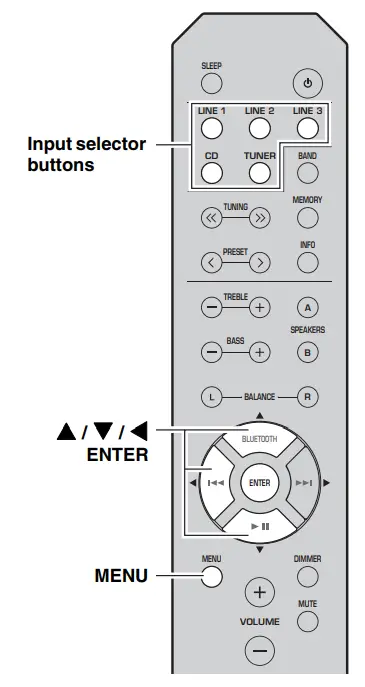
- Press one of the Input selector buttons to select the desired input source.
- Press MENU.
- Press to select the desired menu item, and then press ENTER.
- Press to change the settings, and then press ENTER. To return to the screen where you can select menu items, press .
- To exit the Options menu, press MENU.
Available menu items vary depending on the selected input source.
| Menu item | Description |
| MAX VOLUME (MAX VOL) | Sets the maximum volume level so that the volume will not be accidentally increased above a certain level. Adjustable range: 01 to 99, MAX* |
| INITIAL VOLUME (INIT VOL) | Sets the volume at the time this unit is turned on. When this parameter is set to “OFF”, the volume level used when this unit was set to standby is applied. Adjustable range: OFF*, MUTE, 01 to 99, MAX |
| TUNER STEP (TUNER STP) Only for Asia and General models | Sets tuner frequency step. Choices: AM10/FM100, AM9/FM50* |
| FM MODE | Changes the FM radio wave reception mode (see page 15). Choices: STEREO*, MONO |
| AUTO PRESET (A, PREST) | Automatically detects FM radio stations and registers them as preset stations (see page 15). |
| CLEAR PRESET (C, PREST) | Clears a selected preset station (see page 17). |
| CLEAR ALL PRESET (C,A, PREST) | Clears all preset stations (see page 18). |
| AUTO POWER STANDBY (AUTO STBY) | Sets this unit to standby mode automatically if no operation is performed in the specified time. Choices: OFF, 2H, 4H, 8H*, 12H |
| BLUETOOTH | Enables or disables the Bluetooth function. Choices: OFF, ON* |
| PAIRING | Enters pairing mode (see page 13). |
The default settings are marked with “*”.
TROUBLESHOOTING
Refer to the chart below if this unit does not function properly. If the problem you are experiencing is not listed below or if the instructions below do not help, set this unit to standby mode, disconnect the power cable, and then contact the nearest authorized Yamaha dealer or service center. General
| Problem | Cause | Remedy | See page |
| This unit fails to turn on. | The power cable is not connected or the plug is not completely inserted. | Connect the power cable firmly. | — |
| The impedance setting of the connected speaker is too small. | Use speaker(s) with proper speaker impedance. | 10 | |
| The protection circuitry has been activated because of a short circuit, etc. | Check that the speaker wires are not touching each other and then turn the power of this unit back on. | 9 | |
| This unit has been exposed to a strong external electric shock (such as lightning or strong static electricity). | Set this unit to standby mode, disconnect the power cable, plug it back in after 30 seconds, then use it normally. | — | |
| No sound | Incorrect input or output cable connections. | Connect the cables properly. If the problem persists, the cables may be defective. | 9 |
| No appropriate input source has been selected. | Select an appropriate input source by pressing one of the Input selector buttons on the remote control. | 12 | |
| The SPEAKERS A/B switches are not set properly. | Turn on the corresponding SPEAKERS A or SPEAKERS B. | 12 | |
| Speaker connections are not secure. | Secure the connections. | 9 | |
| Output has been muted. | Deactivate the mute function. | 6 | |
| The MAX VOL or INITIAL VOLUME setting is set too low. | Set the setting to a higher value. | 19 | |
| The component corresponding to the selected input source is turned off or is not playing. | Turn the component on and make sure it is playing. | — | |
| The sound suddenly goes off. | The protection circuitry has been activated because of a short circuit, etc. | Check that the speaker wires are not touching each other and then turn the power of this unit back on. | 9 |
| This unit has become too hot. | Make sure the openings on the top panel are not blocked. | — | |
| The SLEEP function has engaged and the unit has entered standby mode. | Cancel the sleep timer. | 12 | |
| The AUTO POWER STANDBY has set this unit to standby mode. | Change the AUTO POWER STANDBY setting to a longer setting or OFF from the Option menu by pressing MENU. | 19 | |
| Only the speaker on one side can be heard. | Incorrect cable connections. | Connect the cables properly. If the problem persists, the cables may be defective. | 9 |
| Incorrect setting for the BALANCE L/R setting. | Set the BALANCE L/R setting to the appropriate position. | 6 | |
| There is a lack of bass and no ambience. | The + and – wires are connected in reverse at the amplifier or the speakers. | Connect the speaker wires to the correct + and – phase. | 9 |
| A “humming” sound can be heard. | Incorrect cable connections. | Connect the audio plugs firmly. If the problem persists, the cables may be defective. | 9 |
| The volume level cannot be increased, or the sound is distorted. | The component connected to the LINE 3 IN/OUT jacks of this unit is turned off. | Turn on the power of the component. | — |
| Problem | Cause | Remedy | See page |
| The sound is degraded when listening with headphones connected to a CD player connected to this unit. | This unit has been set to standby mode. | Turn on the power of this unit. | 12 |
| The remote control does not work nor function properly. | Wrong distance or angle. | The remote control will function within a maximum range of 6 m (20 ft) and no more than 30 degrees off- axis from the front panel. | 8 |
| Direct sunlight or lighting (from an inverter type of fluorescent lamp, etc.) is striking the remote control sensor of this unit. | Reposition this unit. | — | |
| The batteries are weak. | Replace all batteries. | 8 | |
| This unit responds to the remote control for a Yamaha AV receiver. | The remote controls for both this unit and the AV receiver have been programmed with the same remote control code. | Change the remote control ID of the Yamaha AV receiver. For more information, please refer to the owner’s manual for the AV receiver. | — |
| Your CD player cannot be operated with the remote control. | The remote control does not support the CD player. | Refer to the owner’s manual supplied with the CD player. | — |
| “OVER HEAT” appears on the front panel display. | This unit has become too hot. | Make sure the openings on the top panel are not blocked. | — |
| “CHECK SP” appears on the front panel display. | Speaker cables got shorted out. | Twist bare wires of speaker cables firmly, and then connect to this unit and speakers properly. | — |
Bluetooth
| Problem | Cause | Remedy | See page |
| Cannot make this unit paired with the Bluetooth device. | The Bluetooth device does not support A2DP. | Perform pairing operations with a device which supports A2DP. | — |
| A Bluetooth adaptor, etc. that you want to pair with this unit has a password other than “0000”. | Use a Bluetooth adaptor, etc. whose password is “0000”. | — | |
| This unit and the Bluetooth device are too far apart. | Move the Bluetooth device closer to this unit. | — | |
| There is a device (microwave oven, wireless LAN, etc.) outputs signals in the 2.4 GHz frequency band nearby. | Move this unit away from the device that is emitting radio-frequency signals. | — | |
| In the option menu, BLUETOOTH is set to OFF. | In the option menu, set BLUETOOTH to ON. | 19 | |
| Can’t establish a Bluetooth connection. | This unit is not registered on the connection list of the Bluetooth device. | Perform pairing operations again. | 13 |
| In the option menu, BLUETOOTH is set to OFF. | In the option menu, set BLUETOOTH to ON. | 19 |
| Problem | Cause | Remedy | See page |
| No sound is produced or the sound is interrupted during playback. | The Bluetooth connection of this unit with the Bluetooth device is disconnected. | Perform Bluetooth connection operations again. | 13 |
| This unit and the Bluetooth device are too far apart. | Move the Bluetooth device closer to this unit. | — | |
| There is a device (microwave oven, wireless LAN, etc.) outputs signals in the 2.4 GHz frequency band nearby. | Move this unit away from the device that is emitting radio-frequency signals. | — | |
| The Bluetooth function of the Bluetooth device is off. | Turn on the Bluetooth function of the Bluetooth device. | — | |
| The Bluetooth device is not set to send Bluetooth audio signals to this unit. | Check that the Bluetooth function of the Bluetooth device is set properly. | — | |
| The pairing setting of the Bluetooth device is not set to this unit. | Set the pairing setting of the Bluetooth device to this unit. | — | |
| The Bluetooth device’s volume is set to the minimum. | Increase the volume level. | — |
FM reception
| Problem | Cause | Remedy | See page |
| FM stereo reception is noisy. | The particular characteristics of the FM stereo broadcasts being received may cause this problem when the transmitter is too far away or the antenna input is poor. | Check the antenna connections. Try using a high-quality directional FM antenna. | 11 |
| Switch to monaural mode. | 15 | ||
| There is distortion, and clear reception cannot be obtained even with a good FM antenna. | There is multipath interference. | Adjust the antenna position to eliminate the multipath interference. | — |
| The desired station cannot be tuned in automatically. | The signal is too weak. | Try using a high-quality directional FM antenna. | 11 |
| Try tuning manually. | 15 | ||
| “NO PRESET” is displayed. | No preset stations are registered. | Register stations you want to listen to as preset stations before operation. | 15 |
AM reception
| Problem | Cause | Remedy | See page |
| The desired station cannot be tuned in automatically. | The signal is weak or the antenna connections are loose. | Tighten the AM antenna connections and orient it for the best reception. | — |
| Try tuning manually. | 15 | ||
| There are continuous crackling and hissing noises. | The noises may result from lightning, fluorescent lamps, motors, thermostats or other electrical equipment. | Try using an outdoor antenna and a earth ground. This will help somewhat, but it is difficult to eliminate all noise. | — |
| There are buzzing and whining noises. | A TV set is being used nearby. | Move this unit away from the TV set. | — |
| “NO PRESET” is displayed. | No preset stations are registered. | Register stations you want to listen to as preset stations before operation. | 16 |
SPECIFICATIONS
AUDIO SECTION
- Minimum RMS output power (8 Ω, 40 Hz to 20 kHz, 0.2% THD) [North America, General, China, Korea, Australia and Europe models]:100 W + 100 W [Asia model] :85 W + 85 W
- Dynamic power per channel (8 Ω/6 Ω/4 Ω/2 Ω, IHF):125 W/150 W/165 W/180 W
- Maximum power per channel (4 Ω, 1 kHz, 0.7%, THD) [Europe model]:115 W
- Maximum effective output power (8 Ω, 1 kHz, 10%, THD) [General model]:140 W [Asia model]:125 W
- Input sensitivity/Input impedance (1 kHz, 100 W/8 Ω)CD, etc:500 mV/47 kΩ
- Output level/Output impedance CD, etc. (Input 1 kHz, 500 mV) LINE3 OUT: 500 mV/2.2 kΩ CD, etc. (Input 1 kHz, 500 mV, 8 Ω) PHONES : 470 mV/470 Ω
- Frequency response CD, etc. (20 Hz to 20 kHz):0 ± 0.5 dB CD, etc. (10 Hz to 100 kHz):0 ± 3.0 dB
- Total harmonic distortion CD, etc. to SPEAKERS (20 Hz to 20 kHz, 50 W/8 Ω): 0.2% or less
- Signal-to-noise ratio (IHF-A) CD, etc. (500 mV input shorted) :100 dB or more
- Residual noise (IHF-A) : 70 µV
- Tone control characteristics BASS Boost/Cut (50 Hz) :± 10 dB Turnover frequency .:170 Hz TREBLE Boost/Cut (20 kHz):± 10 dB Turnover frequency :3.0 kHz
Bluetooth SECTION
- Bluetooth version: Ver. 4.1+EDR
- Supported profile: A2DP, AVRCP
- Compatible codec :.SBC, AAC
- Maximum communication distance:10m (without interference)
- Wireless output : Bluetooth Class 2
- Supported contents protection: SCMS-T method
FM SECTION
- Tuning range [North America model]:87.5 to 107.9 MHz [General and Asia models] :87.5 to 107.9 MHz/87.50 to 108.00 MHz [China, Korea, Australia and Europe models: 87.50 to 108.00 MHz
- 50 dB quieting sensitivity (IHF-A, 1 kHz, 100% MOD.) Mono :3 µV (20.8 dBf)
- Signal-to-noise ratio (IHF-A) Mono/Stereo: 71 dB/70 dB
- Harmonic distortion (1 kHz) Mono/Stereo :0.4%/0.4%
- Antenna Input:75 Ω, unbalanced
AM SECTION
- Tuning range [North America model]:530 to 1710 kHz [General and Asia models] :530 to 1710 kHz/531 to 1611 kHz [China, Korea, Australia and Europe models] …. 531 to 1611 kHz
GENERAL
- Power supply [North America model] :AC 120 V, 60 Hz [General model]:AC 110-120/220-240 V, 50/60 Hz [China model] :AC 220 V, 50 Hz [Korea model] :AC 220 V, 60 Hz [Australia model]:AC 240 V, 50 Hz [Europe model]:AC 230 V, 50 Hz [Asia model] :AC 220-240 V, 50/60 Hz
- Power consumption [North America, General, China, Korea, Australia and Europe models] :175 W [Asia model]:140 W
- Standby power consumption [North America, China, Korea, Australia, Europe and Asia models] : 0.3% or less Dimensions (W × H × D): 435 × 141 × 322 mm (17’1/8″ × 5’1/2″ × 12’5/8″)
- Weight :6.7 kg (14.8 lb) * The contents of this manual apply to the latest specifications as of the publishing date. To obtain the latest manual, access the Yamaha website then download the manual file.
Bluetooth®
The Bluetooth® word mark and logos are registered trademarks owned by Bluetooth SIG, Inc., and any use of such marks by Yamaha Corporation is under license. Other trademarks and trade names are those of their respective owners. Handling Bluetooth communications
- The 2.4 GHz band used by Bluetooth-compatible devices is a radio band shared by many types of equipment. While Bluetooth-compatible devices use a technology minimizing the influence of other components using the same radio band, such influence may reduce the speed or distance of communications and in some cases interrupt communications.
- The speed of signal transfer and the distance at which communication is possible differs according to the distance between the communicating devices, the presence of obstacles, radio wave conditions, and the type of equipment.
- Yamaha does not guarantee all wireless connections between this unit and devices compatible with Bluetooth function.
Yamaha Global Site http://www.yamaha.com/
Yamaha Downloads http://download.yamaha.com/
10-1 Nakazawa-cho, Naka-ku, Hamamatsu, 430-8650 Japan
FAQS
This amp can safely power only 2, 8-ohm speakers at once. if you tried to connect 4, 8-ohm speakers at once you would be driving a 4-ohm load and this amp doesn’t deal with 4-ohm loads very well. It’s an 8ohm amp.
There are 3 classes of BT devices. The ranges are under 10m (Class3); 10m (Class2) and 100m (Class3). The range you get between two devices will be the range of the least powerful device. If that’s a cell phone streaming music, expect less than ten meters. If it is a computer with a Class2 BT radio, expect a solid ten meters. But the only way you will get more than ten meters (30 feet) reliably, is if both devices are Class 3. And portable devices rarely are.
YES:
You can use a speaker-to-line level adapter. Connect to the B speakers and use the RCA plugs on the adapter to connect to the subwoofer.
Long answer: the frequency response of an audio product is drawn on an x-y coordinate plot with the “y” range as the sound pressure (or volume) and the “x” range as the frequency ( from 0 to some maximum Hertz…20,000 or more). Graphs on this plot often look like an upside-down cereal bowl. The two “corners” of the bowl, where the bottom meets the sides, are where the sound pressure (volume) of that frequency begin to drop off dramatically. The graph never has two “square” corners. Those two corners are always rounded. And the sides are never straight up and down…they always slope.
The frequency range is the flat part of that upside-down bowl. The maximum and minimum points are taken from each of the two sides of the bowl where the sound pressure (volume) value is a pre-determined percentage of the average sound pressure ( along the “flat” part of the bowl).
So…to answer the question, the frequencies below that 40Hz value probably exist in the signal…but the volume may be so low that for you to provide enough amplification to hear (or feel, in the case of 40Hz and below) may be cost prohibitive and may introduce enough noise in the replay that you might find it objectionable.
The minimum and maximum frequency response values are important to the shopper because they help you select the speakers. Why spend more for a set of speakers that have a range of 20-20k, when the usable frequency of the receiver is 40-20k?
No, it does not transmit to speakers. You would have to connect to the speaker outputs and a Bluetooth transmitter.
It does receive a signal from your phone or device as input and it works quite well.
connect the audio out from the TV to one of the “line in” inputs on the receiver.
As an authorized USA dealer the manufacturer provides us access only to 120V products. This is a fantastic-sounding receiver. World Wide Stereo is 37 years old and a very proud Yamaha dealer.
Only if you have a converter to bring the voltage down to 110
it should as most metal buildings don’t reject FM signals
not plugd in
Curious why the question. If an amplifier is rated for 100 watts into 8 ohms, then it will probably deliver 200 watts into 4 ohms. The specs say it delivers 125W @8 ohms. They also say the High Dynamic Power for 8/6/4/2 ohms is 125/150/165/180w. Hope that helps.
As others have answered: you have to ensure that Bluetooth sharing is turned “on” on both devices / remote; the device should then request confirmation of pairing…
Built-in. Just follow the instructions in the manual to set up or pair.
It is not connected to the cable box.
The “American” model is 120 v only, All the other models are 220. Mine is 120 v only
yes, you can hook equalizer.
There are two separate paired inputs for sets of speakers. So you end up with an A set and a B set. Both can play simultaneously. They are pinch wire connections so you are limited on the number by how many wires sets you could effectively enter into the small clamp aperture.
This unit comes with an FM antenna that snaps onto the back and hangs the other end to the wall behind it.


