ARISTON INSTANTANEOUS ELECTRIC WATER HEATER
GENERAL SAFETY INSTRUCTION
- This manual is an integral part of the product. Keep it with care with the appliance, and hand it on to the next user/owner in case of change of property.
- Read the instructions and warning in this manual carefully, they contain important informa-tion regarding safe installation, use and maintenance.
- The appliance must be installed and commissioned by a qualified technician in accordance with local legislation and health and safety regulations. All power circuits must be shut off before you open the terminal block.
- DO NOT use the appliance for any other than its specified use. The manufacturer is not liable for damage resulting from improper or incorrect use or failure to observe the instructions given in this manual.
- Incorrect installation can result in damage to property and injury to persons and animals; the manufacturer is not liable for the consquences.
- DO NOT leave the packaging materials (staples, plastic bags, expanded polystyrene, etc.) within the reach of children – they can cause serious injury.
- This appliance can be used by children aged from 3 years and above and persons with reduced physical,sensory or mental capabilities or lack of experience and knowledge if they have been given supervision orinstruction concerning use of the appliance in a safe way and understand the hazards involved. DO NOT permit chil-dren to play with the appliance. User cleaning and maintenance may not be done by unsupervised children.
- Any repairs, maintenance, plumbing and electrical hookup must be done by qualified tech-nicians using original spare parts only. Failure to observe the above instructions can compro-mise the safety of the appliance and relieves the manufacturer of any liability for the conse-quences.
- The hot water temperature is regulated by a thermostat which also acts as a safety device to prevent dangerous overheating.
- The electrical hookup must be done as indicated in this manual.
- If the appliance is equipped with a power cord, the latter may only be replaced by an author-ised service centre or professional technician.
- Make sure to drain the appliance when it is out of service or in an area subject to subzero temperatures.
- Do not leave flammable materials in contact with or in the vicinity of the appliance.
- DO NOT touch the appliance when barefoot or if any part of your body is wet
- Before using the device and after routine or extraordinary maintenance, we recommend fill-ing the appliance’s tank with water and draining it completely to remove any residual impuri-ties.
- Do not place anything under the water heater which may be damaged by a leak.
- Failure to observe this warning can result in injury, which may even be fatal in certain circumstances
- Failure to observe this warning can msult in damagae or injury, even to property; plants and animals
GENERAL SAFETY STANDARDS
| Ref. | Warning | Risk | Symbol |
| 1. | Do not open the appliance or remove from its installation | Electrocution hazard due to the presence of live electrical equipment. Personal injury -overheated burns caused by components and wounds caused by sharp edges |
|
| 2. | Do not start or stop the appliance by inserting/pulling the power plug | Electrocution hazard due to damage to the power cord, its plug or the socket | |
| 3. | Do not damage the power cord | Electrocution hazard due to bare live wires | |
| 4. | Do not leave objects on the appliance | Personal injury due to objects falling off the appliance as a result of vibration | |
| Damage to the appliance or other property due to objects falling off the appliance as a result of vibration | |||
| 5. | Do not climb onto the appliance | Personal injury due to falling off the appliance | |
| Damage to the appliance or other property due to the appliance itself detaching from its mounting | |||
| 6. | Do not clean the appliance without having first switched it off, pulled its power plug or shut off its power switch | Electrocution hazard due to the presence of live electrical equipment | |
| 7. | Install the appliance to a solid wall which is not subject to vibration | Danger of the appliance falling off the wall due to structural collapse, or noisy operation | |
| 8. | Make the electrical hookup with cables of adequate cross-section | Danger of fire due to overheating of undersized electrical wires | |
| 9. | Restore all safety and control functions after working on the appliance and check that they are operational before returning it to service | Damage or blocking of the appliance due to improper control | |
| 10. | Drain all components containing hot water, using the bleed cocks, before handling them | Danger of burns | |
| 11. | Descale the system as given in the products “safety sheet”; when doing so, ventilate the room,wear safety clothing, make sure not to mix products, and protect the appliance itself and any adjacent objects | Personal injury due lo contact of the skin and eyes with add, inhalation or ingestion of noxious chemicals | |
| Damage to the appliance and adjacent objects due to corrosion by acid | |||
| 12. | Do not use insecticides, solvents or aggressive detergents to clean the appliance | Damage to plastic and painted parts and assemblies |
TECHNICAL CHARACTERISTICS
| PRODUCT INFORMATION | |||
| Power | 3.5kW | 3.5-4.1kW | 5.5-6.5KW |
| Voltage | 220 | 220-240 | 220-240 |
| Phases | Mono | Mono | Mono |
| Installation | Over sink | ||
| Construction | Open Outlet | ||
| Model | Refer to name plate | ||
| Frequency | 50/60 Hz | 50/60 Hz | 50/60 Hz |
| Electric current | 15.9 A | 17.1 A | 27.1 A |
| Water Protection | IP25 | ||
| Pipe Connection | 1/2″ BSP | ||
| Minimum Water Pressure | 20 kPa (0.2 bar) | ||
| Qelec (kwh) | 2.119 | 2.119 | 2.119 |
| Load Profile | XXS | XXS | XXS |
| Lwa (dB) | 15 dB | ||
| ηwh | 40% | ||
| Rated Volume (l) | 0,35 l | 0,35 l | 0,35 l |
| Weight | 1,350 g | 1,350 g | 1,350 g |
| Dimensions | 183 x 290 x113 mm | ||
The product should be connected only to a supply with the relevant system impedance no more than 0.237 ohm.
Restrictions to connection may be imposed by the supply authority on the use of equipment in the actual relevant system impedance at the interface point on the user’s premise exceeds 0.237 ohm.
This appliance is conforming with the international electrical safety standards IEC 60335-1 and IEC 60335-2-35. When present, The CE marking of the appliances
- LVD Low Voltage Directive: EN 60335-1, EN 60335-2-35, EN 60529, EN 62233, EN 50106.
- EMC Electro-Magnetic Compatibility: EN 55014-1, EN 55014-2, EN 61000-3-2, EN 61000-3-3, EN 61000-3-11 and EN 61000-3-12.
- ERP Energy related Products: Eu812, Eu814, EN50193-1-2013
Installation Instructions
THE GUARANTEE IS SUBJECT TO CORRECT INSTALLATION.
The instant water heater is a novel appliance designed to supply hot water instantly while conserving energy. When the pressure switch is on, then the heating element heats the flowing water.
General information
- The appliance must be installed and commissioned by a qualified technician in accordance with established regulations and local health and safety regulations.
- It is recommended that a residual current device(ELCB)will be incorporated in the circuit.
- Installation of water pipeline must be completed prior to the installation of the heater and must be checked to assure that there are no water leaks.
- This appliance requires water pressure of minimum 20 kPa (0.2 bar).
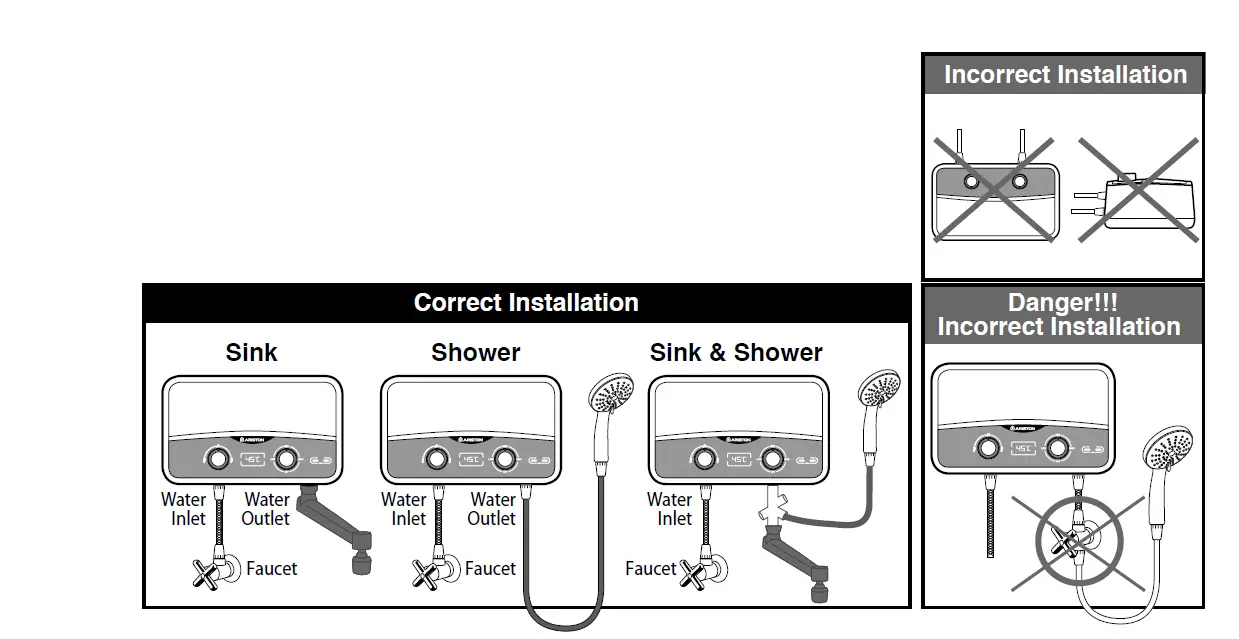
- WARNING! The outlet (with red ring) of the product acts as a vent and must not be connected to anything other than the hose and showerhead supplied.
- Without supervision the use of the appliance by young children or infirm person is forbidden.Playing with the unit by young children is forbidden.
Installation of sink& shower unit 3.5 kW – 6.5 kW
- Remove cover in order to connect the electric cable to the terminal block inside the unit.(unscrew 2 screws)
- The unit should have a separate electric cable in the switch board (see table 2)
- Connect the appliance to the water network and check if there are no leaks as soon as the unit is connected. Use the hoses supplied with the appliance, do not re-use old hoses
- After connecting the water inlet to the unit, connect the electric cable to the designed terminal blocks.
- The appliance must be earthed and the earth cable (show with a letter in the drawing) is fixed to the terminal marked by the symbol .
- The unit must be connected to the electric supply by a 2-pole switch
- Before performing any operations, disconnect the appliance from the electricty mains using the external switch then connect the power to cable to the appliance.
- Connect the electric cable with the designated clamp.
- Return the cover (2 screws)

For effective use
- Turn the water faucet (before inlet pipe) slowly until the lamps in the appliance switch “ON”. Wait 15-20 seconds until hot water starts to flow. For colder water, turn the faucet increasing the water inflow gradually until you receive the desired water temperature. For hotter water, turn the faucet decreasing the water inflow.
- Heating setting
- In AURES SLIM FLOW model, the user can manage the temperature selecting Heating knob and regulating the water flow through water flow knob. The water flow knob allows to regulate the water flow reaching the desired water temperature. Turning left the water flow knob, the water flow increases and temperature decreases. Turning right the water flow knob, the water flow decreases and temperature increases. In AURES SLIM DISPLAY, in addition to AURES SLIM FLOW, the user will see visualized on the product the outlet water temperature
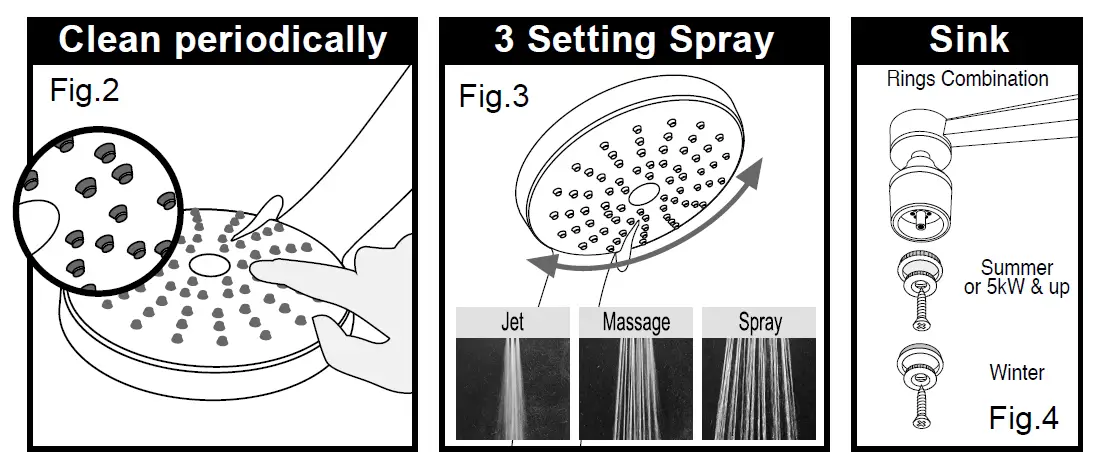
- The spray outlet should be cleaned periodically by unscrewing it from the showerhead and clean thoroughly. (Fig.2, Fig.4)
- In order to achieve maximum efficiency from the unit please grip the showerhead and twist it in either direction to increased or decreased flow – 3 positions (Fig.3). For sink unit – Install open rings in summer and blind rings in winter (inner ring should remain always open) (Fig.4).
- The unit operates automatically by opening the water faucet and shut off when closing the water supply
This product conforms to Directive WEEE 2012/19/EU.
The symbol of the crossed waste paper basket on the ap pliance indicates that at the end of its working life the pro duct should be disposed of separately from normal domestic household rubbish, it must be disposed of at a waste dispo sal center with dedicated facilities for electric 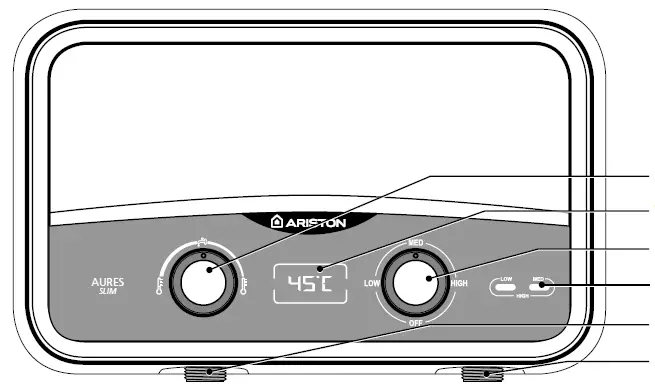
- Flow Rate Knob (Flow &Display model)
- Temp. Displa (Display model)
- Power Knob
- Power Led
- Water Inler
- Water Outlet
| Feature | SLIM | SLIM FLOW | SLIM DISPLAY |
| Water Inlet | x | x | x |
| Water Outlet | x | x | x |
| Power LED | x | x | x |
| Power Knob | x | x | x |
| Flow rate Knob | x | x | |
| Temperature Display | x |
Table 2
| Power | kW Loaded | Heating Setting | Recomended Cable Size | Recomended Fuse Rating | ||
| 220V | 230V | 240V | ||||
| 3.5kW | 3.5 | — | — | 1.5+2.0 kW | 1.5 mm2 | 16 A |
| 3.5kW | 3.5 | — | 4.1 | 1.5+2.0 kW | 2.5 mm2 | 25 A |
| 5.5kW | 5.5 | — | 6.5 | 2.2+3.3 kW | 4 mm2 | 32 A |
| • Operating water pressure 20-800 kPa (0.2-8 bar) • Water pressure operating power switch • Sytandard 1/2″Ø compression inlet connection • Top-left and right cable entry • Bottom-left water entr | ||||||
INSTALLATION
Up to 3.5 kW (One Phase)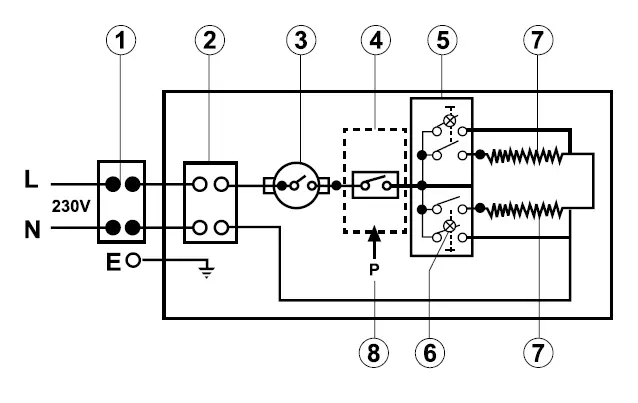
- Multi-pole switch
- Terminal block
- Thermostat
- Microswitch
- Switches
- LED Light
- Heating elements
- Pressure switch
Troubleshooting
| SYMPTOM | POSSIBLE CAUSE | SOLUTION |
| Water not hot enough | Too much water fowing through the heater Reduction In tha ambient temperature
Water Pressure below of 100 kPa Electrical Malfunction | Reduce the fow rate of the water via the outlet tap. Switch to higher temperature setting.
Check if the mains stop valve is fully open and that the there are no other restriction in the supply line. Have the Heater unit check by a qualified electrician or contact your local authorised distributor. |
| Water too hot | Not enough Water fowing through the heater Increase in the ambient temperature | lncrease the fow rate via the outlet tap Switch to lower temperature setting |
| Heater switch Off during use | Interruption of mains electrical supply
ELSD trip, possible earth leakage | Check incoming power supply, MCB, switches and supply cabling. Check earth leakage and reset ELSD If problem persists, call your local authorised distributor for assistance. |
| Water ceases to fow | Blockage of spray head, twisted or blocked fexible shower hose.
No water supply. | Clean or replace spray head, check for free passage of water through hose. Replace as necessary. Check water supply, stop valve Open? and no blockage. |
| Water temperature varies from hot to cold during use | Water pressure has dropped below min. level. | Increase hot water supply, |
| No hot water despite fully open hot water faucet | No electrical power
The activation fow rate needed to turn on the heating element has not been reached. | Check the circuit breaker and check voltage at the wiring block. Clean filter screen • Turn circuit breaker off • Open hot valve to release pressure from the unit. • Turn circuit breaker on. |


