
![]()
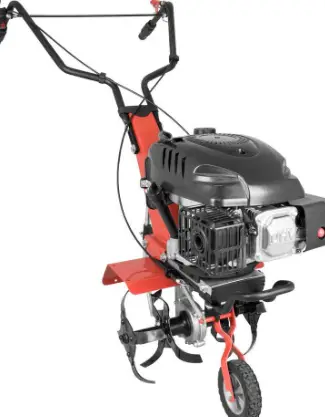
Gude GF 384 Garden Cutter
original instructions
Introduction
To enjoy your new GARDEN CUTTER as long as possible, please read carefully the Operating Instructions and the attached safety instructions before putting the appliance into operation. We also recommend keeping the Operating Instructions for future reference.
We reserve making technical changes to improve the appliance as part of the continuous product development.
This document represents the original Operating Instructions.
Any reprints, even partial, are subject to approval.
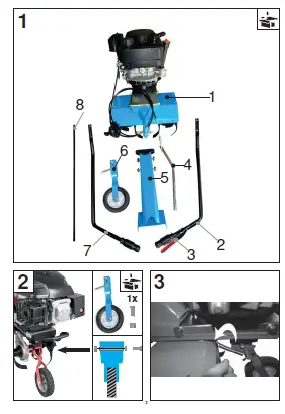
Scope of delivery (1)
- Truck
- handle (drive lever)
- Drive lever
- Depth limiter
- Semibeam
- Rotary wheel
- handle (ON/OFF, speed)
- Cross brace
Warranty
A warranty period of 12 months applies to commercial use and 24 months apply to private use and commences on the day of purchase of the device.
Warranty applies exclusively to failures due to defective material or workmanship. An original sale slip with indication of date of sale must be presented in case of claiming for the warranty rights.
Warranty does not cover unprofessional use such as device overload, violent use, damage caused by third party or foreign materials, failure to comply with operations and assembly manual, and normal wear and tear.
General safety instructions
It is necessary to read the whole guide for operation before the first use of the machine. In case of any doubts associated to the connection and operation of the machine contact the producer (service department).
TO MAINTAIN THE HIGH LEVEL OF SAFETY PLEASE OBSERVE THE FOLLOWING INSTRUCTIONS STRICTLY:
ATTENTION!
- Pay attention to environmental conditions that you work in. The engine driven machine starts producing toxic gases after engine activation. These gases could be invisible and without any smell. Therefore you must never work with the machine in closed or badly ventilated areas. Provide good illumination for your work. If you cut in wet conditions, on snow or ice, in slopes or in unlevelled terrain, ensure good stability.
- Do not let foreign persons accessing to the machine. Keep visitors and by-standers, especially children, sick or weak persons, in a safe distance from your workplace. Pay attention that other persons may not touch the machine.
- Ensure safe storage of tools. Machine that are not in use store in a dry place at certain height if possible or lock them so that they are not accessible to other persons.
- Use a proper tool for every work. Do not use e.g. small machines or accessories for works that should in fact be performed using heavy machines. Use machines exclusively for purposes which they were designed for.
- Care for suitable wear. Your clothing should be purposeful and in may not constrain you in work.
- Wear personal protective means. Wear safety shoes with steel puffs and non-skid sole.
- Wear protective glasses. Shooting up of objects by the machine could occur.
- Wear means for hearing protection. Wear personal means for hearing protection like ear obturators.
- Hand protection. Wear solid gloves – good protection is provided by gloves made of chrome leather.
- Transport. The garden cutter must be transported always with the rotary wheel in transport position. When machine is stand off pay attention that nobody could be threatened. Secure the machine against tipping over, damage and fuel leakage.
- Remove wrenches etc. All wrenches etc. should be removed before the machine is started.
- Stay always attentive. Pay attention to what you do. Follow your common sense when working. Do not operate engine-driven machines when tired. Do not operate the engine being under influence of alcohol, drugs or medicaments that aggravate the ability to concentrate.
- Refilling the fuel. Before refuelling it is always necessary to stop the engine. Open the tank cover always carefully to allow the over-pressure ventilate slowly to avoid squirting the fuel. When working with the machine high temperatures are generated at the machine body so let the machine cooled down before refuelling otherwise fuel ignition could occur resulting in serious burns. Be careful not to overfill the tank when refuelling. If the fuel flows out nearby it must be removed immediately and the machine must be cleaned. Check firm settlement of screw cover after refuelling to avoid its loosening due to vibrations during operation.
Behavior in case of emergency
Provide necessary first aid treatment corresponding to the injury nature and seek qualified medical help as soon as possible. Protect the injured person from other injuries and calm him/her down.
First aid kit must always be available in the place of your work in case of accident in accordance with DIN 13164. Material taken out of the first aid kit needs to be supplemented right away.
If help is needed, please provide the following details:
- Place of accident
- Accident nature
- Number of injured persons
- Injury type5. Place of accident
Marking on the machine
Explanation of symbols
The following symbols are used in this guide and/or on the machine:
Safety of the product:
 | |
| The product corresponds to relevant standards of the EU |
Restrictions:
 |  |
| Ban, general (in connection with other pictogram) | Fire, non-protected source of light and smoking forbidden |
|  |
| Do not finger into rotating parts | Do not use the machine when raining |
Caution:
 | |
| Caution/Attention | Warning from dangerous electrical voltage |
| Warning from inflammable substances | Caution-danger of tumbling over |
| |
| Warning from hot surface | Warning from gases harmful for health |
| |
| The machine may be used only outside closed rooms | Warning from rotating parts |
| |
| Warning from objects flying away | Keep the safety distance |
Orders:
| Wear ear-phones | Wear protective shoes | Read the guide for operation before use |
Environmental protection:
 | |
| Waste should be disposed by expert service so that to avoid any environmental damage. | The packaging material from the cardboard can be handed in into a collection point for recycling. |
Packaging:
| Protect from moisture | The package must point upwards | Attention – Fragile |
| Interseroh Recycling |
Technical specifications:
| Engine output | Working width | Engine speed |
| Tank volume | Weight | Capacity |
| Noise |
| Tank volume | Weight | Capacity |
| Noise |
Use in accordance with designation
The machine is designed only for ordinary use in agriculture, forestry, gardening and care for greenery. When provisions given by general regulations and/or by this guide the producer cannot be held responsible for any damage
Residual risks and preventive measures
Mechanical residual risks
| Threat | Description | Protective measure(s) |
| Cutting, cutting off | Rotating plough-blades could cause serious cutting injuries and possibly amputation of bodily parts. | Always wear protective gloves. Never finger into the machine when operated. |
| Catching, winding up | Weeding plough-blades could wind ropes, wires or parts of clothing up to them. | Remove alien objects from the land, keep distance from fencing, wear close-fitting clothing. |
Electrical residual risks
| Threat | Description | Protective measure(s) |
| Direct | Touching the spark | Do not touch the spark |
| contact with | plug extension when | plug extension when |
| electricity | the engine is running | the engine is running. |
| could result in electrical | ||
| accident. |
Thermal residual risks
| Threat | Description | Protective measure(s) |
| Burns, frost- bites | Touching the exhaust pipe could cause burns. | Let the machine to be cooled down. |
Danger from noise
| Threat | Description | Protective measure(s) |
| Whole body | Prolonged work with | Make breaks from work |
| vibrations | the machine could | regularly. |
| result in bodily harms | ||
| due to vibrations. |
Danger from materials and other substances
| Threat | Description | Protective measure(s) |
| Contact, aspiration | Inhalation of exhausting gases could be extremely harmful for health. | The machine may be operated outdoor only. |
| Fire or explosion | The machine is driven with inflammable mixture of fuel that could ignite for example during refuelling. | Do not refuel close to open flames and do not smoke during refuelling. |
Other risks
| Threat | Description | Protective measure(s) |
| Objects thrown | Stones or soil | Make sure that no other |
| away or | thrown away | persons are present in the |
| splashing | could cause | work area and wear |
| liquids | injuries. | personal protective means. |
Disposal
Instructions for waste disposal implying from pictograms that are located on the machine or possibly on the packaging. The explanation of such signs can be found in chapter “Marking on the machine“
Requirements for operators
The operator must read the guide for operation carefully before any use the machine.
Qualification
No special qualification except detailed instruction session led by an expert is necessary for use of the machine
Minimum age
The machine may be operated by persons older than 16 years only. The exception is the case of the machine utilisation by operation by juvenile persons when this occurs used during profession training to get skills under supervision of a trainer.
Training
The operation of the machine requires just corresponding instruction by an expert or the guide for operation. No special training is necessary.
Technical specifications
| Engine design: | 4-Takt OHV |
| Max. output: | 2,8 kW/ 3,8 PS |
| Swept volume: | 161 cm³ |
| Operating width: | 360 mm |
| Number of plough-: | 4 |
| Noise: | LWA 93 dB |
| Weight approx.: | 31,7 kg |
| Order No.: | 94392 |
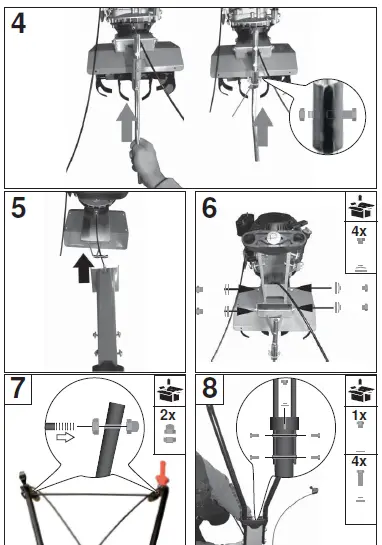
- The PVC connection between the two handles plug and tighten the screw on the grip panel.
- Both handles to grip panel screw (Fig. 8)
- Mount throttle (Fig. 9)
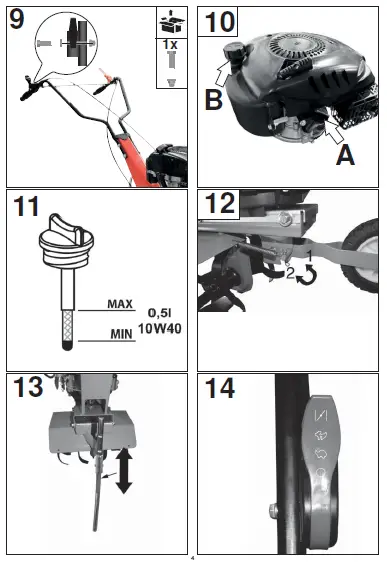
Engine:
- First filling oil into the oil filling (Fig. 10, A) is an up to the mark (Fig. 11).
- Then, fill petrol in the tank (Fig.10, B).
Safety instructions for putting into operation for the first time
Always pay attention to tightening of bolting and use exclusively parts listed in the scope of delivery.
Procedure
Perform the assembly of individual parts in the illustrated order. Doing so pay attention to proper arrangement of construction parts according to illustrations.
The machine is delivered without oil and fuel due to transportation. Fill these according to the data.
Operation
Rotary wheel in operating position (Fig. 12)
Set the rotary wheel into the position 1 for cultivation. (Fig. 12,1)
ATTENTION!
The machine may be transported only with the rotary wheel in
the position 2. (Fig. 12,2)
The rotary wheel may be adjusted only when the engine is stopped!
Cutting height calibration (Fig. 13)
Required depth of cultivation is set by shifting the depth limiter. Three different positions are possible.
Operating lever (Fig.14)
Starting/stopping the machine
Switch the handle to the Choke (Fig. 14). Now pull the starting string uniformly. The engine should start after 3 to 5 pulling the starting string. Put the handle (Fig. 14) onto the required speed and after that press the drive handle against the pillaret (Fig. 15)
Caution: If the engine has been warmed yet it can be started immediately into the position Slowly or Quickly.
After releasing the drive handle the drive stops but the engine keeps running. The engine can be stopped only by switching the switch into the OFF position (Fig. 14).
When starting the engine the machine must not tilt, only if necessary for the operator to start the engine at reverse side
Safety instructions for the operator
- Use the machine only after having the guide for operation carefully.
- Observe all safety instructions specified in the guide.
- Act responsibly towards other persons.
- This machine is equipped with a brake of plough-blades to ensures that plough-blades stop after release of drive handle not later than in 3 seconds. Do not try to stop plough-blades or tilt the machine with rotating plough-blades aside under any circumstances. Wait until the plough-blades stop automatically.
- If plough-blades contact with a foreign object please stop the engine immediately and check the machine for damage when plough-blades stopped. Continue working only with undamaged machine.
- Walk only when working, no not run.
- Always walk forward when working. Never go back with the machine.
- On slopes work always across them and never up and down. Be especially careful when changing the direction.
- When crossing areas without grass and transportation to the workplace and back the plough-blades must not be in operation.
Step-by-step guide
- Fill the fuel into the machine (chapter Assembly and 1putting into operation for the first time)
- Remove any foreign objects from the terrain.
- Cultivate the terrain with garden cutter until the soil is sufficiently cultivated.
- Clean the machine thoroughly after each use.
Inspections and maintenance
Safety instructions for inspections and maintenance
Only regularly maintained and treated machine can become a satisfactory instrument. Insufficient maintenance and care could lead to unforeseen accidents and injuries.
- Always stop the engine and disconnect the spark plug extension in case of any work on the machine!
- Never use aggressive cleaning agents for cleaning. It could damage or destroy the machine.
Inspection and maintenance plan
Before start of work:
- Check the state of engine oil (Fig.10A+11)
- Check for loosen parts
Every 25 hours of operation - Engine oil replacement
- Engine oil condition check
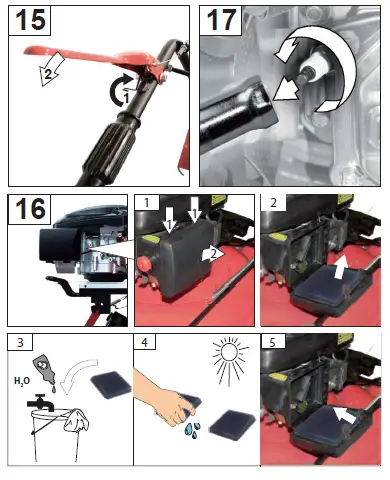
- Air filter cleaning (Fig.16)
- Removing of remainders of grass or soil from rotating parts with a brush or an unpointed object.
- Wiping of the cover with a soft cloth. If a dirt is stiffened the machine may be cleaned using a soft cloth soaked with soapsuds.
Every 100 hours of operation
- Inspection, cleaning and possible spark plug
replacement.(Fig.17
Maintenance
Do you have any technical questions? A claim? Do you need spare parts or the Operating Instructions?
You will be helped quickly and without needless bureaucracy at our webpage www.guede.com in the Services part. Please help us be able to assist you. To be able to identify your appliance when claimed, we need to know its serial No., order
No. and year of production. All these details can be found on the type label. Enter the details below for future reference.
Serial No.
Order No.
Year of production:
Tel.: +49 (0) 79 04 / 700-360
Fax: +49 (0) 79 04 / 700-51999
E-Mail: [email protected]
| Fault | Cause | Elimination |
| Engine does not start | 1. Empty tank 2. Dirty air filter 3. Weak ignition spark 4. „Over-swilled“ engine | 1. Fill the tank up to its full capacity; check whether the carburettor contains a fuel; check tank de- aeration and make an opening in the tank lid with a needle. 2. Clean the air filter. |
| 3. Clean the spark plug or install the new one if necessary; check the ignition cable; let the ignition checked in a service. | ||
| 4. Unscrew the spark plug, clean it and dry; pull several times the starting string when the spark plug is unscrewed. | ||
|
Engine outages occur | 1. Ignition cable is loosened. 2. Fuel piping is clogged or fuel is bad. 3. Ventilation opening in the fuel tank lid is blocked 4. There is water or dirt in fuel piping. 5. Air filter is dirty. | 1. Fit the spark plug extension firmly onto the spark plug. 2. Clean fuel piping, use fresh fuel. 3. Replace the fuel tank lid. 4. Drain the fuel and refill clean and fresh fuel. 5. Clean the air filter. |
| Engine often stop at idle run | 1. Ignition distance is too long, spark plug is defective. 2. Carburettor is not adjusted precisely. 3. Dirty air filter | 1. Adjust or replace the spark plug. 2. Adjust the carburettor. 3. Clean the air filter. |
| Drive does not work properly | 1. Check the drive handle string tension. 2. Drive does not work. | 1. Perform additional adjustment of drive handle string tension if necessary. (pic. 19) 2. Let the machine checked in a service point. |
| Excessive vibrations | 1. Fixing screws are loosened | 1. Tighten the fixing screws. |


