![]() 29240 Honda Talon 1000-4 Aluminum Roof
29240 Honda Talon 1000-4 Aluminum Roof
Instruction Manual
Honda Talon 1000X-4 Aluminum Roof
Product Instructions
Part No: 29240
APPLICATION: Honda Talon 1000X-4, verify accessory fitment at Kolpin.com.
BEFORE YOU BEGIN: Read these instructions and check to be sure all parts and tools are accounted for. Please retain these installation instructions for future reference and parts ordering information.
Note: If any hardware is missing, do not return to the store. Call us to help, Toll-Free 1-877-956-5746.
Items marked (*) are included in Hardware Kit PN 29241.
TOOLS / CONSUMABLES REQUIRED
- Socket Set, Metric
- Wrench Set, Metric
· Cleaning Solution (99% water + 1% mild dishwashing detergent)
· Isopropyl Alcohol (IPA) · Torx Bit Set
· Utility Knife/Cutting Tool
· Cloth, Non-Abrasive (Cheesecloth or equivalent)
· Allen Bit Set
· Torque Wrench
KIT CONTENTS
| 1 | Qty | Part Description |
| 2 | 1 | Talon Front Roof Panel |
| 3 | 1 | Talon Rear Roof Panel |
| 4 | 1 | Front Support Bracket |
| 5 | 1 | Middle Support Bracket |
| 6 | 1 | Rear Support Bracket |
| 7 | 13 | Short Button Screw, Zinc Plated, M6 x 1.0 – 20mm LG |
| 8 | 2 | Long Button Screw, Zinc Plated, M6 x 1.0 – 25mm LG |
| 9 | 6 | Button Screw, Zinc Plated, M8 x 1.25 – 20mm LG |
| 10 | 2 | Medium Flat Washer, Zinc Plated, M6 |
| 11 | 6 | Flat Washer, Zinc Plated, M8 |
| 12 | 3 | Small Flat Washer, Zinc Plated, M6 |
| 13 | 15 | Flange Locknut, Zinc Plated, M6-1.0 |
| 14 | 1 | Front Foam Seal – 42” (1066mm) |
| 15 | 1 | Rubber Overlap Trim Seal |
| 16 | 4 | Side Foam Seal – 30” (762mm) |
| 17 | 10 | Large Flat Washer, Zinc Plated, M6 |
| 18 | 1 | Instruction Guide (not shown) |

Kolpin Outdoors, Inc.
9955 59th Ave N
Plymouth, MN 55442 (877) 956-5746 or (763) 478-5800
www.kolpin.com
[email protected]
ASSEMBLY TIME: Approximately 30 minutes
IMPORTANT: Your Kolpin Aluminum Roof Kit is exclusively designed for your vehicle. Please read the installation instructions thoroughly before beginning. Installation is easier if the vehicle is clean and free of debris. For your safety, and to ensure a satisfactory installation, perform all installation steps correctly in the sequence shown. For better cab assembly procedure, install kits in the following order: front window, rear window, and roof.
INSTALLATION INSTRUCTIONS
- Shift vehicle transmission into “PARK”. Turn key to “OFF” position and remove from vehicle.
- Install the front, middle and rear roof bracket supports (items #3, #4, and #5) onto the cab frame locations as shown. Install each bracket using a short M6 screw (item #6) with a small M6 washer (item #11) onto the cab frame mounting tabs. Fasten each bracket using M6 locknut (item #12). The front, middle and rear brackets could be installed on the roof panel as an optional step. (See illustrations 1-1, 1-2, and 1-3).
Note: Do not tighten hardware at this step since adjustments may be required later.
- Being careful to not scratch painted surfaces, place the front aluminum roof panel (item #1) onto the rear aluminum roof panel (item #2). Fasten panels together by using four short M6 screws (item #6) and four large M6 washers (item #16) inserting through the outer holes at the overlapping seam. Loosely secure with M6 locknuts (item #12) on the underside roof surface. (See illustrations 1-4, 1-5, and 1-7).
 Note, place the rubber seal (item #14) in between the two roof panels as shown. Do not tighten the hardware at this step since adjustments may be required later.
 - Set the roof on a soft surface. Clean the inside (lower) surfaces of the roof (items #1 and #2) with a mild cleaning solution and wipe with isopropyl alcohol. Apply front and side foam seal strips (items #13 and #15) as shown. Trim seals as required. (See illustrations 1-5).
 WARNING
Isopropyl alcohol is hazardous to your health. See isopropyl alcohol packaging for proper handling instructions, including recommended personal protective equipment such as goggles and chemical-resistant gloves.
- Place the roof on top of the vehicle cab frame.
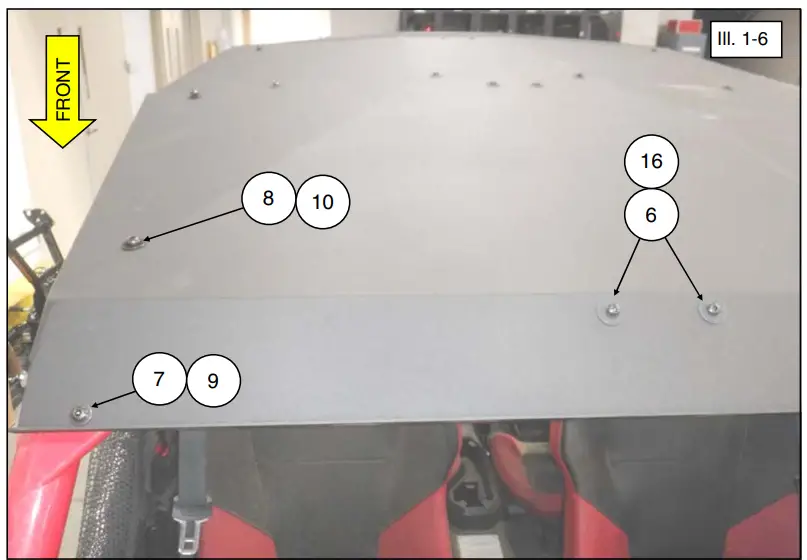
- Secure the roof to the front, middle, and rear support brackets (items #3, #4 and #5) using the shorter M6 screws (item #6) with large fender M6 washers (item #16) and fasten to the underside of brackets using M6 locknuts (item #12). (See illustrations 1-2, 1-3, 1-5, 1-6 and 1-7).
 Note: Do not tighten hardware at this step since adjustments may be required later.
 - Secure the front two corners of the roof to the cab frame using longer M6 screws (item #7) with a medium M6 washer (item #9) as shown. Fasten to upper front cab corner gusset tabs using M6 locknut (item #12). (See illustrations 1-6, 1-8, and 1-9).
 Note: Do not tighten hardware at this step since adjustments may be required later.
 - Secure the remaining roof mounting locations to the vehicle using the M8 screws (item #8) and M8 flat washers (item #10) as shown. Initially thread by hand at the four cab frame corner tab locations. (See illustrations 1-6, 1-7, and 1-9).
Note: Do not tighten hardware at this step since adjustments may be required later.
- Tighten all hardware to specifications: M6 fastener spec. M8 fastener spec.

 Note, place the rubber seal (item #14) in between the two roof panels as shown. Do not tighten the hardware at this step since adjustments may be required later.
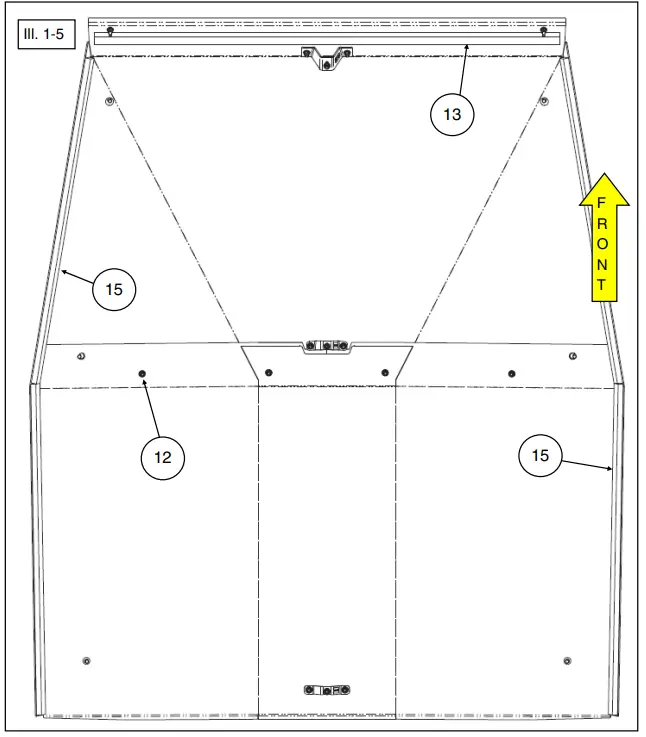
 Note: Do not tighten hardware at this step since adjustments may be required later.
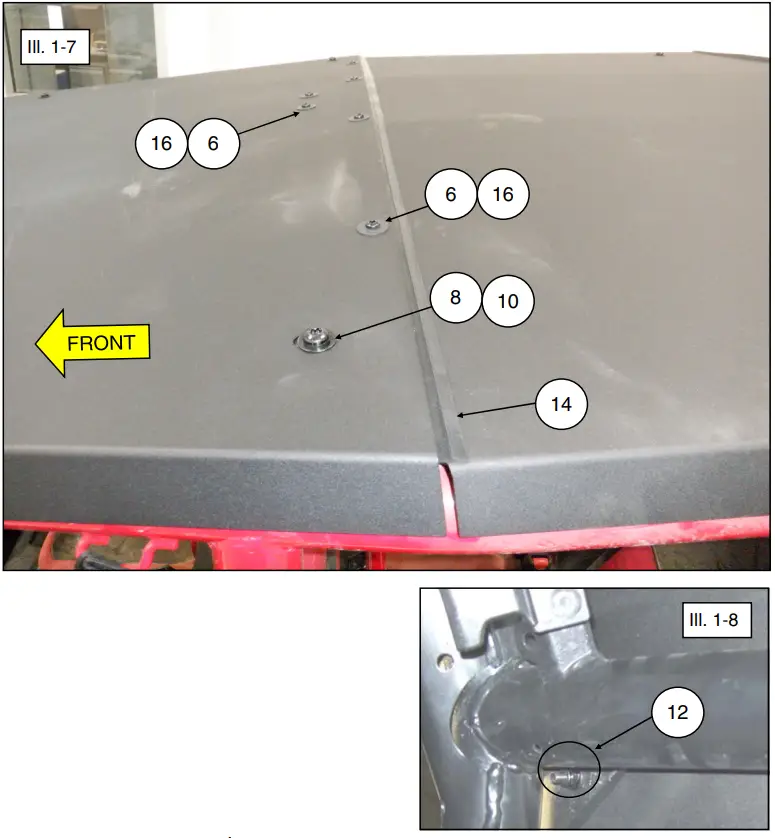 Note: Do not tighten hardware at this step since adjustments may be required later.
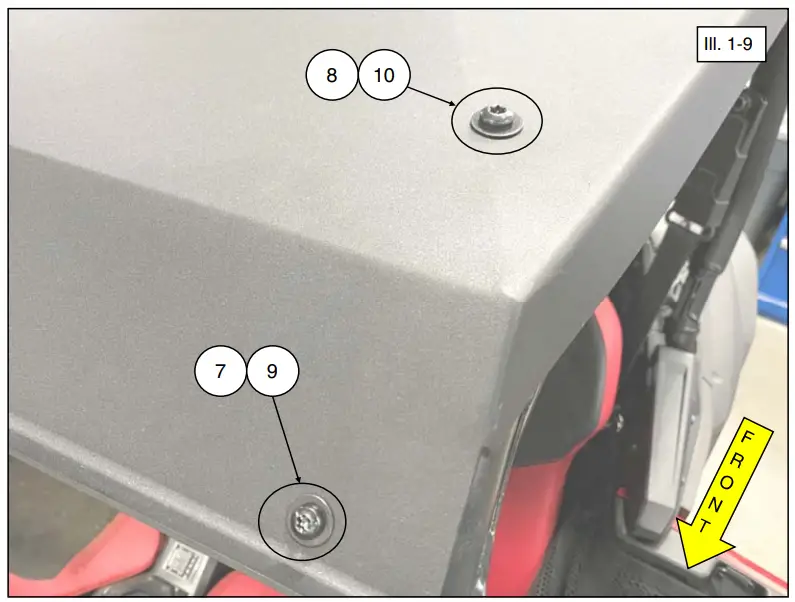
![]() 6MM FASTENER TORQUE: 7 ft. lbs. (9.5 Nm)
6MM FASTENER TORQUE: 7 ft. lbs. (9.5 Nm)![]() 8MM FASTENER TORQUE: 17 ft. lbs. (23 Nm)
8MM FASTENER TORQUE: 17 ft. lbs. (23 Nm)
IMPORTANT
- Check accessory mounts frequently and retighten hardware if necessary.
- Replace this accessory with a new one if it becomes damaged.
- Never use petroleum solvents such as gasoline, thinner benzene, acid or alkaline cleaners.
For additional assistance, please contact Kolpin customer service department at (877) 956-5746 or (763) 478-5800 or email [email protected]
One Year Limited Warranty
For the period of one (1) year from the purchase date, Kolpin will replace for the original purchaser, free of charge, any part or parts found upon examination by Kolpin to be defective in material, workmanship, or both.
All transportation costs incurred by submitting a product to Kolpin for warranty consideration must be borne by the purchaser. If Kolpin determines that the product must be returned to the factory for credit, please call 1-877-956-5746 for a Return Merchandise Authorization (RMA) number and shipping instructions.
This warranty does not apply to parts that have been damaged by accident, alteration, abuse, improper maintenance, normal wear, or other causes beyond the manufacturer’s control. In order to protect you and your ATV, certain parts of the accessory system and/or hardware are designed to fail when the equipment is over-stressed. Parts that are lost due to loosening and improper maintenance are not covered under warranty. This warranty does not cover removal or reinstallation labor fees of the plow system and related components.
Peripheral products such as engines, electric motors, and actuators may carry an original manufacturer’s warranty. Most hardware is general in nature and is easily obtained locally. Be sure to replace with minimum metric class 8.8 specification.
© 2021 Kolpin Outdoors Inc.
REV 00


