Motive AutoTap OBD-II Vehicles
Connect the Motive “Vehicle Gateway” to “AutoTap adapter”
Step 1
Plug the male 9-pin connector into the female 9-pin port located on the AutoTap
Step 2
Insert the male 15-pin connector located on the Motive Vehicle Gateway into the 15-pin female end of the cable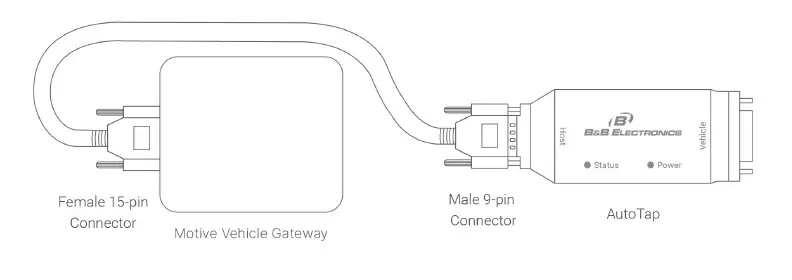
Connect “Vehicle Gateway + AutoTap” to Vehicle
Step 1
Insert the male 15-pin connector into the opposite side of the AutoTap
Step 2
In the vehicle, verify that the engine is OFF. Then, plug the male OBD-II 16-pin connector into vehicle’s diagnostic port
Step 3
Start the vehicle and let it run. After approximately two minutes, the right-side indicator should start flashing red indicating a successful connection to the vehicle.
Step 4
If the engine is running and the right-side indicator is flashing red, the installation is complete and you may turn off the engine. If the right-side indicator remains solid red (not flashing), recheck the connections, and if necessary, please contact Motive support at 855-434-3564 or [email protected]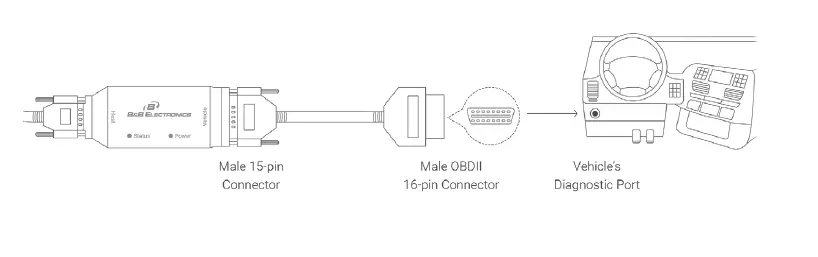
If you want to install using Y-cable option, there are 3rd party Y-cable options available. Motive OBD-II Y-cable (Cable 3017) does not support this option today. Please reach out to our support team for further details
855-434-3564 | [email protected]
gomotive.com


