![]()
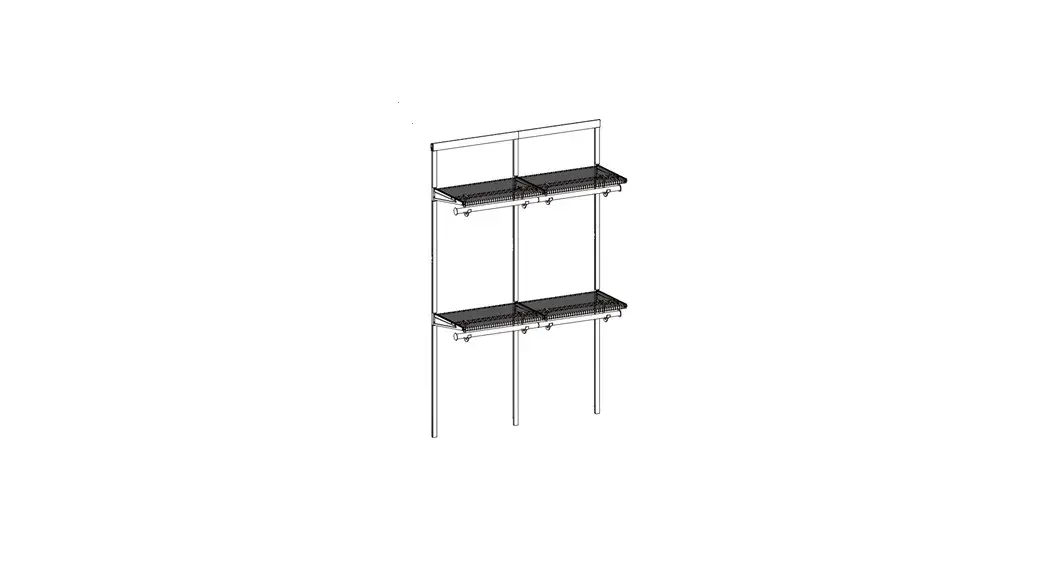
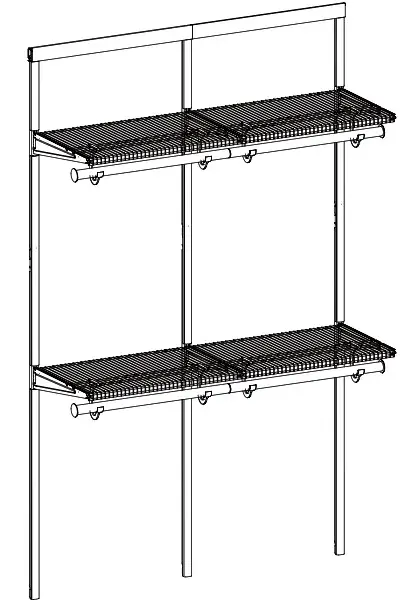
49.5 in. Double Hang
SKU#: 1007160249 / 1007160246 / 1007160236
1007160249 49.5 in. Double Hang
Shipping Package Checklist:
| Item# | Description | QTY I |
| 1006844162 | 49.5 in. Double Shelf – Base Kit | 1 |
| 1006844812 /1006844804/1006844632 | 48 in While/Gray/Birch Decor Shelf Cover (2pk) | 1 |
Quick Start Guide
Look for packet in this `BASE KIT’ box labeled “Modular Configuration Guide”, find your layout in the packet, and make sure you received the correct number of boxes and contents to build your specific layout.
- First, find the “Assembly and Installation” instructions for building your `BASE KIT’ in this base kit box.
a) Measure your space to make sure the complete closet design will fit.
b) Be sure to install the `Base Kit’ at the furthest left side of your closet space.
c) Note: At this time, only install the hang track and vertical rails. Save the brackets, shelves, closet rods and decorative covers for later installation steps. - Next, install the hang track and vertical rails from the `Extension’ box(s) if your layout includes extensions. Save the brackets, shelves, closet rods and decorative covers for later installation steps.
- Now install the brackets, shelves, and closet rods from the base kit and extension boxes, at the desired locations.
- Next, install components from the `Add-On’ box(s) if your layout includes add-ons.
- Last, finish the closet by installing the decorative hang track covers, vertical rail covers, and shelf covers.
Item # 1006-844-162
Model # 90440
ASSEMBLY AND INSTALLATION GUIDE
49.5 IN. DOUBLE HANG – BASE KIT
Questions, problems, missing parts? Before returning to the store, call Everbilt Customer Service
8 a.m. 7 p.m., EST, Monday-Friday, 9 a.m. 6 p.m., EST, Saturday
1-800-305-1726
HOMEDEPOT.COM
THANK YOU We appreciate the trust and confidence you have placed in Everbilt through the purchase of this closet organizer. We strive to continually create quality products designed to enhance your home. Visit us online to see our full line of products available for your home improvement needs. Thank you for choosing Everbilt!
Safety Information
- Please read and strictly follow the assembly instructions for proper installation. Failure to do so may cause objects to accidentally fall, which may result in personal injury or property damage.
- Make sure to distribute the weight evenly on each shelf and use the correct hardware for system mounting.
- Do not overload, which may cause collapse of the system and cause personal injury or property damage.
- Do not climb, stand or step on the product, which may cause collapse of the system and cause personal injury or property damage.
- Be sure to wear appropriate safety equipment when using power tools and hand tools.
- The metal may have sharp edges or corners. The use of protective gloves is strongly recommended.
- Recommend to protect the work surface during assembly.
- This product is not a toy and contains small parts which may cause choking hazard for small children. Close supervision is necessary near children.
![]() DANGER: The metal may have sharp edges or corners.
DANGER: The metal may have sharp edges or corners.
The use of protective gloves is strongly recommended.![]() WARNING: Do not overload the shelving units. This may cause collapse of the system and cause personal injury or property damage.
WARNING: Do not overload the shelving units. This may cause collapse of the system and cause personal injury or property damage.![]() IMPORTANT: Please read and strictly follow the assembly instructions for proper installation.
IMPORTANT: Please read and strictly follow the assembly instructions for proper installation.
Product Specifications
LOAD CAPACITY
Maximum 45 lb per linear foot (closet shelf and rod) / Maximum 20 lb per linear foot for rod loading (when installed per manufacturer’s
instructions below):
- Drywall installation requires mounting into at least 1 stud.
- Drywall requirement for claimed load : ASTM C1396 Compliant, Minimum thickness 1/2 in.
- Maximum spacing between two vertical rails: 24 in. center-to-center spacing, as shown in “Plan Your Layout” section.
- Closet rod support bracket a maximum of 18 in. spacing.
- Installed per manufacturer’s requirements.
Warranty
This product is guaranteed to be free of defects in materials and workmanship for 2 years from the date of purchase. If this product is defective, call 1-800-305-1726 or return the product to the store from which it was purchased for a replacement. Guarantee does not include normal wear and tear.
Pre-installation
PLANNING INSTALLATION
- Measure the closet width and plan the layout. See the “Plan Your Closet Layout” section for illustration examples.
- Select the correct hardware for assembly. See “choose your hardware” section below.
- Use stud finder to locate the studs and mark. It is recommended to mount hang tracks onto studs.
- For creating larger layouts that include multiple hang tracks, install this kit hang track first then install additional hang track extensions ensuring additional hang track is level and in line with previously mounted hang track(s).
TOOLS REQUIRED

HARDWARE PACKAGE CONTENTS
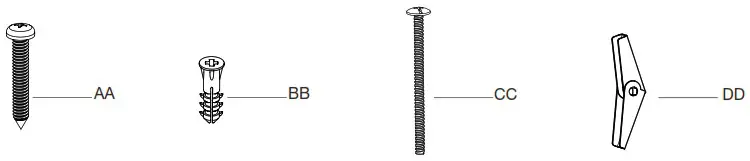
![]() NOTE: Hardware not shown to actual size.
NOTE: Hardware not shown to actual size.
| Part | Description | Quantity |
| AA | Panhead Screw (#12 x 2 in.) | 33 |
| BB | Anchor (1/4 in.) | 33 |
| CC | Bolt (3 in.) | 33 |
| DD | Toggle (3/16 in.) | 33 |
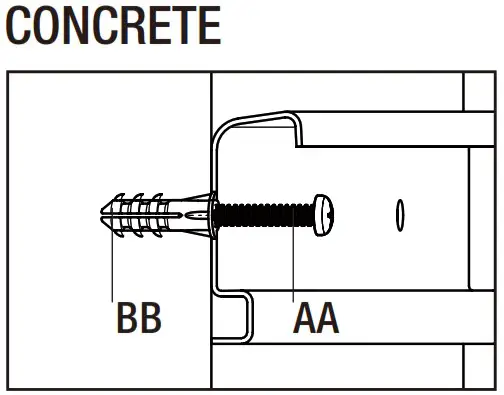
CHOOSE YOUR HARDWARE
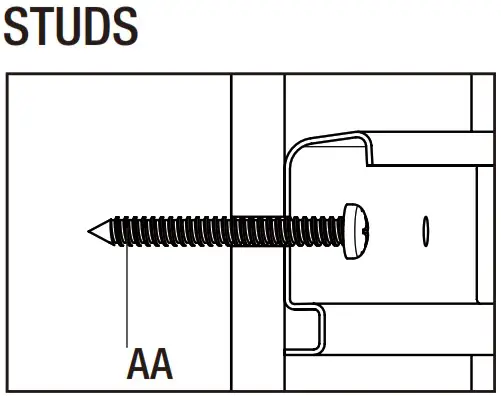 |  |
| Secure to the wall with panhead screws (AA) at stud locations. | Drill 1/4 in. holes, insert wall anchors (BB) and secure to the wall with panhead screws (AA). |
![]() WARNING: This product can expose you to chemicals, including lead, which is known to the State of California to cause cancer and birth defects or other reproductive harm. For more information go to www.P65Wamings.ca.gov
WARNING: This product can expose you to chemicals, including lead, which is known to the State of California to cause cancer and birth defects or other reproductive harm. For more information go to www.P65Wamings.ca.gov
CHOOSE YOUR HARDWARE
DRYWALL
 | Drill a 1/2 in. hole in the drywall. If you hit a stud during drilling, use above stud hardware/instructions for each stud location. |
 | Insert bolt through hang track (or vertical rail/vertical rail joiner) then screw on toggle (DD). Install toggles (DD) in each hole of the component you are attaching before attaching to the wall. Compress and pass the toggle (DD) through the hole you drilled. |
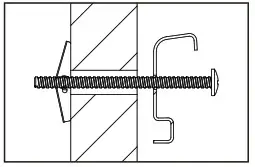 | Allow the toggle (DD) to spring apart behind the drywall. |
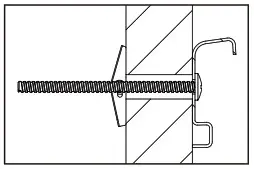 | Screw the bolt (CC) until tight to secure. Pull back on screw head for tension if toggle (DD) is spinning behind wall. Install toggles (DD) in each hole of components before attaching to wall. |
COMPONENT PACKAGE CONTENTS
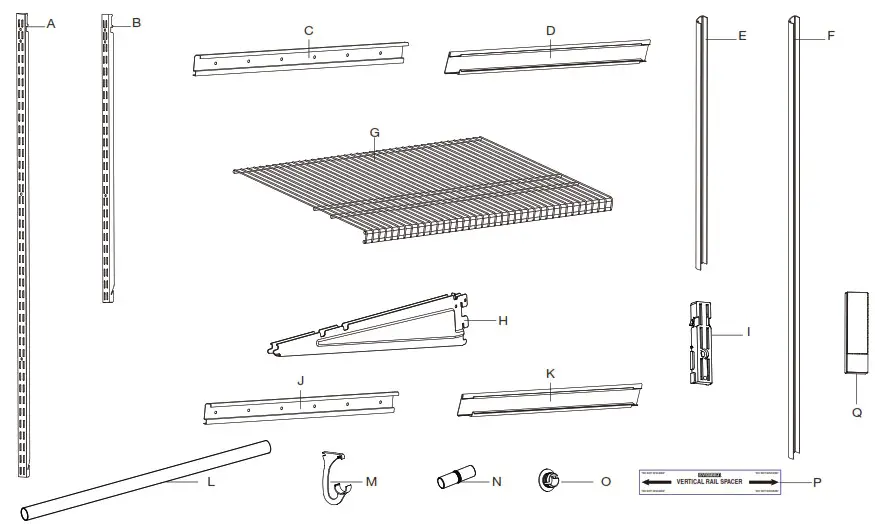
| Part | Description | Quantity |
| A | 48 in. Vertical Rail | 3 |
| B | 30 in. Vertical Rail | 3 |
| C | 25.5 in. Hang Track | 1 |
| D | 25.5 in. Hang Track Cover | 1 |
| E | 30 in. Vertical Rail Cover | 3 |
| F | 48 in. Vertical Rail Cover | 3 |
| G | 24 in. x 16 in. Wire Shelf | 4 |
| H | Shelf Bracket | 6 |
| I | Vertical Rail Joiner | 3 |
| J | 24 in. Hang Track | 1 |
| K | 24 in. Hang Track Cover | 1 |
| L | 24 in. Chrome Closet Rod | 4 |
| M | Chrome Closet Rod Bracket | 8 |
| N | Closet Rod Joiner | 2 |
| O | Chrome Closet Rod Endcap | 4 |
| P | Spacer | 1 |
| Q | Drilling Template Box | 1 |
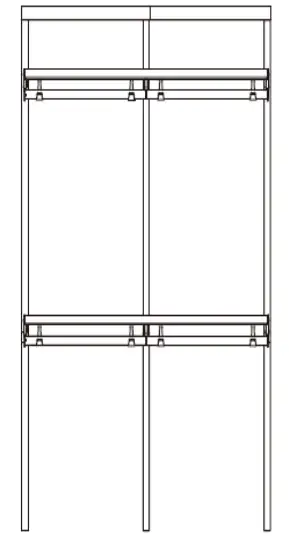
Plan Your Closet Layout
When planning your installation, measure the dimensions of your installation location. For specific designs refer to separate Modular Closet System Configuration Guide.
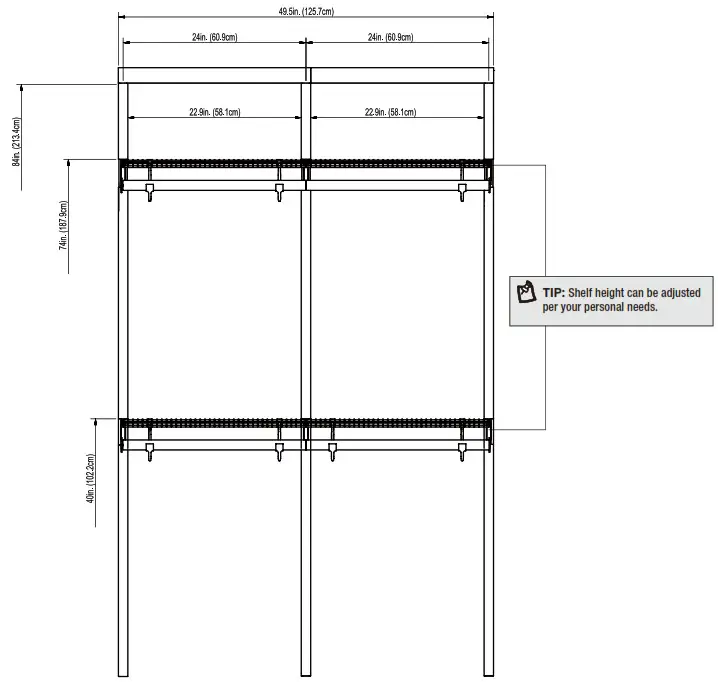
![]() NOTE: All vertical measurements are taken from the floor.
NOTE: All vertical measurements are taken from the floor.
Installation
Install Hang Track
- Use a stud finder to locate and mark your studs if installing on drywall.
- Place the longest hang track (C) flush against the wall, the bottom of the track should be 84 in. off the ground. The thicker side should be on top, closest to the ceiling.
![]() TIP: When creating larger closet layouts that include multiple hang tracks, install this kit hang track to the far-left of your planned closet design.
TIP: When creating larger closet layouts that include multiple hang tracks, install this kit hang track to the far-left of your planned closet design.
Additional shorter length hang tracks will be installed in continuous sequence to the right of this kit hang track.
- Make sure the track is level and mark each screw hole on the wall. Ensure at least one hole aligns with a stud.
- Use correct hardware to secure the hang track and tighten (see “Choose Your Hardware” in the Pre-installation section).
- Repeat steps above for adding remaining hang tracks (J). Be sure to install the next shorter hang tracks (J) level and flush with previous installed hang track (C).
![]() WARNING: Before cutting, drilling, or hammering into any wall, verify the location of electrical, plumbing, and gas lines. Cutting may cause serious injury.
WARNING: Before cutting, drilling, or hammering into any wall, verify the location of electrical, plumbing, and gas lines. Cutting may cause serious injury.

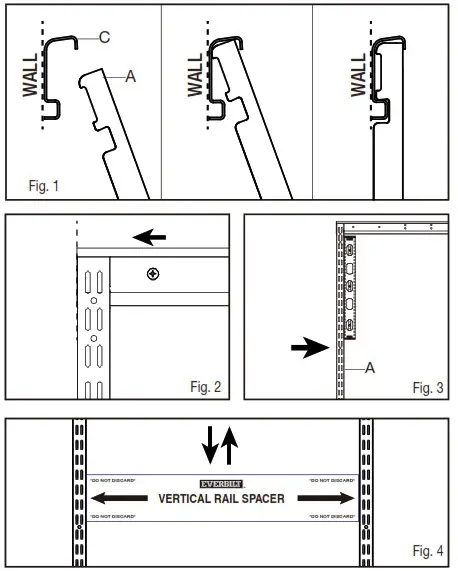
Install Upper Vertical Rails
- Attach the upper vertical rail (A) to the hang track (C) slots as the diagram shows (see Fig. 1).
- Slide the first vertical rail (A) to the left edge of the hang track (C) , so make sure it is flush with the end of the hang track (C) (see Fig. 2).
- Use a level to ensure upper vertical rail (A) assembly is vertically straight (plumb) and secure it using screw holes in vertical rail with appropriate hardware (see Fig. 3).
- Use provided spacer (J) to line up the next upper vertical rail (A) (see Fig. 4). It is CRITICAL to install vertical rails at the correct spacing using spacer (J) for the system to work.
- Repeat the above process to install remaining upper vertical rails.
![]() If creating a larger kit (which ships in several boxes) install all hang tracks and vertical rails from boxes labeled ‘EXTENSION’ BEFORE installing any brackets, shelves or decorative covers in following steps.
If creating a larger kit (which ships in several boxes) install all hang tracks and vertical rails from boxes labeled ‘EXTENSION’ BEFORE installing any brackets, shelves or decorative covers in following steps.![]() WARNING: Before cutting, drilling, or hammering into any wall, verify the location of electrical, plumbing, and gas lines. Cutting may cause serious injury.
WARNING: Before cutting, drilling, or hammering into any wall, verify the location of electrical, plumbing, and gas lines. Cutting may cause serious injury.
Install Vertical Rail Joiners and Lower Vertical Rails
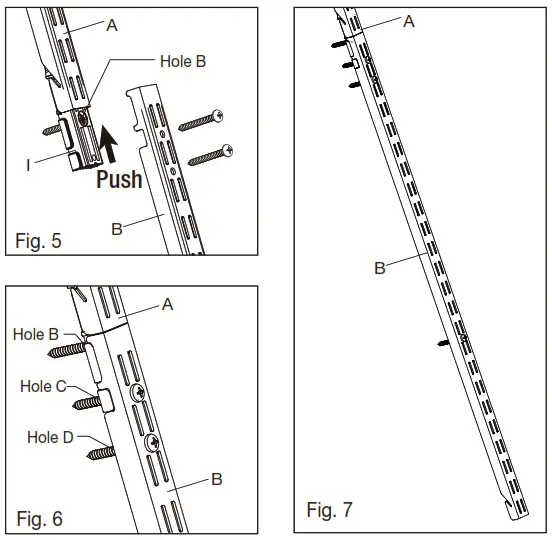
SCENARIO 1: STUD
- Push vertical rail joiner (I) up into upper vertical rail (A) as shown, secure the vertical rail joiner (I) on hole B with panhead screw (#12 x 2 in.) (see Fig. 5).
- Put the lower vertical rail (B) as shown and secure the lower vertical rail (B) on the hole C and D with panhead screw (#12 x 2 in.) (see Fig. 6).
- Use remaining screw holes in lower vertical rail (B) to secure to wall with appropriate hardware, just as you did for upper vertical rail (A) installation (see Fig. 7).
- Use provided spacer (P) to line up the next lower vertical rail. It is CRITICAL to install vertical rails at the correct spacing using spacer (P) for the system to work.
- Repeat the above process to install remaining vertical rail joiners and lower vertical rails.
SCENARIO 2: CONCRETE
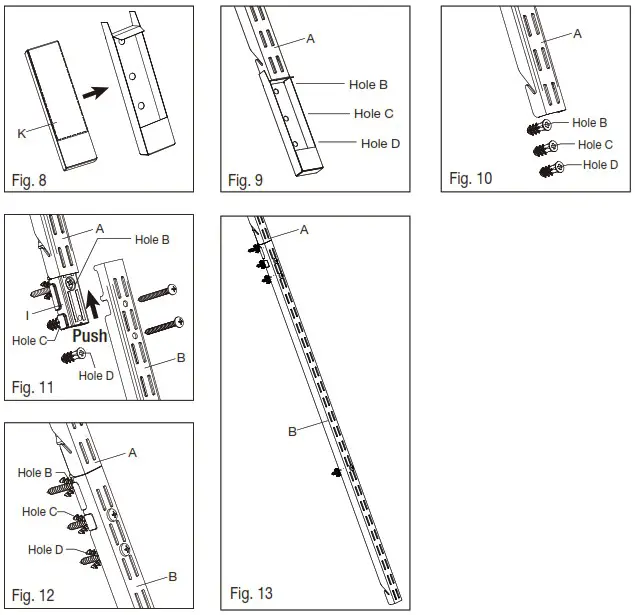
- Tear the drilling template box (K) according to the dashed line (see Fig. 8).
- Align the drilling template box (K) as a locator as shown and mark the holes on the wall (see Fig. 9).
- Drill 1/4 in. holes and insert wall anchors (1/4 in.) into hole B, C and D (see Fig. 10).
- Push vertical rail joiner (I) up into upper vertical rail (A) as shown, secure the vertical rail joiner (I) on hole B with panhead screw (#12 x 2 in.) see Fig. 11).
- Put the lower vertical rail (B) as shown and secure it on the hole C and D with panhead screw (#12 x 2 in.) (see Fig. 12).
- Use remaining screw holes in lower vertical rail (B) to secure to wall with appropriate hardware, just as you did for upper vertical rail (A) installation (see Fig. 13).
- Use provided spacer (P) to line up the next lower vertical rail (B) . It is CRITICAL to install vertical rails at the correct spacing using spacer (P) for the system to work.
- Repeat the above process to install remaining vertical rail joiners and lower vertical rails.
SCENARIO 3: DRYWALL
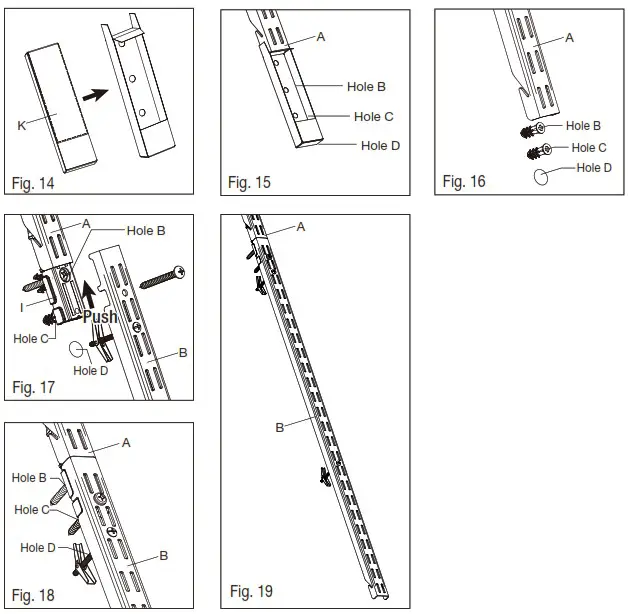
- Tear the drilling template box (K) according to the dashed line (see Fig. 14).
- Align the drilling template box (K) as a locator as shown and mark the holes on the wall (see Fig. 15).
- Drill 1/4 in. holes for hole B and C, drill 1/2 in. hole for hole D. Insert wall anchors (1/4 in.) into hole B and C (see Fig. 16).
- Push vertical rail joiner (I) up into upper vertical rail (A) as shown, secure the vertical rail joiner (I) on hole B with panhead screw (#12 x 2 in.) (see Fig. 17).
- Put the lower vertical rail (B) as shown and secure it on hole C with panhead screw (#12 x 2 in.) and on hole D with toggle (3/16 in.) and bolt (3 in.) (see Fig. 18). Make sure the toggle (3/16 in.) and the bolt (3 in.) are installed on lower vertical rail (B) before secure.
- Use remaining screw holes in lower vertical rail (B) to secure to wall with appropriate hardware, just as you did for upper vertical rail (A) installation (see Fig. 19).
- Use provided spacer (P) to line up the next lower vertical rail (B) . It is CRITICAL to install vertical rails at the correct spacing using spacer (P) for the system to work.
- Repeat the above process to install remaining vertical rail joiners and lower vertical rails.
![]() If creating a larger kit (which ships in several boxes) install all vertical rail joiners and lower vertical rails from boxes labeled ‘EXTENSION’ BEFORE installing any brackets, shelves or decorative covers in following steps.
If creating a larger kit (which ships in several boxes) install all vertical rail joiners and lower vertical rails from boxes labeled ‘EXTENSION’ BEFORE installing any brackets, shelves or decorative covers in following steps.
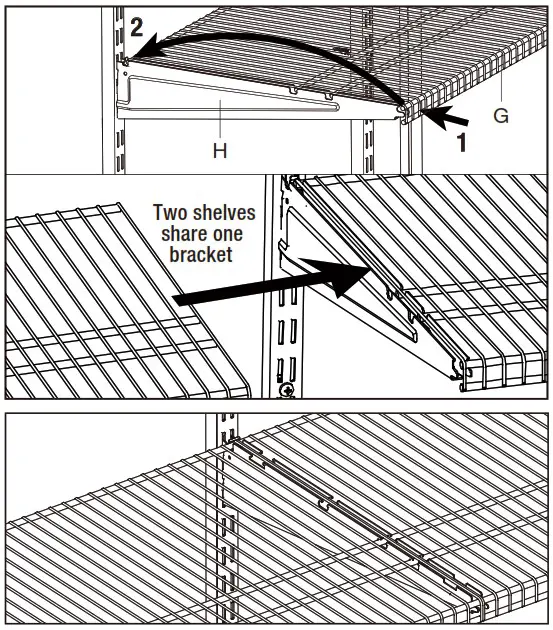
Install Brackets
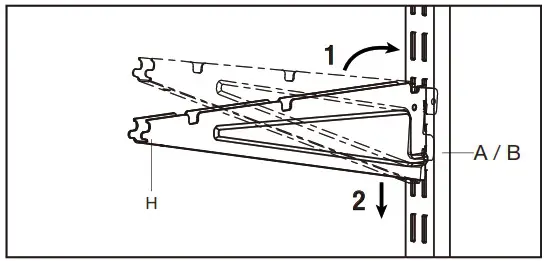
- Insert shelf brackets (H) to the vertical rails (A – B).
- Insert back tabs of bracket into vertical rail slots at desired position.
- Pull down on front of bracket and ensure bracket is locked in place.
- Ensure shelf brackets are inserted at same height on vertical rails so shelf will be level once installed.
Install Shelves
- Make sure your shelves (G) fit your closet layout design.
- Hold the shelf’s (G) front rod, let it fit into the bracket’s (H) front notches as the diagram shows, then push down the shelf’s rear part allowing the shelf’s rear horizontal rod to lock into the back clip of bracket.
![]() NOTE: The bracket is supposed to be shared by two shelves in system as shown on the right. Each end of shelf will take up half of bracket.
NOTE: The bracket is supposed to be shared by two shelves in system as shown on the right. Each end of shelf will take up half of bracket.
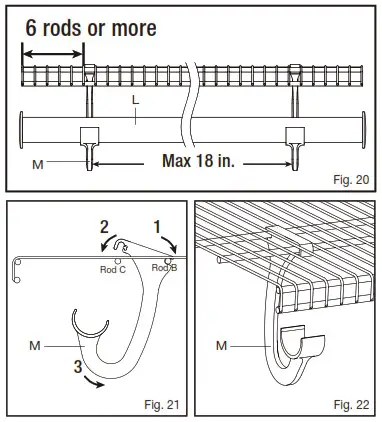
Install Closet Rod Brackets and Closet Rod
- Count 6 rods or more from one side of the wire shelf and install closet rod brackets as shown. Maximum spacing between closet rod brackets
is 18 in. for this system (see Fig. 20). - Put the closet rod support bracket (M) at an angle as shown and place the back part onto the horizontal rod (B) (see Fig. 21).
- Pull down the closet rod support bracket (M) and snap onto the shelf’s front rod (C) (see Fig. 21 and Fig. 22).
![]() NOTE: Closet rod brackets need to be installed BEFORE any decorative shelf covers are installed on shelf.
NOTE: Closet rod brackets need to be installed BEFORE any decorative shelf covers are installed on shelf.
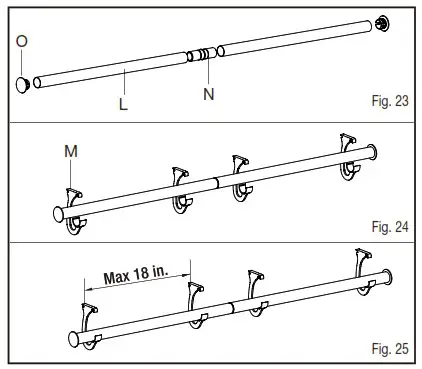
Install Closet Rod Joiner and End Caps
- Measure length of closet rod assembly needed based on your closet layout.
If your layout requires multiple closet rods to be joined, install closet rod joiner (N) to make a longer assembly (see Fig. 23). - If joiner is needed for your layout, insert closet rod joiner (N) into one end of one closet rod (L) and then insert the exposed end of the joiner into the end of second closet rod (L). Repeat this step for longer assemblies where needed (see Fig. 23).
- Push end caps (O) into finished ends of closet rod (L) (see Fig. 23).
- Position closet rod assembly at desired location and snap into closet rod brackets (M) (see Fig. 24 and Fig. 25).
- You may have unused closet rod joiner(s) and/or endcap(s) depending on your design.
![]() NOTE: Make sure to complete joiner assembly (if needed based on layout) before adding end caps to the finished ends of closet rod.
NOTE: Make sure to complete joiner assembly (if needed based on layout) before adding end caps to the finished ends of closet rod.![]() If creating a larger kit (which ships in several boxes) install all brackets, shelves, and closet rods from each box BEFORE installing decorative hang track covers and vertical rail covers in the following steps.
If creating a larger kit (which ships in several boxes) install all brackets, shelves, and closet rods from each box BEFORE installing decorative hang track covers and vertical rail covers in the following steps.
Install Hang Track Covers
- Place the hang track cover (D/K) with the direction as shown then push to snap and lock. Slide from left to right to make sure the whole cover is secured.
- Make sure to put longer hang track cover (D) on the longer hang track (C).

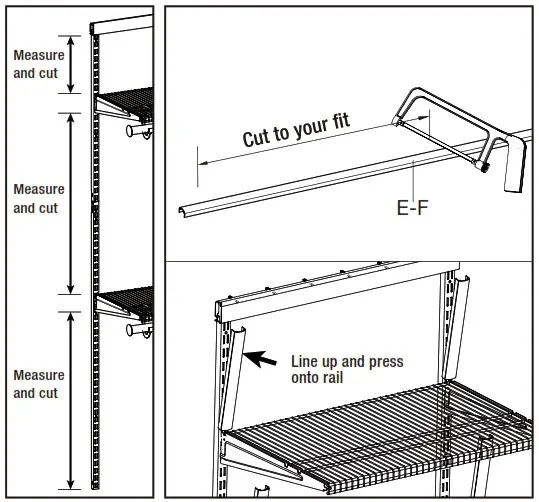
Install Vertical Rail Covers
- Measure open areas of the vertical rail, this includes: bottom of hang track cover to top of shelves, bottom of shelf brackets to top of shelves, bottom of brackets to end of vertical rails, etc.
- Cut the vertical rail cover (E-F) to your desired length with hacksaw.
- Push and press one end of the vertical rail cover (E-F) to the rail to lock onto the rail. Press and move the other end to make sure the whole vertical rail cover is securely in place.
![]() NOTE: For safety, please remember to wear safety gloves, goggles and strictly follow the instructions of your hacksaw during the cutting.
NOTE: For safety, please remember to wear safety gloves, goggles and strictly follow the instructions of your hacksaw during the cutting.
Care and Cleaning
EverbiIt closet organizer is powder coated. Clean following these steps:
- To remove dust, stains, and other deposits: Use a soft cloth (or soft brush) with a diluted solution mix of warm water and a mild detergent (such as liquid dishwashing detergent). DO NOT use solvents.
- Make sure you thoroughly rinse the surface(s) with clean fresh water after cleaning to remove all residue.
- Thoroughly dry the surface(s) before reuse.
![]()
Questions, problems, missing parts? Before returning to the store, call Everbilt Customer Service
8 a.m. – 7 p.m., EST, Monday-Friday, 9 a.m. – 6 p.m., EST, Saturday
1-800-305-1726
HOMEDEPOT.COM
Retain this manual for future use.
Assembly and Installation Guide
48 in. White / Gray / Birch / Décor Shelf Cover (2-Pack)
Item #1006-844-812 / 1006-844-804 / 1006-844-632
Model #90443 / 90445 / 90447
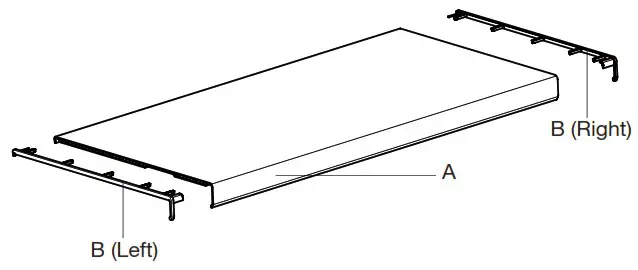
PARTS LIST
| Part | Description | Quantity |
| A | 48 in. Décor Shelf Cover | 2 |
| B | Décor Shelf Cover Endcap Set (both ends) | 2 |
Installation
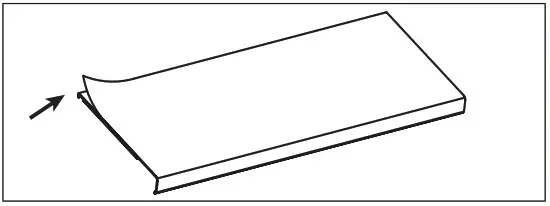
- REMOVE PROTECTIVE FILM (TWO SIDES) BEFORE INSTALLATION.

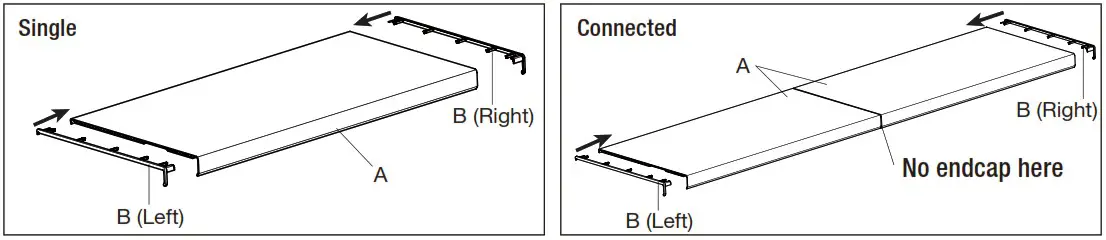
- PUT ON ENDCAPS (B) AS SHOWN BELOW (SINGLE OR CONNECTED).

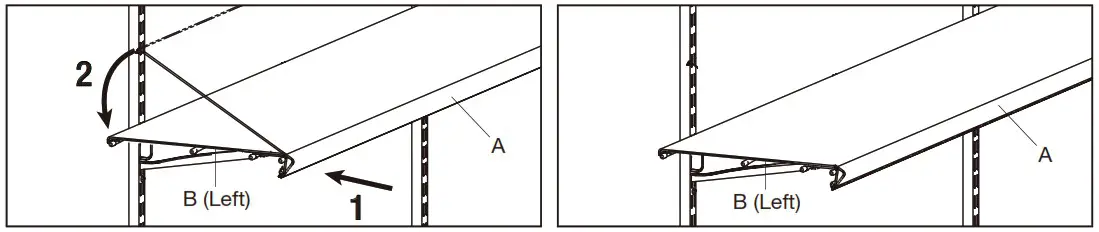
- PLACE A DÉCOR SHELF COVER (A) ONTO WIRE SHELF AND PUSH ALL THE WAY TO THE REAR SO THAT THE FRONT LIP OF THE COVER IS FLUSH AGAINST THE FRONT LIP OF THE WIRE SHELF.
SNAP DOWN REAR OF THE DÉCOR SHELF COVER (A) OVER BACK OF THE BRACKET AT EACH INTERSECTION WITH VERTICAL RAILS.
Warranty
This product is guaranteed to be free of defects in materials and workmanship for 2 years from the date of purchase. If this product is defective, call
1-800-305-1726 or return the product to the store from which it was purchased for a replacement. Guarantee does not include normal wear and tear.
![]() WARNING: This product can expose you to chemicals, including lead, which is known to the State of California to cause cancer and birth defects or other reproductive harm. For more information go to www.P65Wamings.ca.gov
WARNING: This product can expose you to chemicals, including lead, which is known to the State of California to cause cancer and birth defects or other reproductive harm. For more information go to www.P65Wamings.ca.gov
HOMEDEPOT.com
Please contact 1-800-305-1726
for further assistance.


