dji Phantom 4 RTK Agricultural Drone
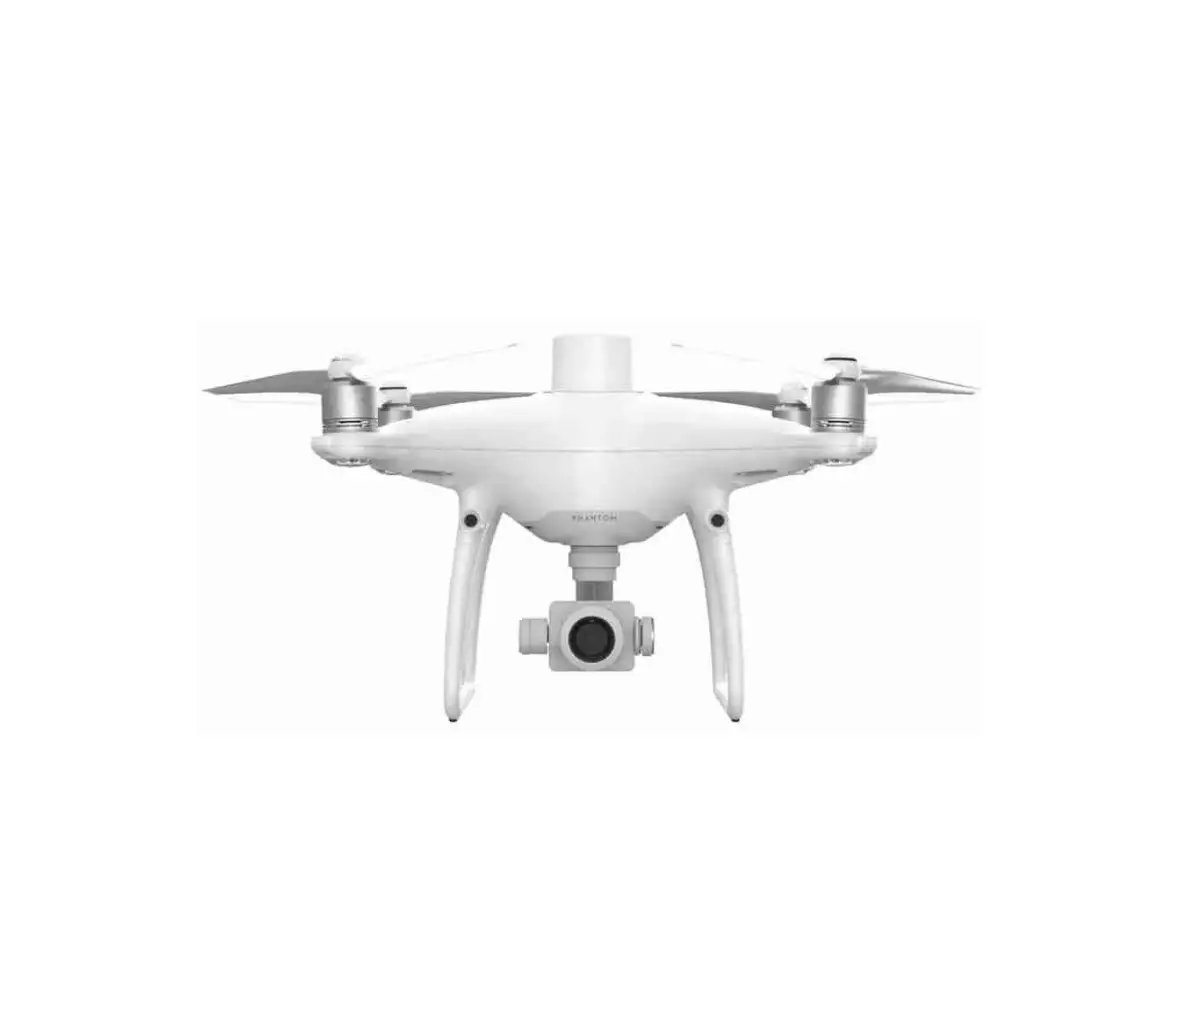
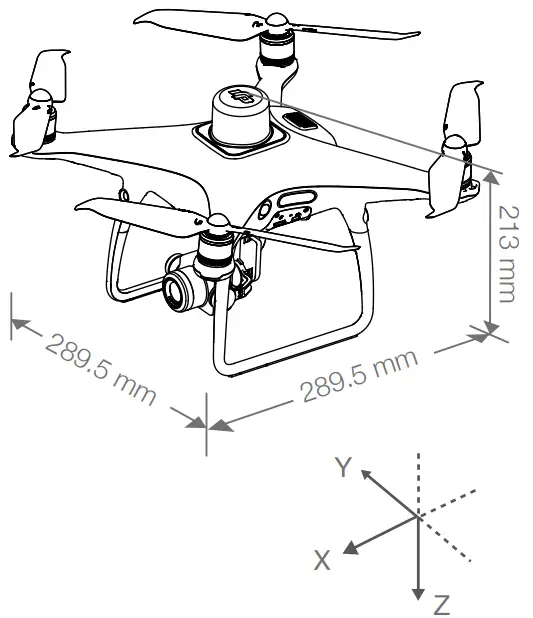
Phantom 4 RTK
The Phantom 4 RTK is a smart mapping and imaging drone capable of highly accurate mapping functions. The aircraft has a built-in DJITM Onboard D-RTK*, which provides precision data for centimeter-level positioning accuracy. Multi-directional obstacle sensing is enabled by forward, rear, and downward vision and infrared sensors*. The camera features a 1-inch 20-megapixel CMOS sensor housed within a high stability gimbal. When it comes to mapping, the high-performance mechanical shutter eliminates rolling shutter distortion when capturing images at speed. Image data can be used to generate maps for field planning when operating a DJI AGRASTM aircraft. Users can also import photos to the DJI TERRATM application or third-party mapping software to composite highly accurate maps for different applications.
The Phantom 4 RTK uses 9455S low-noise propellers to reduce noise and improve efficiency.
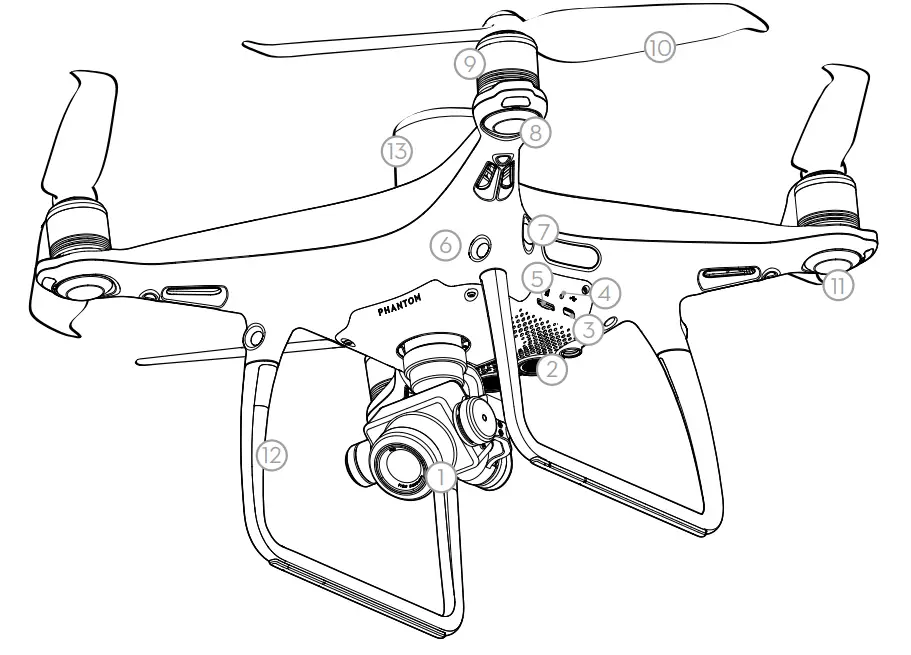
- Gimbal and Camera
- Downward Vision System
- Micro USB Port
- Camera/Linking Status Indicator and
Link Button - Camera microSD Card Slot
- Forward Vision System
- Infrared Sensing System
- Front LEDs
- Motors
- Propellers
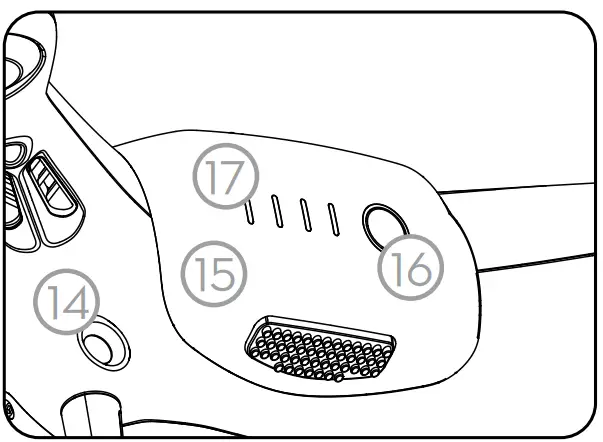
- Aircraft Status Indicator
- OCUSYNCTM Antennas
- Onboard D-RTKTM
- Antenna
- Rear Vision System
- Intelligent Flight Battery
- Power Button
- Battery Level Indicators

![]() DO NOT use a mix of 9455S and 9450S propellers.
DO NOT use a mix of 9455S and 9450S propellers.
* This should be used with Network RTK service, a DJI D-RTK 2 High-Precision GNSS Mobile Station (purchased additionally) or post-processed kinematic (PPK) data (recommended when RTK signal is weak during operation). The Vision and Infrared Sensing Systems are affected by surrounding conditions. Read the Disclaimer and Safety Guidelines to learn more.
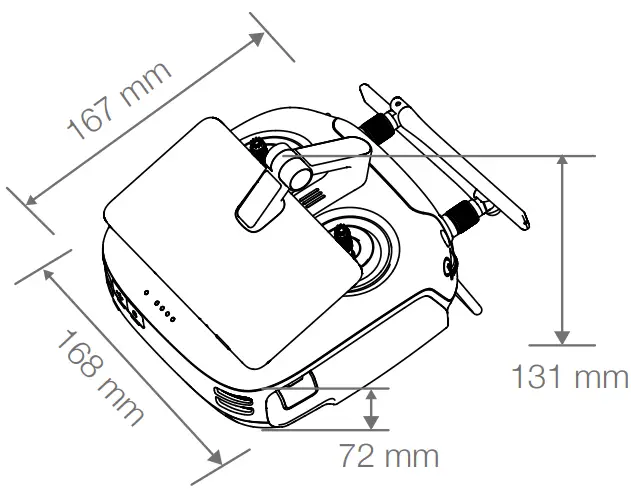
Remote Controller
The Phantom 4 RTK remote controller has a transmission range of up to 4.3 mi (7 km) * with controls for camera tilt and photo capture. DJI OcuSync is built into the remote controller, transmitting live HD imaging from the camera directly. Simply tap the screen in the DJI GS RTK app or import KML/KMZ files to plan an operation for convenient project management. Users can also connect the remote controller to a PC to access DJI Terra for planning and executing operations. The remote controller’s Multi-Aircraft Control mode can be used to coordinate the operation of up to five aircraft at the same time, enabling pilots to work more efficiently. Replaceable batteries can be easily hot-swapped and the antennas are easily removable for quick maintenance.
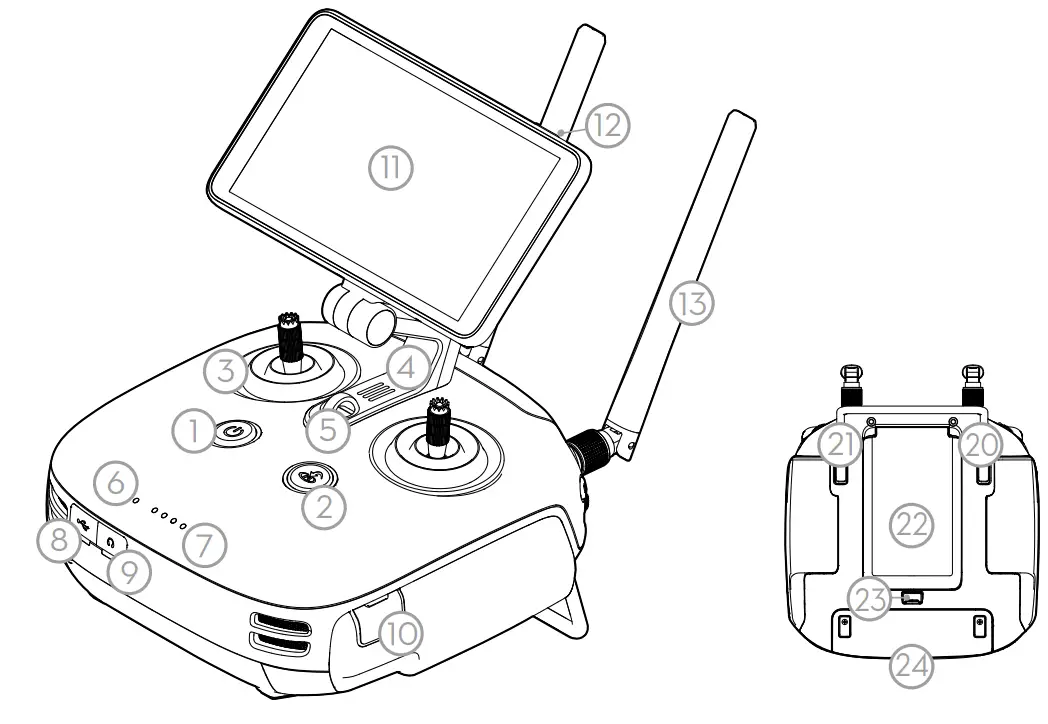
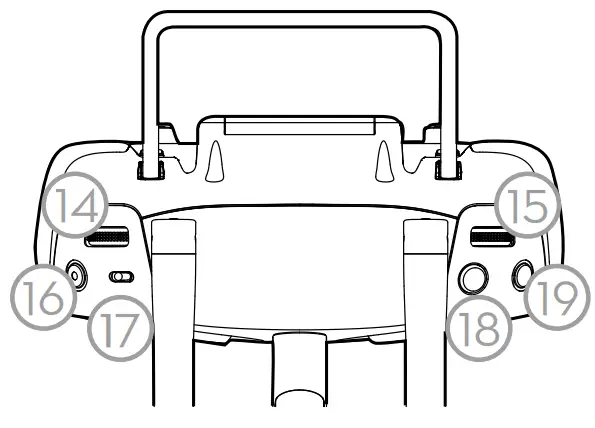
- Power Button
- RTH Button
- Control Sticks
- Speaker
- Lanyard Attachment
- Status LED
- Battery Level LEDs
- USB-C Port
- 3.5 mm Audio Jack
- MicroSD Card Slot
- Display Device
- Sleep/Wake Button
- Antennas
- Gimbal Dial
- Aircraft Control Switch Dial
- Record Button
- Pause Switch
- Shutter Button
- Reserved Button
- Button C1 (customizable)
- Button C2 (customizable)
- Battery Compartment Cover
- Battery Compartment Cover Lock
- Dongle Compartment Cover
The figure below shows the function that each control stick movement performs, using Mode 2 as an example. The left stick controls the aircraft’s altitude and heading, while the right stick controls its forward, backward, left and right movements. The gimbal dial controls the camera’s tilt.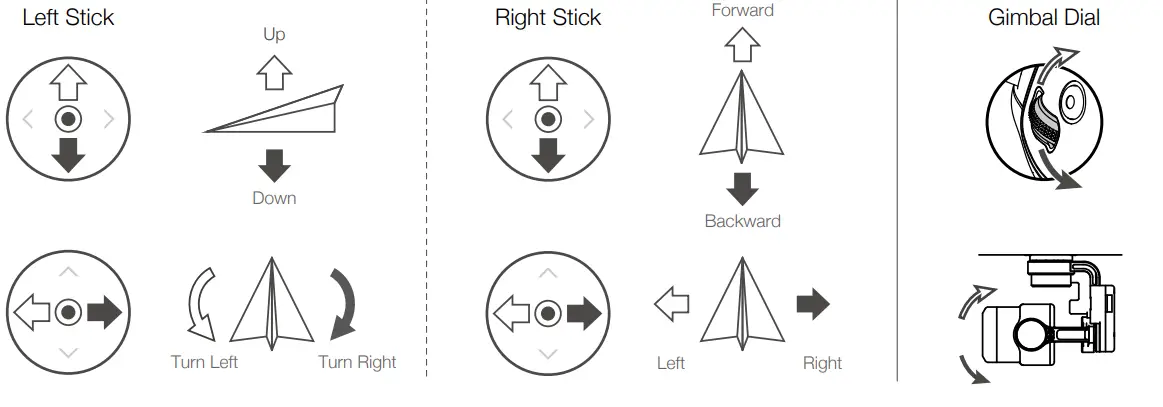
* The remote controller is able to reach its maximum transmission distance (FCC) in a wide open area with no ElectroMagnetic Interference, and at an altitude of about 400 feet (120 meters).
Using Ph antom 4 RTK
Mount the Remote Controller Battery
The remote controller uses an easily removable interchangeable Intelligent Battery for long-term operation.
1 Slide the battery compartment cover lock on the back of the remote controller down to open the cover.
2 Insert the Intelligent Battery into the compartment and push it to the top.
3 Close the cover.
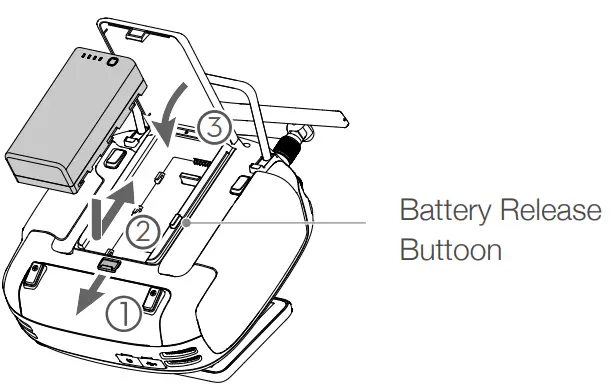
![]() To remove the Intelligent Battery, open the cover, press and hold the battery release button, then push the battery downward.
To remove the Intelligent Battery, open the cover, press and hold the battery release button, then push the battery downward.
Mount the Dongle and SIM Card
- The Phantom 4 RTK remote controller can access the Internet using a 4G dongle with SIM card or Wi-Fi signal. For UK, EU, ACUK, or ACEU versions, a Network RTK server can only be accessed using a 4G dongle with SIM card. For AU or AFUS versions, using a 4G dongle with SIM card is recommended, but a WiFi signal can also be used. To confirm the version of your unit, please view the version code after the product name on the label on the product packaging. When uploading or downloading system logs or operation data, using a Wi-Fi signal for Internet access is recommended.
- Only use a DJI approved dongle.
- The dongle supports various network standards. Use a SIM card that is compatible with the chosen mobile network provider and select a mobile data plan according to the planned level of usage.
- The dongle and SIM card are used to enable the remote controller to access to specific networks and platforms, such as the DJI AG platform. Be sure to mount them correctly, or else network access will not be available.

- Test procedure: Press the remote controller power button once, then press again and hold to turn the remote controller on. In the DJI GS RTK app tap > and select Network Diagnostics. If the statuses of all the devices in the network chain are shown in green the dongle and SIM card are functioning properly.

Check the Battery Levels
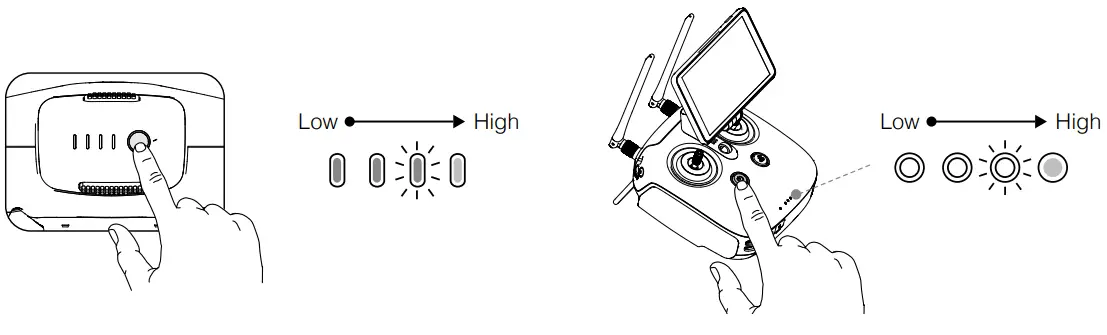
Press once to check the battery level. Short press once, then long press and hold to turn on/off.
Charge the Batteries
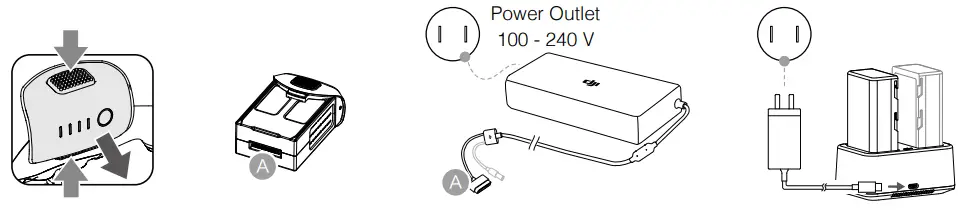
Fully charge the batteries before first-time use.
Prepare the Remote Controller
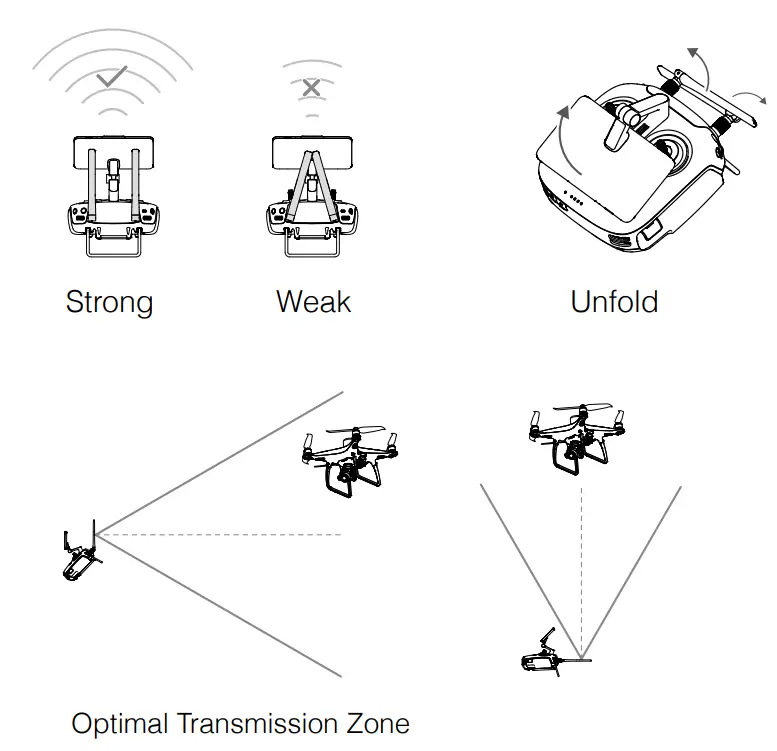
Try to keep the aircraft inside the optimal transmission zone. If the signal is weak, adjust the antennas or fly the aircraft closer.
Prepare for Takeof
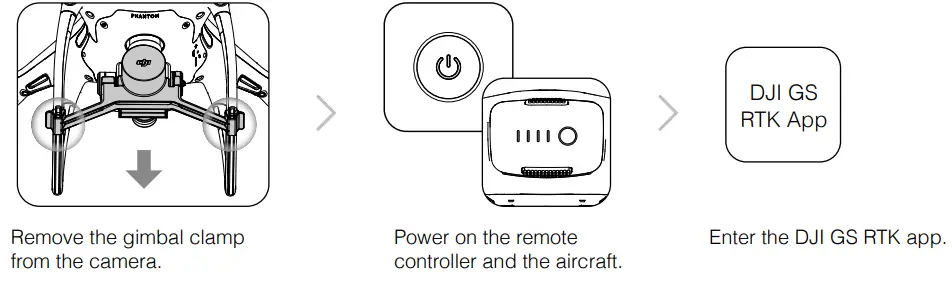
 | When using your Phantom 4 RTK for the first time, activate it using the DJI GS RTK app. Ensure that the remote controller has access to the Internet. |
 Check that the propellers are secure before each flight.
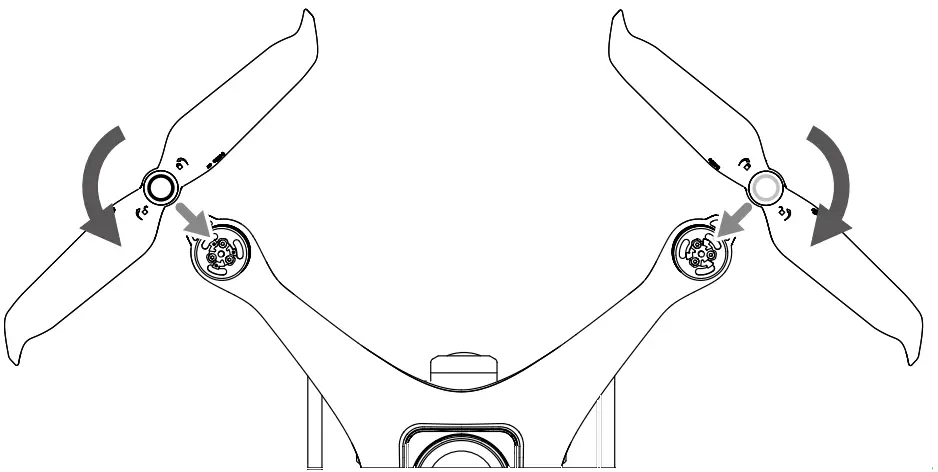
Flight
Ready to Go (RTK)
| Ready to Go (RTK) | Before taking off, make sure the Aircraft Status Bar in the DJI GS RTK app indicates Ready to Go (RTK)* or Ready to Go (GNSS). |
Takeoff
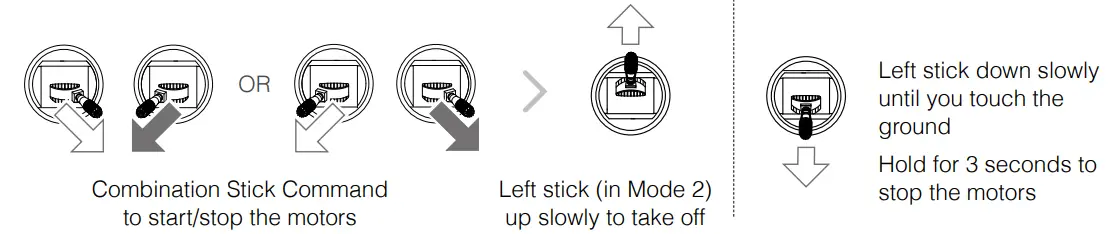
 Spinning propellers can be dangerous. Stay away from spinning propellers and motors. DO NOT start the motors in confined spaces or when there are people nearby.
- Always keep your hands on the remote controller when the motors are
- spinning. Stopping motors mid-flight: Perform the CSC to stop the motors. This function can be enabled in the app.
Only stop motors mid-flight in emergency situations when doing so can reduce the risk of damage or injury.
 It is important to understand basic flight guidelines, for the safety of both you and those around you. Do not forget to read the Disclaimer and Safety Guidelines.
* RTK positioning is recommended. Go to DJI GS RTK > Fly > > RTK to enable RTK module and select a method for receiving RTK signals.
Start Operations
Photogrammetry and waypoint actions can be performed using both DJI Terra software and the DJI GS RTK app. The following example includes instructions for photogrammetry operation using the DJI GS RTK app. Refer to DJI Terra User Manual for details (if in use).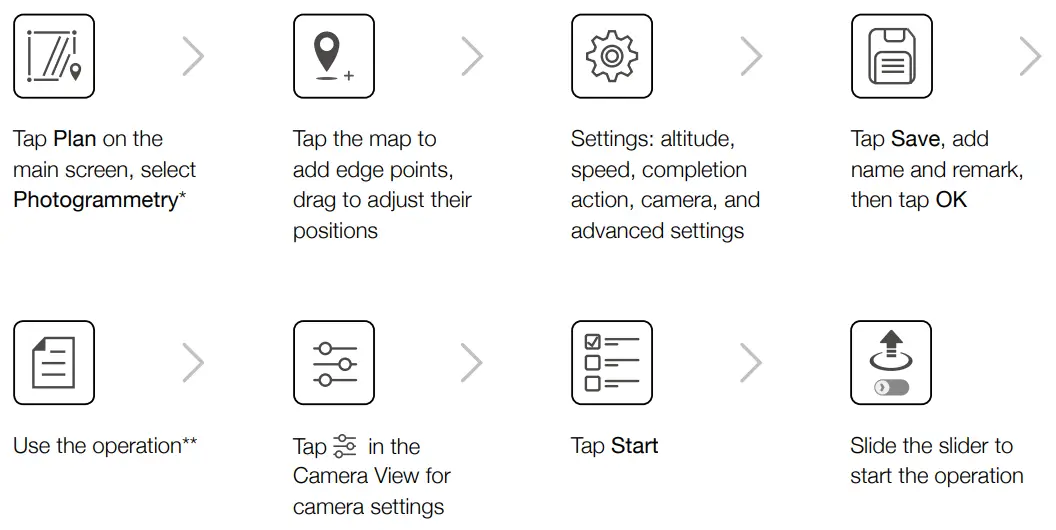
* Users can also import KML/KMZ files to the app through a microSD card to plan photogrammetry operations. Refer to the Phantom 4 RTK User Manual for details.
** Select the operation again via the following method if the operation was not used immediately. Go to DJI GS RTK main screen > Fly > ![]() on the left, select the operation from the planning list, and tap Invoke.
on the left, select the operation from the planning list, and tap Invoke.
- Only take off in open areas.
- An operation can be paused by toggling the Pause Switch. The aircraft will hover and record the breakpoint, and then the aircraft can be controlled manually. To continue the operation, select it from the list again and then resume. The aircraft will automatically return to the breakpoint and resume the operation.
- The aircraft will return to the Home Point automatically once the operation is complete. Instead of RTH, the aircraft can also be set to perform other flight actions within the app.
Applications
 Field Planning
Import aerial photos into DJI Terra to perform map post-processing. Then plan the field in DJI Terra. Use a microSD card to import the plan file from DJI Terra into the Agras MG-1S Advanced / MG-1P series remote controller. Refer to corresponding user manuals for more details.
 High Accuracy Mapping
Import the original aerial photos into DJI Terra and perform map post-processing to produce a high-accuracy map. Please refer to the DJI Terra User Manual for more details.
Visit the link below to learn more about DJI Terra: http://www.dji.com/dji-terra
Specifications
| ● Aircraft | |
| Weight (Battery & Propellers Included) | 1391 g |
| Max Service Ceiling Above Sea Level 1 | 19685 ft (6000 m) |
| Max Ascent Speed | 6 m/s (automatic flight); 5 m/s (manual control) |
| Max Descent Speed | 3 m/s |
| Max Speed | 31 mph (50 kph) (P-mode); 36 mph (58 kph) (A-mode) |
| Max Flight Time | Approx. 30 minutes |
| Operating Temperature | 32° to 104° F (0° to 40° C) |
| Operating Frequency | 2.400 GHz to 2.483 GHz (Europe, Japan, Korea) 5.725 GHz to 5.850 GHz (United States, China) |
| EIRP | 2.4 GHz |
| Hover Accuracy Range | CE (Europe) / MIC (Japan) / KCC (Korea): < 20 dBm 5.8 GHz FCC (United States) / SRRC (Mainland China) / NCC (Taiwan, China): < 26 dBm |
| Image Position Offset | RTK enabled and functioning properly: Vertical: ±0.1 m; Horizontal: ±0.1 m |
| ● GNSS | |
| Single-Frequency High-Sensitivity GNSS | GPS+GLONASS |
| Multi-Frequency Multi-System HighPrecision RTK GNSS | Frequency Used GPS: L1/L2; GLONASS: L1/L2; BeiDou: B1/B2; Galileo: E1/E5 First-Fixed Time: < 50 s Positioning Accuracy: Vertical 1.5 cm + 1 ppm (RMS); Horizontal 1 cm + 1 ppm (RMS). 1 ppm indicates error with a 1 mm increase over 1 km of movement. Velocity Accuracy: 0.03 m/s |
| ● Mapping Functions | |
| Mapping Accuracy* | Mapping accuracy meets the requirements of the ASPRS Accuracy Standards for Digital Orthophotos Class III. |
| Ground Sample Distance (GSD) | (H/36.5) cm/pixel, H indicates the aircraft altitude relative to the shooting scene (unit: m) |
| Acquisition Efficiency | Max operating area of approx. 1 km2 for a single flight (at an altitude of 182 m, i.e., GSD is approx. 5 cm/pixel, meeting the requirements of the ASPRS Accuracy Standards for Digital Orthophotos Class III). |
| ● Gimbal | |
| Controllable Range | Pitch: -90° to +30° |
| ● Vision System | |
| Velocity Range | ≤ 31 mph (50 kph) at 6.6 ft (2 m) above ground with adequate lighting |
| Altitude Range | 0 – 33 ft (0 – 10 m) |
| Operating Range | 0 – 33 ft (0 – 10 m |
| Obstacle Sensory Range | 2 – 98 ft (0.7 – 30 m) |
| Operating Environment | Surfaces with clear patterns and adequate lighting (> 15 lux) |
| ● Infrared Sensing System | |
| Obstacle Sensory Range | 0.6 – 23 ft (0.2 – 7 m) |
| Operating Environment | Surface with diffuse reflection material, and reflectivity > 8% (such as wall, trees, humans, etc.) |
| ● Camera | |
| Sensor | 1’’ CMOS; Effective pixels: 20M |
| Lens | FOV (Field of View) 84°, 8.8 mm (35 mm format equivalent: 24 mm), f/2.8 – f/11, auto focus at 1 m – ∞ |
| ISO Range | Video: 100 – 3200 (Auto), 100 – 6400 (Manual); Photo: 100 – 3200 (Auto), 100 – 12800 (Manual) |
| Mechanical Shutter | 8 – 1/2000 s |
| Electronic Shutter | 8 – 1/8000 s |
| Max Image Size | 4864×3648 (4:3); 5472×3648 (3:2) |
| Video Recording Modes | H.264, 4K: 3840×2160 30p |
| Photo | JPEG |
| Video | MOV |
| Supported File Systems | FAT32 (≤ 32 GB); exFAT (> 32 GB) |
| Supported SD Cards | microSD, Max Capacity: 128 GB. Class 10 or UHS-1 rating required |
| Operating Temperature | 32° to 104° F (0° to 40° C) |
| ● Remote Controller | |
| Operating Frequency | 2.400 GHz to 2.483 GHz (Europe, Japan, Korea) 5.725 GHz to 5.850 GHz (United States, China) |
| EIRP | 2.4 GHz CE / MIC / KCC: < 20 dBm 5.8 GHz FCC / SRRC / NCC: < 26 dBm |
| Max Transmission Distance | FCC / NCC: 4.3 mi (7 km); CE / MIC / KCC / SRRC: 3.1 mi (5 km) (Unobstructed, free of interference) |
| Power Consumption | 16 W (typical value) |
| Display Device | 5.5 inch screen, 1920×1080, 1000 cd/m2 , Android system, 4G RAM + 16G ROM |
| Operating Temperature | 32° to 104° F (0° to 40° C) |
| ● Intelligent Flight Battery (PH4-5870mAh-15.2V) | |
| Capacity | 5870 mAh |
| Voltage | 15.2 V |
| Battery Type | LiPo 4S |
| Energy | 89.2 Wh |
| Net Weight | 468 g |
| Operating Temperature | 14° to 104° F (-10° to 40° C) |
| Max Charging Power | 160 W |
| ● Remote Controller Intelligent Battery (WB37-4920mAh-7.6V) | |
| Capacity | 4920 mAh |
| Voltage | 7.6 V |
| Battery Type | LiPo 2S |
| Energy | 37.39 Wh |
| Operating Temperature | 4° to 104° F (-20° to 40° C) |
| ● Intelligent Battery Charging Hub (WCH3) | |
| Input | 5V/9V/12V/15V 3.7A max |
| Operating Temperature | 41° to 104° F (5° to 40° C) |
| ● AC Power Adapter | |
| Voltage | 17.4 V |
Download the user manual for more information:
http://www.dji.com/phantom-4-rtk
※This Quick Start Guide is subject to change without prior notice.
DJI is a trademark of DJI.
Copyright © 2022 DJI All Rights Reserved.
YC.BZ.SS000393.08


