sentiotec Onni Small 1-053-079 Infrared Cabin User Manual
About this instruction manual
Read these installation and operating instructions carefully and keep them within reach of the infrared cabin. This ensures that you can refer to information on safety and operation at any time.
![]() These installation and operating instructions can also be found in the downloads section of our website: www.sentiotec.com/downloads
These installation and operating instructions can also be found in the downloads section of our website: www.sentiotec.com/downloads
Important information for your safety
The infrared cabin has been produced in accordance with the applicable safety regulations for technical units. However, hazards may arise during use. Therefore adhere to the following safety information and the specific warning notices in the individual chapters.
Intended use
The infrared cabin is used for the heating of the human body.
The cabin location must be protected against splashing water. For optimal operation, the location should have an ambient temperature of at least 20 °C. The maximum air humidity in the surroundings should not exceed 95%.
The cabin must be erected on a level surface. A distance of at least 5 cm from the wall must be maintained.
Any use exceeding this scope is considered improper use. Improper use can result in damage to the product, severe injuries or death.
Safety information
- Installation and connection of the electrical parts (control unit, heater, etc.) may only be performed when the power supply is disconnected.
- Also comply with the regulations applicable at the installation location.
- For your own safety, consult your supplier in the event of problems that are not explained in sufficient detail in the installation instructions.
- The cabin may not be used by children under 8 years old.
- The cabin may be used by children over 8 years old, by persons with limited psychological, sensory or mental capabilities or by persons with lack of experience/knowledge only under the following conditions:
- They are supervised.
- They have been shown how to use the device safely and are aware of the hazards that could occur.
- Children may not play with the cabin.
- Children under 14 years of age may only clean the cabin if they are supervised.
- The cabin may not be cleaned with steam cleaners, high-pressure cleaners or splashed water.
- For health reasons, do not use the sauna when under the influence of alcohol, medication or drugs.
- Before the control unit is switched on, make sure that no combustible objects have been placed on the heating elements.
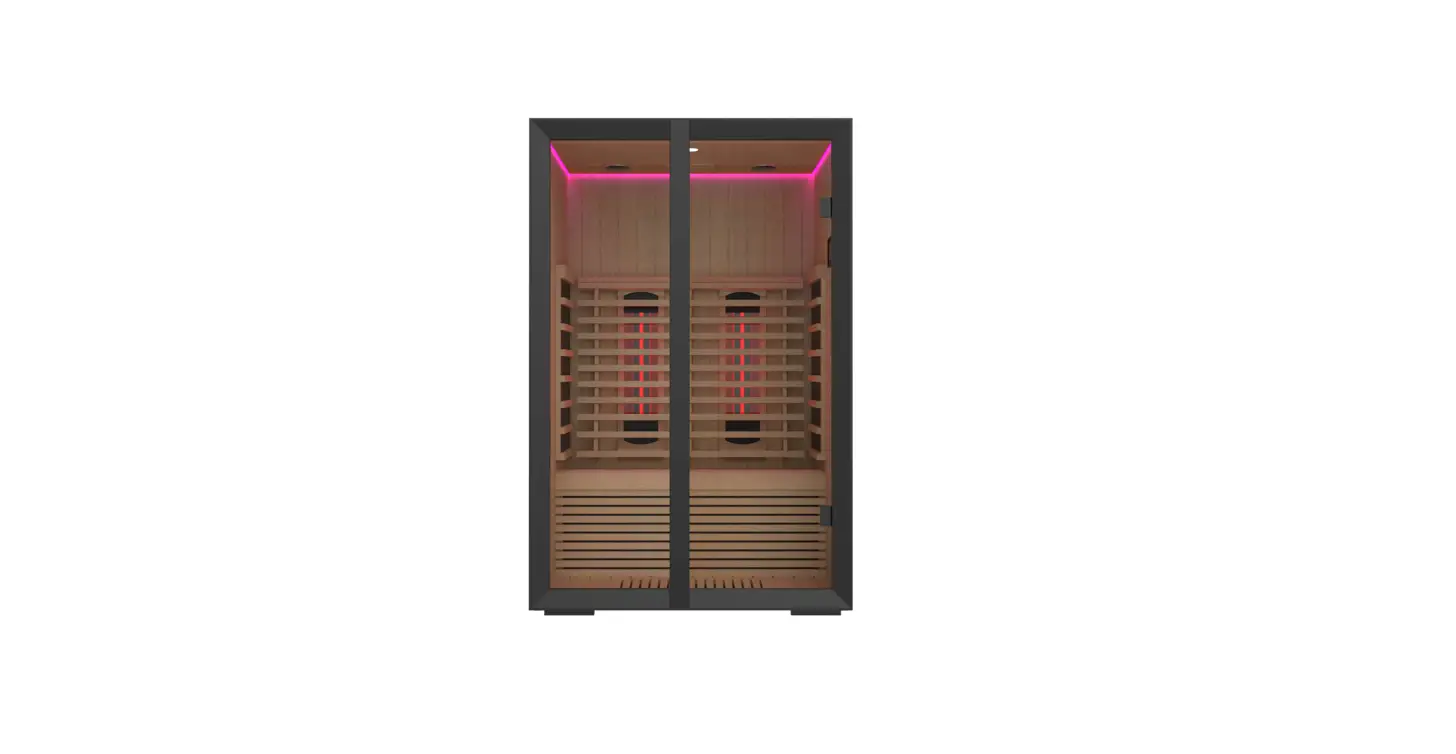
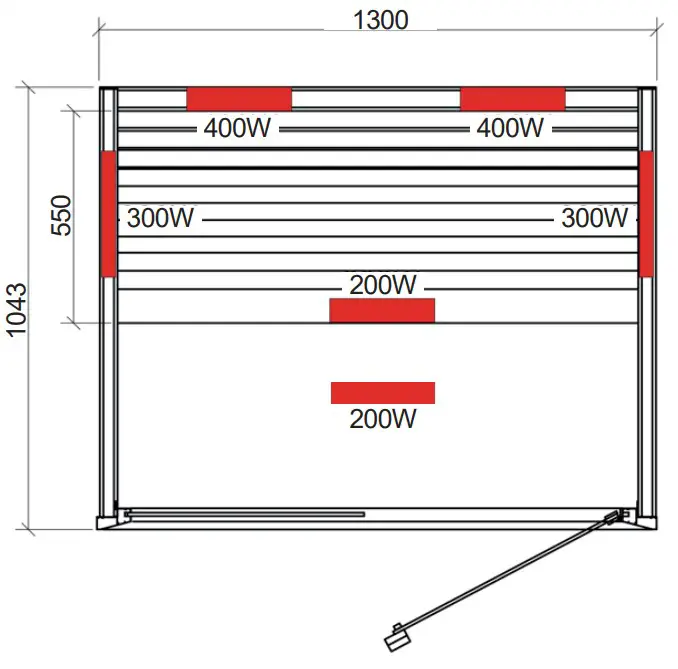
Product description
Technical data
| Cabin material | Abachi |
| Cabin dimensions (L x W (depth) x H) | 1300 x 1043 x 2000 mm |
| Voltage supply | 230 VAC 50 Hz |
| Total output | 1800 Watt; 7.8 A |
| IR radiator, dimmable | 2 × 400 W |
| Heating elements, side wall | 2 × 300 W |
| Heating element, calves | 1 × 200 W |
| Heating element, floor | 1 × 200 W |
Floor plan
Scope of delivery
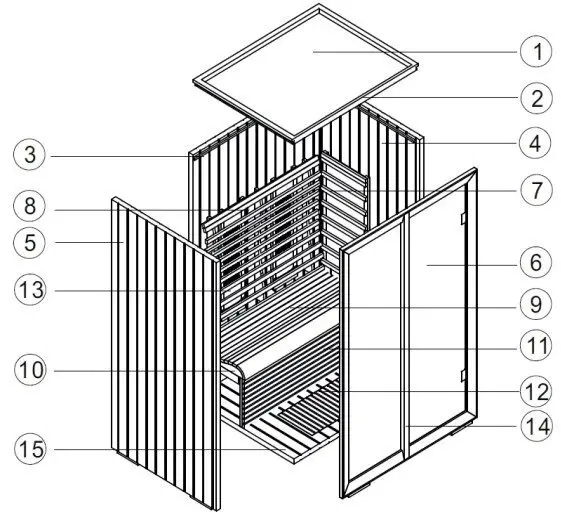
Parts list
| No. | NAME | DIMENSIONS | PIECES |
| 1 | Roof cover | 1214 x 954 x 5 mm | 1 |
| 2 | Roof element | 1214 x 954 x 65 mm | 1 |
| 3 | Rear wall | 1214 x 1980 x 59 mm | 1 |
| 4 | Side wall, right | 1013 x 1980 x 46 mm | 1 |
| 5 | Side wall, left | 1013 x 2000 x 46 mm | 1 |
| 6 | Glass front | 1000 x 2000 x 67 mm | 1 |
| 7 | Heating element, side | 460 x 878 x 40 mm | 2 |
| 8 | IR radiators | 250 x 780 x 65 mm | 2 |
| 9 | Ergonomic bench | 1214 x 550 x 80 mm | 1 |
| 10 | Bench support | 1214 x 510 x 60 mm | 1 |
| 11 | Heating element, calves | 1214 x 390 x 40 mm | 1 |
| 12 | Heating element, floor | 670 x 340 x 55 mm | 1 |
| 13 | Ergonomic backrest | 1100x 870 x 111 mm | 1 |
| 14 | Door handle | 1960 x 80 x 32 mm | 1 |
| 15 | Floor grid | 914 x 954 x 46 mm | 1 |
| Screws | 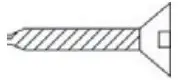 5 x 35 mm 5 x 35 mm | 12 | |
| Screws | 4 x 45 mm | 10 | |
| Screws | 5 x 60 mm | 4 | |
| Screws | 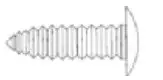 4 x 35 mm 4 x 35 mm | 8 |
Installation
Before you begin work, check the parts list to ensure that all the individual parts have been delivered. If any parts are missing, please contact your dealer within 14 days of receiving the cabin – see warranty card at the end of the instructions.
![]() You need an assistant for assembly.
You need an assistant for assembly.
We also advise you to pre-drill the holes for the screws.
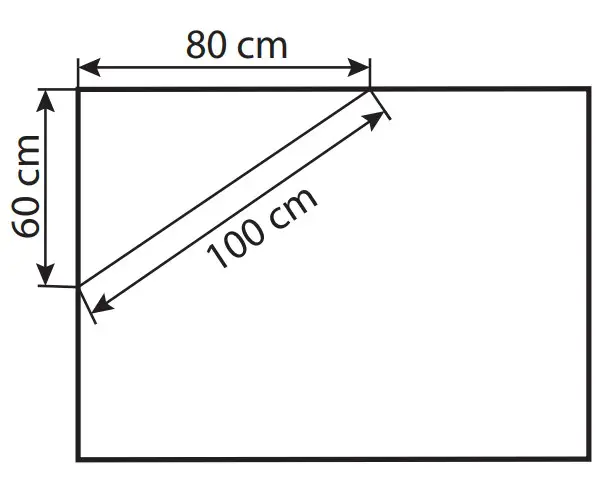
![]() Check the right angle:
Check the right angle:
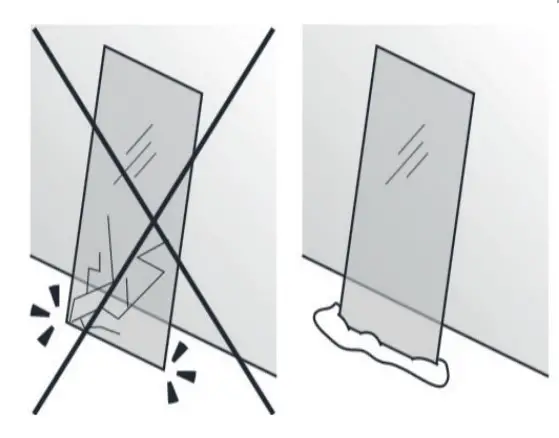
![]() Handle glass with care: Special care must be taken with the edges of the glass – hardened glass can shatter into small pieces in the event of impact. Insert protective cushioning (e.g: cardboard box) under the edge of the glass.
Handle glass with care: Special care must be taken with the edges of the glass – hardened glass can shatter into small pieces in the event of impact. Insert protective cushioning (e.g: cardboard box) under the edge of the glass.
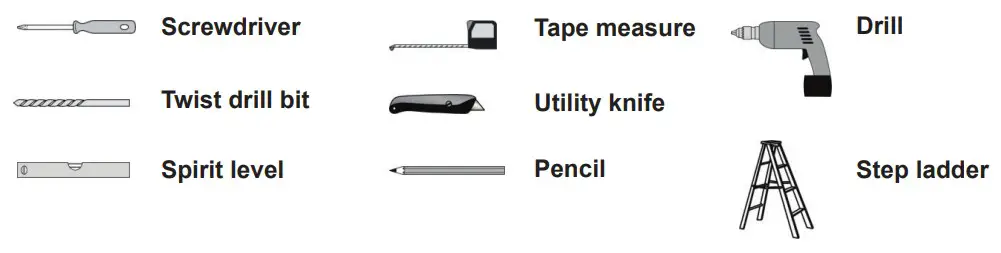
Tools required
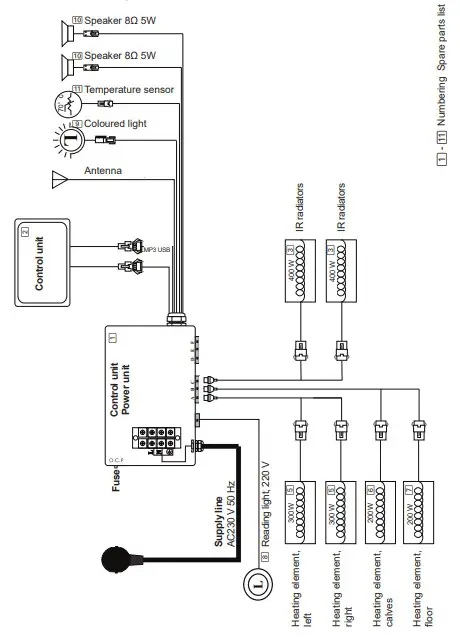
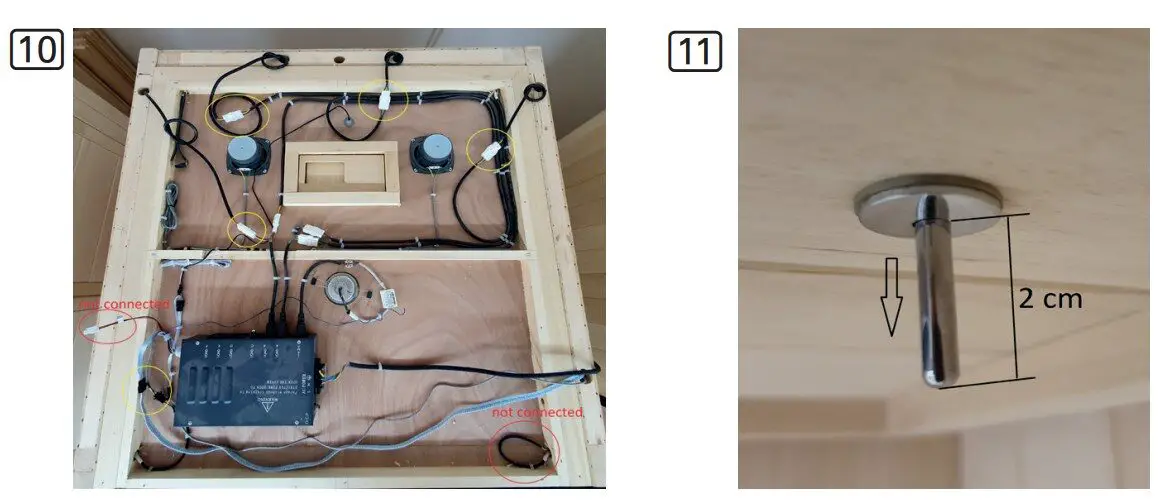
Circuit diagram
Operation
Commissioning
Connect all connectors according to the circuit diagram and then connect the control unit (power unit) to the wall socket. On/off![]() lights up on the display.
lights up on the display.
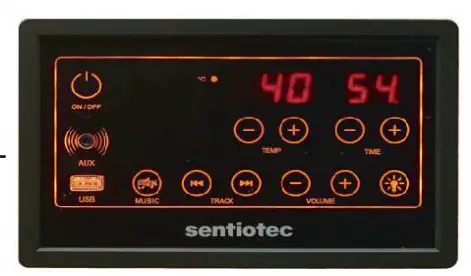
Press On/off to switch the control unit on. The heating elements start to heat.
The cabin temperature and the operating time are displayed. The time is automatically activated for 60 minutes or to the last selected time. If you press On/off again, all functions (heating elements, light and music) are switched off.
![]() Settings can be made for 10 seconds (flashing display), then it switchesn to display mode.
Settings can be made for 10 seconds (flashing display), then it switchesn to display mode.
Temperature settings
The desired temperature can be set with the Temperature +/- keys (30-70 °C).
When the temperature is reached, all heating elements are automatically switched off. If the temperature drops 2 °C below the previously set temperature, the heating elements are automatically switched on again.
If the cabin temperature exceeds 80 °C, “HH” flashes in the display. All functions are automatically switched off. Wait until the temperature drops below 70 °C, and restart the cabin with ON/OFF.
![]() The maximum temperature that can be reached in the cabin may be lower than the desired temperature. This depends on the temperature outside the cabin.
The maximum temperature that can be reached in the cabin may be lower than the desired temperature. This depends on the temperature outside the cabin.
Time settings
The desired heating time from 5 to 60 min. can be set with the Time +/- button (each press of the button = 1 minute). There is then a countdown of the minutes and at “00” all functions are automatically switched off.
Light
Pressing the Light button switches on the reading light and the coloured light.
You can enter the setting mode by pressing and holding the “Light” button for three seconds (“Lx” (x = 1-9) in the temperature display and “2n” in the time display). The following settings are possible:
“Time +”: Reading light on/off
“Time -”: Coloured light on/off
“Temperature + / -”: Colour selection
L1 = white, L2 = pink, L3 = blue, L4 = sky blue, L5 = green, L6 = yellow,
L7 = red, L8 = rotate colours, L9 = slow change of colour
Music
By pressing the Music button you can switch between the FM radio, Bluetooth, USB and external input AUX functions.
Volume +/- can be used to control the volume in the range of 1 to 30. Press Track ![]() to select the previous/next track/radio station.
to select the previous/next track/radio station.
FM radio
Press the Music button until FM is displayed and then press and hold the Music button for three seconds. The radio will automatically search for and store stations (stations from 87.5 MHz to 108.5 MHz). Press Track ![]() to select the previous or nextradio station.
to select the previous or nextradio station.
Bluetooth
Press the Music button until BLU is displayed, in order to activate the Bluetooth connection to your mobile phone. Turn on the Bluetooth search function of the mobile phone and search for the “BT Sauna” Bluetooth device (match time = 7 sec.).
After successfully connecting with the phone, you can play the music from the mobile phone.
USB
Press the Music button until USB is displayed. Music (MP3) is played from the inserted USB stick.
AUX
Press the Music button until AU is displayed. The music from the connected device plays.
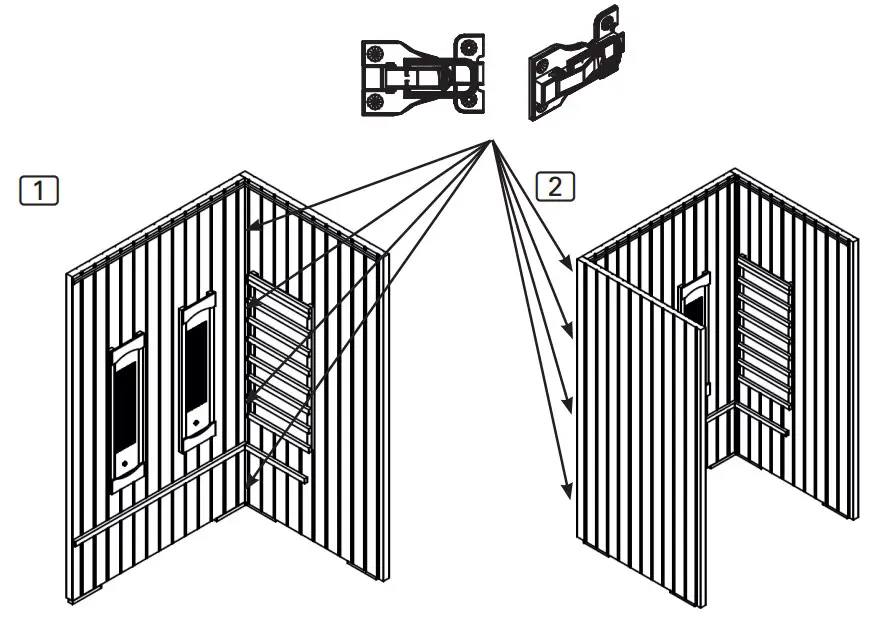
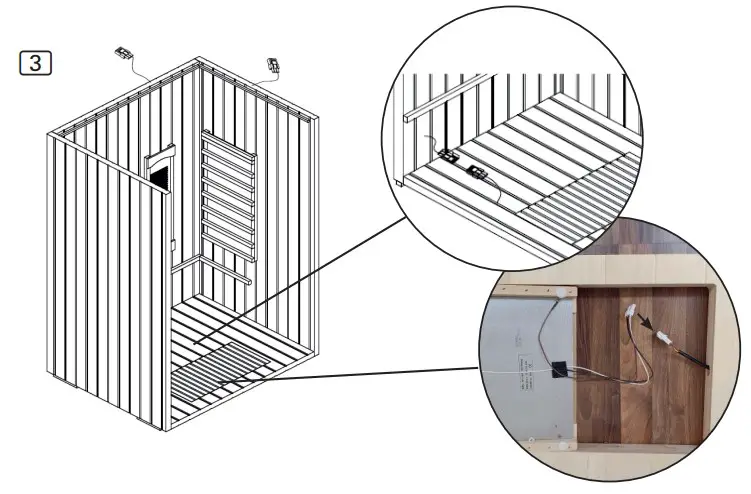
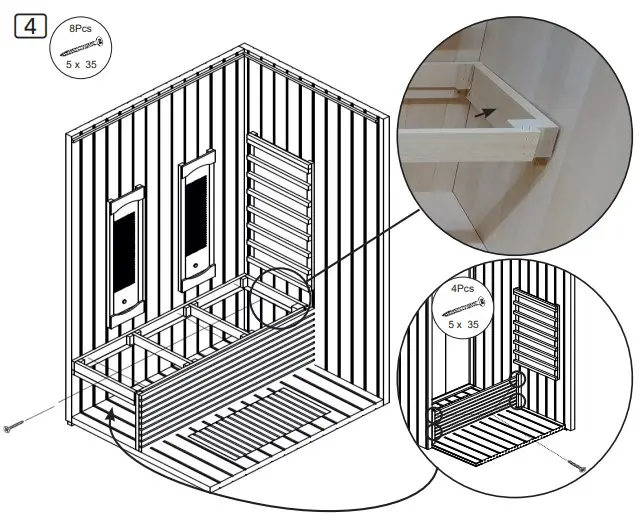
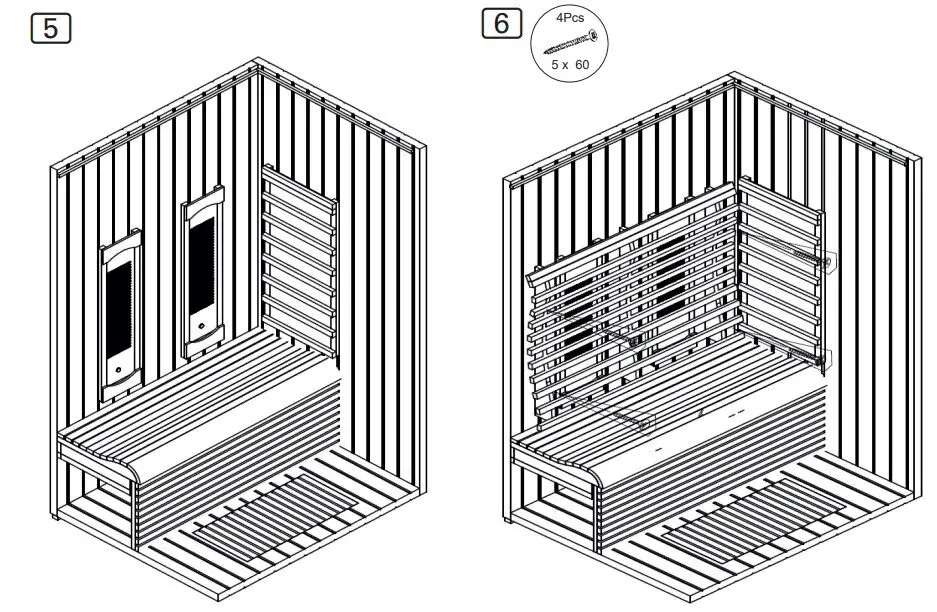
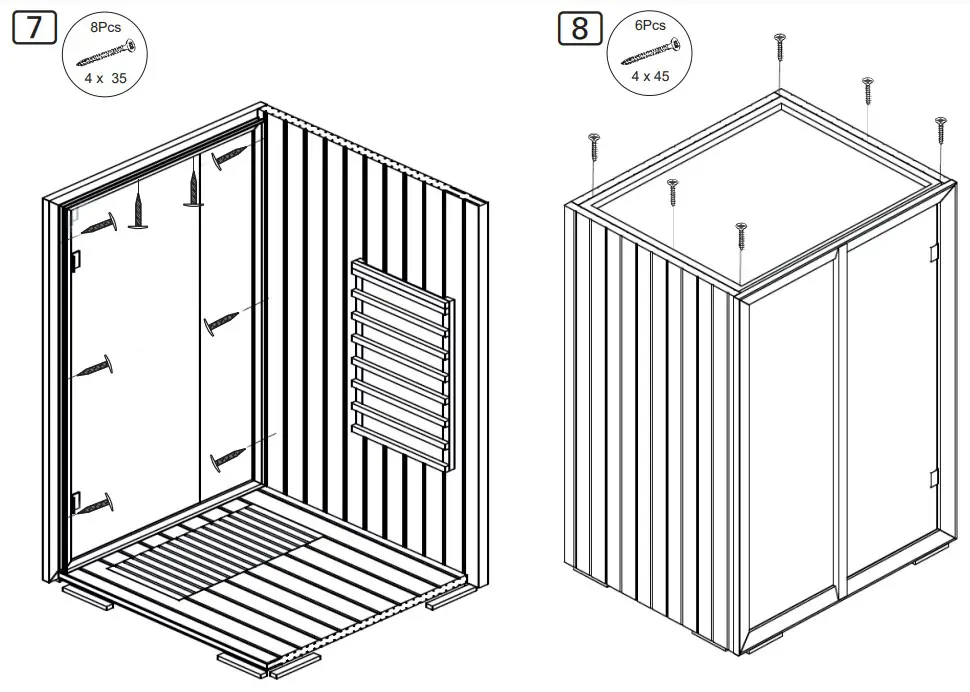
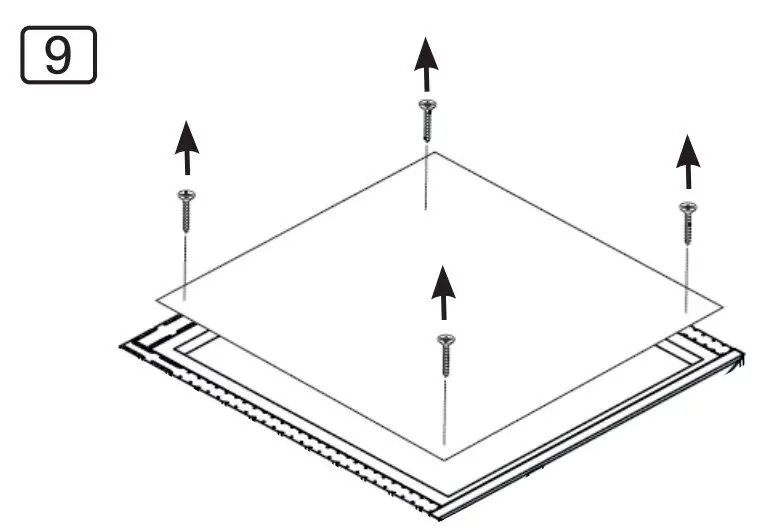
Assembly illustrations
Guarantee card
Fill in this form and send it by e-mail to your dealer
Invoice number:____________________ Date of invoice:__________
Name / telephone number/ email: __________________________________
Item condition (unopened, recently opened or used):_______________________
In the images below, identify (with a circle), the defective item. Include pictures of the defective item as an attachment, and send them by e-mail.
Spare parts
| Nr. | NAME | ORDERNUMBER |
| 1 | Control unit | Onni-IR-P |
| 2 | Control panel | Onni-IR-C |
| 3 | Radiator complete 400 W (770*210*40) | Onni-IR-400 |
| Radiator element 400 W (540*Ø10) | Onni-IR-400-ES | |
| 5 | Heating element side 300W | Onni-IR-300-S |
| Heating element calves 200W (100*30mm) | Onni-IR-WP-200-100 | |
| 7 | Heating element floor 200W | Onni-WP-200-B |
| 8 | Spot reading light 3W | Onni-IR-SP |
| Color light | Onni-IR-RGB | |
| Speakers 2x5W | Onni-IR-LSP | |
| b | Temperatur sensor | Onni-IR-F |

sentiotec GmbH | Division of Harvia Group
T +43 (0) 7672/22 900-50 |
F -80 | [email protected] | www.sentiotec.com


 Large Infrared Cabin User Manual")


