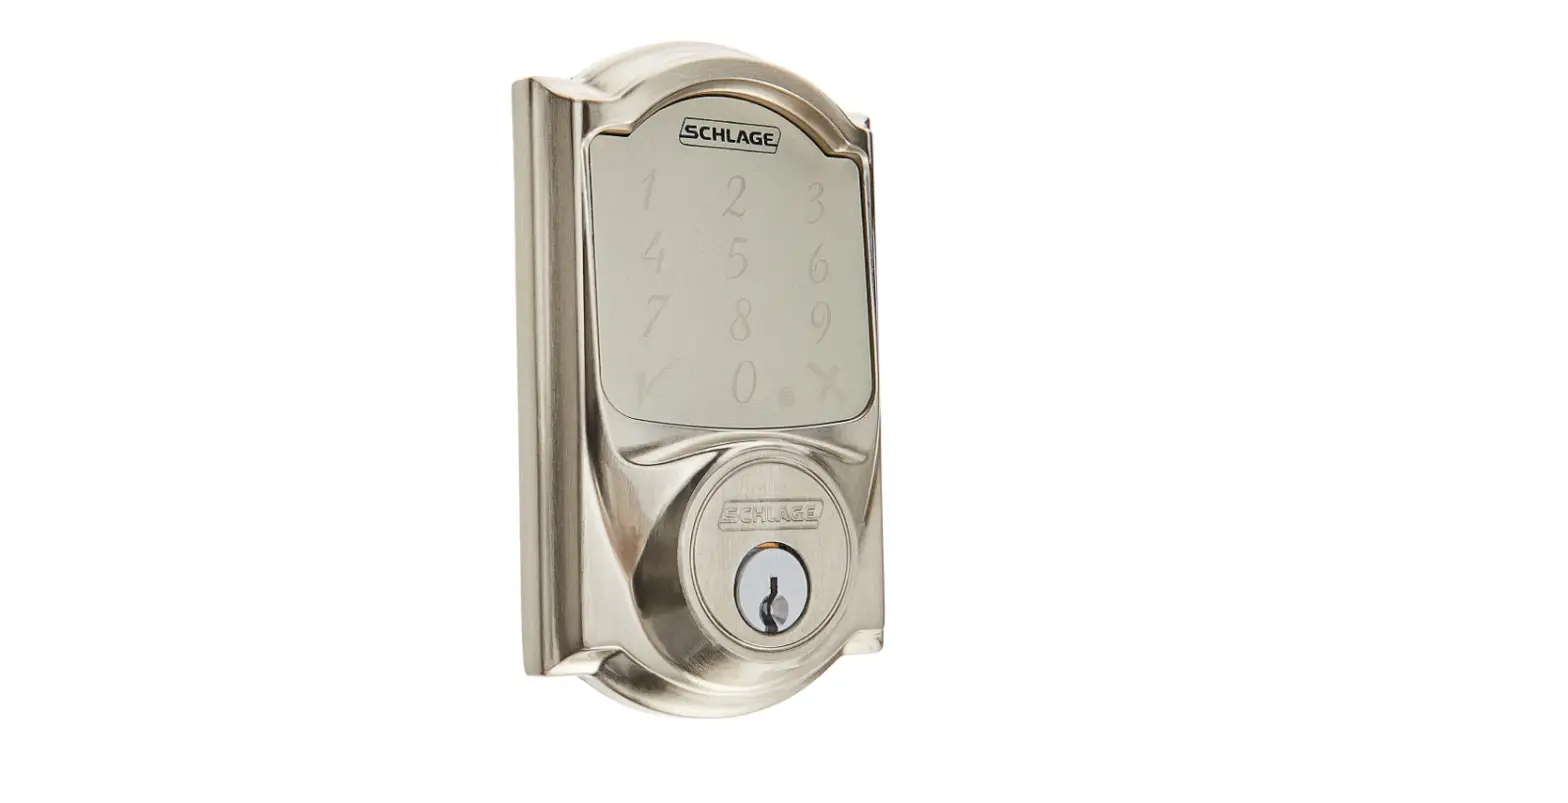
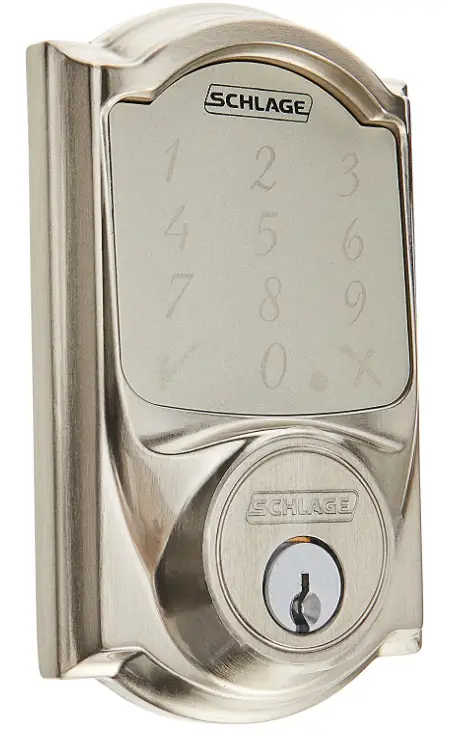
SCHLAGE BE479AA Smart Deadbolt
Package Contents
Camelot Style shown throughout guide.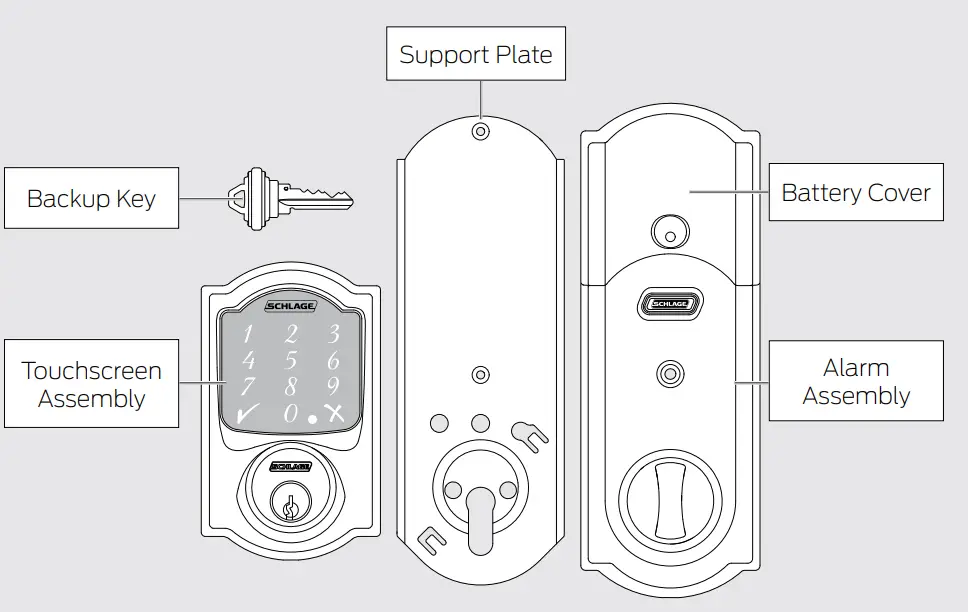
Need Help?
For technical documents and videos, visit schlage.com or the Help Center in the Schlage Sense app
U.S.A.: 888-805-9837
Canada: 800-997-4734
Mexico: 018005067866
Let’s get started!
Once you have all your tools together, please follow each step carefully and in order. Because this is an electronic lock, the order of steps is very important. If you skip a
step, you may have to perform a factory default reset and start over.
You will definitely need this tool:
- Phillips screwdriver
You can use a manual or electric screwdriver, but please DO NOT use a power drill!
You may also need these tools:
- Tape Measure
- Flathead Screwdriver
- Pencil
- Wood Block
- Hammer
INSTALLATION NOTES! PLEASE READ!
- DO NOT use a power drill for installation! This could damage the lock.
- Please read all the instructions before calling customer support.
- DO NOT install the batteries before installing the lock! Follow the instructions in order!
- If you have previously installed this lock on another door, you MUST perform a
Factory Default Reset FIRST! See the User Guide for more information. - This lock is designed for the following operating temperatures:
- Outside Lock Body (exterior mounted): -31˚F (-35˚C) to 151˚F (66˚C)
- Inside Lock Body (interior mounted): 14˚F (-10˚C) to 120˚F (49˚C)
Download the app
Download the Schlage Sense app from the App Store. Just search for “Schlage Sense” to find the app.
Apple HomeKit™ technology provides an easy, secure way to control your home’s lights, doors, thermostats, and more from your iPhone, iPad, or iPod touch. HomeKit requires an iPhone, iPad, or iPod touch with iOS 8.4 or later.
Watch the installation video
You can access installation videos in the app! The videos will give you a good overview of the installation process.
Alternatively, please visit answers.schlage.com and then click on Schlage Sense.
Check current door/frame alignment.
Because the bolt on this lock is extended automatically, it is important that the door and frame are aligned. Use this checklist to determine if your current alignment will work without any adjustment.
- I can lock the door without pushing, pulling or lifting the door.
- My door alignment—the ability to lock the door easily and smoothly—stays the same with changing seasons.
- When the door is closed, there is space for the deadbolt to extend 1” into the frame when locked.
If you could not check every box in the checklist, you will need to adjust your door and/or frame. Please visit answers.schlage.com for more information.
Remove the current deadbolt from the door.
Remove the entire deadbolt, including the bolt. You may also want to remove the strike. »»In order to maintain BHMA Grade 1, you must install the included reinforcement plate and strike (see step 7d on page 7). »»A standard Schlage deadbolt is shown. Check with your specific deadbolt manufacturer if you need help.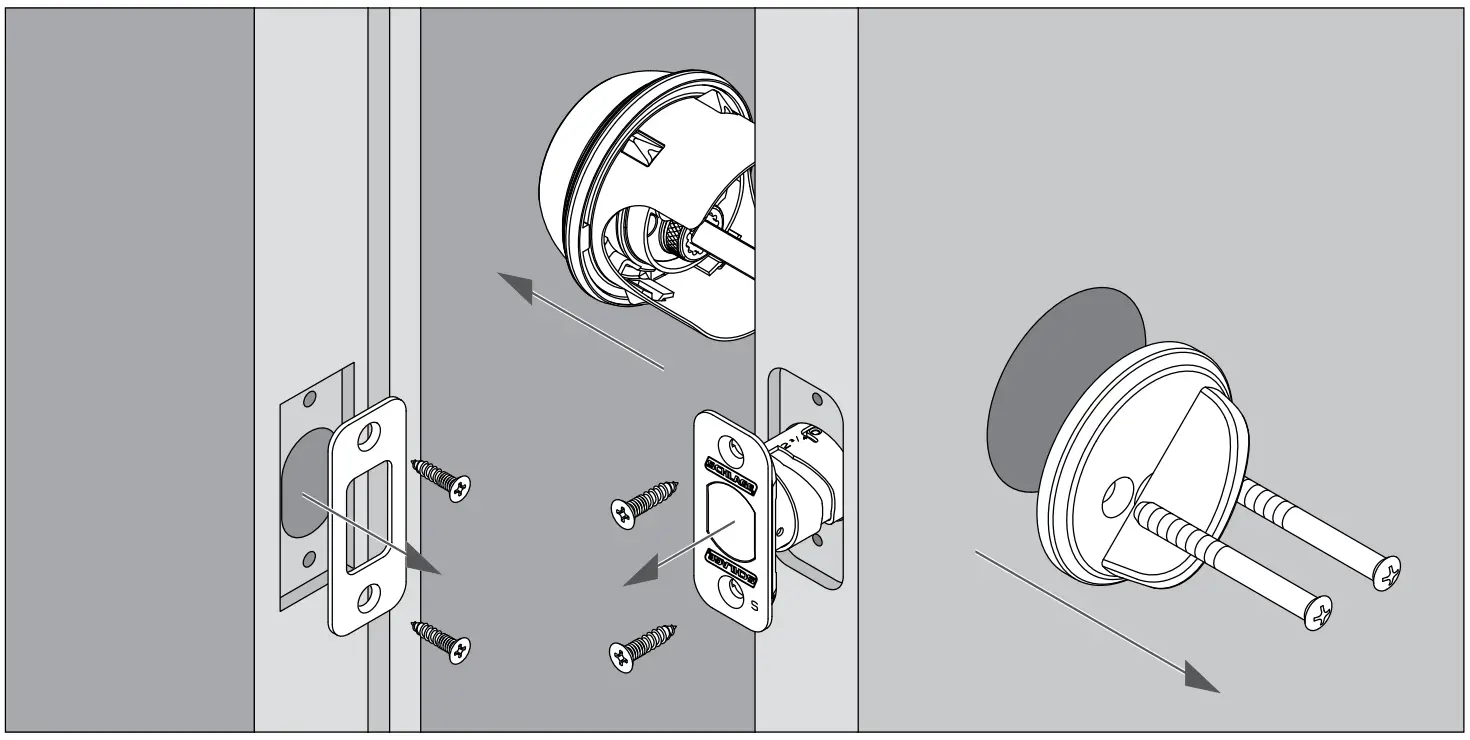
Check door/frame dimensions
Measure the dimensions shown. If your door dimensions do not match, you will need to change your door preparation. Go to answers.schlage.com
»for d»rilling instructions.
- If your door is thicker than 1C\v”, you will need a thick door kit. Please call Customer Service:
- Mark your crossbore and backset measurements on this page. You will need these measurements for installation. Either measurement is normal.
Toll-Free Calling From:
U.S.A.: (888) 805-9837
Canada: (800) 997-4734
Mexico: 018005067866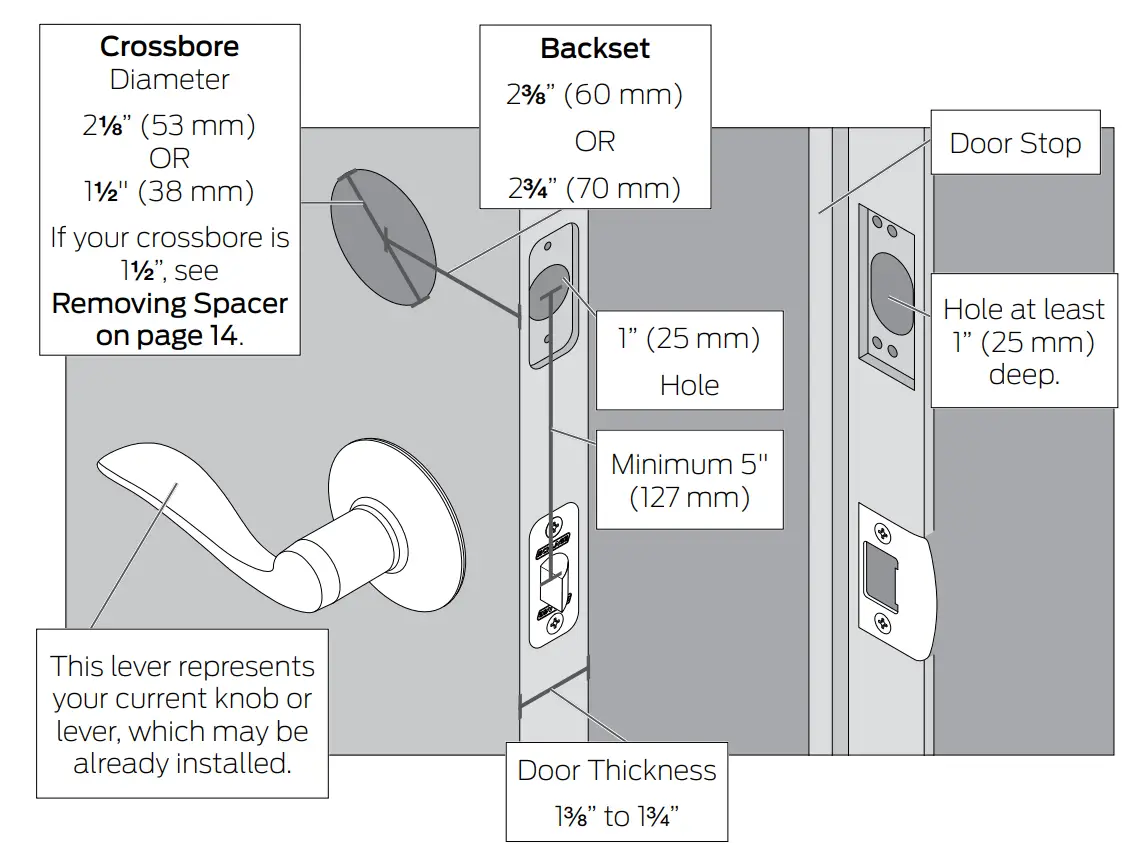
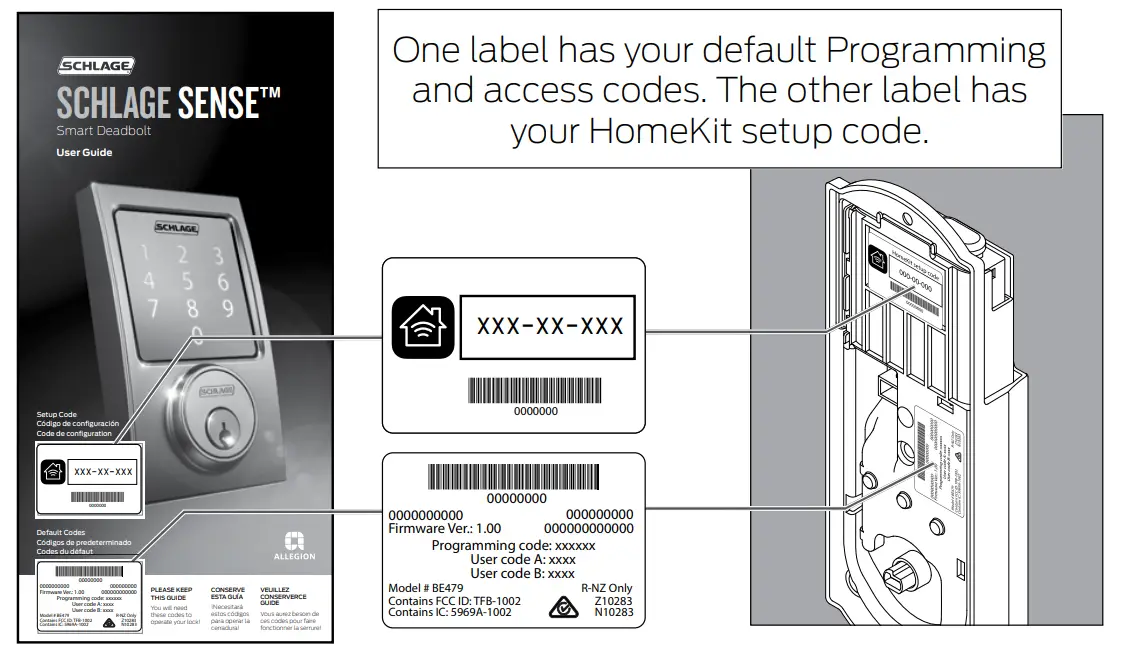
Locate programming and access codes
Codes are located on the stickers on the front of the User Guide. You will need these codes to operate the lock. They are also located on the back of the Alarm Assembly.
- Do NOT remove these stickers from the back of your lock! If you lose your codes, you can reset your lock back to these default codes.
- The HomeKit setup code is used to connect your lock to your iPhone, iPad, or iPod touch.

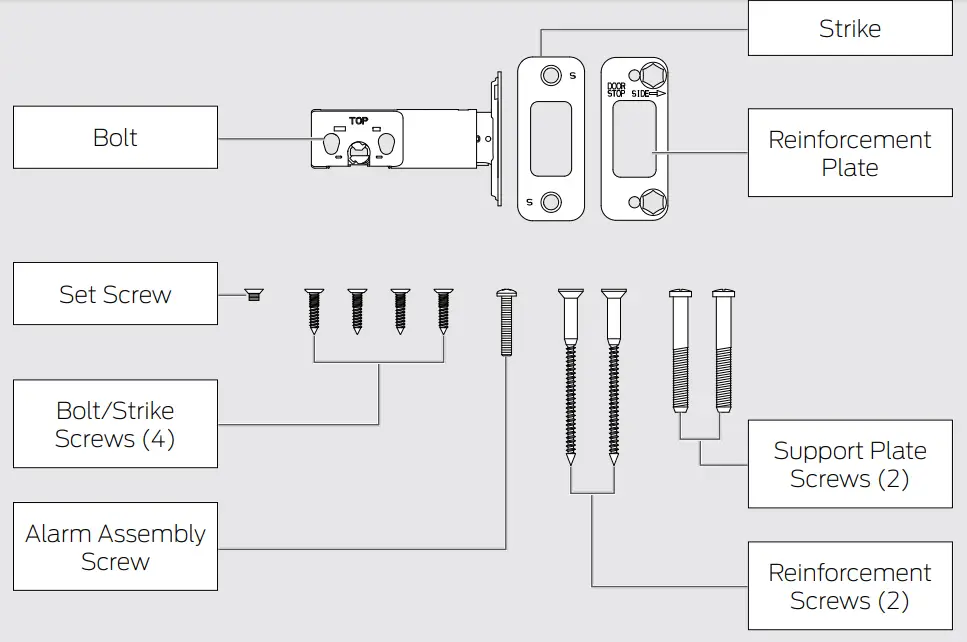
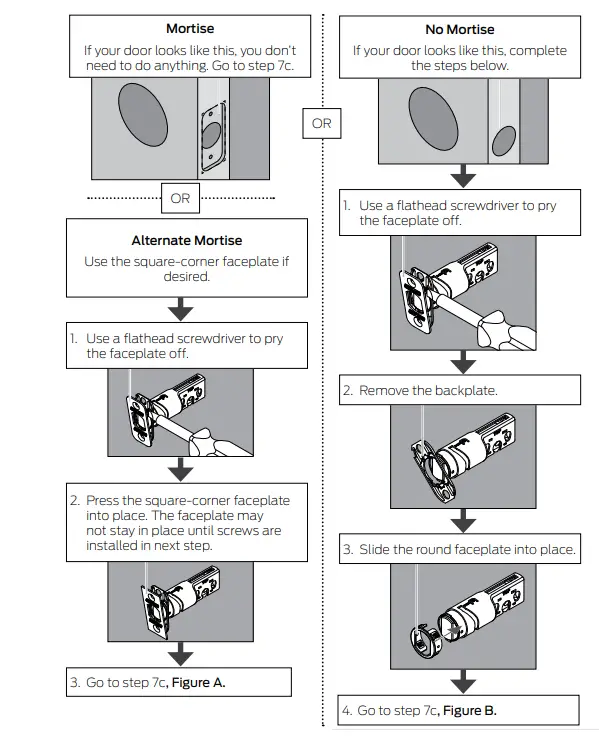
Install bolt and strike
- Adjust bolt length, if necessary.
- If the backset (see step 5 on page 5) of your door was 2C\,” (60 mm), you do not need to do anything. Proceed to step step 7b.
- If the backset (see step 5 on page 5) of your door was 2C\v” (70 mm), you need to adjust your bolt. Twist the faceplate until the button pops into the 2C\v” space.

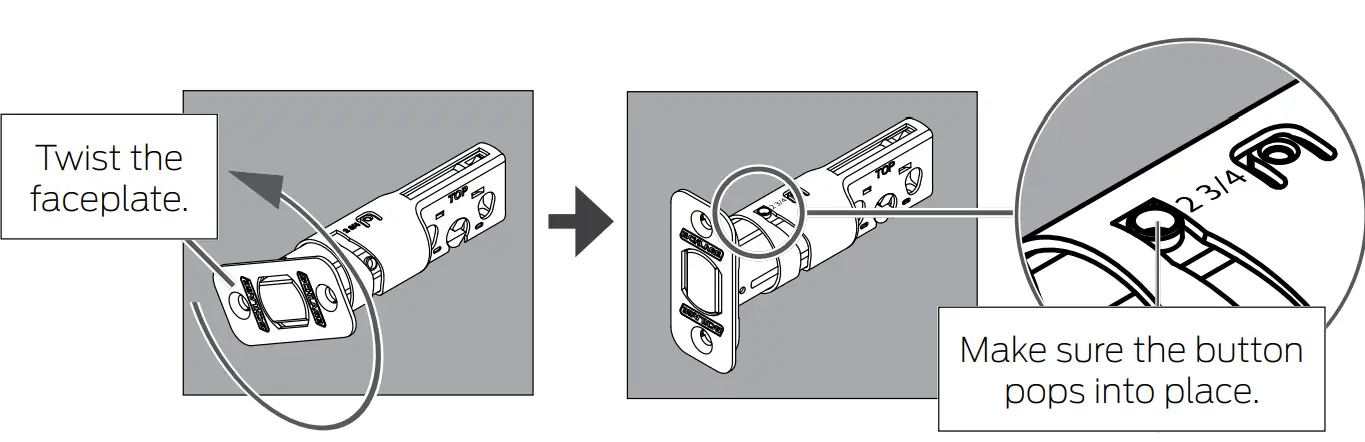
- Change the faceplate, if necessary.
In step 7c, your installation will depend on which kind of door edge you had in this step.
- Install the bolt into the door
Choose the picture below that matches your door.
- Install the strike into the frame.
Inst»all all the parts shown for maximum security. In order to maintain BHMA Grade 1, you must install the included reinforcement plate and strike.
The reinforcement screws may not fit on doors with sidelights. - Test bolt alignment
- Close the door.
- Insert a flathead screwdriver into the slot in the bolt, as shown.
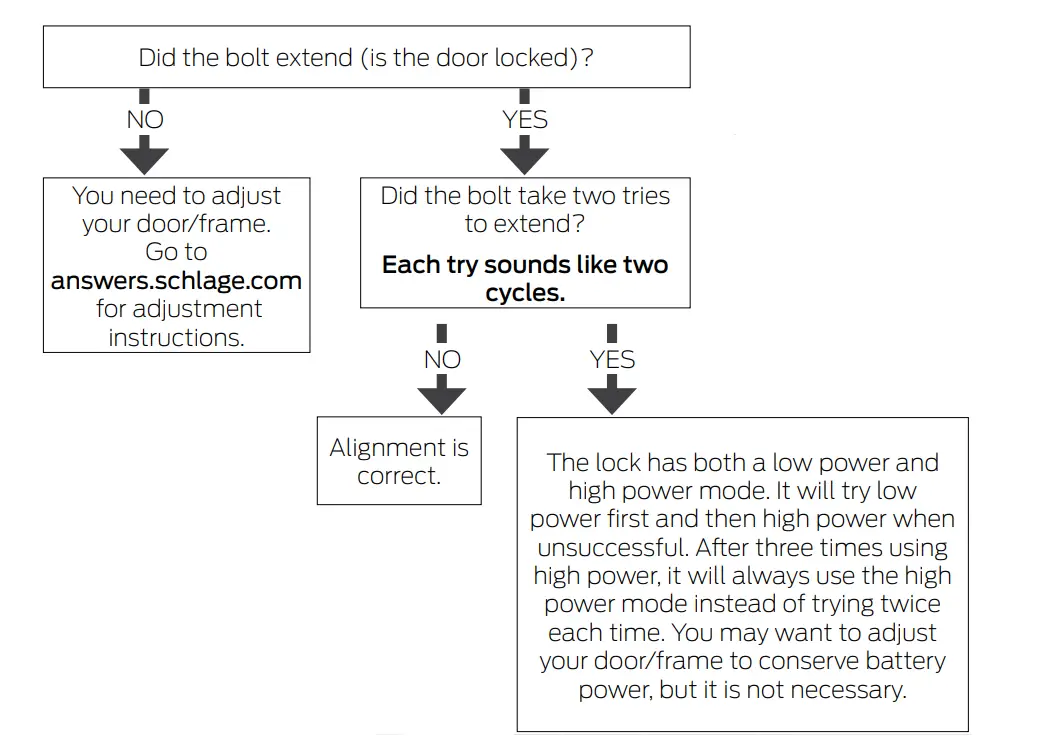
- Rotate the screwdriver toward the door edge to extend the bolt into the hole in the frame. This operation should be smooth. You should be able to rotate the screwdriver 90˚, fully extending the bolt.
- If the operation was not smooth, or if the bolt did not fully extend, adjust your frame and/or door preparation. Go to answers.schlage.com and watch the video Proper Alignment of Door and Frame for a Smoothly Operating Lock for further instructions.
- R»etract (unlock) the bolt before continuing to step 8. If the deadbolt continues to rub against the strike, contact Customer Support for an alternate strike with an additional .060” (2 mm) clearance.


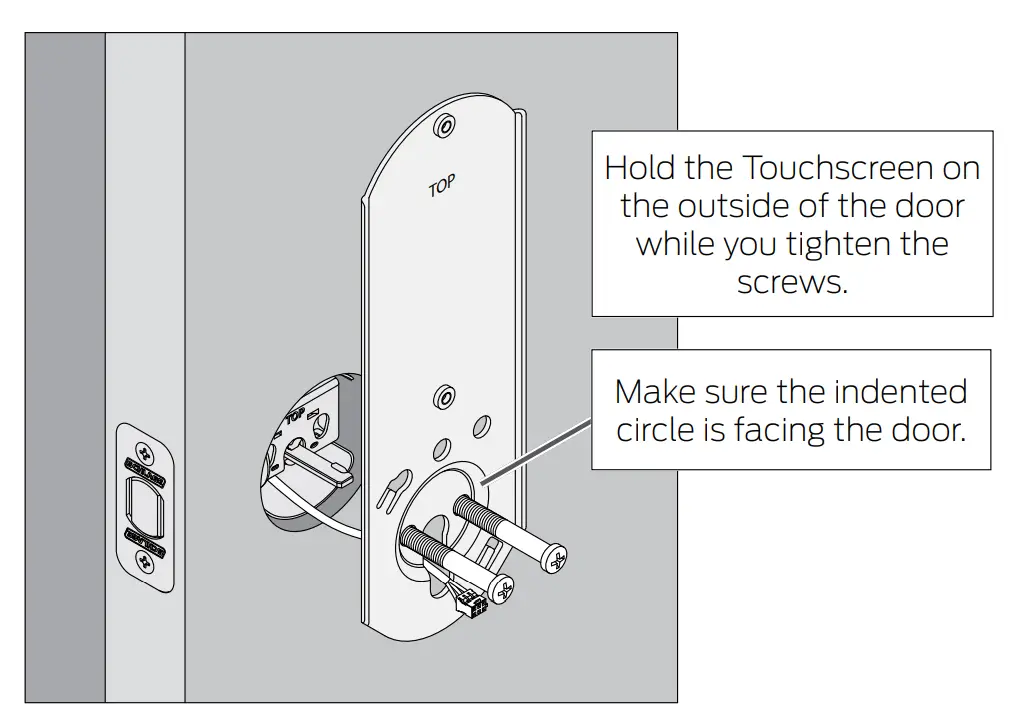
Install the Touchscreen Assembly
- Install the Touchscreen on the outside of the door.
Always remove the spacer for a 1Z\x” (38 mm) crossbore. See Spacer Removal on page 14 before continuing.- The clips snap into the cross bore (see step 5 on page 5) to assist in holding the keypad on the door.
- The Touchscreen Assembly should install smoothly. If it does not, check that the bolt is set to the correct backset (see step 7a on page 6).
NOTE: If you have a crossbore (see step 5 on page 5) that is slightly less than 2Z\,” ( 54 mm), the lock may not install smoothly. You can remove the spacer.
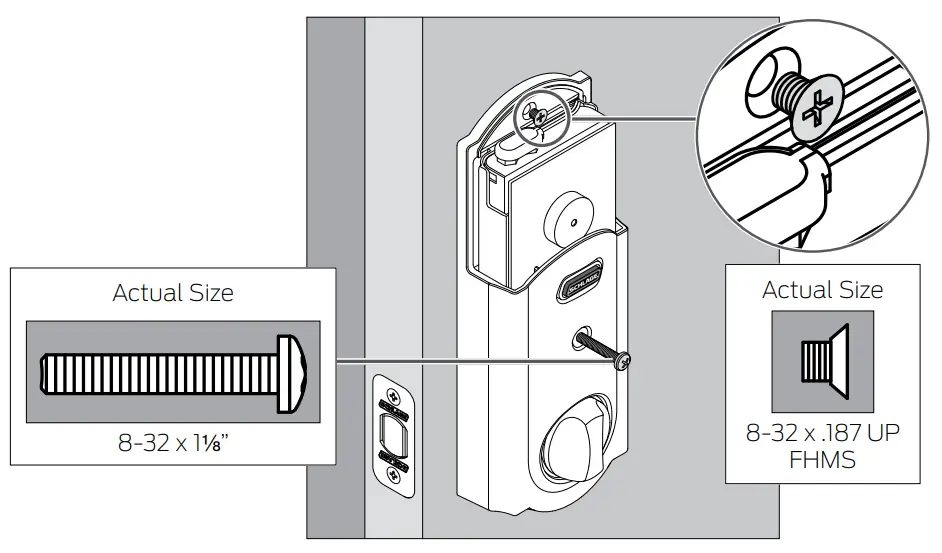
- Install the Support Plate on the inside of the door.
Make sure the Touchscreen and Support Plate are straight on the door before tightening the screws. Tighten the screws fully to prevent the lock from moving over time.
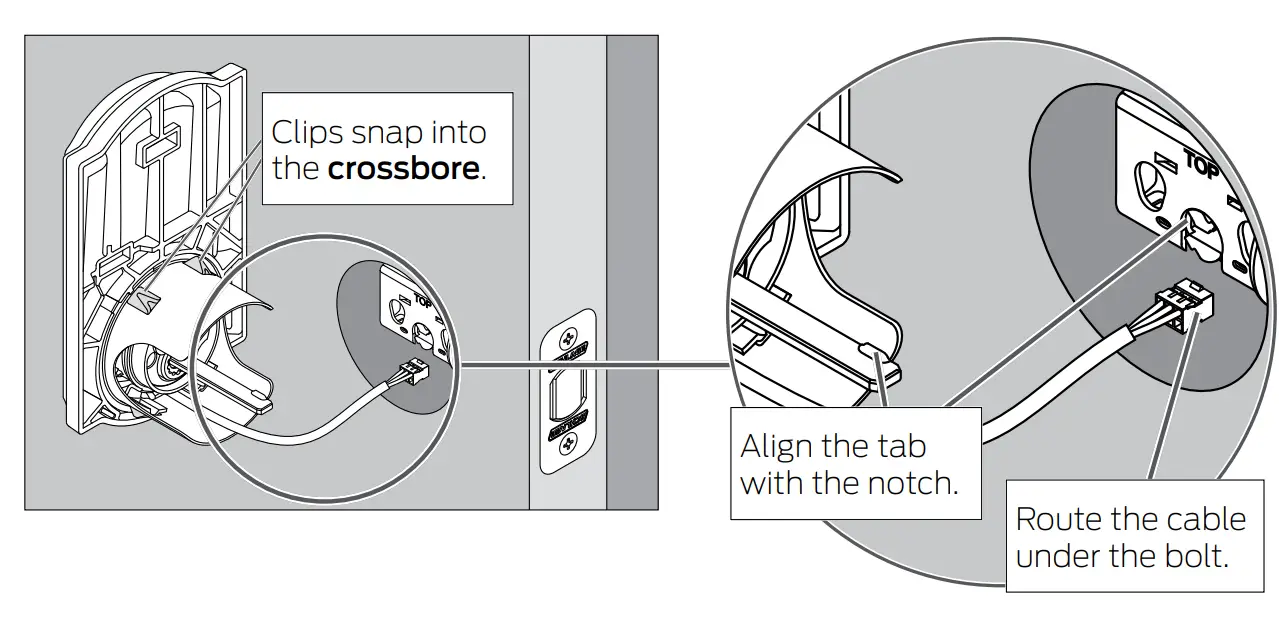
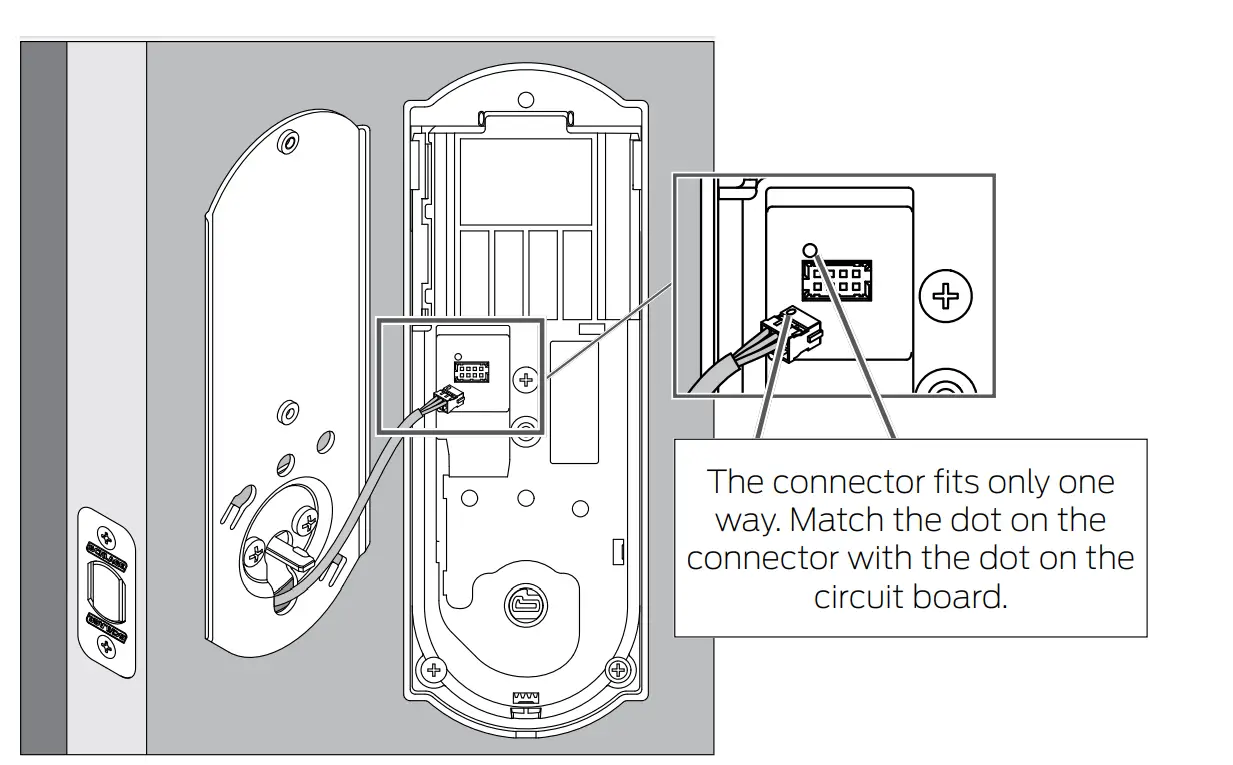
Install the Alarm Assembly
- Remove the battery cover from the Alarm Assembly.

- Connect the cable to the Alarm Assembly.
Locate the screws in step 9d before beginning this step so they will be handy when you need them.
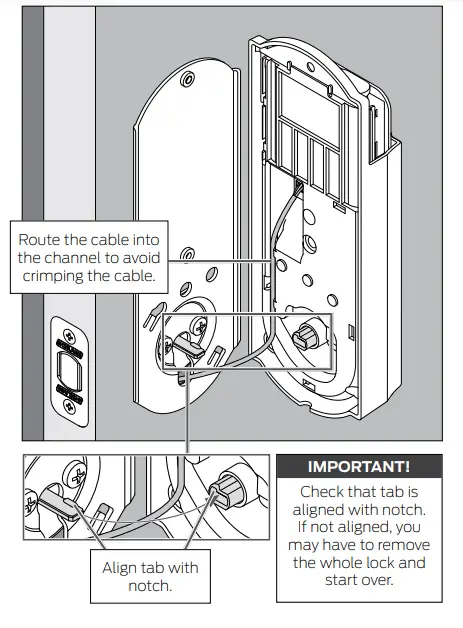
- Install the Alarm Assembly.
- Align the tab with the notch as shown.
- Route the cable into the channel.
- Then slide the Alarm Assembly toward the door.

- Secure the Alarm Assembly to the Support Plate.
Install the lower screw first. NOTE
NOTE
Please do not rotate the thumb turn at this time. It may not rotate easily. Setup will be performed after installation is complete.
 NOTE
NOTEInstall the Batteries
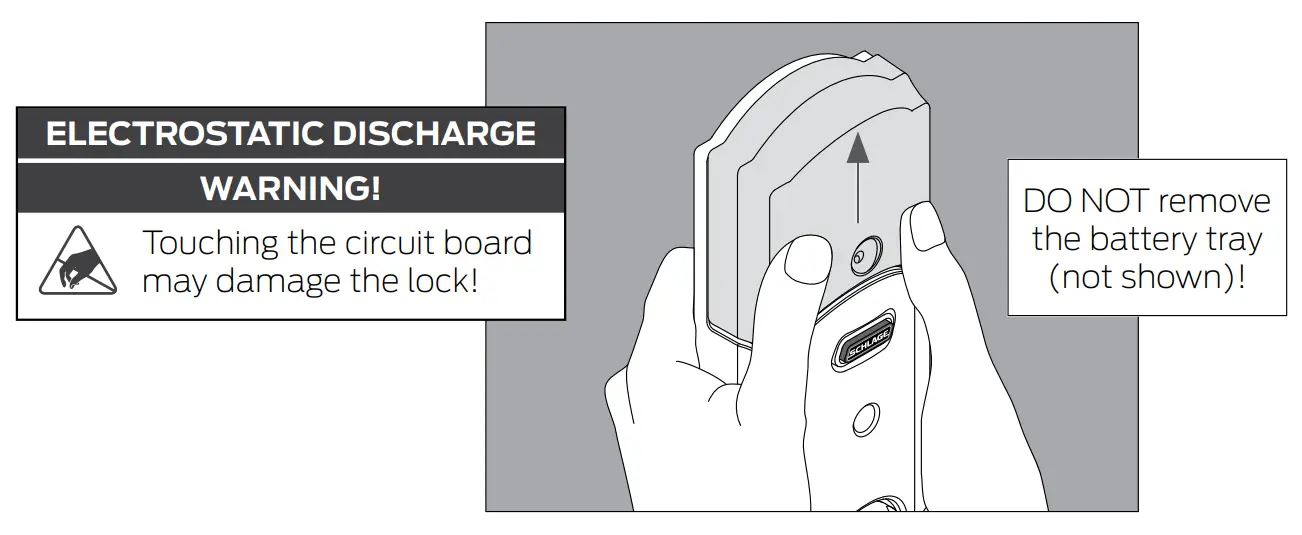
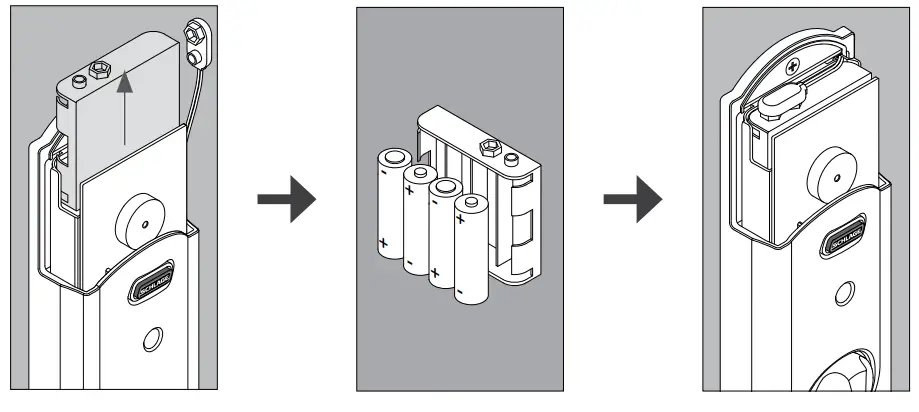
Install the batteries into the battery tray.
- Unsnap the connector.
- Remove the battery tray.
- Install four high-quality alkaline AA batteries. Lithium batteries may cause undesirable operations.
- Carefully replace the battery tray, with the batteries facing the door.
- Snap the connector back into place.

ELECTROSTATIC DISCHARGE
WARNING!
Touching the circuit board may damage the lock!
Install the battery cover.
Set up the Lock
- Open the door if it is not already open.
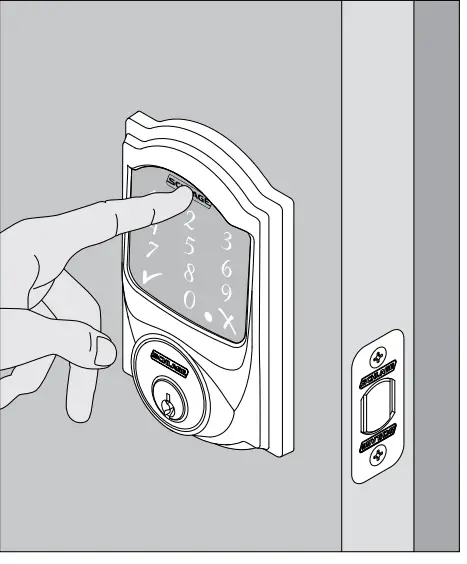
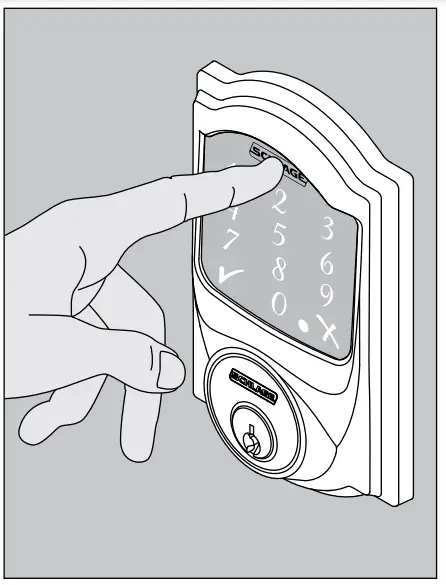
- Press the Outside Schlage Button.
- Enter one of the default access codes into the lock (see the label shown in step 6 on page 5).
- The lock will perform a setup routine. Wait until the bolt stops moving before continuing. If the Touchscreen did not light up during this step, you may have a power problem.
Install fresh batteries and make sure the battery wires are connected (see step 10a on page 11). If that does not help, make sure the cable is connected and is not crimped (see step 9b on page 10).
Test the Lock
CAUTION
Keep the key with you during testing to avoid being locked out!
For complete information about programming and light/beep patterns, see the Manual Programming Guide and Troubleshooting sections in the User Guide.
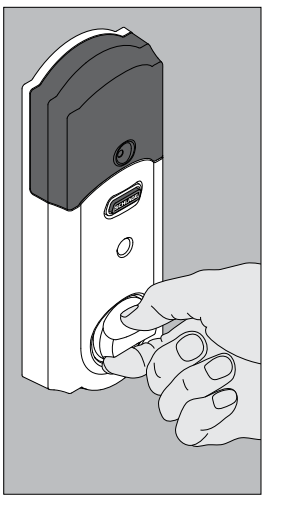
- Extend the bolt (lock) using the inside thumb turn
- Close the door.
- Rotate the thumb and turn toward the door jamb to extend the bolt.


- Extend the bolt (lock) using the Touchscreen.
- Unlock the door using the thumb turn if you have not already.
- Take the key and the default access codes with you!
Go outside and close the door. - Press the Outside Schlage Button.
- The bolt should extend.


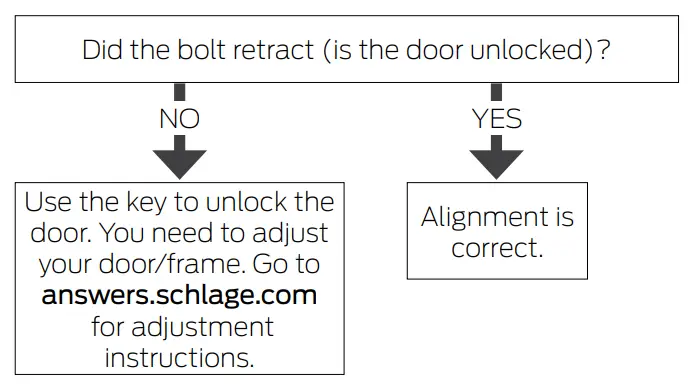
- Retract the bolt (unlock) using the Touchscreen
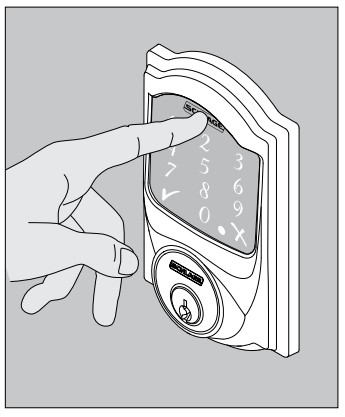
- Press the Schlage button.
- Enter one of the default access codes into the lock.
- The bolt should retract.


- If the lock failed to lock or unlock
- If the Touchscreen did not light up, you may have a power problem. Install fresh batteries and make sure the battery connector is connected (see step 10a on page 11). If that does not help, make sure the cable is connected to the Alarm Assembly and is not crimped (see step 9b on page 10).
- If the lock had power but you need to adjust your door/frame, please go online to answers.schlage.com for complete adjustment instructions and videos.

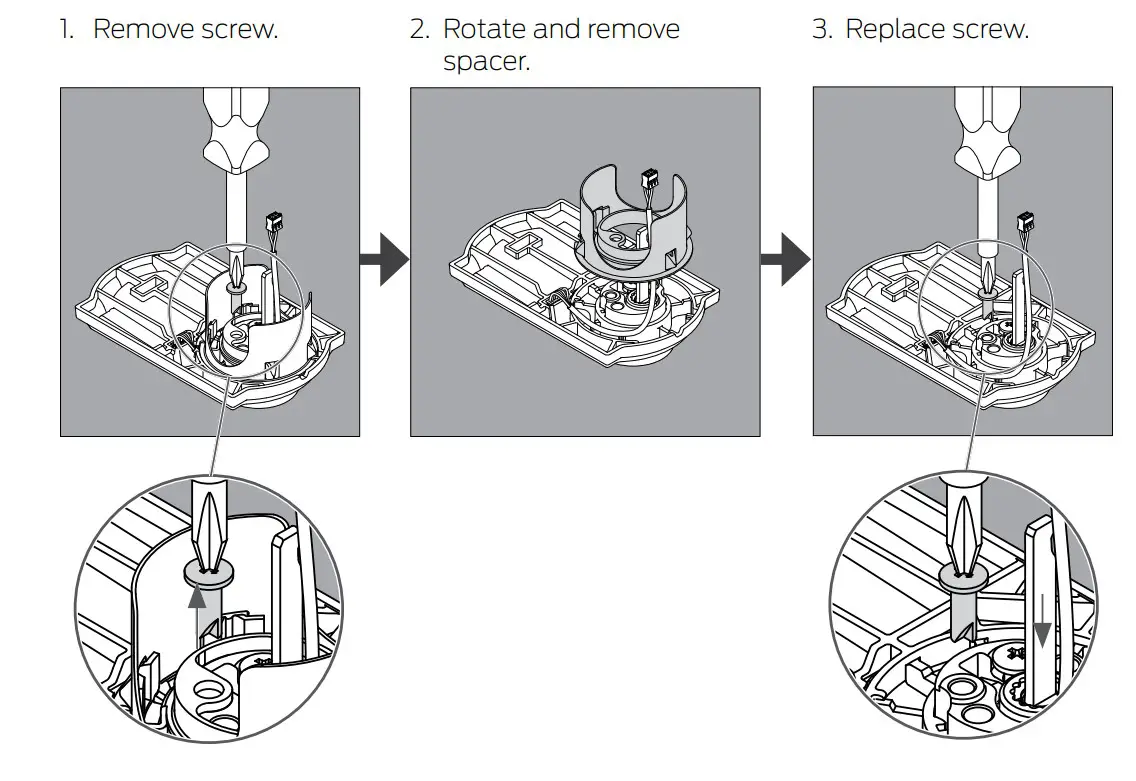
Spacer Removal
(Option for small crossbones only)
ONLY if your door has less than a 2Z\,” (54 mm) crossbore, remove the spacer as shown.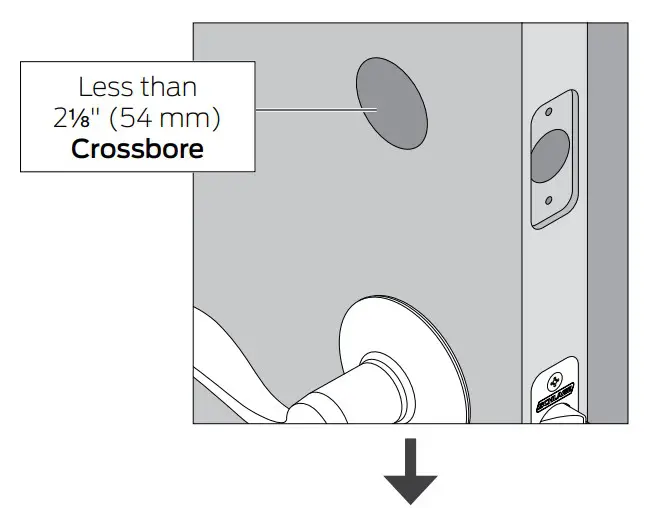
Continue to the User Guide
Your lock is installed and functional. Continue to the User Guide for complete information about how to configure and operate the lock and alarm.
Questions about your new Schlage Sense™ Smart Deadbolt?
Please don’t return it to the store!
Let us help you first!
Apple, iPhone, iPad, iPad Air, and iPod touch are trademarks of Apple Inc., registered in the U.S. and other countries. HomeKit is a trademark of Apple Inc.
FAQS
Yes. We have three on the app. But, I must say that we are very disappointed in the app. It is antiquated and Schlage support positively sucks! The locks require more frequent updates than I’d like, and some updates have to be loaded several times before they actually work. Will never buy Schlage digital locks again!
You can hit the icon or enter your code. It does not open based on proximity.
The keypad on the outside sticks out a half inch or less – well within the door frame.
Yes both
Only if you have your Apple TV set up as your HUB for Apple Homekit. This also works with an iPad but it has to stay at home within BlueTooth range to the lock.
Yes. You can enable or disable up to 30 codes remotely using your iphone app. You can enable a code for a seoecific day or days. You can also set the time range, for example between 12:00 and 3:00 on Wednesdays. Best part is you can do this
from any ware as long as the lock is connected to the Apple TV 4th generation.
Yes. You can connect multiple locks to the sense app (and name them). Can also control with a Home app too
Yes it will. I rarely use my app. I just use my apple home to tell it to lock and unlock. But the Schlage app does keep a log.
It can’t tell the difference between different mobile phones unlocking the door but if the code is entered it will log it.
lock is Bluetooth only unless you buy a separate wifi accessory. you have to be within 30 feet of the lock to change passcodes. you can open the lock with the passcode without your phone.
YEs there is an app you can manage all your locks.
When paired with a Wi-Fi bridge, sold separately.
you are the only one you has to invite someone to share the lock or to give them access
Works with iphone. I am not aware of SmartThings. I needed extra wide bolts for our door and customer service was great. Call them.
It is HomeKit compatible. It can be made Amazon-compatible as I recall . Not sure how. . There is another model that is Amazon-compatible but you still have to use a bridge (Eg. Smart Thing) for that compatibility to be enabled
Yes, you can set it to lock automatically at from 30 seconds to 4 minutes. I have mine set at 4 minutes, gives me time to go out and get the mail.
Go to Schlage for that question
yes, Apple TV is only necessary if you want to access the features of the lock over the Internet. if your phone is in range of the lock Siri can be used to unlock it.


