
 HP CR259FN Original HP 61 Black/Tri-color Ink
 HP CR259FN Original HP 61 Black/Tri-color Ink
Specifications
- Product Dimensions 5 x 16.2 x 12.5 inches
- Item Weight: 1.6 ounces
- Ink Color: Black
- Page Yield: 170
- Compatible Devices: Printer
- Compatibility Options: OEM
- Brand: HP
Introduction
HP Black/Tri-color Ink Cartridges work with HP DeskJet printers to provide high-quality printing for a wide range of documents and graphics. The black ink cartridge is designed to produce crisp, sharp text and graphics, while the tri-color cartridge contains cyan, magenta, and yellow ink to produce a full range of colors. These cartridges are easy to install and replace, and they are engineered to work seamlessly with your HP DeskJet printer to provide reliable, hassle-free printing. They are also designed to be cost-effective, with high page yields to help reduce the frequency of cartridge replacement.
Solution one: Use genuine HP cartridges
Make sure that the installed cartridges are compatible with your printer and that they are unmodified, genuine HP cartridges.

Visit HP SureSupply to check ink cartridge compatibility or purchase replacement ink cartridges.
- Go to the HP SureSupply website.
- Scroll to the bottom of the page, and then make sure the country/region location is correct.
- Follow the on-screen instructions to order new ink cartridges or check ink cartridge compatibility with your printer.
Genuine HP ink cartridges can also be purchased from other retailers.
Solution two
Remove, inspect, and then reseat the cartridges
The cartridge might not have full electrical contact with the printer. Removing and reinstalling the cartridge might help.
- Press the Power button to turn on the printer.
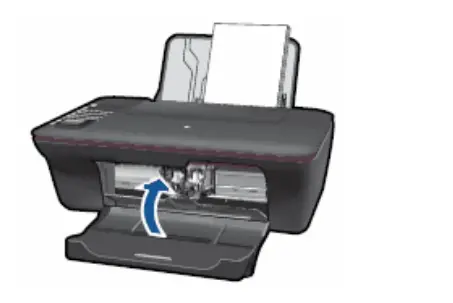
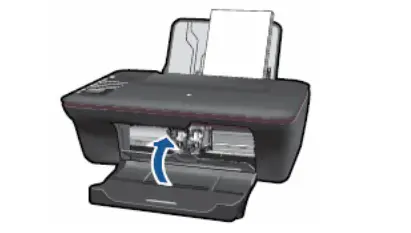
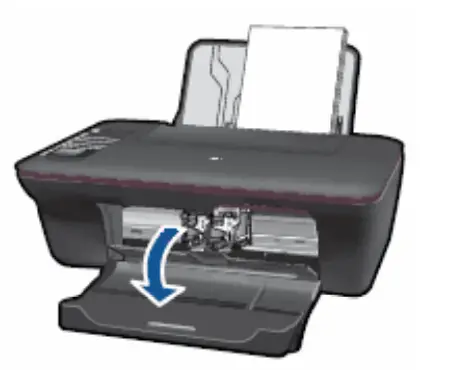
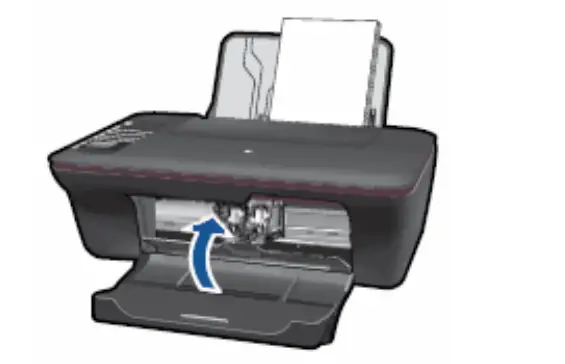
- Open the cartridge access door. The carriage moves to the center of the printer. Wait until the carriage is idle and silent before you continue.
Figure : Open the cartridge access door

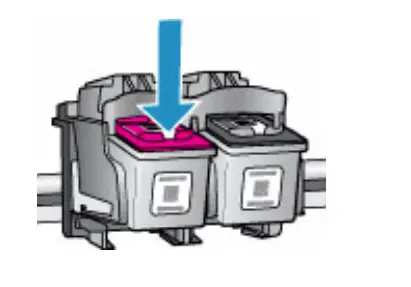
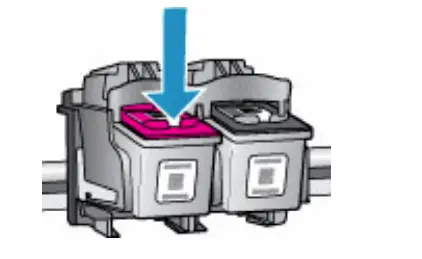
Press down on the cartridge to release it, and then pull the cartridge out to remove it from its slot.
Figure : Remove the cartridge

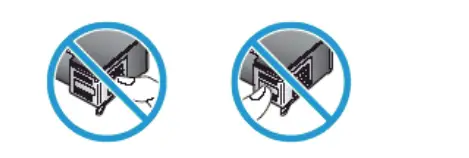
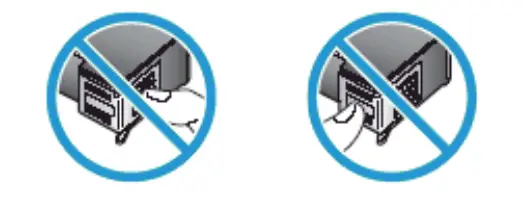
Caution
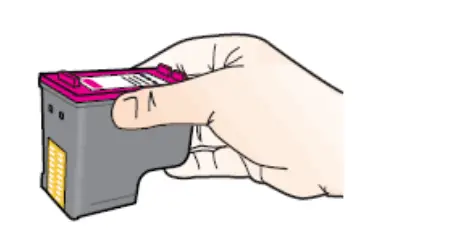
Do not touch the copper-colored contacts or the ink nozzles. This can result in clogs, ink failure, and bad electrical connections.
Figure : Do not touch the contacts or nozzles
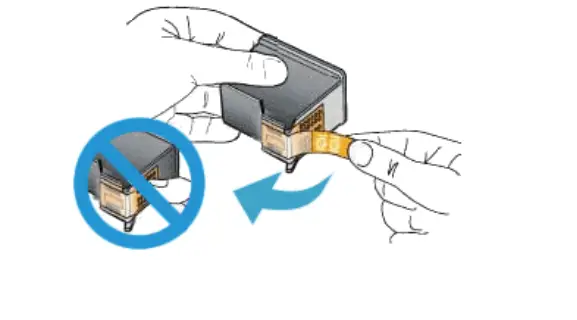
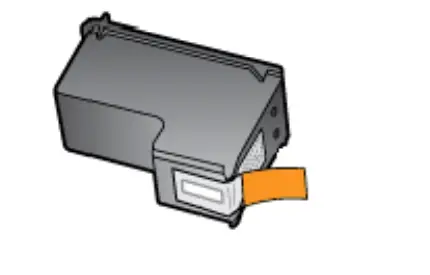
Remove any clear protective tape that still might be on the nozzles.
Caution
Do not try to remove the copper electrical strip.
Figure: Remove the protective tape
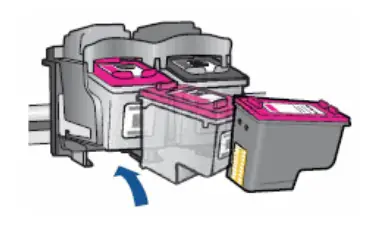
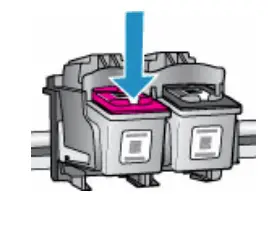
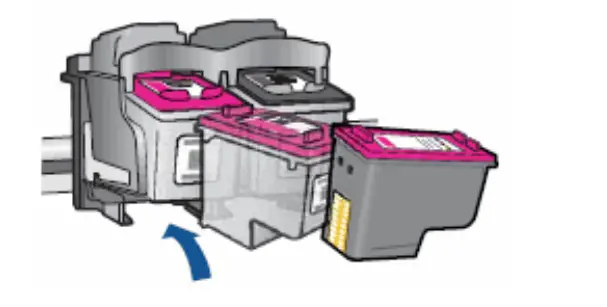
Hold the cartridge by its sides with the nozzles toward the printer, and then insert the cartridge into its slot. Make sure that the icon on the cartridge matches the icon on the slot.
Figure: Insert the cartridge into its slot
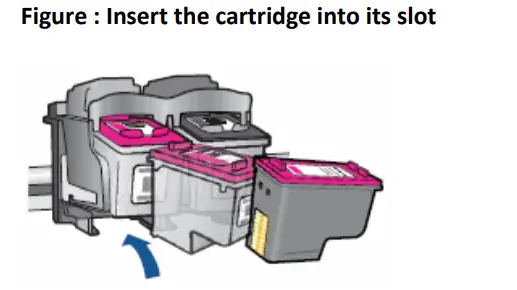
- The tri-color cartridge (
 goes in the slot on the left
 - The black cartridge
 goes in the slot on the right
 goes in the slot on the right
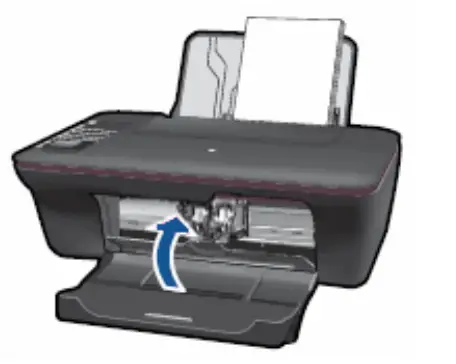
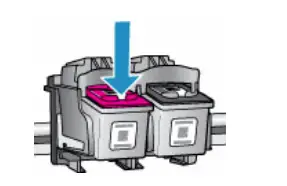
Push the cartridge forward into its slot until it snaps into place.
Figure : Snap the cartridge into place

- Repeat these steps for the other cartridge.
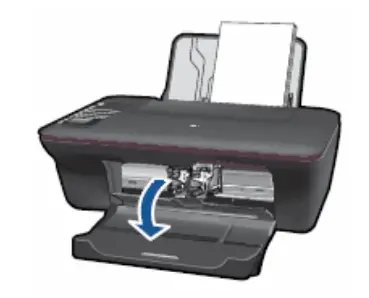
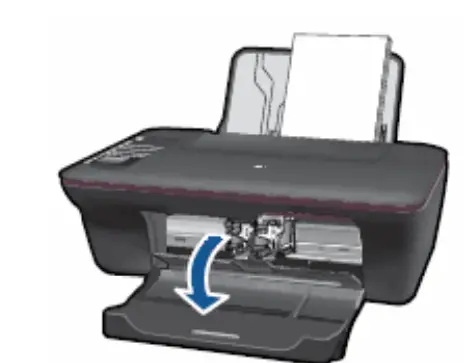
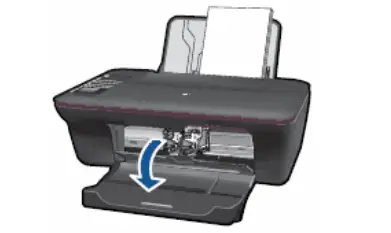
- Close the cartridge access door.
Figure : Close the cartridge access door
- Try to print again.
Solution three
Clean the electrical contacts
Follow these steps to clean the electrical contacts on the cartridge.
Gather the following materials
- Dry foam-rubber swabs, lint-free cloth, or any soft material that will not come apart or leave fibers (coffee filters work well)
- Distilled, filtered, or bottled water (tap water might contain contaminants that can damage the cartridges)
Caution
Do not use platen cleaners or alcohol to clean the cartridge contacts. These can damage the cartridge or the printer.
Press the Power button to turn on the printer.
Open the cartridge access door. The carriage moves to the center of the printer. Wait until the carriage is idle and silent before you continue.
Figure Open the cartridge access door
 Disconnect the power cord from the back of the printer.
Press down on the cartridge to release it, and then pull the cartridge out to remove it from its slot.
 Disconnect the power cord from the back of the printer.
Figure : Remove the cartridge
Caution
Do not leave the cartridges outside of the printer for more than 30 minutes. If the cartridge is outside of the printer for too long, the ink can dry and clog the nozzles.
- Hold the cartridge by its sides.
Figure : Hold the cartridge by its sides
- Inspect the cartridge contacts for ink and debris buildup.
- Dip a clean foam-rubber swab or lint-free cloth into distilled water, and then squeeze any excess water from it.
- Clean only the copper-colored contacts.
Figure : Clean the contacts
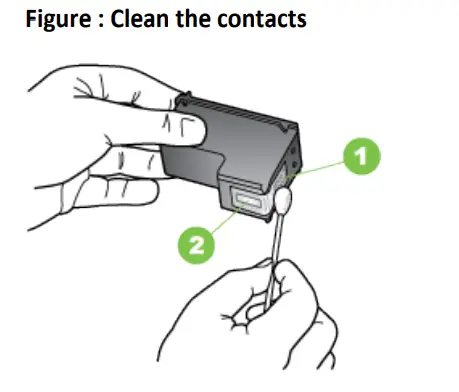
- Copper-colored contacts
- Ink nozzles (do not clean)
- Repeat these steps for the other cartridge.
- Lightly moisten another cotton swab with distilled water, and then squeeze any excess water from the swab.
- Use the swab to clean the electrical contacts in the carriage, located inside the printer.
Figure: The electrical contacts in the cartridge slots
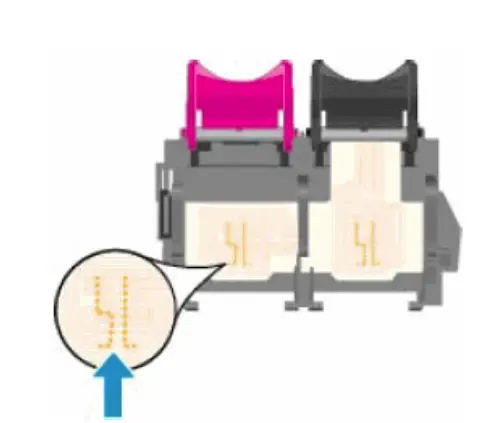
- Wait 10 minutes to allow the cartridge and carriage electrical contacts to dry.
Hold the cartridge by its sides with the nozzles toward the printer, and then insert the cartridge into its slot. Make sure that the icon on the cartridge matches the icon on the slot.
Figure : Insert the cartridge into its slot
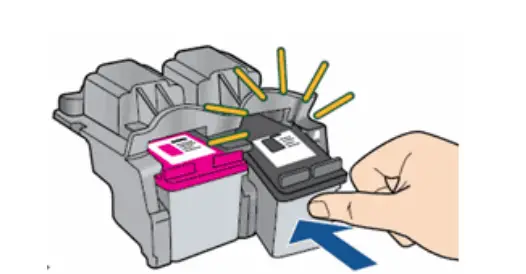
Push the cartridge forward into its slot until it snaps into place.
Figure: Snap the cartridge into place
- Repeat these steps for the other cartridge.
- Close the cartridge access door.
Figure : Close the cartridge access door
- Reconnect the power cord to the back of the printer.
- Try to print again.
- If you are still unable to print, repeat these steps to clean and reseat the cartridges. Multiple cleanings might be necessary to restore printing.
Solution four
Reset the printer
Follow these steps to reset the printer.
- Press the Power button (
 ) to turn on the product.
 - With the product turned on, disconnect the power cord from the rear of the product.
- Unplug the power cord from the wall outlet.
- Wait at least 15 seconds.
- Plug the power cord back into the wall outlet.
- Reconnect the power cord to the rear of the product.
- If the product does not turn on by itself, press the Power button ( ) to turn it on.
Solution five
Identify and replace the problem cartridge
If cleaning and reseating the cartridge and resetting the printer does not fix the problem, replace the cartridge with a new cartridge.
Step one: Identify the problem cartridge
- Press the Power button to turn on the printer.
- Open the cartridge access door. The carriage moves to the center of the printer. Wait until the carriage is idle and silent before you continue.
Figure: Open the cartridge access door
- Press down on either cartridge to release it, and then pull the cartridge out to remove it from its slot.
Figure : Remove the cartridge
- Close the cartridge access door.
Figure : Close the cartridge access door
- If the ‘Incompatible Print Cartridge(s)’ or the ‘Print Cartridge Problem’ error message still displays on the computer, proceed to the next step.
- If the computer does not display an error message, skip to the ‘replace the cartridge’ step and replace the tri-color cartridge.
- Open the cartridge access door. The carriage moves to the center of the printer. Wait until the carriage is idle and silent before you continue.
- Push down on the top of the tri-color cartridge (located on the left side of the carriage) to release it, and then pull it toward you to remove it from its slot.
- Slide the black cartridge forward into the empty right slot, and then gently push on the upper part of the cartridge until it clicks into place.
- Close the cartridge access door.
- If the ‘Incompatible Print Cartridge(s)’ or the ‘Print Cartridge Problem’ error message still displays on the computer, proceed to the ‘Replace the cartridge’ step and replace the black and the tri-color cartridge.
- If the computer does not display an error message, proceed to the ‘replace the cartridge’ step and replace the tri-color cartridge.
Step two: Replace the problem cartridge
Follow these steps to install a new cartridge. If you need to print immediately and the quality of the printouts is not a concern, you can print in backup mode.
If you have a defective ink cartridge or printhead, it might be under warranty. To check the warranty on your ink supplies, go to hp.com/go/learnaboutsupplies, select your country/region, and then review the limited warranty information for your supplies.
Video of replacing a cartridge
The following video demonstrates how to replace a cartridge.
Note
The video shows the HP Deskjet 2050. The outside of the product might not look the same as your product, but the steps are the same. If you have trouble viewing the video or to view the video in a different size, click here to play the video on YouTube.
- Load plain white paper in the input tray.
- Press the Power button to turn on the printer.
- Open the ink cartridge door. The carriage moves to the center of the printer. Wait until the carriage is idle and silent before you continue.
Figure: Open the ink cartridge door
- Lightly press down on the ink cartridge to release it, and then pull the ink cartridge out to remove it from its slot.
Figure: Remove the ink cartridge
Caution
Do not touch the copper-colored contacts or the ink nozzles. Touching these parts can result in clogs, ink failure, and bad electrical connections.
Figure: Do not touch the contacts or nozzles
- Remove the new ink cartridge from its packaging, and then pull the pull tab to remove the plastic tape.
Caution
Do not touch the copper-colored contacts or ink nozzles. Also, do not re-tape the ink cartridge. Doing so can result in clogs, ink failure, and bad electrical connections.
Figure: Remove the plastic tape
- Hold the ink cartridge by its sides with the contacts toward the printer and the nozzles facing down toward the bottom of the product, and then insert the ink cartridge into its slot.
- The tri-color ink cartridge ( goes in the slot on the left
- The black ink cartridge goes in the slot on the right
- The tri-color ink cartridge (
Figure: Insert the ink cartridge into its slot
- Push the ink cartridge forward into its slot until it snaps into place.
- Repeat these steps to replace the other ink cartridge, if necessary.
- Close the ink cartridge access door.
Figure: Close the ink cartridge access door
- Press the button next to OK on the control panel display (
 )
)
 )
)The printer prints an alignment page.
Solution six: Service the printer
If you have followed the preceding steps, including replacing the cartridges with new, genuine HP cartridges, the printer hardware might be malfunctioning. Follow these steps to service the printer.
Contacting HP for service in all countries/regions except Asia Pacific.
If you completed all the preceding steps and your product still has an issue, service the product.
First, go to Check your product warranty to check your printer warranty status, and then go to Contact HP Support to find an authorized service dealer or to schedule a repair.
Repair fees might apply for out-of-warranty printers.
Workaround: Print in backup mode
If you do not have a replacement cartridge available, you can still print. Remove the problem cartridge, and then print with the remaining cartridge. If you remove the tri-color cartridge, the printouts are in grayscale. If you remove the black cartridge, the printer prints slowly and the colors in the printouts might differ.
- Press the Power button to turn on the printer.
- Open the cartridge access door. The carriage moves to the center of the printer. Wait until the carriage is idle and silent before you continue.
Figure : Open the cartridge access door
- Press down on either cartridge to release it, and then pull the cartridge out to remove it from its slot.
Figure: Remove the cartridge
- Close the cartridge access door. The control panel displays a message that one of the cartridges is missing or not detected.
- Wait a few moments for the message to clear, and then submit a print job.
Frequently Asked Questions
Make sure that all of the ink cartridges are installed correctly. If you are using refilled or third-party ink cartridges, they might not work properly with your printer.
Make sure that you are using genuine HP ink cartridges and that they are installed correctly. If you are using refilled or third-party ink cartridges, they might not work properly with your printer.
From the home screen of your printer’s control panel, touch Menu > Settings > Network Setup Wizard. Touch Wireless Setup Wizard, and then follow the on-screen instructions to connect to a wireless network.
The blinking yellow light indicates that an ink cartridge is low or expended. Replace the expended ink cartridge with a new one, and then press OK to continue printing. Solution two: Use remanufactured or refilled cartridges Replace the original ink cartridges with remanufactured or refilled ink cartridges. These types of cartridges are available from many sources, including retailers and online vendors. However, be aware that some of these types of cartridges might not work properly with your printer or might cause damage to your printer. Before purchasing any type of ink cartridge, make sure that it is compatible with your printer and that it will not cause damage to your printer. Solution three: Clean the print head
Yes. I’ve been using my HP Envy 5530 for years with this HP 61 black or tricolour cartridge. “HP 61 cartridge” is written on the printer.
Yes, they frequently remain on the store shelves for some time before being simply checked for dates on the boxes. The best response I can give them is that.
It functions on my HP Deskjet 2512, a unique printer.
The number 3052A appears in a list of numbers on the side of the box indicating what this cartridge fits.
A computer accessory known as an inkjet printer prints physical copies by sprinkling ink onto paper.
The incorrect kind of ink for your printer is HP 61. You will require HP 934/935.
My ink cartridges have never dried out, but I do print something almost every day. Friends of mine who don’t print frequently never experienced a cartridge drying out issue.
It does function in HP ENVY 5535, yes.


