
RIED HX-308 Special IR Zoom Camera
INTRODUCTION

- Before attempting to connect or operate this product, please read these instructions carefully and
save this manual for future use. - The design and specifications are subject to change without prior notice to improve product’s quality
CAUTION : TO REDUCE THE RISK OF ELECTRIC SHOCK DO NOT REMOVE COVER (OR BACK) NO USER SERVICEABLE PARTS INSIDE REFER SERVICING TO QUALIFIED SERVICE PERSONNEL REFER SERVICING TO QUALIFIED SERVICE PERSONNEL.
![]() The lightning flash with an arrowhead symbol within an equilateral triangle is intended to alert the user to the presence of uninsulated dangerous voltage within the product’s enclosure that may be of sufficient magnitude to constitute a risk of electric shock to persons.
The lightning flash with an arrowhead symbol within an equilateral triangle is intended to alert the user to the presence of uninsulated dangerous voltage within the product’s enclosure that may be of sufficient magnitude to constitute a risk of electric shock to persons.
![]() The exclamation point within an equilateral triangle is intended to alert the user to the presence of important operating and maintenance (servicing) instructions in the literature accompanying the product
The exclamation point within an equilateral triangle is intended to alert the user to the presence of important operating and maintenance (servicing) instructions in the literature accompanying the product
FCC WARING – This equipment may generate or use radio frequency energy. Changes or modifications to this equipment may cause harmful interference unless the modifications are expressly approved in the instruction manual. The user could lose the authority to operate this equipment if an unauthorized change or modification is made.
REGULATORY INFORMATION : FCC Part 15
This equipment has been tested and found to comply with the limits for a Class A digital device, pursuant to Part 15 of the FCC Rules. These limits are designed to provide reasonable protection against harmful interference when the equipment is operated in a commercial environment This equipment generates, uses, and can radiate radio frequency energy and, if not installed and used in accordance with the instruction manual, may cause harmful interference to radio communications. Operation of this equipment in a residential area is likely to cause harmful interference in which case the user will be required to correct the interference at his own expense.
- A suitable conduit entries, knock-outs or glands shall be provided in the cable entries of this product in the end use.
- Holes in metal, through which insulated wires pass, shall have smooth well rounded surfaces or shall be provided with brushings.
WARNING – Do not install this equipment in a confined space such as a bookcase or similar unit.
WARNING – Wiring methods shall be in accordance with the National Electric Code, ANSI/NFPA 70.
WARNING – This is a class A product. In a domestic environment this product may cause radio interference in which case the user may be required to take adequate measures
WARNING – To reduce a risk of fire or electric shock, do not expose this product to rain or moisture.
CAUTION – This installation should be made by a qualified service personrel and should conform to all local codes.
CAUTION – To avoid electrocal shock, do not open the cabinet. Refer servicing to qualified personnel only.
CAUTION – The apparatus should not be exposed to water (dripping or splashing) and no objects filled with liquids, such as vases, should be placed on the apparatus.
![]() Disposal of your old appliance
Disposal of your old appliance
- When this crossed-out wheeled bin symbol is attached to a product it means the product is covered by the European Directive 2002/96/EC
- All electrical and electronic products should be disposed of separately from the municipal waste stream via designated collection facilities appointed by the government or the local authorities
- The correct disposal of your old appliance will help prevent potential negative conse- quences for the environment and human health
- For more detailed information about disposal of your old appliance, please contact your city office, waste disposal service or the shop where you purchased the product.
To disconnect power from the mains, pull out the main cord plug. When installing the product, ensure that the plug is easily accessible.
IMPORTANT SAFETY INSTRUCTIONS IMPORTANT SAFETY INSTRUCTIONS
- Read these instructions – All these safety and operating instructions should be read before the product is operated.
- Keep these instructions – The safety, operating and user instructions should be retained for future reference.
- . Heed all warnings – All warnings on the product and in the operating instructions should be adhered to.
- Follow all instructions – All operating and user instructions should be followed.
- Do not use this apparatus near water – For example : near a bath tub, wash bowl, kitchen sink, laundry tub, in a wet basement, near a swimming pool, etc.
- Clean only with dry cloth – Unplug this product from the wall outlet before cleaning. Do not use liquid cleaners
- Do not block any ventilation openings. Install in accordance with the manufacturer’s instructions. – Slots and openings in the cabinet are provided for ventilation, to ensure reliable operation of the product, and to protect it from overheating. The openings should never be blocked by placing the product on a bed, sofa, rug or other similar surface. This product should not be placed in a built-in installation such as a bookcase or rack unless proper ventilation is provided and the manufacturer’s instructions have been adhered to.
- Do not install near any heat sources such as radiators, heat registers, stoves, or other apparatus (including amplifiers) that produce heat.
- Protect the power cord from being walked on or pinched particularly at plugs, convenience receptacles, and the point where they exit from the apparatus.
- Only use attachments/accessories specified by the manufacturer

- Unplug this apparatus during lightning storms or when unused for long periods of time
- Refer all servicing to qualified service personnel.
Servicing is required when the apparatus has been damaged in any way, such as power supply cord or plug is damaged, liquid has been spilled or objects have fallen into the apparatus, the apparatus has been exposed to rain or moisture, does not operate normally, or has been dropped.

FEATURES
|
|
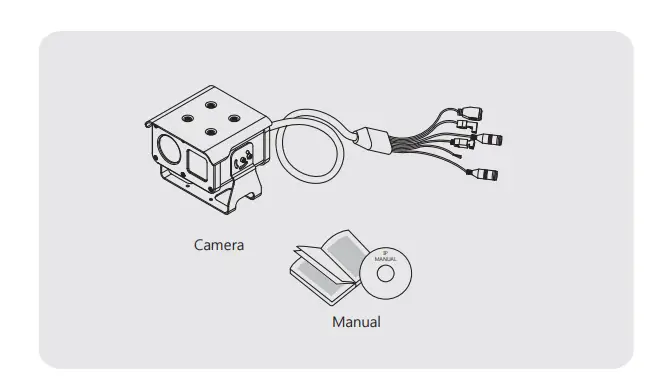
PACKAGE COMPONENTS
PART NAMES AND FUNCTIONS

CONNECTIONS INSTALLATION
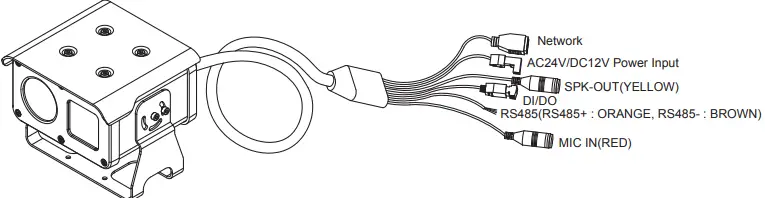
NETWORK
Used to connect the LAN cable.(10/100Mbps supported)
POWER
Used to connect the power.(AC24V/1.5A, DC12V/2A)
SPK-OUT/MIC IN
Used to connect the audio SPK-OUT/MIC IN cable.(3.5 Ø) DI/DO
Alarm IN : In order to make alarm on the web GUI, short or open between DI and GND port. (Please refer the IP manual for more information)
Alarm OUT : Control the relay On/Off on the web GUI, relay will short or open between DOA and DOB.(Please refer the IP manual for more information)
RS-485 COMMUNICATION
Connect to an external controller of RS-485 format.(Protocol : Pelco-D 2400 supported)
GND : GREEN
F.D : BLUE(IP Initialization)
CONNECTIONS INSTALLATION
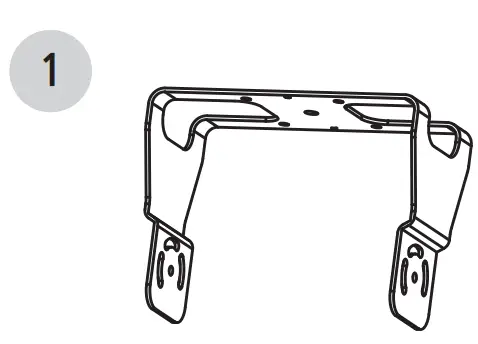
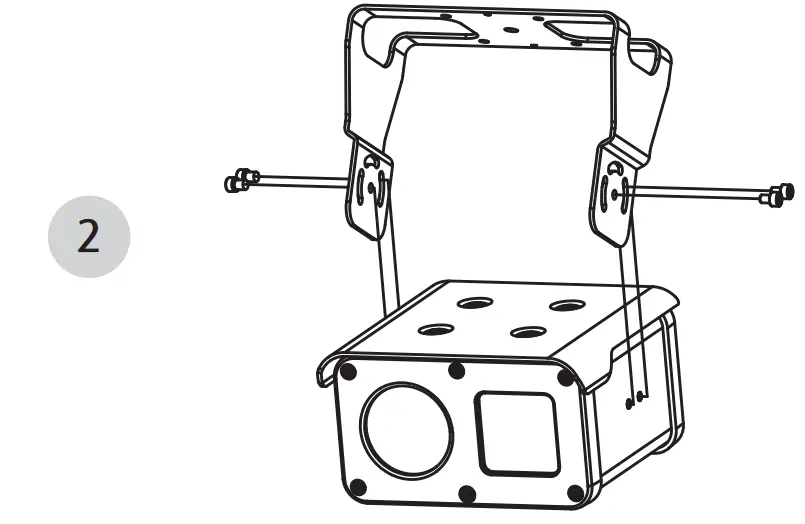
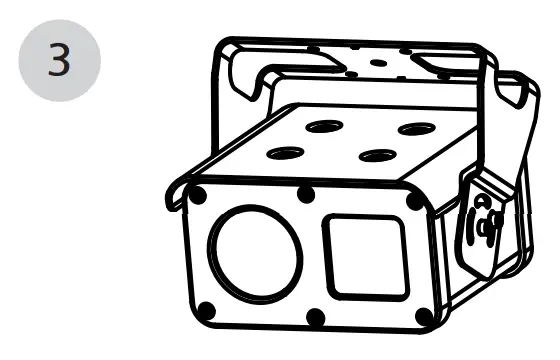
BRACKET INSTALLATION
Bottom side installation
- Place the bracket “ ▽ ” mark to the front and fix the bracket

- Install the camera using screw (Wrench M4*8 D/S) as figure

- Adjust camera angle and fix the screw

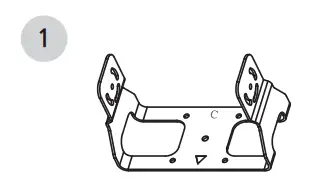
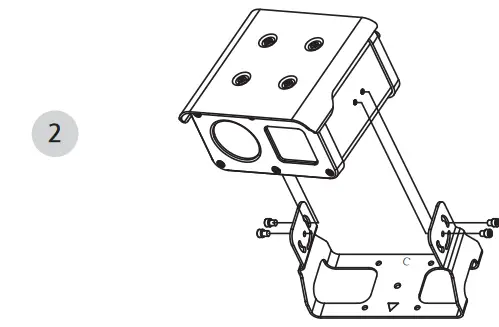
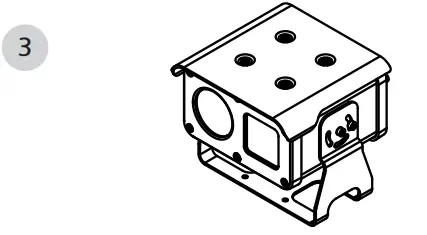
Ceiling installation
- Place the “C” mark to the front side and fix the bracket on the ceiling.

- Install the camera using screw (Wrench M4*8 D/S) as figure.

- Adjust camera angle and fix the screw

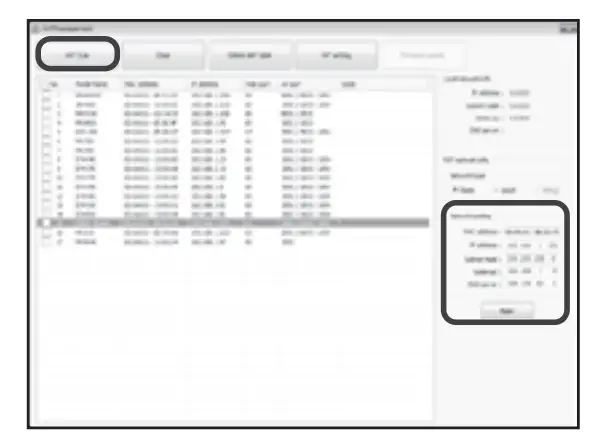
NETWORK
Setting IP address
Using NVT Management enables to set network settings.
- Excute NVT Management.

● Double click NVTManagement.exe - Setting IP address
● Click NVT Scan button to find IP cameras than select the camera.
● Input IP address, net mask, gateway and name server address than click Apply button.
● Default IP and Password is ID:root, PW:pass
● If you have any network information about your network, please ask to your network administrator. - Access the camera using web browser.
ID: root
Password: pass
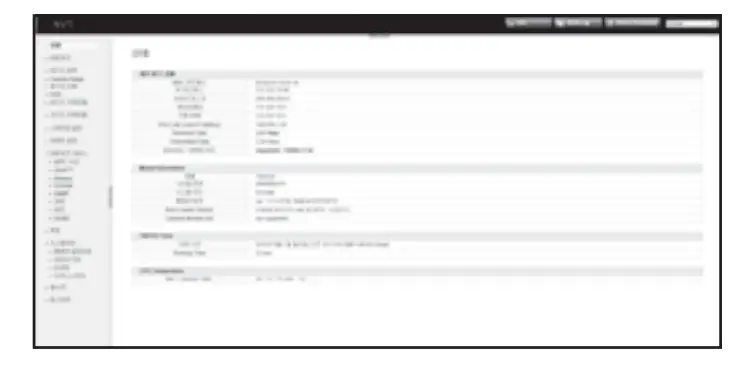
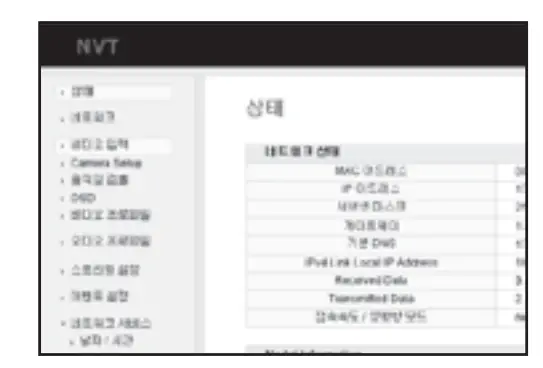
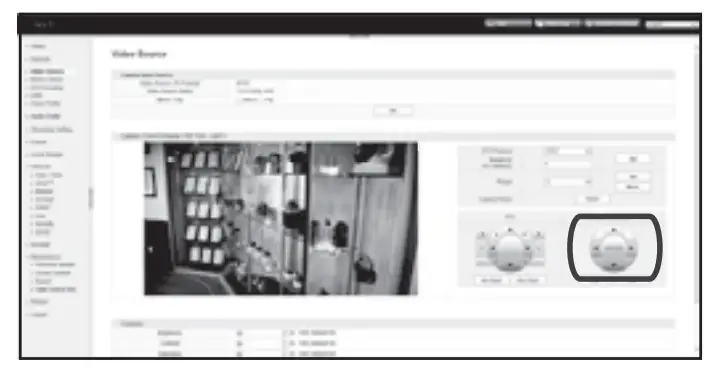
- Camera setting
Go to setting menu as below
Click Video Source
Go to Camera Control section
Click Enter button to call OSD menu.
Adjust camera setting using OSD menu.
For more information, please refer the following OSD setting manual.

Camera menu is subject to change without prior notice to upgrade and quality increase and we may use slip sheet for the change.
Please check the camera version and the slip sheet if the camera menu and this manual menu is not matched
Functions can be setup using “Menu Key Command” of Visca protocol.
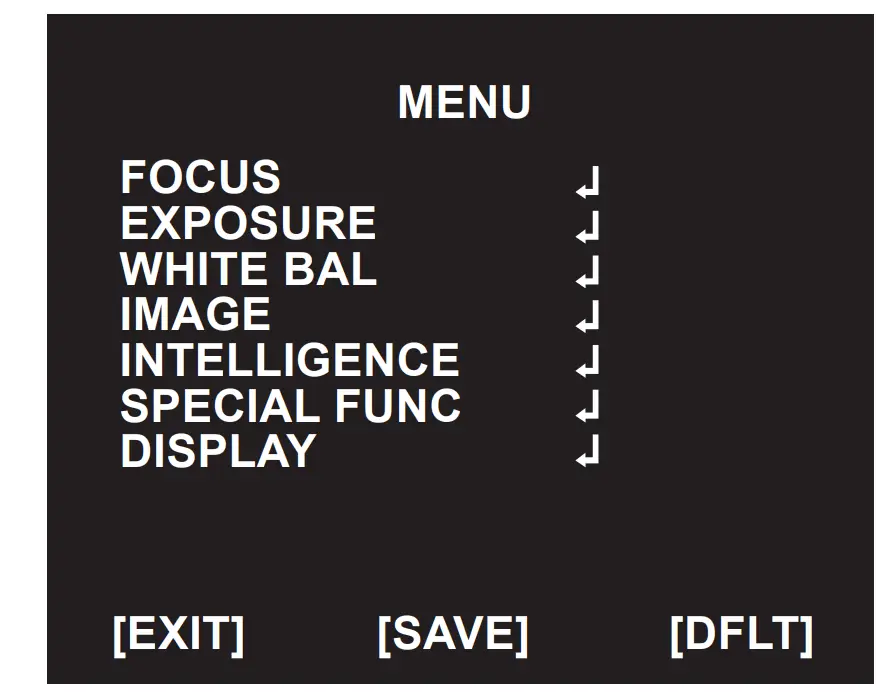
The menu consists of the “Main Menu” and “Sub Menu”.
The main menu is displayed where 7 camera functions can be selected.
To the push of each main menu selection, the sub-menu is displayed If you want save the menu, select [SAVE].
If you want not save the menu, select [EXIT]
(After select , Power off -> on)
If you want default the menu, select [DFLT]
FOCUS
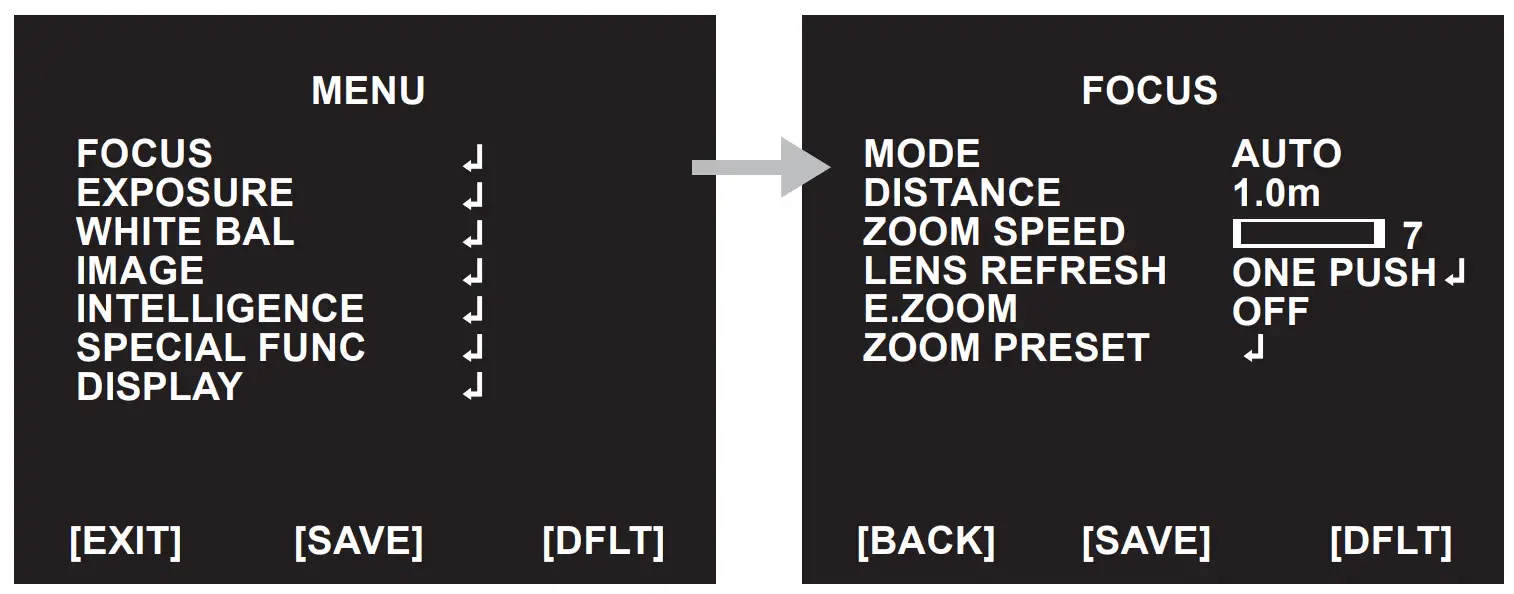
◈ MODE : Select auto focus mode
► AUTO, ONE PUSH, MANUAL
◈ DISTANCE : Select minimum distance in focus between camera and object.
►x12 Camera : 0.1 / 1.0 / 3.0 / 5.0 / 10.0 m ►x20, x30 Camera : 0.1 / 1.0 / 3.0 / 6.0 / 10.0 m
◈ ZOOM SPEED : Select Zoom Speed
►0 (Slow) ~ 7 (Fast)
◈ LENS REFRESH : Lens origin calibrated automatically.
►ONE PUSH↵ / ON (1 day ~ 10 days)
◈ E.ZOOM : Select maximum digital zoom magnification.
►OFF / ON (max x2 ~ x19, x21, x23, x25, x28, x32)
◈ ZOOM PRESET : Select zoom preset
►PRESET # : Select Zoom preset number (1 ~ 5)
►MODE : OFF / ON↵
▷ ON↵ : Adjust the Zoom Position
EXPOSURE
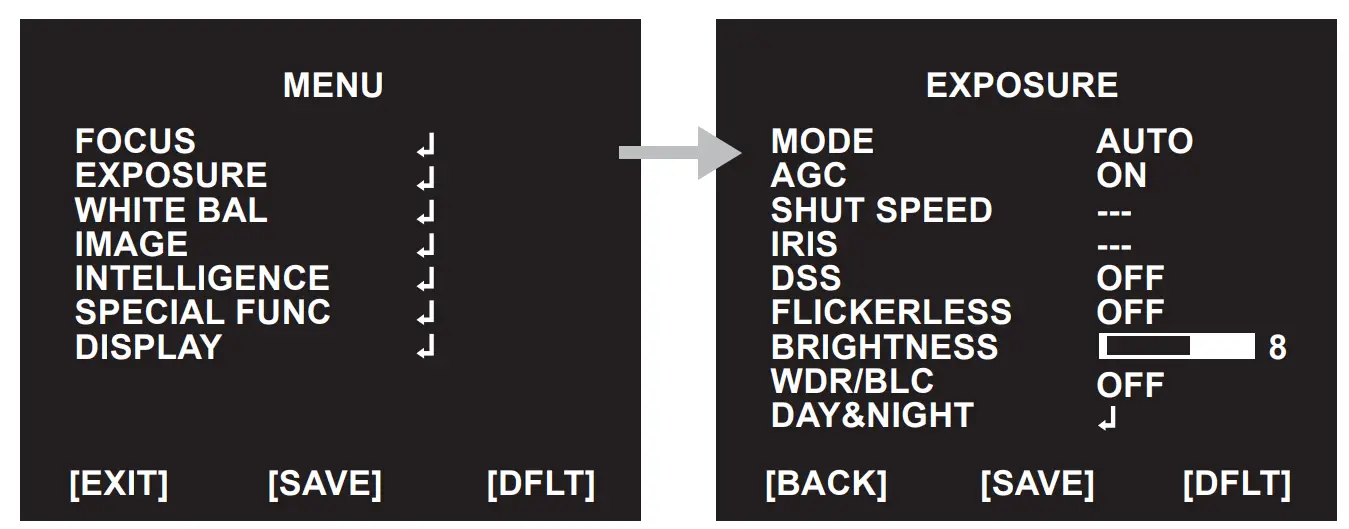
◈ MODE : Select Exposure Mode
►AUTO / IRIS.P / SHUT.P / MANUAL
◈ AGC : Select Auto Gain Control
► OFF / ON (AUTO, SHUT.P or IRIS.P Mode)
► 0 ~ 10 (MANUAL Mode)
◈ SHUT SPEED : Can be set in SHUT.P or MANUAL mode
* 30 / 25 fps mode ► x4, x2, 1/30(25), 1/60(50), 1/120(100), 1/250, 1/700, 1/1000, 1/1600, 1/2500, 1/5000, 1/7000, 1/10000, 1/30000 sec
◈ IRIS : Iris level can be set in IRIS.P or MANUAL mode
► 0 ~ 20
◈ DSS : Select maximum DSS (Digital Slow Shutter)
* 30 / 25 fps mode
► OFF / x2, x4
◈ FLICKERLESS : Select Flickerless mode
► OFF / ON (remove screen flicker)
◈ BRIGHTNESS : Adjust brightness level
► 0(dark) ~ 20(bright) steps
◈ WDR/BLC : Select WDR(Wide Dynamic Range) or BLC(Back Light compensation)
► WDR↵
▷ LEVEL : Adjust WDR level.
► LOW, MID-LOW, MIDDLE, MID-HIGH, HIGH
※ WDR doesn’t work in Manual Exposure Mode and Shutter Priority Mode.
※ When WDR on, CVBS output is disabled.
► BLC↵
▷ POSITION : Adjust the window position
▷ SIZE : Adjust the window size
※ Can’t use WDR and BLC at the same time.
(When WDR On, BLC is Off. And when BLC is On, WDR is Off)
※ BLC doesn’t work in Manual Exposure Mode
◈ DAY&NIGHT : Select Day&Night
► MODE : AUTO↵ / EXT-IN↵ / DAY / NIGHT↵
▷ AUTO
► DELAY : 0 ~ 255 sec
► THRS : 0 ~ 28
Day↔Night switching level in Auto Mode.
Switching in lower lux with lower threshold level.
► GAP : LOW, MID-LOW, MIDDLE, MID-HIGH, HIGH
Margin between Day→Night switching level and Night→Day switching level.
► IR DETECTION : Setting IR Detection mode. (ON / OFF)
► IR DET LEVEL : Setting IR Detection level. (LOW, MID-LOW, MIDDLE, MID-HIGH, HIGH)
► BURST : OFF / ON
▷ EXT-IN
► DELAY : 0 ~ 255 sec
► BURST : OFF / ON
► POLARITY : External Input polarity (ACTIVE LOW / ACTIVE HIGH)
▷ NIGHT
► BURST : OFF / ON
WHITE BALANCE IMAGE
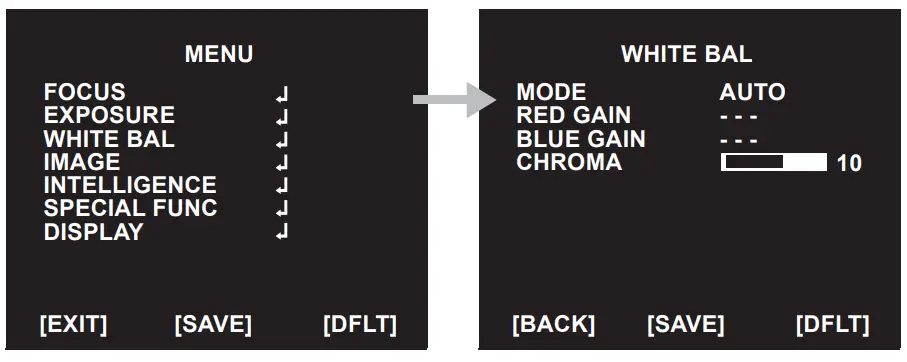
◈ AWB : Select WHITE BALANCE mode
► AUTO / ONE PUSH↵ / MANUAL / INDOOR / OUTDOOR
▷ AUTO : Automatically adjusts color according to the available lighting.
▷ ONE PUSH : It is a fixed white balance mode that may be automatically readjusted only by pressing ONE PUSH
▷ MANUAL↵ : Color can be corrected when the user increases or decreases “RED GAIN” or “BLUE GAIN”.
▷ INDOOR : Set color temperature to be Indoor light (3700°K)
▷ OUTDOOR : Set color temperature to be Outdoor light (5100°K)
◈ RED GAIN : Adjust R gain value ► 0 ~ 20 steps
◈ BLUE GAIN : Adjust B gain value ► 0 ~ 20 steps
◈ CHROMA : Adjust CHROMA gain value ► 0 ~ 20 steps
IMAGE
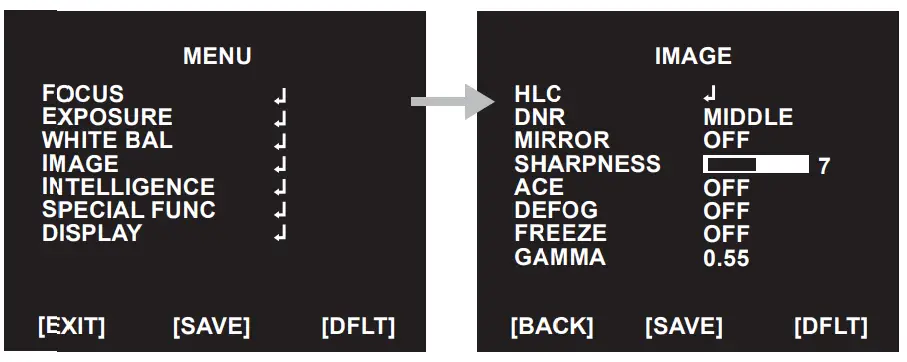
◈ HLC : Select High Light Compensation.
When extremely bright light is projected to the camera masking is used on the portion to prevent partial saturation on the monitor.
▷ MODE : OFF / ON / NIGHT
▷ LEVEL : 0 ~ 20 steps
▷ COLOR : 0 ~ 13 steps
◈ DNR : Select Digital Noise Reduction
► OFF / LOW / MIDDLE / HIGH / AUTO
◈ MIRROR : Select a flip mode
► OFF / H / V / H&V
▷ H : You can flip the picture horizontally on the screen
▷ V : You can flip the picture vertically on the screen
▷ H&V : You can flip the picture horizontally & vertically on the screen
◈ SHARPNESS : Adjust sharpness level
► 0 ~ 10 steps
◈ ACE : Select Digital WDR (Wide Dynamic Range)
► OFF / LOW / MIDDLE / HIGH
◈ DEFOG : Carry out defog function
► OFF / ON↵
▷ MODE : AUTO / MANUAL
▷ LEVEL : LOW / MIDDLE / HIGH
※ Can’t use DEFOG and ACE at the same time (when DEFOG is On, ACE is Off)
◈ FREEZE : Select real or still mode
► OFF / ON
◈ GAMMA : Select GAMMA
► 0.45 / 0.55 / 0.65 / 0.75
INTELLIGENCE
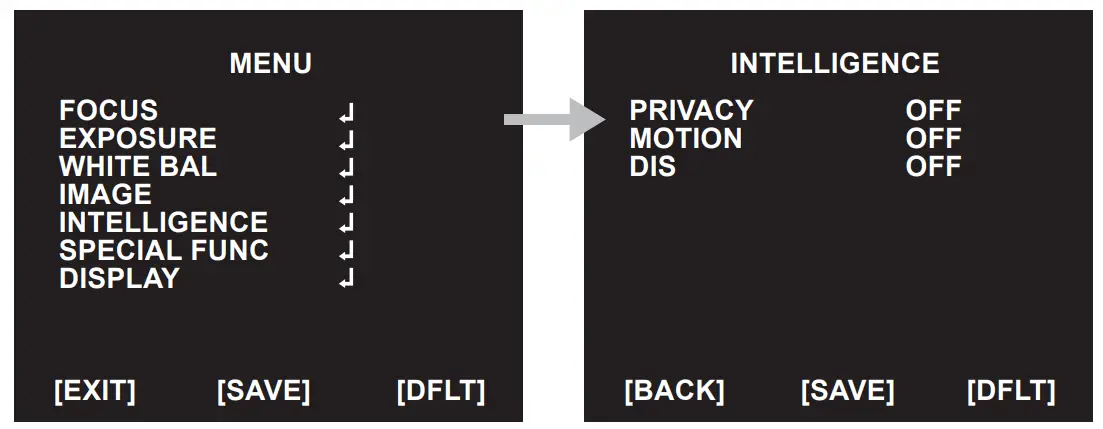
◈ PRIVACY : Hide an area you want to hide on the screen
► OFF / ON↵
▷ MASK# : Select mask area number (1 ~ 24)
▷ MODE : Mask enable or disable (OFF / ON)
▷ POSITION : Adjust the mask position
▷ SIZE : Adjust the mask size
▷ COLOR : Select mask color (0 ~ 13)
▷ TRANS : Select mask transparency level (0 ~ 4)
◈ MOTION : When there is movement of the subject in the screen, there will be an motion detection
► OFF / ON↵
▷ AREA# : Setting 3 areas(1~3) of motion detection
▷ MODE : OFF / ON (Limit and define areas of motion detection)
▷ SENSITIVITY : Adjust sensitivity of MD (0 ~ 20 steps)
More sensitive to setting to low step with sensitivity
▷ POSITION : Adjust the Area position
▷ SIZE : Adjust the Area size
▷ INTERVAL :Select the alarm interval time (0 ~ 255sec)
▷ DWELL TIME : Select the duration time about changing MD mode (0 ~ 255sec)
▷ ZOOM PRESET : Select Motion Zoom Preset Mode and Position (OFF / ON↵)
◈ DIS : Select Digital Image Stabilizer mode
► OFF / ON↵
▷ RANGE : Setting the image compensation range. (10%, 20%, 30%)
▷ FILTER : Setting the sensitivity to hold DIS function in worst case. (LOW, MIDDLE, HIGH)
▷ AUTO C : Setting Auto Centering mode (OFF, HALF, FULL)
SPECIAL FUNC
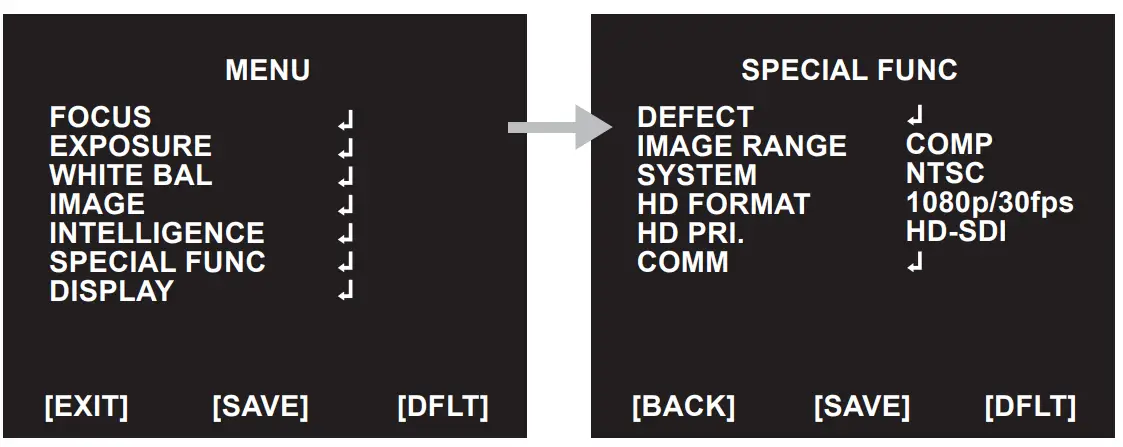
◈ DEFECT : Compensates for bad pixels that may occur. Occurs when the whole screen is in full black or if there is bad pixelation and it changes the THRS values until the screen is fixed.
※ When you use this function, you have to block the lens for blocking lights into the lens.
◈ IMAGE RANGE : Select image bit range. (Full : 100%, Compressed : 75%)
► FULL, COMP, USER↵
▷ LEVEL : Select user mode level (0 ~ 32)
◈ SYSTEM : Select NTSC or PAL
◈ COMM : Set up the camera ID, baud rate, protocol
▷ ID : Select the camera ID
► 1 ~ 255
▷ BAUD RATE : Select serial communication speed
► 2400 / 4800 / 9600 / 19200 / 38400 / 57600 / 115200bps
▷ PROTOCOL : Select operating protocol
► VISCA / PELCO-D / PELCO-P / UPDATE
* Do not change protocol setting. Protocol must be Pelco-D.
Otherwise, IP camera will not be coltrolled.
DISPLAY

◈ DISP SEL : Select display item.
► OFF / ON ↵
▷ ID : OFF / ON
▷ TITLE : OFF / ON
▷ ZOOM RATIO : OFF / ON
▷ SYSTEM MSG : OFF / ON (MD Alarm)
◈ SET TITLE : Select camera title menu (Text edit– max 40 characters) ◈ INIT SEL : Select display initial message.
► OFF / ON ↵
▷ ID : OFF / ON
▷ BAUDRATE : OFF / ON
▷ PROTOCOL : OFF / ON
▷ VERSION : OFF / ON
▷ INIT MSG : OFF / ON
◈ SET INIT MSG : modify initial message. (Text edit – max 40 characters)
◈ LANGUAGE : Select language.
► English / Simplified Chinese / Traditional Chinese / Japanese
※ Character Table of Text edit Mode
A B C D E F G H I J K L M N O P Q R S T
U V W X Y Z a b c d e f g h i j k l m n
o p q r s t u v w x y z ,. ( ){ }[ ]
0 1 2 3 4 5 6 7 8 9 * + – / =- ! ? 11 1
DISPLAY SPECIFICATION
| x12 | x20 | x30 | ||||||||
| 1/2″ Sony CMOS Sensor | 1/3″ Panasonic CMOS Sensor | |||||||||
| 1952(H) x 1241(V) = 2.42M Pixels | 1956(H) x 1266(V) = 2.48M Pixels | |||||||||
| 1937(H) x 1097(V) = 2.12M Pixels | 1944(H) x 1092(V) = 2.12M Pixels | |||||||||
| Progressive Scan | ||||||||||
| Internal | ||||||||||
| Digital : 1080p/30(25)fps | ||||||||||
| Analog : 700TVL | ||||||||||
| Color : 0.15 lux , BW : 0.01lux | Color : 0.5 lux , BW : 0.1lux | |||||||||
| Color DSS : 0.0375 lux, BW DSS : 0.002 lux | Color DSS : 0.125 lux , BW DSS : 0.025 lux | |||||||||
| CVBS | ||||||||||
| more than 50dB (AGC off) | ||||||||||
| x12 Day & Night Zoom Lens | x20 Day & Night Zoom Lens | x30 Day & Night Zoom Lens | ||||||||
| Optical x12, Digital x32 Zoom | Optical x20, Digital x32 Zoom | Optical x30, Digital x32 Zoom | ||||||||
| f = 7.0 mm ~ 84.0 mm | f = 4.7 mm ~ 94.0 mm | f = 4.3 mm ~ 129.0 mm | ||||||||
| F1.5 (wide) ~ F1.9 (tele) | F1.6 (wide) ~ F3.5 (tele) | F1.6 (wide) ~ F4.7 (tele) | ||||||||
| 58.3° | 51.1° | 30.0° | 62.7° | 55.4° | 32.6° | 71.3° | 58.9° | 45.3° | ||
| 6.5° | 5.0° | 3.2° | 3.3° | 2.9° | 1.6° | 2.58° | 2.11° | 1.61° | ||
| Mode / Distance / Zoom Speed / Lens Refresh / E.Zoom / Zoom Preset | ||||||||||
| Auto / One Push / Manual | ||||||||||
| Distance | 0.1 / 1.0 / 3.0 / 5.0 / 10.0 m | 0.1 / 1.0 / 3.0 / 6.0 / 10.0 m | ||||||||
| Zoom Speed | 0(Slow) ~ 7(Fast) | |||||||||
| Lens Refresh | One Push / 1 ~ 10Day | |||||||||
| E.Zoom | Off / MAX x2 ~ x32 | |||||||||
| Zoom Preset | 5 Preset | |||||||||
| Exposure | Mode / AGC / Shut Speed / Iris / DSS / Flickerless / Brightness / WDR/BLC / D&N | |||||||||
| Mode | Auto / Iris. Priority / Shut. Priority / Manual | |||||||||
| Gain Control (AGC) | Off / On | |||||||||
| Shutter Speed | 1/30(25) ~ 1/30,000 sec | |||||||||
| Iris | 0 ~ 20 | |||||||||
| Digital Slow Shutter (DSS) | Off / x2 / x4 (/ x8 : 60 or 50 fps mode only) | |||||||||
| Flickerless | Off / On | |||||||||
| Brightness | 0 ~ 20 steps | |||||||||
| WDR/BLC | OFF / WDR / BLC | |||||||||
| Day&Night | Auto / Day / Night / Ext-in | |||||||||
| White Balance | Auto / One Push / Manual / Indoor / Outdoor | |||||||||
| Image | HLC / DNR / Mirror / Sharpness / ACE / Defog / Freeze / Gamma | |||||||||
| HLC | Off / On / Night Only | |||||||||
| DNR | Auto / Off / Low / Middle / High | |||||||||
| Mirror | Off / H / V / H&V | |||||||||
| Sharpness | 0 ~ 10 steps | |||||||||
| ACE | Off / Low / Middle / High | |||||||||
| Defog | Off / On(Auto / Manual) | |||||||||
| Freeze | Off / On | |||||||||
| Gamma | 0.45 / 0.55 / 0.65 / 0.75 | |||||||||
| Intelligence | Privacy / Motion / DIS | |||||||||
| Privacy Mask | Off / On (24 positions) | |||||||||
| Motion Detection | Off / On (3 positions) | |||||||||
| Digital Image Stabilizer | Off / On | |||||||||
| Special Func | Defect / Image Range / System / HD Format / HD-Pri / COMM | |||||||||
| Defect DET | One push | |||||||||
| Image Range | Full / Comp. / User | |||||||||
| System | NTSC / PAL | |||||||||
| Comm | ID : 1 ~ 255 | |||||||||
| Baud Rate : 2400 / 4800 / 9600 / 19200 / 38400 / 57600 / 115200 | ||||||||||
| Protocol : VISCA / Pelco-D / Pelco-P / Update | ||||||||||
| Display | Disp Sel / Set Title / InitSel / Set InitMsg / Language | |||||||||
| Disp Sel (Off / On) | ID / Title / Zoom Ratio / System Message | |||||||||
| Set Title | Text Edit | |||||||||
| Init Sel (Off / On) | ID / Baud Rate / Protocol / Version / Init. Message | |||||||||
| Set Init Msg | Text Edit | |||||||||
| Language | English / Simplified Chinese / Traditional Chinese / Japanese | |||||||||
| OSD Text | 0 ~ 9 , A ~ Z , a ~ z | |||||||||
| Power Source | AC 24V | |||||||||
| Power Consumption | 1.5A | |||||||||
| Power Input | Connector | |||||||||
| Video Output | Connector | |||||||||
| Storage Temperature | -20℃ ~ +60℃ ((Humidity : 0%RH ~ 90%RH) | |||||||||
| Operating Temperature | -10℃ ~ +50℃ ((Humidity : 0%RH ~ 90%RH) | |||||||||
| NETWORK | ||||||||||
| Ethernet | RJ-45 (10/100BASE-T) | |||||||||
| Video Compression Format | H.264, MPEG-4, MJPEG | |||||||||
| Resolution | 1080p, 720p, 1024×576, 640×360, D1, 4CIF, VGA | |||||||||
| Streaming Capability | Triple streaming | |||||||||
| Alarm | In 1ch / Out 1ch | |||||||||
| Audio In / Out | Mic In / Audio Out | |||||||||
| Audio Compression Format | G.711 u-law | |||||||||
| Audio Communication | Bi-directional audio | |||||||||
| IP | IPv4, IPv6 | |||||||||
| Protocol | TCP, IP, HTTP, DHCP, FTP, DNS, DDNS, NTP, ICMP, SNMP, SMTPE, UPnP, | |||||||||
| RTP, RTSP, ONVIF | ||||||||||
| Storage | Micro SD | |||||||||
| ONVIF | Support | |||||||||
| Webpage Language | Korean, English | |||||||||
* Design and specifications are subject to change without notice.
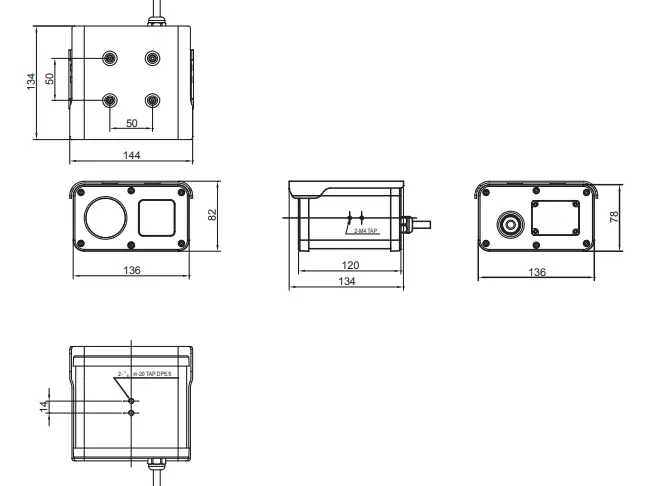
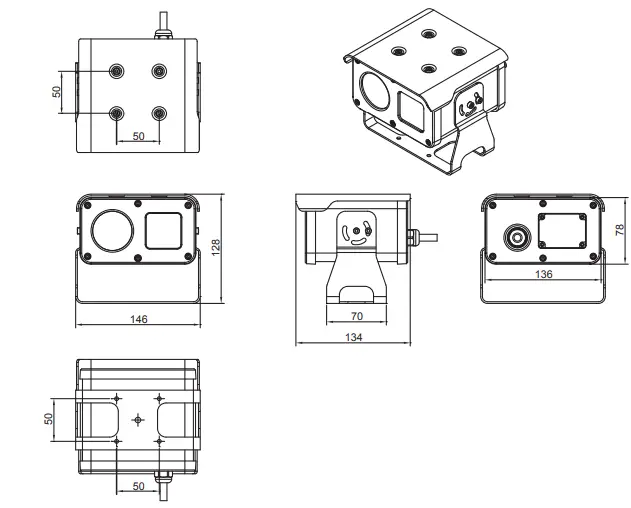
DRAWING
TROUBLESHOOTING
If there are problems in operation, please refer to the items below.
If the problem persists, please contact the agent you purchased this product from.
| Trouble shooting |
|
|
|
|
|
|
|


