
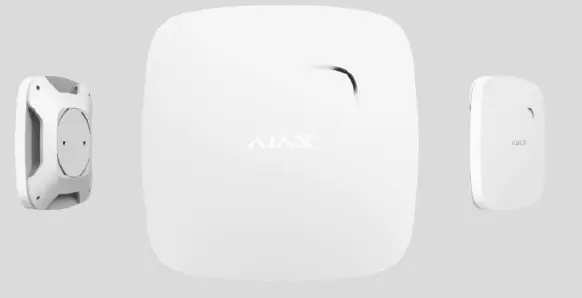
AJAX 8219 FireProtect Wireless Fire Detector
FireProtect (FireProtect Plus) is a wireless indoor are detector with an in-built buzzer and a battery, ensuring up to 4 years of autonomous operation. FireProtect can detect smoke and rapid temperature increase. Aside from these functions, FireProtect Plus additionally can alert of dangerous CO level. Both detectors can function independently from the hub. Connecting to the Ajax security system via a secured radio protocol, FireProtect (FireProtect Plus) communicates with the at a distance of up to 1,300 m in line of sight. The detector can be a part of third-party security systems, connecting to them via the or integration module. The detector is set up via the for iOS, Android, macOS, and Windows. The system notifies the user of all events through push notifications, SMS, and Jeweller hub Ajax uartBridge Ajax ocBridge Plus Buy fire detector with carbon monoxide sensor FireProtect Plus Ajax apps calls (if activated). The Ajax security system can be connected to a central monitoring station of a security company.
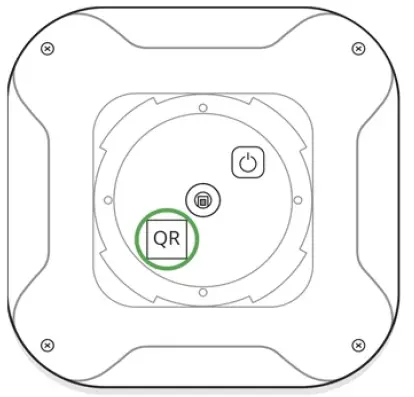
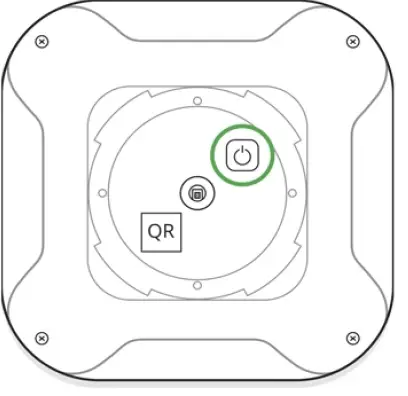
Functional Elements
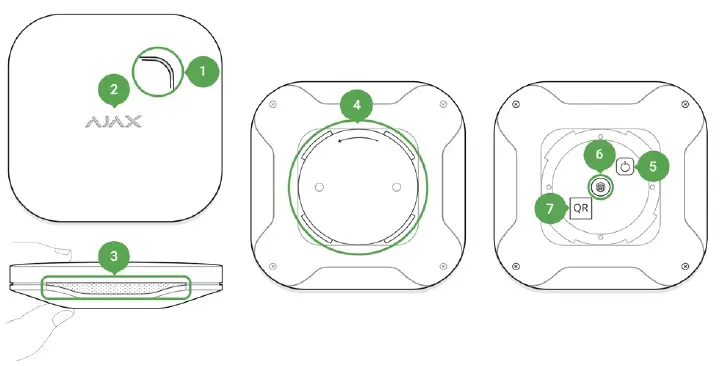
- Siren hole
- Light indicator (acts as the sensor and Test button)
- Smoke chamber hole with the temperature detector behind the net
- SmartBracket attachment panel
- Power button
- Tamper button
- QR code
Operating Principle
When smoke penetrates the detector chamber, it distorts infrared light between the emitter and photoelectric receiver. This distortion triggers a smoke alarm. When the temperature exceeds 60°С or rises by 30°С during 30 minutes (not necessary to reach 60°С), the detector registers temperature increase, which triggers a fire alarm. In case of alarm, the detector activates the built-in buzzer (the siren sound can be heard from afar) and blinks with the light indicator. When connected to a security system, both the user and the security company are notified of the alarm. FireProtect Plus reacts to carbon monoxide long before the first symptoms of poisoning appear. It is triggered:
- Not earlier than 120 minutes at a carbon monoxide concentration of 0.003% (30 ppm).
- 60 to 89 minutes at a carbon monoxide concentration of 0.005% (50 ppm).
- 10 to 39 minutes at a concentration of 0.01% (100 ppm).
- Up to 3 minutes at a concentration exceeding 0.03% (300 ppm).
Loss of consciousness is possible at a CO concentration of 0.1% lasting over 2 hours The detector stops notifying about the dangerous level of carbon monoxide
when the concentration drops to 40 ppm (0.004%) within one minute. The siren of the device can be turned off using three ways:
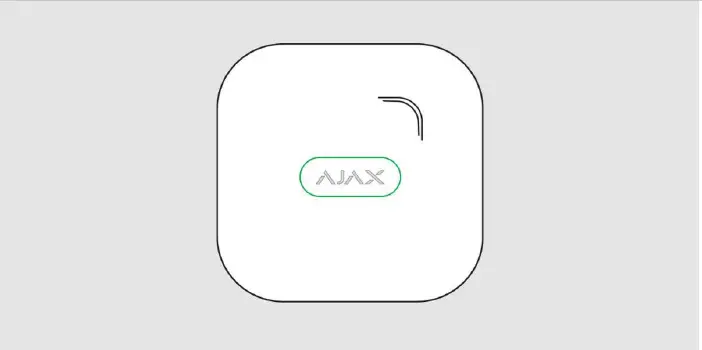
- By pressing the Ajax logo on the device lid (there is a touch button under the logo).

- Through the Ajax app. In case of fire alarm, you will see a pop-up message in Ajax app suggesting to turn off the built-in sirens

- Using the / (if Interconnected Fire Detectors Alarm feature is enabled). To turn off the built-in sirens in case of fire alarm, press the button on the KeyPad/KeyPad Plus.


Please note that for this to work you need to priorly select Mute Interconnected Fire Alarm command for this button in the KeyPad/KeyPad Plus settings. If smoke and/or temperature levels do not restore to normal values, in 10 minutes, the FireProtect/FireProtect Plus turns on the siren again.
Connecting the Detector to the Ajax Security System
Connecting to the hub
- Following the hub user guide, install the . Create the account, add the hub, and create at least one room. Ajax app
- Switch on the hub and check the internet connection (via Ethernet cable and/or GSM network).
- Make sure that the hub is disarmed and does not update by checking its status in the Ajax app.
Pairing the detector with hub:
- Select Add Device in the Ajax app.
- Name the device, scan or type the QR Code (located on the detector body and packaging), and select the location room.

- Tap Add — the countdown will start.
- Switch on the device.

To make sure that the detector is on, press the on/off button — the logo will light up red for a second. For detection and pairing to occur, the detector should be located within the coverage area of the wireless network of the hub (at a single protected object). The connection request is transmitted for a short time: at the moment of switching on the device. If pairing with the hub fails, the detector operates autonomously; switch off the detector for 5 seconds and retry. The detector connected to the hub is displayed in the list of devices in the app. The update of the detector status in the list depends on the device inquiry time set in the hub settings (the default value is 36 seconds).
Connecting to Third-Party Security Systems
To connect the detector to a third-party security central unit using the or integration module, follow the recommendations in the manual of the respective device. The smoke detector always operates in the active mode. When connecting FireProtect to third-party security systems, it is appropriate to place it in a permanently active protection zone.
States
- Devices
- FireProtect | FireProtect Plus
| Parameter | State |
| Temperature | The temperature of the device. Measures on the device processor and changes gradually |
| Jeweller Signal Strength | Signal strength between the hub and the detector |
| Connection | Connection status between the hub and the device |
| Battery Charge | Battery level of the device. Two states available:
ОК |
| Battery discharged
| |
| Lid | The tamper state of the device — reacts to the detachment |
| ReX | Displays the status of using a radio signal range extender |
| Smoke | Shows if smoke is detected |
| Temperature Threshold Exceeded | The state of temperature threshold exceeded alarm |
| Rapid Temperature Rise | The state of rapid temperature increase alarm |
| High CO Level (FireProtect Plus only) | The state of dangerous CO level alarm |
| Backup Battery Charge | Backup battery level of the device |
| Smoke sensor | The state of the smoke detector |
| Smoke Sensor Dust Level | The dust level in the smoke chamber |
|
Temporary Deactivation | Shows the status of the device: active, completely disabled by the user, or only notifications about triggering of the device tamper button are disabled |
| Firmware | Detector firmware version |
| Device ID | Device identifier |
Settings
- Devices
- FireProtect | FireProtect Plus
- Settings
| Setting | Value |
| First field | Device name, can be edited |
| Room | Selecting the virtual room to which the device is assigned |
| Dangerous CO Level Alarm (FireProtect Plus only) | If active, the detector alerts of exceeding the limits of carbon monoxide concentration |
| High Temperature Alarm | If active, the detector reacts when the temperature is 60°C and higher |
| Rapid Temperature Rise Alarm | If active, the detector reacts to rapid temperature increase (30°С for 30 minutes or less) |
| Alert with a siren if smoke is detected | If active, sirens added to the system are activated in case of smoke alarm |
| Alert with a siren if temperature threshold exceeded | If active, sirens added to the system are activated in case if temperature threshold exceeded |
| Alert with a siren if rapid temperature rise detected | If active, sirens added to the system are activated in case if rapid temperature rise detected |
| Alert with a siren if CO detected (FireProtect Plus only) | If active, sirens added to the system are activated in case if CO concentration is dangerous |
| Jeweller Signal Strength Test | Switches the device to the signal strength test mode |
| Smoke Sensor Self Test | Starts FireProtect selftest |
|
Temporary Deactivation | Allows the user to disconnect the device without removing it from the system.
Two options are available:
Entirely — the device will not execute system commands or participate in automation scenarios, and the system will ignore device alarms and other notifications
Lid only — the system will ignore only notifications about the triggering of the device tamper button
Learn more about temporary deactivation of devices
Note that a disabled device does not trigger an interconnected alarm of fire detectors. But if smoke is detected, the built-in siren will sound |
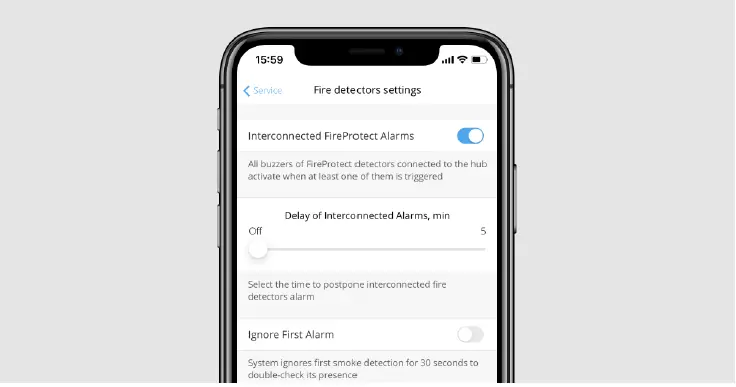
Interconnected Fire Detectors Alarms Setup
The function activates built-in sirens of all fire detectors if at least one of them is triggered. Sirens are activated within the hub–detector ping interval according to the Jeweller settings.
To enable Interconnected Alarms:
- Open the Devices tab in the
- Select a hub
- Go to its Settings by pressing
- Select the Service item
- Go to the Fire detectors settings menu and activate the Interconnected Fire Detectors Alarms option
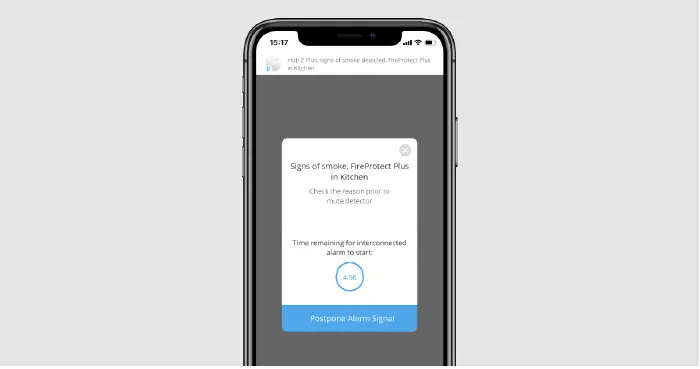
- If necessary, set the Delay of Interconnected Alarms from 0 to 5 minutes (in 1-minute increments). The option allows you to postpone the interconnected alarm for a specified period of time.
The function works as follows:
- One of the FireProtect/FireProtect Plus detectors detects an alarm.
- Delay of Interconnected Alarms starts.
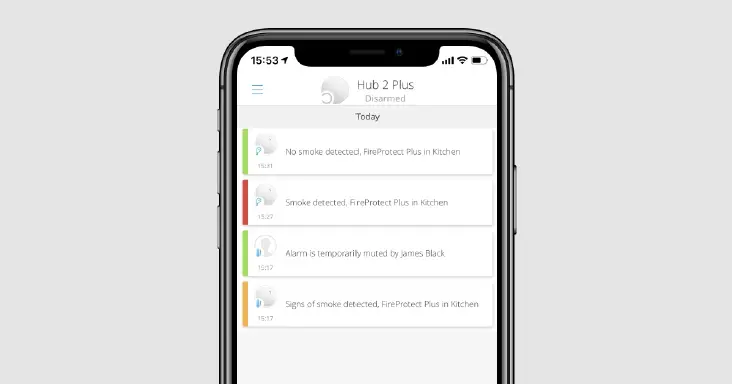
- The built-in siren of the fire detector informs the alarm. Users receive notifications in the Ajax app (if are enabled). At the object, are activated (if the are enabled).

- An alarm confirmation event is sent to the monitoring station and security system users, and the system starts the interconnected alarm for fire detectors if:
- The interconnected alarm delay time has passed, and the triggered detector is still registering an alarm.
- During the delay of the interconnected alarms, the triggered detector reports a different type of alarm (for example, the detector report the exceeding of the temperature threshold after a smoke alarm).
To give more time to eliminate the cause of false triggering of the detector, the user can delay the propagation of the interconnected alarm for another 10 minutes: During the interconnected alarm delay, another fire detector in the system raised an alarm.
- Through Ajax apps.

- By pressing the KeyPad/KeyPad Plus function button (in the interconnected fire alarm muting mode).
- By pressing the Button in the interconnected fire alarm muting mode.
- By eliminating the cause of the alarm (fire detectors at the facility no longer detect an alarm).
- By pressing the touch button of the triggered fire detector.
If necessary, activate the Ignore First Alarm option. This setting is recommended for premises with potential sources of false alarms. For example, if the device is installed in a place where dust or steam can get into the detector.
The option functions as follows:
- The detector reports a smoke alarm.
- The built-in 30-second timer of the detector starts.
- If after 30 seconds the detector still detects a threat, an alarm is sent to the hub.
Setting the Residential fire alarm system
Residential fire alarm system is an Ajax system feature that defines user and device rights to mute the interconnected alarms of fire detectors. If the feature is enabled, users can silence fire alarms of triggered detectors onlyin the groups to which they have access. And Button, KeyPad, KeyPad Plus — the alarms only of those fire detectors that are in the same group. The feature is useful for objects consisting of several rooms and protected by a single hub. For example, for multi-apartment complexes where each apartment is a group with at least one fire detector installed. In this case, users can respond to the alarms of their groups without silencing the alarms of other groups.
Indication
| Event | Indication |
| Detector switching on | The logo lights up green for 1 second |
| Detector switching off | The logo blinks red three times and the device switches off |
| Registration failed | The logo blinks green for a minute, then the device switches to the autonomous mode |
| Smoke or temperature increase detected | The siren switches on, the logo lights red during the fire/smoke alarm |
|
Battery low | One short sound signal per 90 sec — main batteries low (CR2)
Two short sound signals per 90 sec — backup battery low (CR2032)
Three short sound signals per 90 sec — both batteries low |
Performance testing
The Ajax security system allows conducting tests for checking the functionality of connected devices. The tests do not start straight away but within a period of 36 seconds when using the standard settings. The test time start depends on the settings of the detector scanning period (the paragraph on “Jeweller” settings in hub settings).
Attenuation Test
According to the requirements of EN50131 standard, the level of the radio signal sent by wireless devices is decreased during the test mode.
Detector Testing
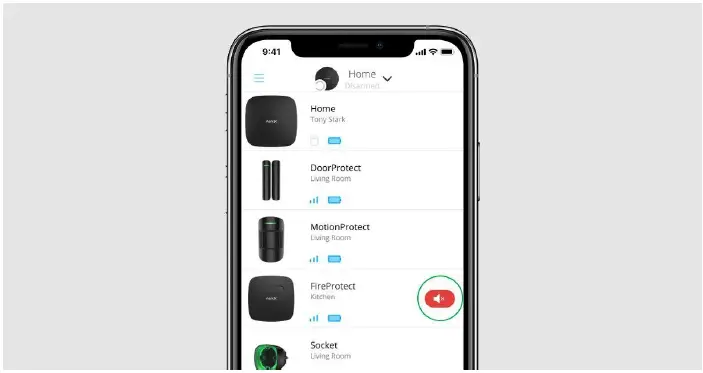
Before installing the detector, check the smoke sensor. To test it, switch on the detector and press the sensor button (the logo center) for a few seconds – the detector will test the smoke chamber with the electronic simulation of smoke generation and then will switch on the siren for 6 seconds. You will receive the notification in the Ajax app regarding the test result and detector status
Installation
Selecting the Location
The location of the detector depends on its remoteness from the hub, and obstacles hindering the radio signal transmission: walls, floors, large objects inside the room. If the signal level is low (one bar), we cannot guarantee the stable operation of the detector. Take all possible measures to improve the quality of the signal. At least, move the detector: even a 20 cm shift can significantly improve the quality of signal reception. If after moving the device still has a low or unstable signal strength, use a . Install the detector at the ceiling in the highest point where hot air and smoke are concentrated in case of fire. If there are any beams at the ceiling, protruding by 30 or more centimeters from the ceiling level, install the detector between every two beams.
Installation procedure
Before installing the detector, make sure that you have selected the optimal location that follows the guidelines of this manual!
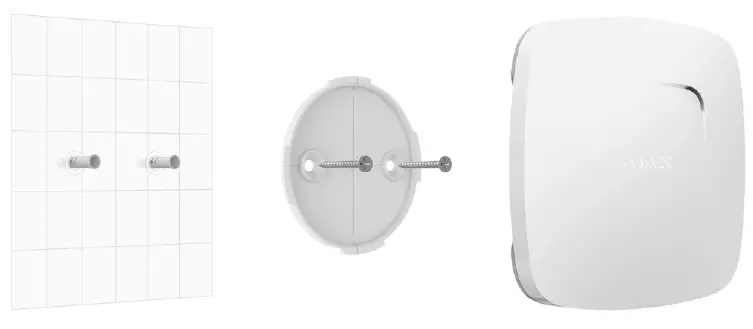
- Fix the SmartBracket panel on the ceiling using bundled screws. If you use any other attachment tools, make sure that they do not damage or deform the attachment panel.
- Put the detector on the attachment panel by turning it clockwise on SmartBracket. When the detector is fixed in SmartBracket, it blinks with LED, signaling that the tamper is closed.
If LED doesn’t blink after fixing in SmartBracket, check the status of the tamper in the and then the fixing tightness of the panel. If someone detaches the detector from the surface or takes it off the attachment panel, the security system notifies you.
Do not install the detector:
- outside the premises (outdoors);
- nearby any metal objects or mirrors causing attenuation or screening of the signal;
- at any places with fast air circulation (air fans, open windows or doors);
- closer than a meter to the cooking surface;
- inside premises with the temperature and humidity beyond the range of permissible limits;
- closer than 1 m to the hub.
Autonomous Use of the Detector
The detector can be used autonomously, without connecting to a security system.
- Switch on the detector by pressing the on/off button for 3 seconds (the logo will light up green for 1 second) and conduct the smoke test.
- Select the optimal location of the detector following the recommendations in the second part of the section Selecting the location of this manual.
- Install the detector as described in the section Installation procedure
In case of autonomous use, the detector notifies of the detected fire/smoke with the siren sound and light of the logo. To switch off the siren, press the logo (there is a sensor button) or eliminate the cause of the actuated alarm.
Maintenance and Battery Replacement
Check the operational capability of the detector regularly. Clean the detector body from dust, spider web, and other contaminants as they appear. Use soft dry napkin suitable for tech equipment. Do not use any substances containing alcohol, acetone, gasoline, and other active solvents to clean the detector. To a certain level, the detector ignores the dust in the smoke chamber. When the chamber becomes too dusty, the detector notifies the user of the need to clean it via the app (and beeps every minute and a half). Such maintenance is compulsory for the detector to operate correctly
How to clean up the smoke chamber
Pre-installed batteries ensure up to 4 years of autonomous operation. If the batteries are discharged, the security system sends the respective notifications and the detector signal with a sound every 90 seconds:
- if the main batteries are low — a single short signal;
- if the backup battery is low — two short signals;
- if both batteries are low — three short signals.
How long Ajax devices operate on batteries, and what affects this Battery Replacement
Tech Specs
| Smoke-sensitive element | Photoelectric sensor |
| Temperature-sensitive element | Thermocouple |
| Sound notification volume | 85 dB at a distance of 3 m |
| Alarm threshold at the temperature | +59°С ±2°С |
| Tamper protection | Yes |
|
Radio communication protocol | Jeweller
|
|
Radio frequency band | 866.0 – 866.5 MHz 868.0 – 868.6 MHz 868.7 – 869.2 MHz 905.0 – 926.5 MHz 915.85 – 926.5 MHz 921.0 – 922.0 MHz Depends on the region of sale. |
|
Compatibility | Operates independently or with all Ajax hubs, |
| Maximum RF output power | Up to 20 mW |
| Radio signal modulation | GFSK |
|
Radio signal range | Up to 1,300 m (any obstacles absent)
|
| Power supply | 2 × CR2 (main batteries), CR2032 (backup battery), 3 V |
| Battery life | Up to 4 years |
| Installation method | Indoors |
Compliance with standards
Complete Set
- FireProtect (FireProtect Plus)
- SmartBracket mounting panel
- Batteries CR2 (pre-installed) — 2 pcs
- Battery CR2032 (pre-installed) — 1 pcs


