MotionProtect Outdoor User Manual
Updated January 14, 2021
MotionProtect Outdoor is a wireless outdoor motion detector for the Ajax security system. The detector communicates with the hub via protected Jeweller radio protocol at a distance up to 1,700 meters in the line of sight. MotionProtect Outdoor features protection against blocking the detector view(anti-masking system) and triggering by pets (pet immunity). The motion detection distance is adjustable: from 3 up to 15 meters.![]() MotionProtect Outdoor can operate both on pre-installed batteries or use an external power supply. Depending on the detector settings, the batteries’ life is up to 5 years. MotionProtect Outdoor does not support connection via the ocBridge Plus and uartBridge integration modules.
MotionProtect Outdoor can operate both on pre-installed batteries or use an external power supply. Depending on the detector settings, the batteries’ life is up to 5 years. MotionProtect Outdoor does not support connection via the ocBridge Plus and uartBridge integration modules.
The user can cone the detector via the Ajax app for iOS, Android, macOS, and Windows. The security system notices through push negotiated).
The Ajax security system can be connected to a central monitoring station of a security company.
Buy outdoor motion detector MotionProtect Outdoor
Functional Elements
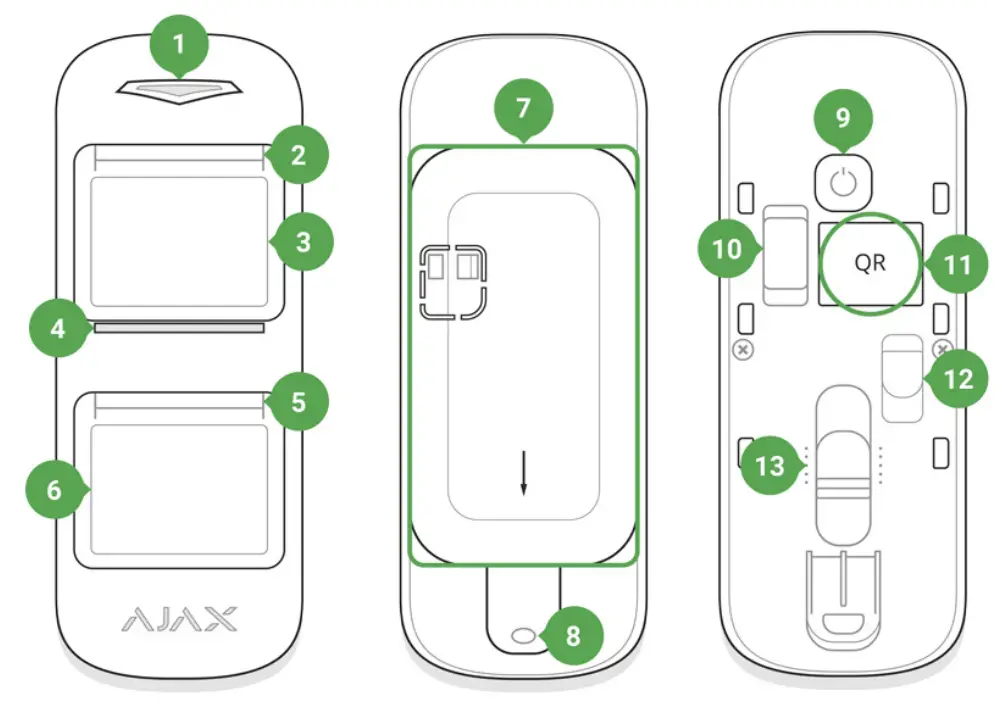
- Main light indicator
- Upper light indicator and masking sensor
- Upper motion sensor lens
- Masking sensor
- Lower light indicator and masking sensor
- Lower motion sensor lens
- SmartBracket attachment panel (perforated part is required for actuating the tamper button in case of any attempt to dismantle the detector)
- The hole for attaching SmartBracket panel with a screw
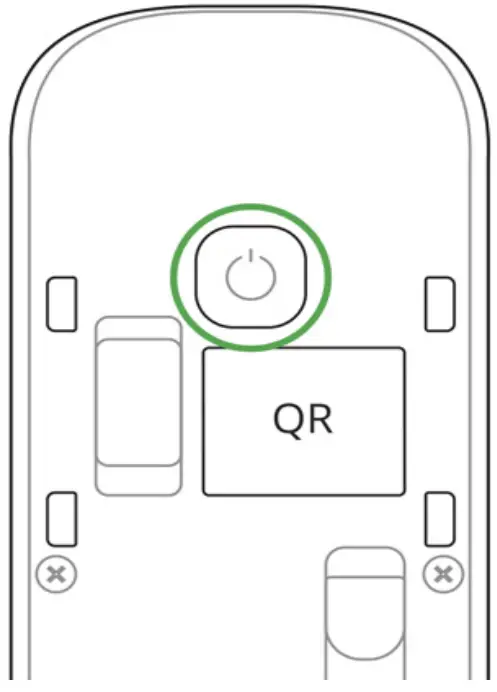
- The “On” button
- Tamper button
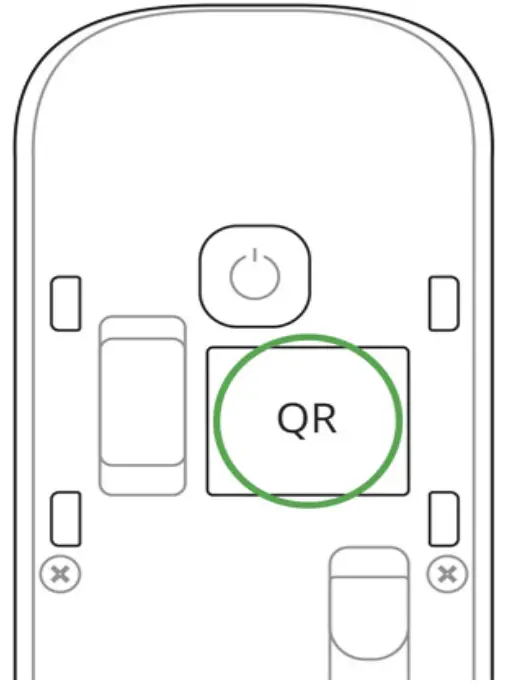
- QR Code
- Connector for external power supply cable outlet
- Scrollbar for adjusting the motion detection range
Operating Principle
When the system is armed, the detector continuously receives signals from two PIR sensors. If both sensors detect identical motion, MotionProtect Outdoor instantly transmits an alarm signal to the hub and blinks with a green LED. MotionProtect Outdoor ignores animals, birds, insects, as well as swaying plants and trees.![]() By a motion alarm, the security system also can activate sirens and notify a security company if connected.
By a motion alarm, the security system also can activate sirens and notify a security company if connected.
 The detector recognizes motion and sends the, but next alarms until disarming are transmitted no more than once in 5 seconds.
If a motion is detected before the system is armed, the detector will be armed not immediately, but during the next polling by the hub.
Learn more about the algorithm of the detector operation
Anti-masking system
Masking is an attempt to block in any way the view of the detector’s lens.
MotionProtect Outdoor detects the following types of masking:
- An obstacle in front of both lenses (an object on the height of the detector and at a distance of up to 20 cm in front of it)
- An obstacle in front of any of the lenses (an object at a distance of up to 10 cm in front of one of the lenses)
- Painting or pasting any of the lenses with an opaque substance
- Pasting the detector front side with an opaque substance
- Applying an aerosol or painting the detector front side with paint
If one or more types of masking are detected, the detector generates a masking alarm and lights up a green LED for 1 second.
MotionProtect Outdoor detects masking regardless of the security state: armed or disarmed.
Response time to masking
| Masking type | Active mode (detector is armed) | Passive mode (detector is disarmed) | ||
| Time to alarm, s | Time to restore, s | Time to alarm, s | Time to restore,s | |
| An obstacle in front of both lenses | 2 | 8 | 130 | 10 |
| An obstacle in front of any of the lenses | 130 | 18 | 130 | 10 |
| Pasting or painting any of the lenses | 130 | 18 | 130 | 10 |
| Pasting the detector front side | 130 | 18 | 130 | 10 |
| Applying aerosol or painting the detector front side with paint | 130 | 18 | 130 | 10 |
Connecting
Before starting connection:
- Following the hub user guide, install the Ajax app. Create the account, add the hub, and create at least one room.
- Switch on the hub and check the internet connection (via Ethernet cable and/or GSM network).
- Make sure that the hub is disarmed and does not update by checking its status in the Ajax app.
![]() Only users with administrator rights can add the device to the hub
Only users with administrator rights can add the device to the hub
How to connect the device to the hub:
- Select the Add Device option in the Ajax application.
- Name the device, scan/write manually the QR Code (located on the body and packaging), and select the location room.

- Select Add — the countdown will begin.
- Switch on the device by pressing the on/off button for 3 seconds.
For the detection and interfacing to occur, the detector should be located within the coverage area of the wireless network of the hub (at a single protected object). Request for connection to the hub is transmitted for a short time at the time of switching on the device.
MotionProtect Outdoor turns off automatically after 6 seconds if it failed to connect to the hub. To retry the connection, you do not need to switch off the device. If the detector has already been assigned to another hub, turn off MotionProtect Outdoor, and then follow the standard addition procedure.
If the connection to the hub failed, repeat the connection attempt after 30 seconds.
The device connected to the hub will appear in the list of devices of the hub in the app. The update of the detector statuses in the list depends on the device ping interval set in the hub settings (the default value is 36 seconds).To avoid masking alarms, switch off anti-masking in the device settings before the installation!
States
- Devices
- MotionProtect Outdoor
| Parameter | Value |
| Temperature | Temperature of the Detector. Measured on the processor and changes gradually |
| Jeweller Signal Strength | Signal strength between the hub and the detector |
| Connection | Connection status between the hub and the detector |
| Battery Charge | Battery level of the device. Two states available: ОК Battery discharge how battery charge is displayed in Ajax apps |
| Lid | The tamper mode of the detector, which reacts to the detachment of or damage to the body |
| Delay when entering, sec | Delay time when entering |
| Delay when leaving, sec | Delay period after the security system is armed |
| Routed Through ReX | Displays the status of using the ReX range extender |
| External Power | Displays the status of using the external power supply |
| Sensitivity | Sensitivity level of the motion detector: low, normal, high |
| Anti-masking | Has the anti-masking option been enabled |
| Always Active | When turned on, the motion detector always detects movement |
| Temporary Deactivation |
|
| Firmware | Detector firmware version |
| Device ID | Device identifier |
Settings
- Devices
- MotionProtect Outdoor
- Settings


| Setting | Value |
| First field | Detector name can be edited |
| Room | Selecting the virtual room to which the device is assigned |
| Delay when entering, sec | Selecting delay time when entering |
| Delay when leaving, sec | Delay period after the security system is armed |
| Delays in night mode | When enabled, the detector will experience a delay in the night mode |
| Arm in night mode | When turned on, the detector will switch to armed mode when using night mode |
| Alarm LED indication | Allows you to disable the indicator during an alarm. Available for devices with eversion 5.55.0.0 or higher How to e-version or the ID of the detector or device? |
| Sensitivity | Choosing the sensitivity level of the motion sensor: High Normal Low |
| Anti-masking | If active, the sensor will always detect masking |
| Always active | When turned on, the detector always registers motion |
| Alert with a siren if motion detected | If active, added to the system are sirens activated when the motion detected |
| Jeweller Signal Strength Test | Switches the detector to the Jeweller signal strength test mode |
| Detection Zone Test | Switches the detector to the detection area test: General motion detector test Upper motion detector test Detection Zone Test Lower motion detector test Masking sensor test (if anti-masking a function is enabled) |
| Attenuation test | Switches the detector to the signal fade test |
| Temporary Deactivation | mode (available in detectors with e version 3.50 and later) Allows the user to disconnect the device without removing it from the system.Two options are available: Deactivate entirely — the device will not execute system commands or participate in automation scenarios and the system will ignore device alarms and other noti |
| User Guide | Opens the detector User Guide |
| Unpair Device | Disconnects the detector from the hub and deletes its settings |
Indication
MotionProtect Outdoor light indicator may light up red or green depending on the device status.
Indication When Pressing the “On” button
| Event | Indication |
| Pressing the power button (detector is switched on) | Lights up red while the button is held down |
| Switching on | Lights up green while the device is switching on |
| Switching off | Initially lights up red, then blinks three times |
Turned-on detector indication
| Event | Indication | Note |
| Detector connection to the hub | Lights up green for a few seconds | |
| Hardware error | Blinks red continuously | The detector requires repair, please contact Support Service |
| Motion- and masking-triggered alarm or tamper button triggering | Lights up green for about one second | |
|
Battery needs replacing | During the alarm, it slowly lights up green and slowly goes out | Replacement of the detector battery is described in the Battery replacement manual |
Functionality Testing
The Ajax security system allows conducting tests for checking the functionality of connected devices.
The tests do not start immediately but within a period of 36 seconds when using default settings. The test time starts depending on the settings of the detector ping interval (the “Jeweller” menu in the hub settings).
Jeweller Signal Strength Test
Detection Zone Test
Attenuation test
According to the requirements of EN50131, the level of the radio signal sent by wireless devices is reduced during the test mode.
Choosing an installation place
![]() Before installing the detector, conduct the Jeweller signal strength test.
Before installing the detector, conduct the Jeweller signal strength test.
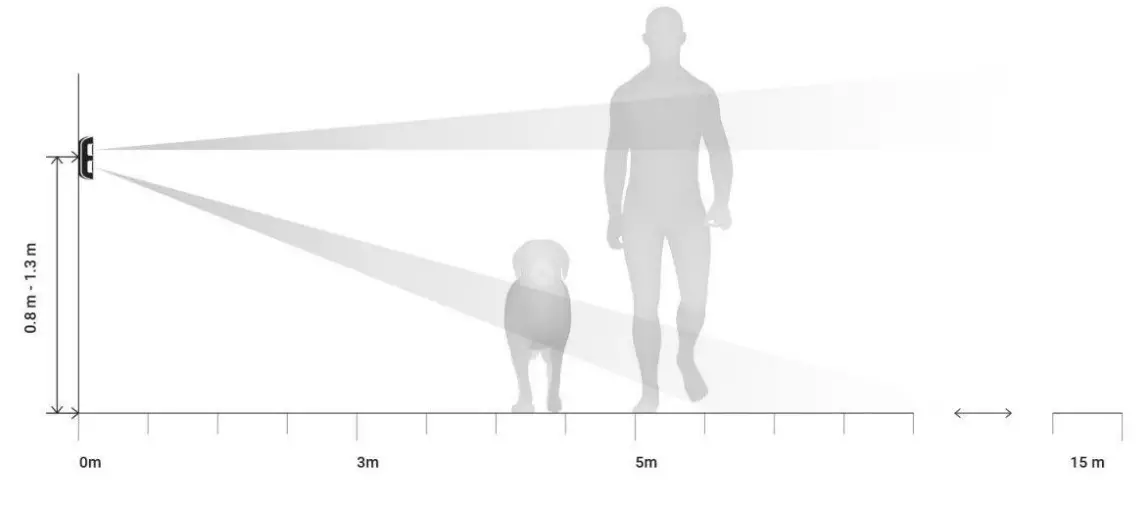
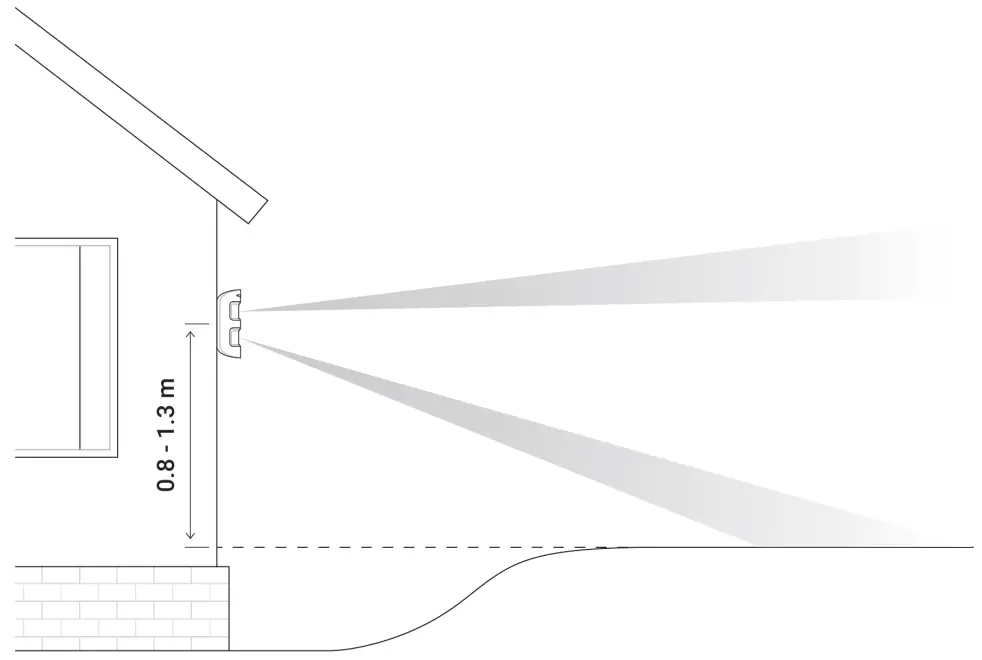
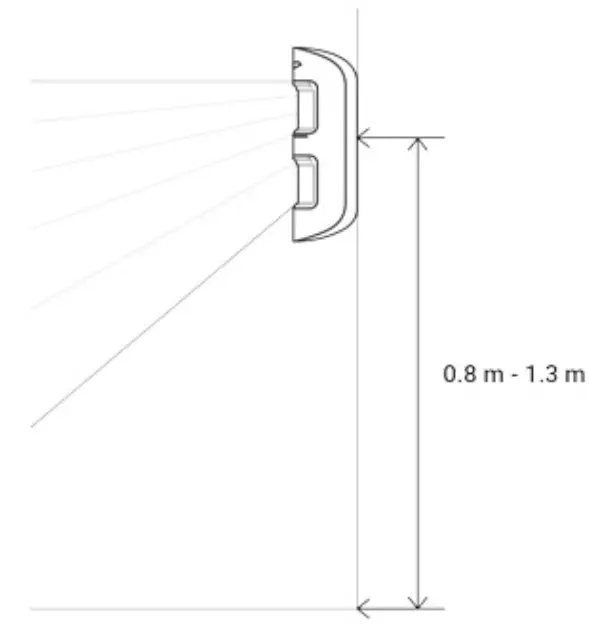
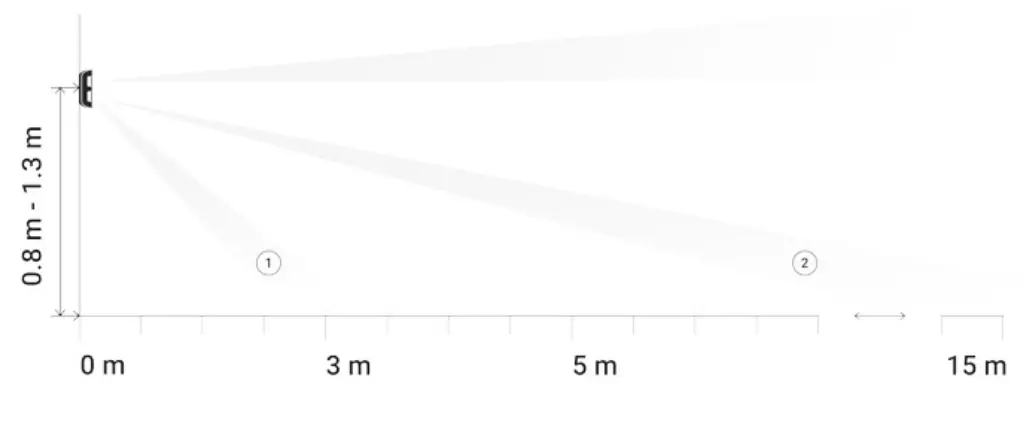
Install MotionProtect Outdoor at the height of 0.8 – 1.3 m, ensuring the upper lens axis is parallel to the ground, and the supposed intrusion path is perpendicular to the lens axis.
When choosing the installation place, consider the maximum device detection range. It depends on the sensitivity level and the position of the regulator for adjusting the motion detection range.
| Regulator position | Sensitivity level | Motion detection range |
| Top (minimum range) | Low / Middle / High | up to 3 meters |
| Middle | Low | up to 7 meters |
| Middle / High | up to 8 meters | |
| Low (maximum range) | Low / Middle / High | up to 15 meters |
The detection range was tested at an ambient temperature of +23°C and clear weather. In other conditions, the detection range may vary. When choosing an installation place, use the Detection Zone Test to determine the sector in which the device detects movement as accurately as possible.
To avoid false alarms due to rain or snow falling on the masking sensors, install MotionProtect Outdoor under a covering. To protect masking sensors in the open area, use
Hood for MotionProtect Outdoor cover
MotionProtect Outdoor sends an alarm to the hub only if both PIR sensors detect identical motion. The difference in time of motion detection should not exceed 1.5 seconds.
Check the detector functioning at the alleged installation place. When choosing the location of MotionProtect Outdoor, take into account the radio signal communication range.
If the signal level is low (one bar), we cannot guarantee the stable operation of the detector. Take all possible measures to improve the quality of the signal. At least, move the detector: even a 20 cm shift can signify the quality of signal reception.
If the detector has low or unstable signal strength even after moving, use a ReX radio signal range extender![]() Be careful when mounting the attachment panel. Excessive force during its mounting can lead to deformation of the panel and, consequently, to the inability to install the detector or to its unreliable attachment SmartBracket with the bundled tools.
Be careful when mounting the attachment panel. Excessive force during its mounting can lead to deformation of the panel and, consequently, to the inability to install the detector or to its unreliable attachment SmartBracket with the bundled tools.
Using any other tools, e.g., large diameter screws may damage the attachment panel. We do not recommend using double-sided adhesive tape for permanent mounting. The tape
runs dry with time, which can cause falling, false triggering, and detector malfunction.
Do not install the detector:
- Without Hood for MotionProtect Outdoor in a place without a covering.
- Opposite the trees whose leaves can be in the detection zone of the upper and lower PIR sensors of the detector. Opposite the bushes higher than 80 cm.
- Near metal objects and mirrors (they can shield the radio signal and lead to its attenuation).
- Closer than 1 meter from the hub.
Note that MotionProtect Outdoor does not detect movement behind the glass.
Therefore, do not install the detector in locations where glass objects can obstruct the detector’s view. For example, in places where a glass door can obstruct the view of the device.
Why motion detectors react to animals and how to avoid it
Install detector at a height 0.8 to 1.3 meters so that its upper lens looks parallel to the ground. If the site is uneven, the installation height is considered from the highest point of the territory controlled by the detector.
Detector installation procedure
- Fix the SmartBracket attachment panel on the surface temporarily using bundled screws or double-sided adhesive tape. Consider the installation height: 0.8 – 1.3 meters.

- Select the motion detection distance (3 to 15 m) using the adjustment scroll bar.

 The lower PIR sensor beam direction with the speci maximum (2) detection range
 - Put MotionProtect Outdoor on the SmartBracket attachment panel. Leave the detection area (horizontal detection angle — 90°) and make sure that there are no moving objects within the detection area to calibrate anti- masking sensors properly.

 Attention! The anti-masking sensors will begin to calibrate automatically when the detector has been put on the SmartBracket attachment panel. Calibration lasts up to 30 seconds and is followed by the others.
 - Conduct the Detection Zone Test for upper and lower sensors separately, both sensors simultaneously, and anti-masking test in the Ajax app. If the detector does not react to motion, select the appropriate sensitivity level, detection range, and check the detector slope angle.
- If all tests have been appropriately passed, tBracket to the surface with screws permanently, put MotionProtect Outdoor on the attachment panel, and wait until the end of calibration. Fix the detector on the attachment panel with the bundled screw.
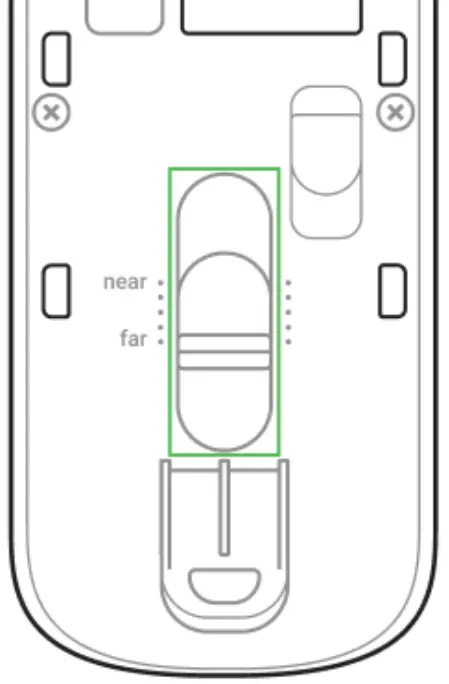
 The lower PIR sensor beam direction with the speci maximum (2) detection range
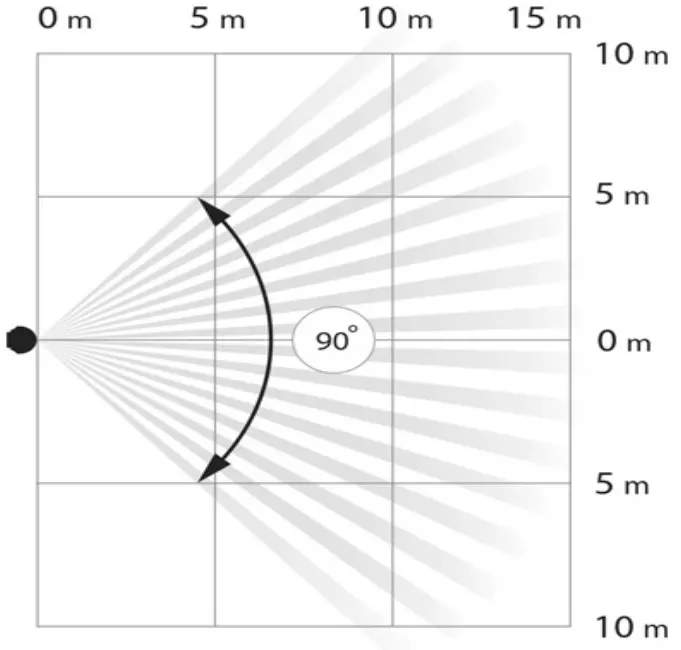
Connecting External Power Supply
MotionProtect Outdoor can use an external power supply of 5-28 V DC, 200 mA. If the external power supply is connected, there is no need to remove the pre-installed batteries. Batteries provide the detector with a backup power source.
To connect the external power supply:
- Disassemble the detector body: remove the screws and open the lid.
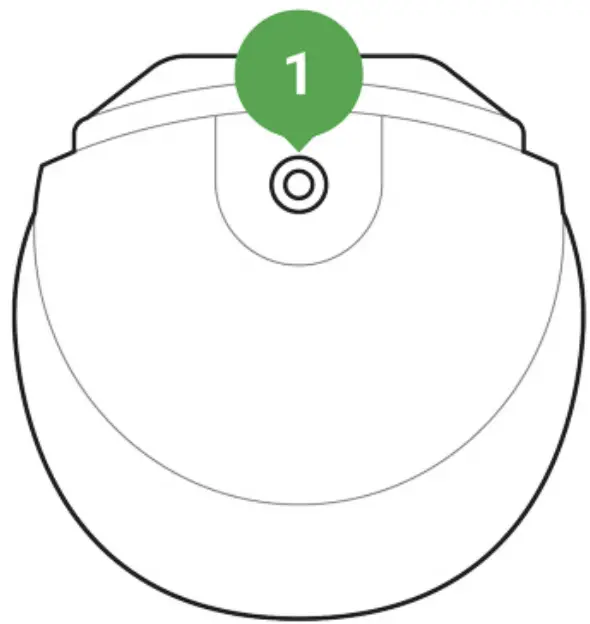
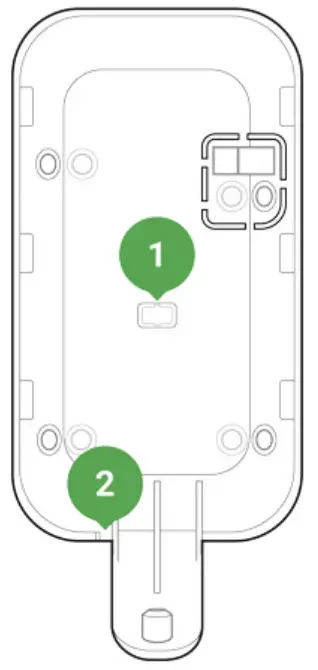
- Break off special caps on the SmartBracket attachment panel:
 1. A cap for putting out the power supply wire behind the SmartBracket attachment panel
2. A cap for putting out the power supply wire below the SmartBracket attachment panel - Run the external power supply dead wire through the attachment panel and cap.
- Connect the cable to the terminal strips observing polarity. Fix the wire with the clamp.
 3. Terminal strips on the detector board
4. The clamp on the back of the detector body - Switch on the power supply. The value of the External Power Supply the detector settings will change to Connected.Use grounded power supply source only!
- Fix the rear of the body with screws, install the detector and wait until the end of calibration.
 1. A cap for putting out the power supply wire behind the SmartBracket attachment panel
 3. Terminal strips on the detector board
Maintenance
Check the operational capability of the detector regularly. Clean the detector body from dust, spider web, and other contaminants as they appear. Use a soft dry napkin suitable for tech equipment.
Do not use any substances containing alcohol, acetone, gasoline, and other active solvents to clean the detector.
The pre-installed battery ensures up to 5 years of autonomous operation (with the 3 minutes ping interval by the hub). If the detector battery is low, the system noti, and the LED indicator smoothly lights up and goes off if a glass break is detected or the tamper is triggered.
How long Ajax devices operate on batteries, and what affects this
Battery replacement
Hood Installation
Hood for MotionProtect Outdoor is a cover protecting masking sensors of the detector from rain and snow. Install it when the detector cannot be placed under the covering.
Buy Hood for MotionProtect Outdoor
![]() Hood for MotionProtect Outdoor can be mounted even on a detector that is already installed. You don’t need to detach the device from the surface for installing the hood.
Hood for MotionProtect Outdoor can be mounted even on a detector that is already installed. You don’t need to detach the device from the surface for installing the hood.
To install Hood for MotionProtect Outdoor:
- Remove the protective of the Dual Lock tape, which is glued to the inner surface of the hood.
- Attach the hood to the detector — part of the tape will stick to the body of the detector.
- Detach the hood from the MotionProtect Outdoor and smooth out the part of the tape that remained on the detector body.
- Put the hood back so that both parts of the tape stuck, the detector.
Tech Specs
| Motion detection distance | Adjustable, 3–15 m when the detector is installed at 1 m height |
| Protection against masking | Yes |
| Pet ignoring function | Yes, height up to 80 cm when the detector is installed at 1 m height |
| Protection against false triggering | Yes, algorithmic analysis |
| Frequency band | 868.0 – 868.6 MHz or 868.7 – 869.2 MHz, depending on the sales region |
| Compatibility | Operates only with all Ajax hubs, and range extenders |
| Maximum radio signal power | Up to 20 mW |
| Radio signal modulation | GFSK |
| Radio signal range | Up to 1,700 m (where there are no obstacles) |
| Power supply | 2 × CR123A, 3 V |
| Battery life | Up to 5 years |
| External power | 5 – 28 V DC, 200 mA |
| Usage | Indoors and outdoors |
| Body protection level | IP55 |
| Anti-tamper switch | Yes |
| Installation method | Outdoors/indoors |
| Operating temperature range | From -25°С to +60°С |
| Operating humidity | Up to 95% |
| Accessories | Hood for MotionProtect Outdoor |
| Overall dimensions | 183 × 70 × 65 mm |
| Weight | 322 g |
Complete set
- MotionProtect Outdoor
- SmartBracket mounting panel
- CR123A battery — 2 pcs. (pre-installed)
- Installation kit
- Quick Start Guide
Warranty
Warranty for the “AJAX SYSTEMS MANUFACTURING” LIMITED LIABILITY COMPANY products is valid for 2 years after the purchase and does not apply to the pre-installed battery.
If the device does not work correctly, you should support service—in half of the cases, technical issues can be solved remotely!
The full text of the warranty
User Agreement
Technical support:
[email protected]
References
 Why motion detectors react to animals and how to avoid it | Ajax Systems Blog
-
End user agreement - Ajax Systems
-
Jeweller radio technology | Ajax Systems
-
Current product lines of the Ajax security system
-
Current product lines of the Ajax security system
-
Current product lines of the Ajax security system
-
Security system control panels | Ajax Systems
-
Ajax MotionProtect Outdoor — Wireless outdoor motion detector
-
Hood for MotionProtect Outdoor — Visor for protection of Ajax sensors
-
ocBridge Plus — Module for Ajax devices integration with wired systems
-
Signal range extenders in the security system | Ajax Systems
-
ReX — Intelligent radio signal range extender | Ajax Systems
-
Alarm sirens for Ajax security systems
-
uartBridge — Module for Ajax devices integration with third-party wireless alarms systems
-
Jeweller and Wings radio protocols in the Ajax security system
-
Software | Ajax Systems
-
Ajax devices standards compliance list
-
Warranty - Ajax Systems
-
How battery charge is displayed in Ajax apps | Ajax Systems Support
-
What is Devices Auto Deactivation and how it works | Ajax Systems Support
-
How to find out the device firmware version | Ajax Systems Support
-
How long Ajax devices operate on batteries, and what affects this | Ajax Systems Support
-
How to temporarily deactivate a device without removing it from the system | Ajax Systems Support
-
How to change batteries in the MotionProtect Outdoor | Ajax Systems Support
-
Jeweller radio protocol: technology and capabilities | Ajax Systems Support
-
What is Attenuation Test | Ajax Systems Support
-
What is Detection Zone Test | Ajax Systems Support
-
What is Jeweller Signal Strength Test | Ajax Systems Support


