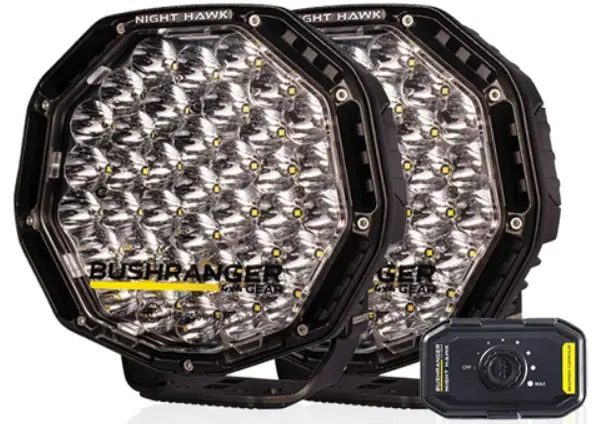
BUSHRANGER NIGHT HAWK Dual Output Driving Light Wiring Loom
 IMPORTANT! Read Carefully
- We recommend these wiring looms to be fitted by a qualified automotive electrician.
- Suitable for 12V automotive DC electrical systems only.
- A forward facing light system may be used only as an auxiliary to high beam. Check compliance and regulations with local authorities. These wiring looms are designed for use with auxiliary driving lights that are required to switch on and off with the vehicles headlight high beam system.
Overview
SPECIFICATIONS
| Part No. | NHW300DT | NHW600DTP |
| Description | Night Hawk 300W 12V Driving Light Wiring Loom. | Night Hawk 600W 12V Driving Light Wiring Loom |
| Fitting Time | 60 Minutes (approx.) | 60 Minutes (approx.) |
| Input Voltage | 12VDC | 12VDC |
| Power Plugs | 2 x Deutsch DT06 (2 pin) | 2 x Deutsch DTP06 (2 pin) |
| Current Rating (max) | 26A total (13A per plug) | 50A total (25A per plug) |
| Relay Rating | 1 x 12VDC 40A Relay | 2 x 12VDC 40A Relays |
| Fuses | 1 x 40A Regular Blade Fuse 1 x 3A Mini Blade Fuse | 2 x 40A Regular Blade Fuses 1 x 3A Mini Blade Fuse |
| In-Cabin Switch | ON/OFF Push Button Mouse Style with LED indicators (Optional vehicle specific OE Style switches available separately) | |
| Wiring Grade | High Temp 105°C rated, protected with split tubing | |
| Wire Lengths | Battery to Relay/s: 0.5m Relay to Switch: 4.0m Relay to High Beam Plug: 1.1m Relay to Driving Light Plug 1: 1.6m Relay to Driving Light Plug 2: 2.6m | |
Parts Included:
- Wiring Loom
- Relay Mounting Screws and washers
- Cable Ties
- Spare Fuses
Installation Guide
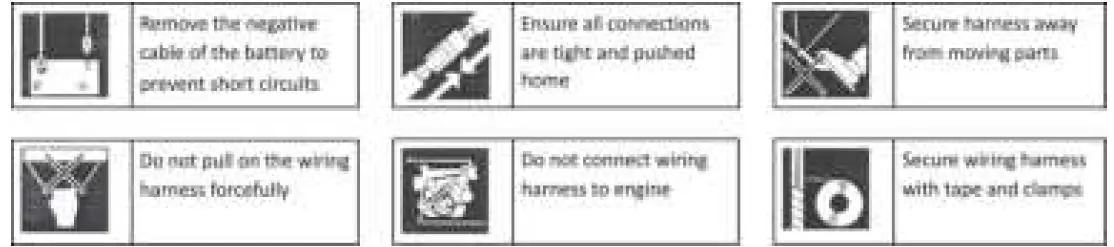
- Remove the negative (-) cable of the battery to prevent short circuits.
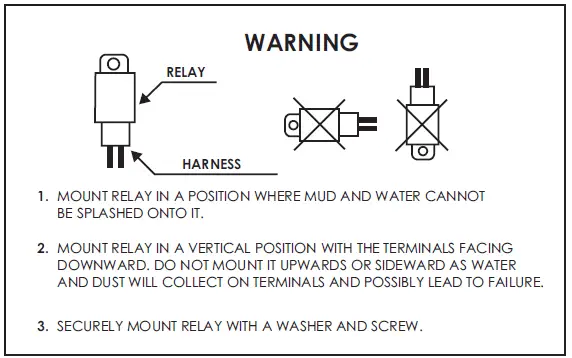
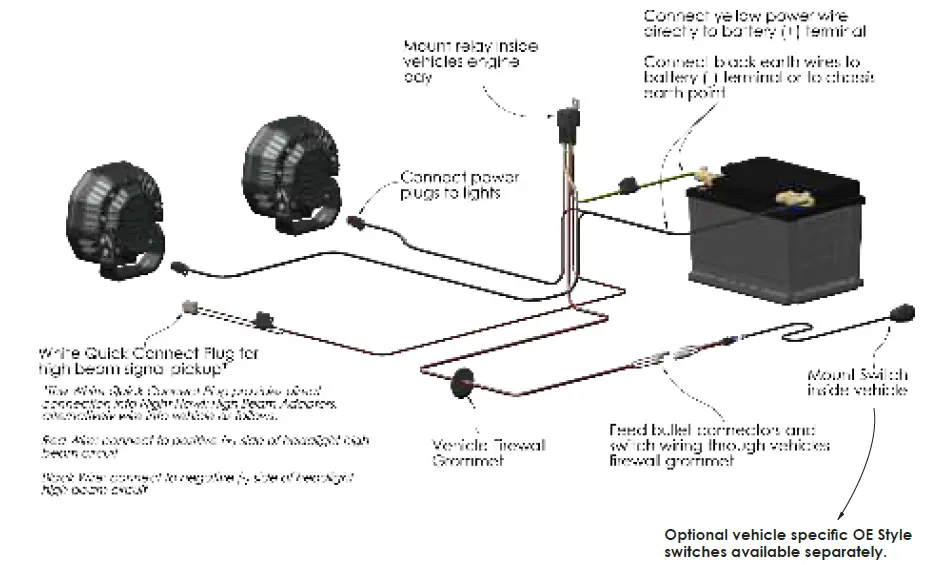
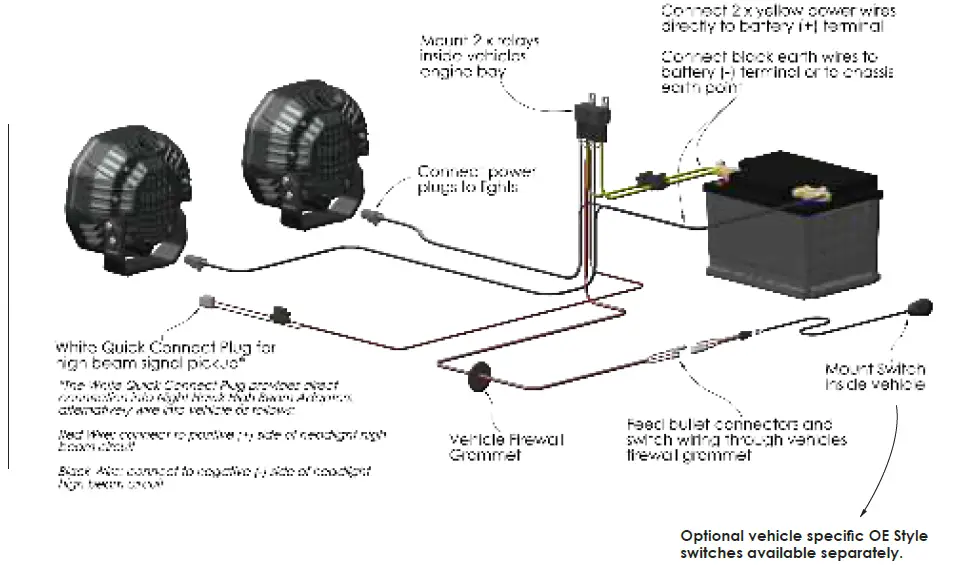
- Lay out the wiring loom in the engine bay and locate a convenient spot to mount the relay/s. Refer to relay mounting note here:

- Disconnect the mouse switch from the switch wiring at the 3 x bullet connectors. Feed the bullet connectors of the red, white & black switch wires through an existing grommet in the vehicles firewall and pull wires through into the cabin of the vehicle.
Note: remove the protective split tubing from these wires during this step, then cut and refit the tubing once the wires have been routed. - Re-connect the bullet connectors of the mouse switch and switch wiring, and secure the switch to a convenient place on the dashboard using the supplied double-sided tape.
- Move to the engine bay and route the white quick connect plug towards the back of the vehicle’s headlight for high beam signal pickup. Connect this white plug to a suitable Night Hawk High Beam adaptor (sold separately).
Note: If high beam adaptor is not available, cut off the white plug and connect the red and black wires into the vehicle as follows:
For positively switched vehicles- Connect the red wire to the positive (+) side of the high beam circuit; commonly the positive (+) high beam switching wire at the headlight or the high beam fuse in the fuse box.
- Connect the black wire to the negative (-) side of the high beam circuit; commonly an earth connection at the headlight or on the body of the vehicle.
For negatively switched vehicles - Connect the red wire to the positive (+) side of the high beam circuit; commonly a constant positive (+) wire at the headlight or positive (+) terminal of vehicles battery.
- Connect the black wire to the negative (-) side of the high beam circuit; commonly the negative (-) high beam switching wire at the headlight.
- Route the Deutsch power plugs towards the front of the vehicle and connect to the driving lights.
- Route the yellow power wire/s and black earth wires towards the battery. Connect the yellow wire/s to the positive (+) terminal of the battery, and the black earth wires to the negative (-) terminal of the battery or to the vehicle’s chassis earth point.
- Secure all wires to existing vehicle wiring looms using supplied cables ties and ensure wires are kept away from hot surfaces and moving parts.
- After installation check all connections and then reconnect the negative (-) cable to the battery.

NHW300DT Wiring Diagram
Warranty Policy
- Our Warranty
We warrant to you that the Kingsley product is free from defects in workmanship and materials for the warranty period. - Fitting and use
Please ensure you:- fit the Kingsley product in accordance with the product information and all relevant vehicle safety and compliance laws
- use the Kingsley product for the purpose for which it was originally designed and in accordance with the product information and all relevant vehicle safety and compliance laws
- Exclusions
Our warranty doesn’t cover:- normal wear and tear
- fitting the Kingsley product other than in accordance with the product information and any relevant vehicle safety and compliance laws, including
incorrect fitting - using the Kingsley product other than for the purpose for which it was originally designed or other than in accordance with the product information and any relevant vehicle safety and compliance laws, including unusual, improper or negligent use or misuse or overloading
- misuse or neglect of the Kingsley product, including improper repair or maintenance or failing to repair or maintain
- alteration, abuse, acts of nature, terrorism, vandalism, collision, road hazards or adverse conditions
- Making a claim
Please immediately contact us as soon as you become aware of a possible defect in the Kingsley product. We’ll arrange for you to either attend a Kingsley outlet (at your cost) for a Kingsley representative to inspect the Kingsley product (as fitted to your vehicle) or for you to return the Kingsley product to us. We’ll also request you to provide the purchase receipt and complete a warranty claim form. In order to ensure our warranty is not voided, please keep the purchase receipt as proof of purchase and don’t remove the fitted Kingsley product from your vehicle before contacting us. Note: Non-transferable warranty. The original purchaser can only claim warranty. If your claim’s in order, we’ll notify you and (at our sole discretion) either repair or replace the defective workmanship or materials (at our cost) or refund to you the purchase price you paid for the defective Kingsley product. If further information or investigation is required or if the claim does not meet the requirements under our warranty, we’ll let you know. - Australian Consumer Law
The Kingsley product comes with guarantees that can’t be excluded under the Australian Customer Law. You’re entitled to a replacement or refund if there’s
a major failure and compensation for any other reasonably foreseeable loss or damage. You’re also entitled to have the Kingsley product repaired or replaced if it fails to be of acceptable quality and the failure doesn’t amount to a major failure. - Other consumer rights
The benefits to you under our warranty are in addition to any other rights and remedies you are entitled to under relevant consumer laws. Our warranty replaces any other warranty given by Kingsley or it’s supplier in respect of the Kingsley product. - Terms
The following terms have the following meanings:Term Meaning Product information information about the Kingsley product which may be contained in any of the documentation provided with the Kingsley product, including safety instructions, installation instructions, operating instructions, owner’s manual, service manual, labels and packaging Purchase date the date you purchased the Kingsley product from a Kingsley outlet, as specified in the purchase receipt Kingsley outlet an outlet authorised by Kingsley to sell Kingsley products Kingsley products products or components which Kingsley manufacturers or sells through Kingsley outlets Warranty period commences on and from the purchase date and ends as follows:
NHW300DT | NHW600DTP – WIRING LOOM – 12 Months.We/Us Kingsley Enterprises Pty Ltd (ABN 23 001 592 749) E: [email protected]
A: 6A Brooks Road, Ingleburn NSW 2565 P: 1800 654 767
W: www.bushranger.com.auYou the purchaser of the Kingsley product from a Kingsley outlet


