Aputure MT Pro Mini Tube Light

Introduction
- Thank you for purchasing the Aputure® MT Pro.
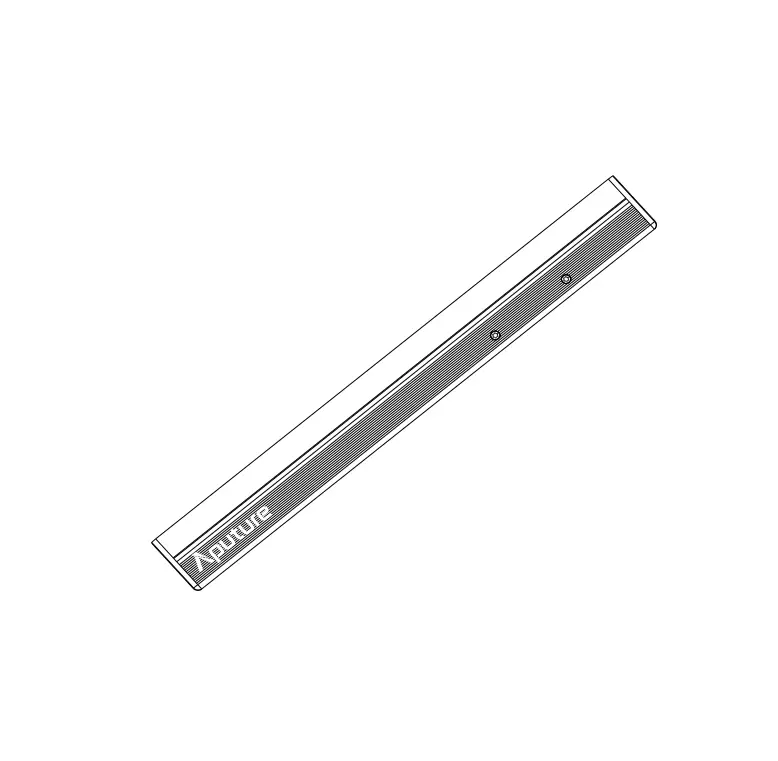
- Aputure MT Pro is a full spectrum mini LED tube light for cinematographers and lighting professionals. Featuring total color and pixel control in a compact form factor, the MT Pro is your new film making paintbrush.Granting you true creative freedom, the MT Pro utilizes advanced wireless connectivity with our innovative Sidus Link mobile app and the industry-standard Lumenradio CRMX for wireless DMX adjust ability.
- Meet the MT Pro. All the color you need in the palm of your hand.
IMPORTANT SAFETY INSTRUCTIONS
When using this unit, basic safety precautions should always be followed, including the following:
- Read and understand all instructions before using.
WARNING
Please keep MT Pro away from diskette, credit cards, monitors, mechanical watches, mobile phones, medical devices (pacemakers), etc. - Close supervision is necessary when any fixture is used by or near children. Do not leave the fixture unattended while in use.
- Care must be taken as burns can occur from touching hot surfaces.
- Do not operate the fixture if a cord is damaged, or if the fixture has been dropped or damaged, until it has been examined by qualified service personnel.
- Let the lighting fixture cool completely before storing. Unplug the power cable from lighting fixture before storing and store the cable at assigned space of the carrying case.
- To reduce the risk of electric shock, do not immerse this fixture in water or any other liquids.
- To reduce the risk of fire or electric shock, do not disassemble this fixture. Contact [email protected] or take the lighting fixture to qualified service personnel when ser vice or repair is required. Incorrect reassembly may cause electric shock when the lighting fixture i s in use.
- The use of any accessory attachment not recommended by the manufacturer may increase the risk of fire, electric shock, or injury to any persons operating the fixture.
- Please do not place the LED lighting fixture near any flammable object.
- Only use a dry microfiber cloth to clean the product.
- Please do not use the light fixture in wet condition on account of electric shock may be caused.
- Please have the product checked by an authorized service personnel agent if the product has a problem. Any malfunctions caused by unauthorized disassembly are not covered by the warranty. The user may pay for maintenance.
- We recommend only using the original Aputure cable accessories. Please note that any malfunctions a caused by using unauthorized accessories are not covered by the warranty. The user may pay for maintenance.
- This product is certified by RoHS, CE, KC, PSE, and FCC. Please operate the product in full compliance with relevant country’s standards. Any malfunctions caused by incorrect use are not covered by warranty. The user may pay for maintenance.
- The instructions and information in this manual are based on thorough, controlled company testing procedures. Further notice will not be given if the design or specifications change.
SAVE THESE INSTRUCTIONS
FCC Compliance Statement
WARNING
Changes or modifications not expressly approved by the party responsible for compliance could void the user’s authority to operate the equipment.
NOTICE
This equipment has been tested and found to comply with the limits for a Class B digital device, pursuant to Part 15 of the FCC Rules. These limits are designed to provide reasonable protection against harmful interference in a residential installation. This equipment generates, uses, and can radiate radio frequency energy and, if not installed and used in accordance with the instructions, may cause harmful interference to radio communications. However, there is no guarantee that interference will not occur in a particular installation.
If this equipment does cause harmful interference to radio or television reception, which can be determined by turning the equipment off and on, the user is encouraged to try reorient or relocate the receiving antenna.
- Increase the separation between the equipment and receiver.
- Connect the equipment to an outlet on a different circuit than the receiver is connected to.
- Consult the dealer or an experienced radio/TV technician for help
RF Warning Statement:
This device has been evaluated to meet general RF exposure requirements.
Components List
Please make sure all accessories listed below are found before using. If not, contact your seller immediately.
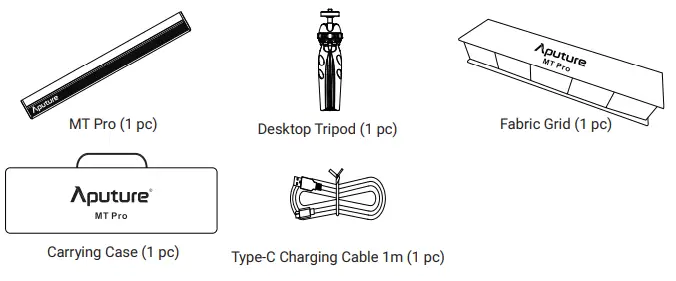
* The illustrations in the manual are only diagrams for reference. Due to the continuous development of new versions of the product, if there are any differences between the product and the user manual diagrams,please refer to the product itself.
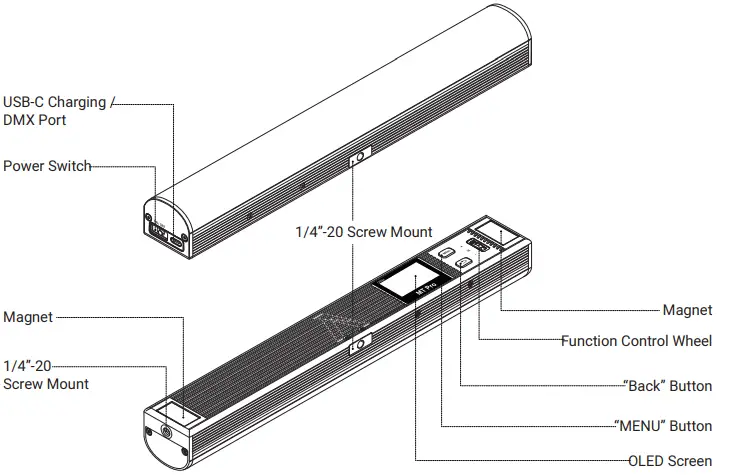
Product Details
Installations
Magnets
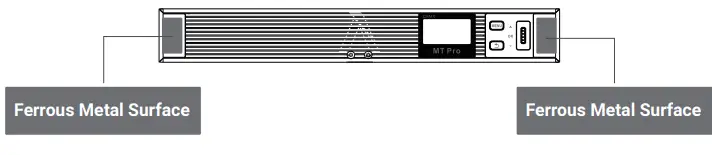
WARNING
Do not install MT Pro on any surface where the temperature is above 80°C, as this may damage the magnet.
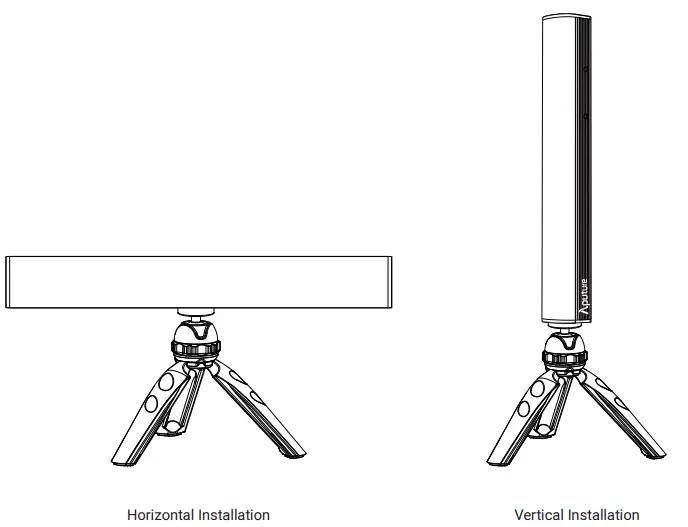
Desktop Tripod
Operations
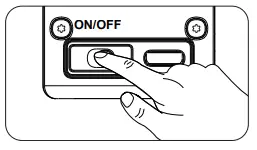
Power ON/OFF
Adjust the position of the power switch to turn the light on or off.
Type-C charging
As the light is charging, the on-screen battery level indicator will animate to show the battery’s status. After the battery is fully charged, the battery level indicator will be displayed as full.
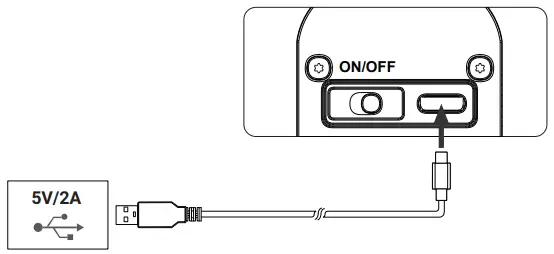
- Please use the included USB-C cable to charge MT Pro. Using a different cable won’t guarantee optimal charging.
- Supports 5V/2A charging via charger or power banks.
- Charging rate will slow down when the light is powered on. Turn the light off for optimal charging.
Manual control
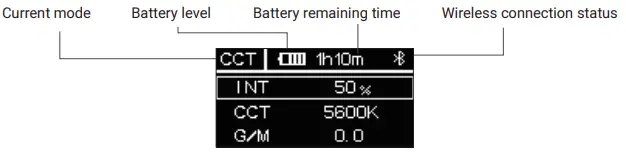
UI Introducing
Menu
Press MENU to access the system menu, rotate and press the control wheel to select CCT / HSI / RGB / FX /Custom FX / DMX Setting / CRMX Setting / BT Setting / Language / Factory Reset / Product Info / Screensaver / Exit.
CCT
Press MENU to access the system menu, rotate and press the control wheel to select CCT mode.
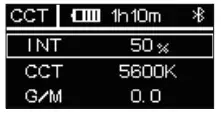
- INT (Intensity): 0.0 – 100.0 %
- CCT (Correlated Color Temp.): 2000 K – 10000
- KG/M (Green / Magenta adjustment): -1.0 – +1.0
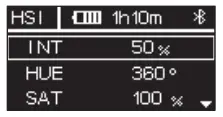
HSI
Press MENU to access the system menu, rotate and press the control wheel to select HSI mode.
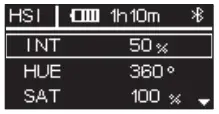
- INT (Intensity): 0.0 – 100.0 %
- HUE (Hue): 0.1 – 360.0°
- SAT (Saturation): 0.0 – 100.0 %
- CCT (Correlated Color Temp.): 2000 K – 10000 K
RGB
Press MENU to access the system menu, rotate and press the control wheel to select RGB mode.
FX
Press MENU to access the system menu, rotate and press the control wheel to select FX mode.
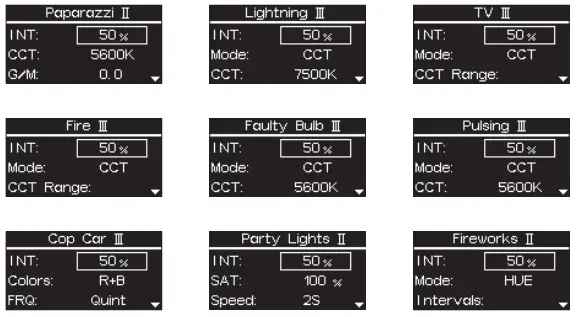
- System FX
Press the control wheel to select system FX, rotate and press the control wheel to select Paparazzi II / Lightning III / TV IV / Fire III / Faulty Bulb III / Pulsing III / Cop car III / Party Lights II/ Fireworks II.
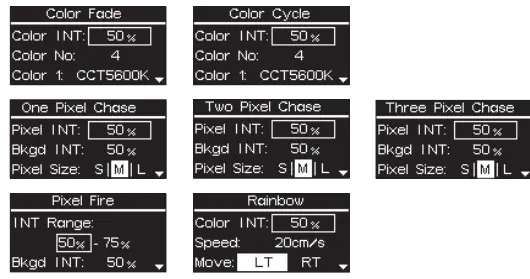
- Pixel FX
Press the control wheel to select system FX, rotate and press the control wheel to select Color Fade / Color Cycle / One Pixel Chase / Two Pixel Chase / Three Pixel Chase / Rainbow / Pixel Fire.
Please refer to page 12 – 14 for detailed parameter info
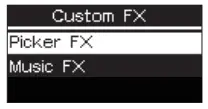
Custom FX
Press MENU to access the system menu, rotate and press the control wheel to select Custom FX. You can choose to enter Picker FX or Music FX. Each type can save 10 custom FXs. In the name of each FX, “NO FX” means unsaved FX, and “Untitled” means saved FX.
DMX Setting
- Press MENU to access the system menu, rotate and press the control wheel to select DMX Setting.
- DMX Address: Choose the DMX address of MT Pro, press and hold the control wheel for 2 seconds to lock/unlock the DMX address (Prevent accidental touch to exit DMX mode)
- DMX Profiles: Rotate the control wheel and press to choose DMX profile.
- DMX Loss Behavior:
- Hold Last Setting: After DMX signal is lost, remember the last control setting.
- Black Out: when the DMX signal is lost, it will be Black out
- Fade To Black: after DMX signal is lost, it will fade to Black in 60 seconds
- Hold 2min & Fade Out: After the DMX signal is lost, keep the last control setting for two minutes, and then Fade to Black within 60 seconds

- The fade-out time decreases as the percentage of brightness decreases. When the brightness output is 100%, the fade-out time is 60 seconds, which decreases in sequence.
- If the signal is reconnected, the DMX console will continue to maintain the signal output as same as before.

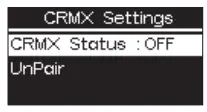
CRMX Setting
- Press MENU to access the system menu, rotate and press the control wheel to select CRMX Setting mode.
- CRMX Status: When CRMX Status is ON, it will continuously search for a pairable signal in the background to
connect. - Unpair: Unpair will disconnects the currently established connection so that other signal transmitters can be paired.

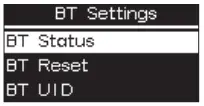
BT Setting
- Press MENU to access the system menu, rotate and press the control wheel to select BT Setting mode.
- BT Status: Rotate and press the control wheel to turn on/off Bluetooth.
- BT Reset: Reset the MT Pro Bluetooth connection, and your mobile phone or tablet will be able to connect to and control the light with Sidus Link App.
- BT UID: See the Bluetooth Unique Identifier.

Language
Press MENU to access the system menu, rotate and press the control wheel to select Language, Rotate and press the control wheel to select English or Simplified Chinese.

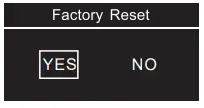
Factory Reset
- Press MENU to access the system menu, rotate and press the control wheel to select Factory Reset. Factory Setting:
- Light Mode: Intensity 50%, CCT 5600K;
- Language: English;
- BT Status: ON;
- DMX: Address 001, Profile CCT&RGB, Hold Last Setting.

Product Info
Press MENU to access the system menu, rotate and press the control wheel to select Product Info to see Firmware Version / Hardware Version.

Screensaver
Press MENU to access the system menu, rotate and press the control wheel to select Screensaver mode. You can choose to turn the screensaver on after 30/60/120 minutes or turn it off.
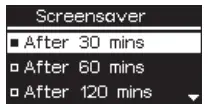
WARNING
Turning off screensaver may cause screen burn-in.
Exit
Press MENU to access the system menu, rotate and press the control wheel to select Exit. It will go back to the previous interface.
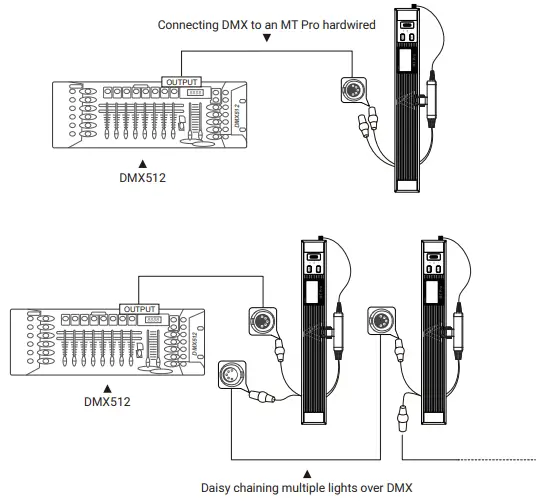
Wired DMX Control
Connect to a standard DMX controller
Connecting DMX to an MT Pro hardwired
DMX Interface Info

DMX Profile
The MT Pro offers a variety of DMX modes. Please find a detailed overview of all DMX modes in the document, DMX Chart is available for free download on the Aputure official website https://www.aputure.com.
Using the Sidus Link APP
You can download the Sidus Link app from the iOS App Store or Google Play Store for enhancing the functionality of the light. Please visit Sidus.link/app/help for more details regarding how to use the app to control your Aputure lights.

Specifications
| Power Input | 9W | Power Output | 7.5W |
| CRI | 95 | Battery | 3.7 V / 4200 mAh |
| TLCI | 98 | Battery Runtime | 100%: 2 hours |
| CQS | 96 | Charging time | 2 hours(USB DC 5 V / 2 A) |
| CCT Range | 2000 – 10000 K | Operating Temperature | -10°C – +45°C |
| Weight
Control Methods | 391 g / 0.86 lbs
Sidus Link APP, DM | Dimensions (L x W x H)
X,CRMX, On-board | 40 x 35 x 300 mm / 1.57 x 1.38 x 11.81 in |
Photometrics
| CCT | Distance | Bare Bulb | Fabric Grid |
| 2700K | 0.5m | 526 lux / 48fc | 471 lux / 43fc |
| 1m | 143 lux / 13fc | 128 lux / 11fc | |
| 3200K | 0.5m | 532 lux / 49fc | 476 lux / 44fc |
| 1m | 144 lux / 13fc | 129 lux / 11fc | |
| 5600K | 0.5m | 585 lux / 54fc | 523 lux / 48fc |
| 1m | 159 lux / 14fc | 142 lux / 13fc | |
| 6500K | 0.5m | 614 lux / 57fc | 549 lux / 51fc |
| 1m | 167 lux / 15fc | 149 lux / 13fc | |
| 7500K | 0.5m | 577 lux / 53fc | 515 lux / 47fc |
| 1m | 157 lux / 14fc | 140 lux / 13fc | |
| 10000K | 0.5m | 514 lux / 47fc | 460 lux / 42fc |
| 1m | 139 lux / 12fc | 125 lux / 11fc | |
| R | 0.5m | 151 lux / 14fc | 142 lux / 13fc |
| 1m | 42 lux / 3fc | 37 lux / 3fc | |
| G | 0.5m | 253 lux / 23fc | 225 lux / 20fc |
| 1m | 70 lux / 6fc | 61 lux / 5fc | |
| B | 0.5m | 56 lux / 5fc | 48 lux / 4fc |
| 1m | 18 lux / 1fc | 12 lux / 1fc |
Detailed Parameters of FX Control
System FX
|
Paparazzi Ⅱ | INT | 0% – 100% |
| CCT | 2000 K – 10000 K | |
| G/M | -1.0 – +1.0 | |
| Intervals | [ 0.2S – 1.0S ] – [ 2.0S – 18.0S ] | |
| Status | Stop / Loop |
|
Lightning Ⅲ | INT | 0% – 100% | |||
| Mode | CCT | 2000 K – 10000 K | G/M | -1.0 – +1.0 | |
| HSI | 1 – 360° | SAT | 0 – 100 % | ||
| CCT | 2000 K – 10000 K | ||||
| Intervals | [ 1.5S – 3.0S ] – [ 2.6S – 30.0S ] | ||||
| Status | Stop / Trigger /Loop | ||||
|
TV Ⅲ | INT | 0% – 100% | |||
| Mode | CCT Range | [ 2000 K – 9900 K ] – [ 2100 K – 10000 K ] | G/M | -1.0 – +1.0 | |
| HSI Range | [ 0° – 359° ] – [ 1° – 360 °] | SAT | 0 – 100 % | ||
| CCT | 2000 K – 10000 K | ||||
| Intervals | [ 0.5S – 2S ] – [ 5.0S – 15.0S ] | ||||
| Status | Stop / Loop | ||||
|
Fire Ⅲ | INT | 0% – 100% | |||
| Mode | CCT Range | [ 1400 K – 9900 K ] – [ 1800 K – 10000 K ] | G/M | -1.0 – +1.0 | |
| HSI Range | [ 0° – 359° ] – [ 1° – 360 °] | SAT | 0 – 100 % | ||
| CCT | 2000 K – 10000 K | ||||
| FRQ | 60 – 240 /min | ||||
| Status | Stop / Loop | ||||
|
Faulty Bulb Ⅲ | INT | 0% – 100% | |||
| Mode | CCT | 2000 K – 10000 K | G/M | -1.0 – +1.0 | |
| HSI | 1 – 360° | SAT | 0 – 100 % | ||
| CCT | 2000 K – 10000 K | ||||
| Intervals | [ 0.3S – 1.8S ] – [ 1.8S – 7.5S ] | ||||
| Status | Stop / Loop | ||||
|
Pulsing Ⅲ | INT | 0% – 100% | |||
| Mode | CCT | 2000 K – 10000 K | G/M | -1.0 – +1.0 | |
| HSI | 1 – 360° | SAT | 0 – 100 % | ||
| CCT | 2000 K – 10000 K | ||||
| Pluses | 10 – 200 /min | ||||
| Status | Stop / Loop | ||||
|
Cop Car Ⅲ | INT | 0% – 100% |
| Colors | R / B / R+B / B+W /R+B+W | |
| FRQ | Single / Double / Quad / Quint / Quint all / Cycle | |
| Status | Stop / Loop |
|
Party Light Ⅱ | INT | 0% – 100% |
| SAT | 0 – 100% | |
| Speed | 1 – 60S | |
| Status | Stop / Loop |
|
Firework Ⅱ | INT | 0% – 100% |
| Mode | CCT / HUE / CCT+HUE | |
| Intervals | [ 0.5S – 9S ] – [ 2.0S – 11.0S ] | |
| Status | Stop / Loop |
Pixel FX
| INT | 0% – 100% | |
| Color No | 1 / 2 / 3 / 4 | |
| Color 1 | Black / | |
| Color 2 | HUE: 30° / 60° / 90° / 120° / 150° / 180° / 210° / 240° / 270° / 300° / | |
| Color Fade | Color 3 | 300° /360° / |
| Color 4 | CCT: 2500K 3200K / 4300K / 5600K / 6500K / 7500K | |
| Speed | 1 – 640 cm/s | |
| Move | Left / Right | |
| Status | Play / Pause / Stop |
| INT | 0% – 100% | |
| Color No | 1 / 2 / 3 / 4 | |
| Color 1 | Black / | |
| Color 2 | HUE: 30° / 60° / 90° / 120° / 150° / 180° / 210° / 240° / 270° / 300° / | |
| Color Cycle | Color 3 | 300° / 360° / |
| Color 4 | CCT: 2500K 3200K / 4300K / 5600K / 6500K / 7500K | |
| Transfer | Step / Smooth | |
| Speed | 0.1 – 10.0S | |
| Move | Left / Right | |
| Status | Play / Pause / Stop |
|
One Pixel Chase | Pixel INT | 0% – 100% |
| Bkgd INT | 0% – 100% | |
| Pixel Size | S / M / L | |
| Departure | 1 Way / 2 Way | |
| Color 1 Color 2 Blackground | Black (Blackground Only )/ HUE: 30° / 60° / 90° / 120° / 150° / 180° / 210° / 240° / 270° / 300° / 300° / 360° / CCT: 2500K 3200K / 4300K / 5600K / 6500K / 7500K | |
| Speed | 1 – 640 cm/s | |
| Move | Left / Right / Loop (1 Way) Bounce / Cross (2 Way) | |
| Status | Play / Pause / Stop |
| Pixel INT | 0% – 100% | |
| Bkgd INT | 0% – 100% | |
| Pixel Size | S / M / L | |
| Departure | 1 Way / 2 Way | |
| Two Pixel Chase | Color 1 Color 2 | Black (Blackground Only )/ HUE: 30° / 60° / 90° / 120° / 150° / 180° / 210° / 240° / 270° / 300° / |
| Color 3 | 300° /360° / | |
| Color 4 | CCT: 2500K 3200K / 4300K / 5600K / 6500K / 7500K | |
| Blackground | ||
| Speed | 1 – 640 cm/s | |
| Move | Left / Right / Loop (1 Way) Bounce / Cross (2 Way) | |
| Status | Play / Pause / Stop |
| Pixel INT | 0% – 100% | |
| Bkgd INT | 0% – 100% | |
| Pixel Size | S / M / L | |
| Departure | 1 Way / 2 Way | |
| Color 1 | Black (Blackground Only )/ | |
| Three Pixel Chase | Color 2 Color 3 | HUE: 30° / 60° / 90° / 120° / 150° / 180° / 210° / 240° / 270° / 300° / 300° /360° / |
| Color 4 | CCT: 2500K 3200K / 4300K / 5600K / 6500K / 7500K | |
| Color 5 | ||
| Color 6 | ||
| Blackground | ||
| Speed | 1 – 640 cm/s | |
| Move | Left / Right / Loop (1 Way) Bounce / Cross (2 Way) | |
| Status | Play / Pause / Stop |
|
Rainbow | INT | 0% – 100% |
| Speed | 1 – 640 cm/s | |
| Move | Left / Right | |
| Status | Play / Pause / Stop |
|
Pixel Fire | INT Range | [ 0% – 75% ] – [ 25% – 100% ] |
| Bkgd INT | 0% – 100% | |
| Fire 1 Blackground | Black / HUE: 30° / 60° / 90° / 120° / 150° / 180° / 210° / 240° / 270° / 300° / 300° /360° / CCT: 2500K 3200K / 4300K / 5600K / 6500K / 7500K | |
| Frequency | 1 – 10 Hz | |
| Move | Horizontal / Vertical | |
| Status | Play / Pause / Stop |


