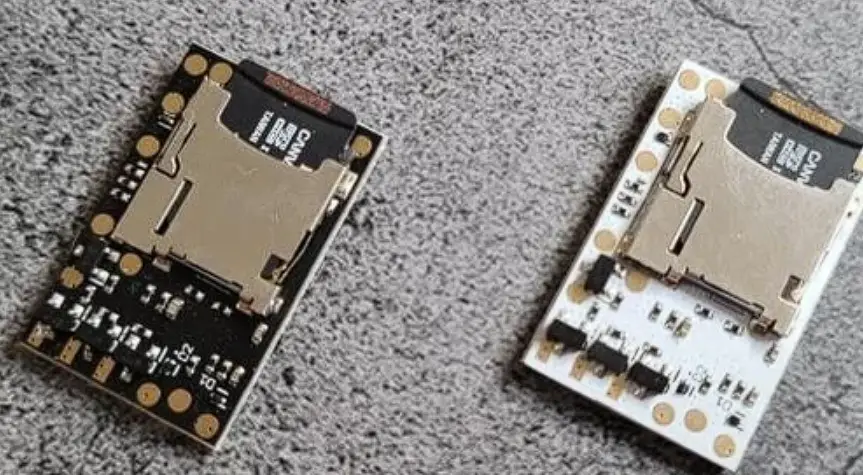
SABERTEC Golden Harvest v3 Phase 4 Soundboard and microSD Card
Quick Setup Guide
There are four high-power channels on the GH v3 (see image below). The following LED connections are recommended for the respective LED setups:
- RGB LED:
- Channel 1: Red (negative)
- Channel 2: Green (negative)
- Channel 3: Blue (negative)
- Channel 4: Switch/Chamber/Accent LEDs (negative)
- RGBW LED:
- Channel 1: Red (negative)
- Channel 2: Green (negative)
- Channel 3: Blue (negative)
- Channel 4: White (negative)
- Single color blade LEDs with separate clash LED:
- Channel 1: Blade LEDs wired in parallel (negative)
- Channel 2: Clash LED (negative)
- Channel 3: Switch/Chamber/Accent LEDs (negative)
- Channel 4: Switch/Chamber/Accent LEDs (negative)
- Quad Cree with fixed color:
- Channel 1: Power (negative)
- Channel 2: Power (negative)
- Channel 3: Power (negative)
- Channel 4: Switch/Chamber/Accent LEDs (negative)
- Nonpixel:
- Channel 1: Power (negative)
- Channel 2: Power (negative)
- Channel 3: Power (negative)
- Channel 4: Not connected
Alternatively, you can also use only channel 1 and channel 2 to power the Quad Cree with dedicated color or Neopixel. Using also channel 3 increases brightness slightly.
DNU means “do not use this pad” as the corresponding pads do not have any purpose yet. However, this might change with future firmware updates.

DNU means “do not use t his pad” as the corresponding pads do not have any purpose yet. However, t his might change with future firmware updates.
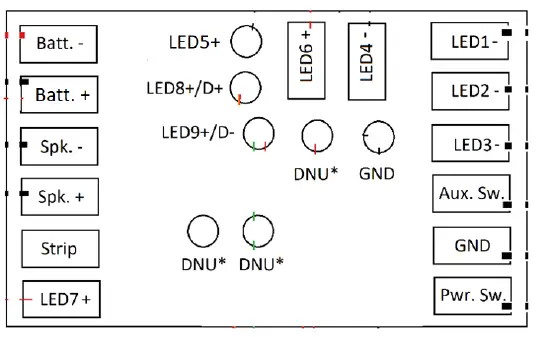
The position of the Batt. + pad indicated above holds only for the black boards. For its position on the green boards, please check the manual. The LED channel 5 is only available on phase 3 and phase 4 boards.
The table below lists the functions of each pad on the top side of the board.
| Pad | Function | Remark |
| Batt. – | Connect to negative of battery | Internally connected to all GND pads |
| Batt. + | Connect to positive of battery | |
| Spk. – | Connect to negative of speaker | |
| Spk. + | Connect to positive of speaker | |
| Strip | Connect to data line of Neopixel | Resistor is already included on the board |
| D + | Connect to D + of the USB module | |
| D – | Connect to D – of the USB module | |
| Aux. Sw. | Connect to auxiliary switch (must be momentary if used) | Second pin of the switch needs to ben connected to GND |
| GND | Ground | |
| Pwr. Sw. | Connect to power switch (must be momentary) | Second pin of the switch needs to be connected to GND |
| LED1 – | High-power LED output (4,2 V and 9 A) | |
| LED2 – | High-power LED output (4,2 V and 9 A) | |
| LED3 – | High-power LED output (4,2 V and 9 A) | |
| LED4 – | High-power LED output (4,2 V and 9 A) | |
| LED5 + | Accent LED output (3,3V and 20 mA) | Only available on phase 3 and 4 boards |
| LED6 + | Accent LED output (3,3V and 20 mA) | |
| LED7 + | Accent LED output (3,3V and 20 mA) | |
| LED8 + | Accent LED output (3,3V and 20 mA) | |
| LED 9 + | Accent LED output (3,3V and 20 mA) |
To setup the Golden Harvest for your saber, please read the following instructions on how to choose your hardware setup and on how to choose your light effects.
Choosing Your Hardware Setup
You can easily customize your hardware setup by opening the “general.txt” file on your microSD card. To configure your board for your hardware setup, it is sufficient to adjust only three parameters which are described in the following.
| PARAMETER | DESCRIPTION |
| BUTTON_MODE | Defines which button mode you want to use. The following modes are available:
|
| USB | Defines if you want to use USB for charging and file transfer. The following values are possible:
|
| NUMBER_OF_LEDS | Defines the number of Pixels in your blade. Only needed to adjust if you are using Pixel strips. Please count only the number of LEDs of one of the Pixel strips. Usually, the number is between 110 and 135. Alternatively, you can use the Saber Editor to adjust the Pixel number on the fly. See the section about the menu navigation below. The number of LEDs is internally clamped to 144. |
There are even more customizable parameters in the “general.txt” of course, but to configure your Golden Harvest v3 for your hardware setup, only these three parameters need to be adjusted.
Choosing Your Light Effects
You can easily customize your light effects by changing the value of the parameter “effect_font_slot” in the “general.txt” file on your microSD card. In the image below, you see which values correspond to the different LED setups. For Neopixel, there are three default packages available that differ with respect to the number of presets that they include.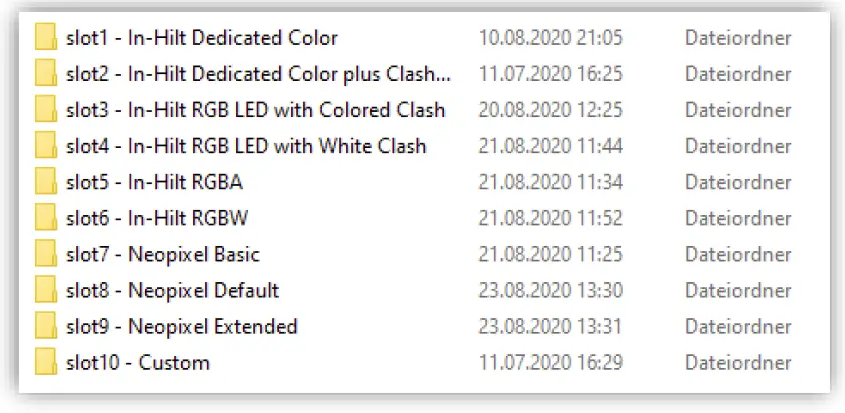
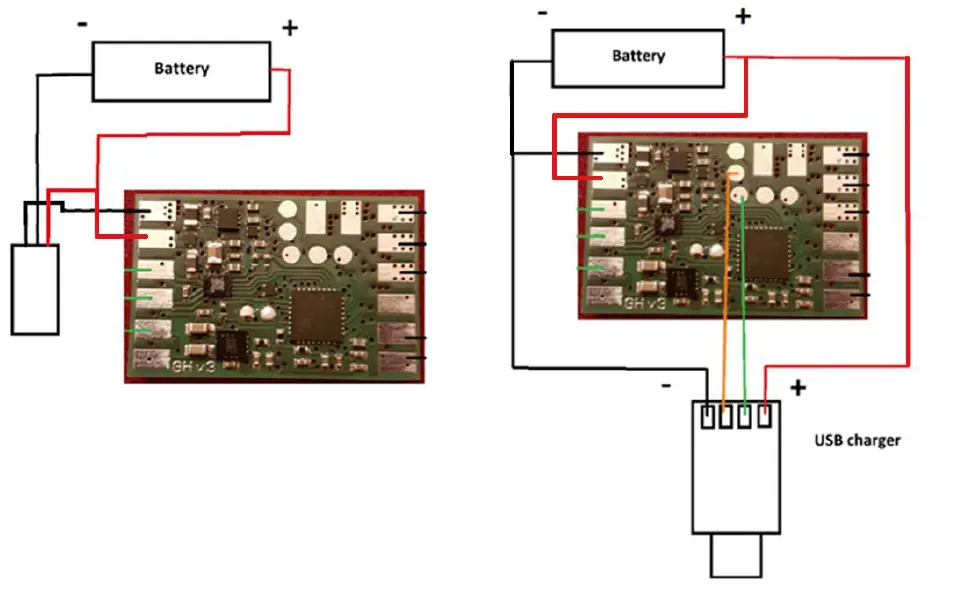
In the following, the wiring of a recharge port and of our Seedling USB module are shown. Both wiring diagrams depict the respecitve connections independent from the actual LED setup you are using. Please also have a look at the wiring diagrams for the LED setups.
- Recharge Port (in addition to LED wiring)
The wiring of a recharge port is shown below. It is the same for any LED setup. The recharge port has to be connected such that it connects „Batt. –“ and the negative of the battery if the kill key is pulled out. - Seedling module (in addition to LED wiring)
The wiring of the Seedling module is shown below. It is the same for any LED setup. Please make sure that the orange and green wires are of same length.
Neopixel without Neopixel accents
The wiring of Neopixel is shown below. To setup your board to Neopixel, set the parameter “number_of_leds” in the “general.txt” to the number of neopixel LEDs in your blade. There is already a 470 Ohm data line resistor on the board so that you don’t need to add one. If your blade is pre-resistored, this will not affect the functionality. If you want to use standard accent LEDs with a Pixel blade, make sure to use the pads LED5 – LED9.
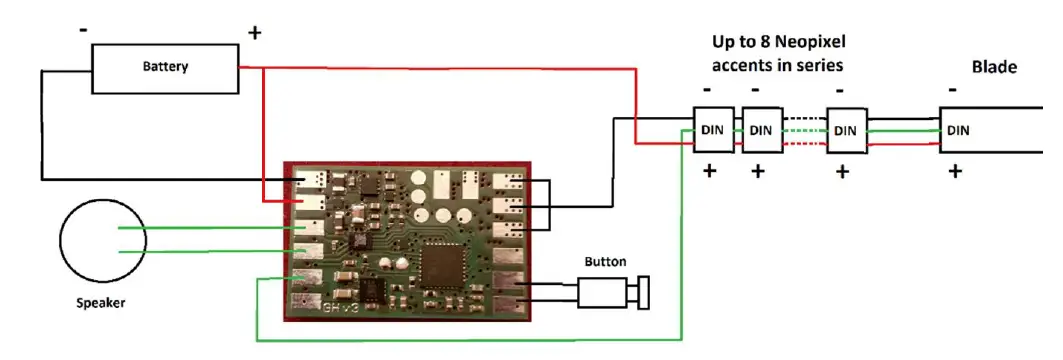
Neopixel with Neopixel Accents
The wiring of a Neopixel blade with using Neopixel accents is shown below. Just wire them in series to the blade and set the parameter “number_of_neopixel_accents” in your “general.txt” file to the number of Neopixel accents you are using. The maximum possible number is 8. There is already a 470 Ohm data line resistor on the board so that you don’t need to add one. If your blade is pre-resistored, this will not affect the functionality. If you want to use standard accent LEDs with a Pixel blade, make sure to use the pads LED5 – LED9.
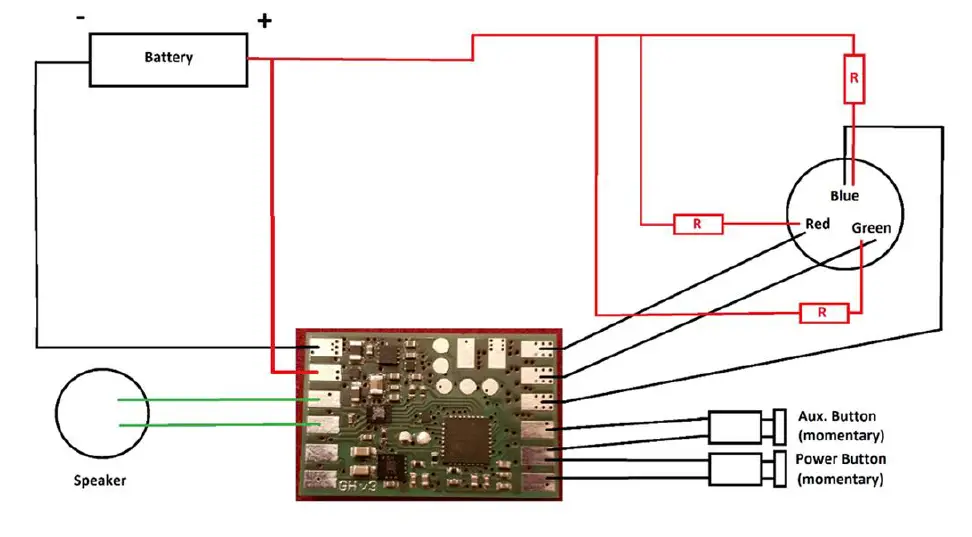
RGB The wiring of an In-Hilt RGB LED is shown below. If you want to use additional accent LEDs, please use LED channel 4. More LED channels will be available to drive accent LEDs after future firmware updates.
RGBW The wiring of an In-Hilt RGBW LED is shown below. If you want to use additional accent LEDs, please use LED channel 4. More LED channels will be available to drive accent LEDs after future firmware updates.
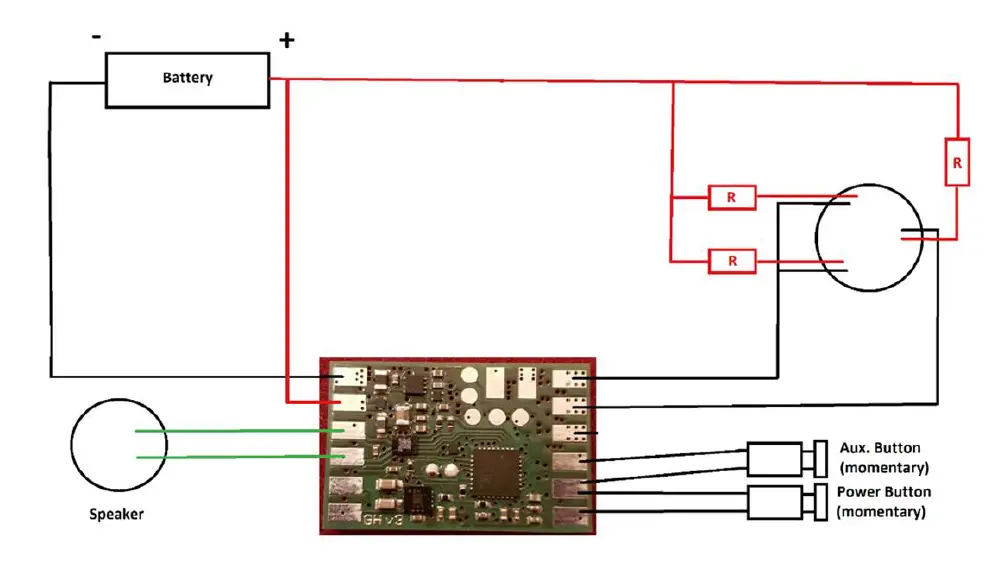
Single color blade with separate clash
The wiring of an In-Hilt LED as single color blade with separate clash is shown below. If you want to use additional accent LEDs, please use LED channel 3 or LED channel 4. More LED channels will be available to drive accent LEDs after future firmware updates.
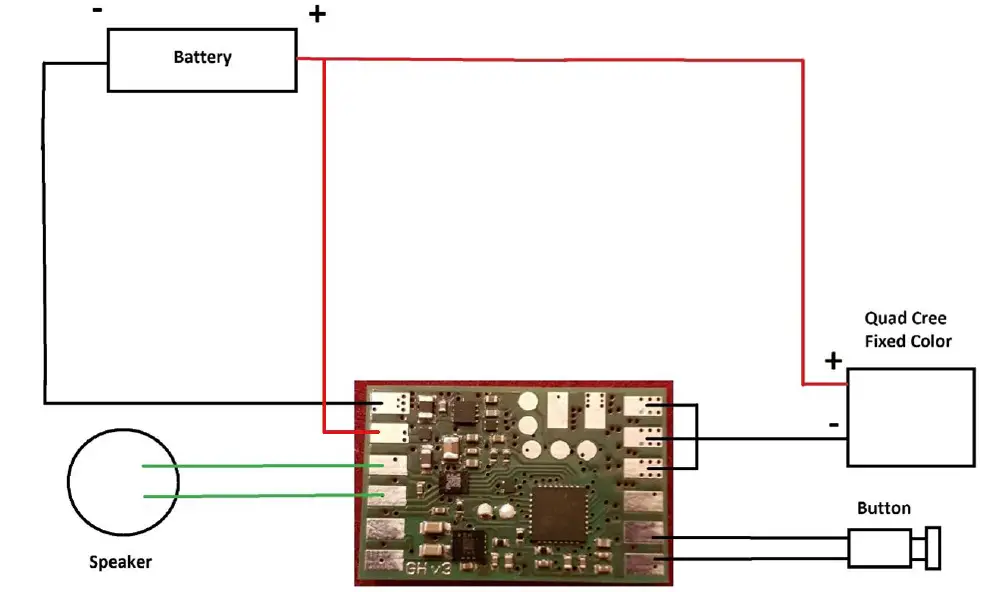
Quad Cree with fixed color
Resistors are not depicted. They should be used to limit the LED current.
Navigation Using Two Momentary Buttons
The two buttons are reffered to as auxiliary and power button according to the wiring examples above. This button mode can be selected by setting the parameter “button_mode=2” in the “general.txt” file on your microSD card.
| FUNCTION | TRIGGERING WITH TWO BUTTONS |
| Power On | Tap the power button |
| Change Color Profile* | Tap the power button while holding the auxiliary button |
| Enter Effect Menu | Hold the power button, then hold it again. Point the saber upwards while doing this. |
| ∟ Change Blade Profile* | ∟ Slowly twist the saber |
| ∟ Change On Top Effect* | ∟ Tap the auxiliary button |
| ∟ Save And Leave | ∟ Hold the power button until the confirmation sound is played |
| Enter Accent Menu | Hold the power button, then hold it again. Point the saber downwards while doing this. |
| ∟ Change Ignited Accent Profile* | ∟ Tap the power button |
| ∟ Go To Ignited Accent Profile | ∟ Hold the power button |
| ∟ Change Standby Accent Profile* | ∟ Tap the power button |
| ∟ Save And Leave | ∟ Hold the power button until the confirmation sound is played |
| Enter Color Change Menu | Hold the power button, then tap it. Point the saber upwards while doing this. |
| ∟ Cycle Through Preset Color Profiles | ∟ Slowly twist the saber |
| ∟ Save And Leave | ∟ Hold the power button |
| Enter Lockup Mode | Hold the auxiliary button, then tap it. Point the saber upwards while doing this. |
| ∟ Leave Lockup Mode | ∟ Tap the auxiliary button |
| Enter Drag Mode | Hold the auxiliary button, then tap it. Point the saber downwards while doing this. |
| ∟ Leave Drag Mode | ∟ Tap the auxiliary button |
| Enter Melt Mode | Hold the power button, release it and then perform a stab |
| ∟ Leave Melt Mode | ∟ Tap the power button |
| Blaster Block | Tap the auxiliary button |
| Force Push | Hold the auxiliary button while swinging the saber |
| Activate Power Saving | Hold the power button while performing a stab |
| Deactivate Power Saving | Hold the power button while performing a stab |
| Power Off | Hold the power button until the saber shuts down |
| Enter Sound Font Menu | Hold the auxiliary button before the blade is ignited. Point the saber upwards while doing this. |
| ∟ Go To Next Sound Font* | ∟ Slowly twist the saber |
| ∟ Jump 10 Sound Fonts Further* | ∟ Tap the power button |
| ∟ Save And Leave Sound Font Menu | ∟ Hold the auxiliary button |
| Show Battery Indicator | Hold the power button while performing a stab before the saber is ignited |
| ∟ Calibrate Battery | ∟ When your battery is fully charged, perform a stab while battery level is displayed |
| Enter Volume Control | Hold the auxiliary button before the blade is ignited. Point the saber downwards while doing this. |
| ∟ Adjust Volume | ∟ Slowly twist the saber |
| ∟ Twist Retraction | |
| ∟ Turn twist retraction on | ∟ Slowly twist the saber clockwise |
| ∟ Turn twist retraction off | ∟ Slowly twist the saber counterclockwise |
| ∟ Save and Leave Editor Mode | ∟ Hold the power button |
| ∟ Effect Font Slot | |
| ∟ Select effect font slot | ∟ Slowly twist the saber |
| ∟ Save and Leave Editor Mode | ∟ Hold the power button |
| ∟ Save And Leave Saber Editor | |
| ∟ Confirm Selection | ∟ Hold the power button |
| Wake Up From Deep Sleep | Tap the power button |
| Reset | Hold the power button for 10 s |
When changing the On Top Effect, Background Effect or Sound Font, you can go to the next one by pointing your saber upwards during selection or to the previous one by pointing your saber downwards.
Navigation Using Only One Momentary Button
As mentioned above, all of the features of our board are accessible even with using only one momentary button. The button mode can be selected by setting the parameter “button_mode=4” in the “general.txt” file on your microSD card.
| FUNCTION | TRIGGERING WITH ONE MOMENTARY SWITCH |
| Power On | Tap the button |
| Enter Effect Menu | Hold the button, then hold it again. Point the saber upwards while doing this. |
| ∟ Change Blade Profile* | ∟ Slowly twist the saber |
| ∟ Change On Top Effect* | ∟ Tap the button |
| ∟ Save And Leave | Hold the button until the confirmation sound is played |
| Enter Accent Menu | Hold the button, then hold it again. Point the saber downwards while doing this. |
| ∟ Change Standby Accent Profile* | ∟ Tap the button |
| ∟ Enter Ignited Accent Submenu | ∟ Hold the button for 1 s |
| ∟ Change Ignited Accent Profile* | ∟ Tap the button |
| ∟ Save And Leave | Hold the button until the confirmation sound is played |
| Enter Color Change Menu | Hold the button, then tap it. Point the saber upwards while doing this. |
| ∟ Cycle Through Preset Color Profiles | ∟ Slowly twist the saber |
| ∟ Save And Leave | Hold the button |
| Enter Lockup Mode | Hold the button, release it and then twist the saber. Point the saber upwards while doing this. |
| ∟ Leave Lockup Mode | Tap the button |
| Enter Drag Mode | Hold the button, release it and then twist the saber. Point the saber downwards while doing this. |
| ∟ Leave Drag Mode | Tap the button |
| Enter Melt Mode | Hold the power button, release it and then perform a stab |
| ∟ Leave Melt Mode | Tap the power button |
| Blaster Block | Tap the button |
| Force Push | Hold the button while swinging the saber |
| Activate Power Saving | Hold the power button while performing a stab |
| Deactivate Power Saving | Hold the power button while performing a stab |
| Power Off | Hold the power button until the saber shuts down |
| Enter Sound Font Menu | Hold the button before the blade is ignited, then release it. Point the saber upwards while doing this. |
| ∟ Go To Next Sound Font* | ∟ Slowly twist the saber |
| ∟ Jump 10 Sound Fonts Further* | ∟ Tap the button |
| ∟ Save And Leave Sound Font Menu | Hold the button |
| Show Battery Indicator | Hold the power button while performing a stab before the saber is ignited |
| ∟ Calibrate Batter | ∟ When your battery is fully charged, perform a stab while battery level is displayed |
| Enter Volume Control | Hold the button before the blade is ignited, then release it. Point the saber downwards while doing this. |
| ∟ Adjust Volume | ∟ Slowly twist the saber |
| ∟ Save And Leave Volume Control | Tap the power button |
| Start Background Music | Hold the button while twisting the saber before the saber is ignited. Point the saber upwards while doing this. |
| ∟ Skip Track | ∟ Quickly twist the saber |
| ∟ Stop Background Music | Hold the button while twisting the saber before the saber is ignited |
| Enter Saber Edito | Hold the button while twisting the saber before the saber is ignited. Point the saber downwards while doing this. |
| ∟ Select Editor Mode | ∟ Tap the button |
| ∟ Color Profile | |
| ∟ Select Color Profile | ∟ Slowly twist the saber |
| ∟ Edit Color | ∟ Slowly twist the saber |
| ∟ Go To Next Saber State | ∟ Tap the button |
| ∟ Revert Colors To Default | ∟ Perform a stab |
| ∟ Save Color Profile | ∟ Hold the button |
| ∟ Confirm Selection | ∟ Tap the button |
| ∟ Save and Leave Editor Mode | ∟ Hold the button |
| ∟ Pixel Number | |
| ∟ Edit Pixel Number | ∟ Slowly twist the saber |
| ∟ Save and Leave Editor Mode | ∟ Hold the button |
| ∟ Ignition Speed | |
| ∟ Select Sound Font | ∟ Slowly twist the saber |
| ∟ Edit Ignition Speed | ∟ Slowly twist the saber |
| ∟ Save Ignition Speed | ∟ Hold the button |
| ∟ Confirm Selection | ∟ Tap the button |
| ∟ Save and Leave Editor Mode | ∟ Hold the button |
| ∟ Retraction Speed | |
| ∟ Select Sound Font | ∟ Slowly twist the saber |
| ∟ Edit Retraction Speed | ∟ Slowly twist the saber |
| ∟ Save Retraction Speed | ∟ Hold the button |
| ∟ Confirm Selection | ∟ Tap the button |
| ∟ Save and Leave Editor Mode | ∟ Hold the button |
| ∟ Battle configuration | |
| ∟ Blaster Block Mode | |
| ∟ Button and Swinging | ∟ Slowly twist the saber clockwise |
| ∟ Button | ∟ Slowly twist the saber counterclockwise |
| ∟ Force Push Mode | |
| ∟ Button and Swinging | ∟ Slowly twist the saber clockwise |
| ∟ Button | ∟ Slowly twist the saber counterclockwise |
| ∟ Lockup Mode | |
| ∟ Button and Clashing | ∟ Slowly twist the saber clockwise |
| ∟ Button | ∟ Slowly twist the saber counterclockwise |
| ∟ Save and Leave Editor Mode | ∟ Hold the button |
| ∟ Gesture Controls | |
| ∟ Stab Ignition | |
| ∟ Turn stab ignition on | ∟ Slowly twist the saber clockwise |
| ∟ Turn stab ignition off | ∟ Slowly twist the saber counterclockwise |
| ∟ Swing ignition | |
| ∟ Turn swing ignition on | ∟ Slowly twist the saber clockwise |
| ∟ Turn swing ignition off | ∟ Slowly twist the saber counterclockwise |
| ∟ Twist Ignition | |
| ∟ Turn twist ignition on | ∟ Slowly twist the saber clockwise |
| ∟ Turn twist ignition off | ∟ Slowly twist the saber counterclockwise |
| ∟ Twist Retraction | |
| ∟ Turn twist retraction on | ∟ Slowly twist the saber clockwise |
| ∟ Turn twist retraction off | ∟ Slowly twist the saber counterclockwise |
| ∟ Save and Leave Editor Mode | ∟ Hold the button |
| ∟ Effect Font Slot | |
| ∟ Select effect font slot | ∟ Slowly twist the saber |
| ∟ Save and Leave Editor Mode | ∟ Hold the button |
| ∟ Save And Leave Saber Editor | |
| ∟ Confirm Selection | ∟ Hold the button |
| Wake Up From Deep Sleep | Tap the button |
| Reset | Hold the button for 10 s |
When changing the On Top Effect, Background Effect or Sound Font, you can go to the next one by pointing your saber upwards during selection or to the previous one by pointing your saber downwards.
Frequently Asked Questions
There are no blaster and lockup effects in Neopixel setup for example. How can I fix that?
Answer: The most probable reason for this is that you forgot to activate the Neopixel light effects on your microSD card. Please follow the steps described in the section “Choosing Your Light Effects”
My blade is blinking white. How can I fix that?
Answer: The white blinking indicates that your microSD card is not inserted properly or some files or folders are missing on it.
There is no sound or stuttering sound. How can I fix that?
Answer: Please recharge your saber.
Some sound files are not played or some sound fonts are not recognized. How can I fix that?
Answer: Please check that your sound font folders and the sound file names are enumerated continuously and check the naming of the sound files. The Seedling Module is connected to my computer, but even after 10 minutes it does not recognize the microSD card as mass storage device.
How can I fix that?
Answer: Please check the device manager, look for an “unknown device”, click on it with the right mouse button and uninstall the “unknown device”. After that, you can try to reconnect the Seedling Module to your computer. Also make sure that you are using a computer with Windows 7 or Windows 10.


