
Yeastar TG Gateway Integration
 Connect Yea star P-Series PBX System and Yea star TG GSM Gateway
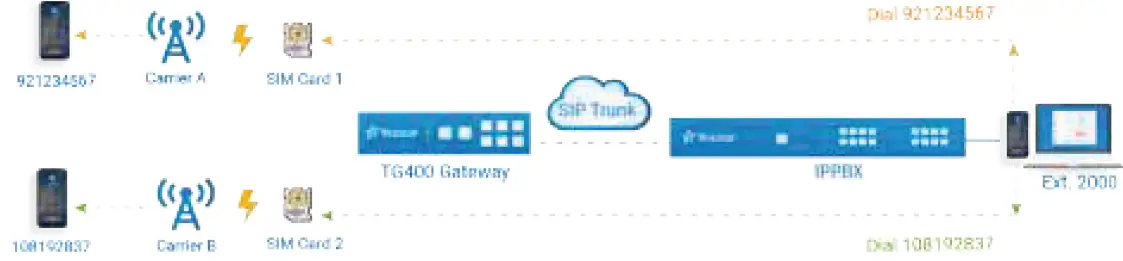
This guide provides a configuration example to describe how to extend GSM/3G/4G trunks for Yeastar P-Series PBX System.
Background
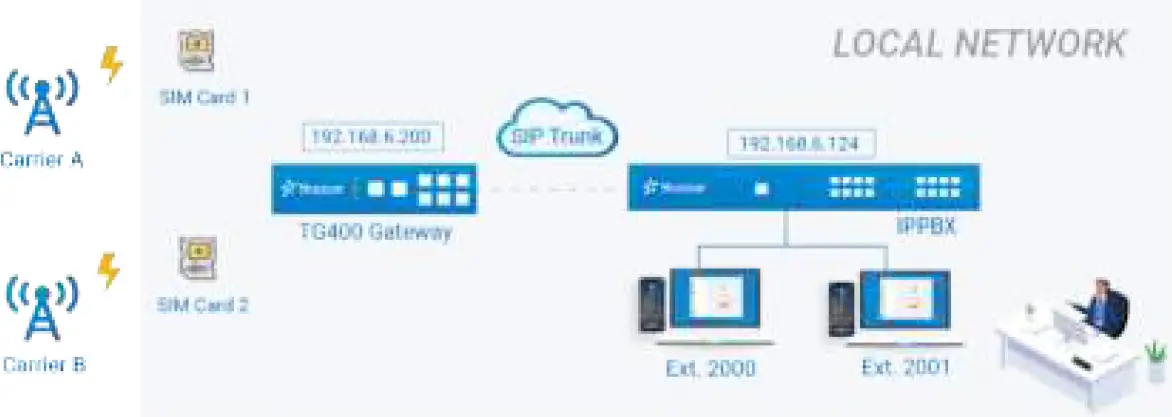
The instructions provided in this guide are based on the following test environment.
| Equipment | Firmware Version | IP Address |
| Yeastar P560 PBX System | 37.2.0.81 | 192.168.6.124 |
| Yeastar TG400 GSM Gateway | 91.3.0.21.4 | 192.168.6.200 |
There are two SIM cards installed in Yeastar TG400 GSM Gateway. The following table shows mobile number prefixes of the two carriers.
| SIM Card | Carrier | Mobile Prefix |
| SIM Card 1 | Carrier A | 92 |
| SIM Card 2 | Carrier B | 10 |
 Objectives
This guide provides guidance based on the above scenario to help you achieve following objectives:
- Connect Yea star P-Series PBX System and Yea star TG400 Gateway
- Make Outbound Calls through a Designated GSM Trunk
- Route Calls from Different Carriers to Different Destinations
Connect Yeastar P-Series PBX System and Yeastar TG400 Gateway
This topic introduces the steps to connect Yeastar P-Series PBX System and Yeastar TG400 via SIP peer trunks. After the two devices are connected, GSM trunks are extended on the Yeastar P-Series PBX System.
Create a SIP peer trunk on Yeastar IPPBX
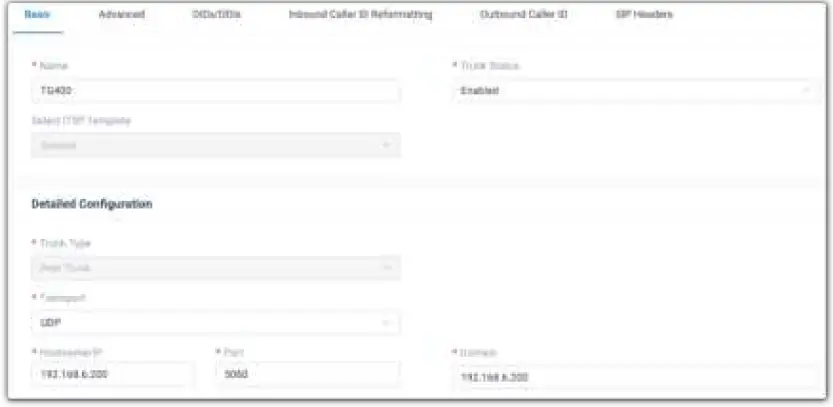
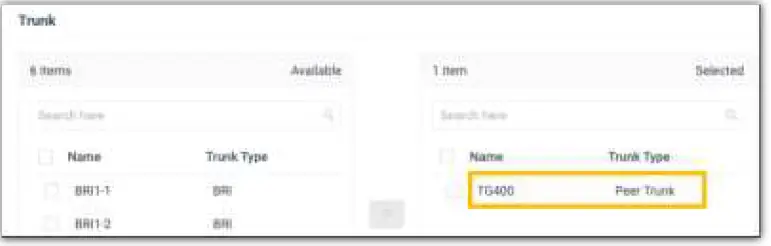
- Log in to the PBX management portal, go to Extension and Trunk > Trunk, click Add.
- Configure the trunk basic settings.
- Name: Enter a name to help you identify it. For example, TG400.
- Trunk Status: Select Enabled.
- Select ITSP Template: Select General.
- Trunk Type: Select Peer Trunk.
- Transport: Select UDP.
- Hostname/IP: Enter the IP address of Yeastar TG400 gateway. In this example, enter 192.168.6.200.
- Port: Enter the SIP port of Yeastar TG400 gateway. In this example, enter the default port 5060.
- Domain: Enter the IP address of Yeastar TG400 gateway. In this example, enter 192.168.6.200.

- Click Save anad Apply.
Wait for seconds and check the trunk status on the Trunk page.
If the status shows , Yeastar IPPBX is connected to the Yeastar TG400 gateway.![]() Create a SIP peer trunk on Yeastar TG400 Gateway
Create a SIP peer trunk on Yeastar TG400 Gateway
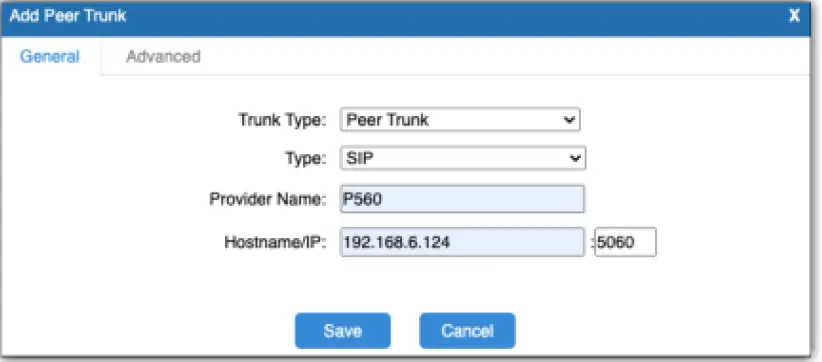
- Log in to the gateway web interface, go to Gateway > VoIP Settings > VoIP Trunk, click Add VoIP Trunk.
- In the pop-up window, configure the following settings:
- Trunk Type: Select Peer Trunk.
- Type: Select SIP.
- Provider Name: Enter a name to help you identify it.
- Hostname/IP: Enter the IP address of Yeastar IPPBX and the SIP port. In this example, enter 192.168.6.124 and the default SIP port 5060.

- Click Save and Apply Changes.
- Wait for seconds and check the trunk status on the Status > System Status > Trunk Status page.
If the status shows “OK”, Yeastar TG400 Gateway is connected to the Yeastar IPPBX.![]() Make Outbound Calls through a Designated
Make Outbound Calls through a Designated
GSM Trunk
Many carriers have call plans that let you make free or low-cost calls between other numbers through the same carrier network. The following guides you how to make outbound calls through designated GSM trunks to save call charges.
Scenario
In this scenario, you will route outbound calls through designated GSM trunks as follows:
| Outbound Number Format | Trunk | Carrier |
| Number with prefix 92 | GSM trunk 1 | Carrier A |
| Number with prefix 10 | GSM trunk 2 | Carrier B |
 Create an outbound route on Yeastar IPPBX
To allow PBX users to call through the Yeastar TG400 gateway, you need to create an outbound route on Yeastar IPPBX.
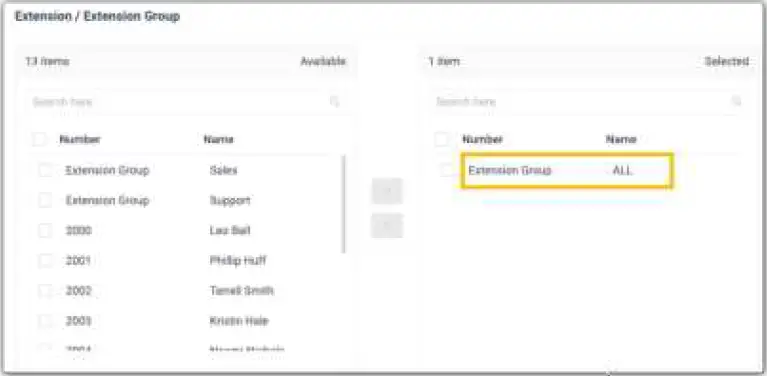
- Log in to the PBX management portal, go to Call Control > Outbound Route, click Add.
- Configure the following settings for the outbound route and leave other settings as default.
- Name: Enter a name to help you identify it. For example, TO-TG400.
- Dial Pattern: Set the dial patterns according to your needs. In this example, set Pattern to X., which means that users can dial any number without limitation.

- Trunk: Select the SIP peer trunk that is connected to the Yeastar TG400. In this example, select the trunk TG400.

- Extension/Extension Group: Select the extensions that are allowed to make calls through this outbound route. In this example, select all the extensions.

- Click Save and Apply.

Create two ‘IP to Mobile’ routes on Yeastar TG400
Create an ‘IP to Mobile’ route for carrier A, and create another one for carrier B. These two routes will match the dialed numbers from PBX and send numbers out through designated GSM trunks.
- Log in to the gateway web interface, go to Gateway > Route Settings > IP to Mobile, click Add IP to Mobile Route.
- In the pop-up window, configure the route, then click Save and Apply Changes. The following table shows the required configurations for carrier A and carrier B.
| Setting | Description | For Carrier A | For Carrier B |
| Simple Mode | To keep simple mode with basic settings or to expand more settings. | No | No |
| Route Name | Enter a name to help you identify it. | To-CarrierA | To-CarrierB |
| Call Source | Select the SIP trunk that is connected to Yeastar IPPBX. | SPS – P560 | SPS – P560 |
| DID Number | Enter the pattern or number to match dialed numbers from Yeastar IPPBX. Note: If you want to match any incoming calls, you need to set DID Number to .(dot), or outbound calls would fail. | Enter 92. to allow the numbers with prefix 92. | Enter 10. to allow the numbers with prefix 10. |
| Call Destination | Select the GSM trunk that will be used to call out. | Mobile – Trunk1 | Mobile – Trunk2 |
‘IP to Mobile’ route for carrier A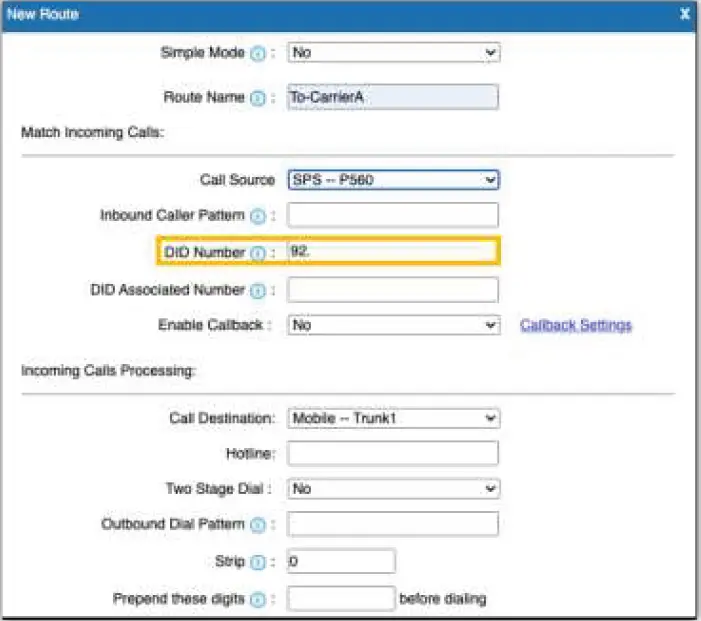 ‘IP to Mobile’ route for carrier B
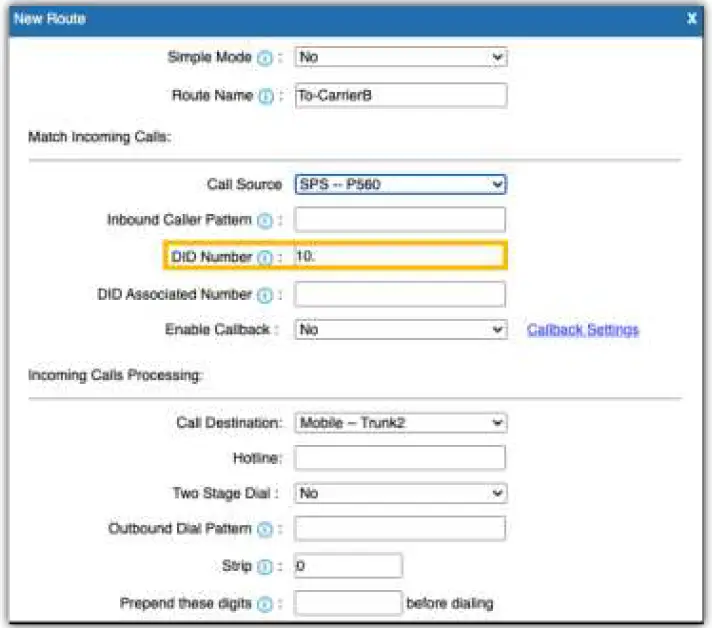 Make test calls from Yeastar IPPBX
Examples:
- Dial number 921234567, the call will be made through GSM trunk1.
- Dial number 108192837, the call will be made through GSM trunk 2.
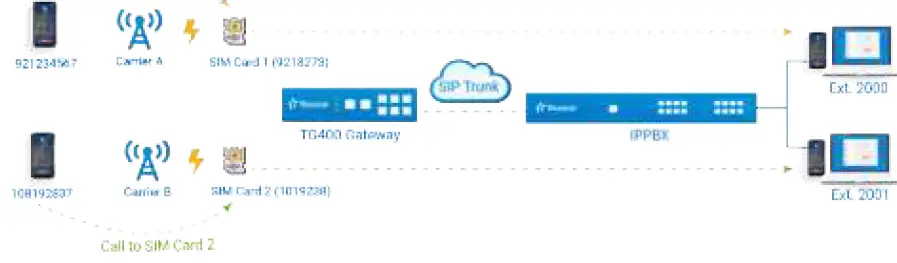
Route Calls from Different Carriers to Different Destinations
When external users call to GSM trunks of different carriers, the calls will reach different destinations. This section gives instructions based on the following scenario.
Scenario
| Carrier | Trunk | Destination |
| Carrier A | GSM trunk 1: 9218273 | Extension 2000 |
| Carrier B | GSM trunk 2: 1019238 | Extension 2001 |
 Create two ‘Mobile to IP’ routes on Yeastar TG400
Create an ‘Mobile to IP’ route for carrier A, and create another one for carrier B.
- Log in to the gateway web interface, go to Gateway > Route Settings > Mobile to IP, click Add Mobile to IP Route.
- In the pop-up window, configure the route, then click Save and Apply Changes.
The following table shows the required configurations for carrier A and carrier B.
| Setting | Description | For Carrier A | For Carrier B |
| Simple Mode | To keep simple mode with basic settings or to expand more settings. | Yes | Yes |
| Route Name | Enter a name to help you identify it. | CarrierA-To-P560 | CarrierB-To-P560 |
| Call Source | Select which trunk the call comes from. | Mobile — Trunk 1 | Mobile — Trunk 2 |
| Call Destination | Select the SIP trunk that is connected to Yeastar IPPBX. | SPS – P560 | SPS – P560 |
| Hotline | Enter a hotline number to avoid two-stage dialing. Note: The hotline number will be sent to the PBX as a DID number, which can be configured on PBX’s inbound route to distinguish calls from different carriers. | 888888 | 999999 |
‘Mobile to IP’ route for carrier A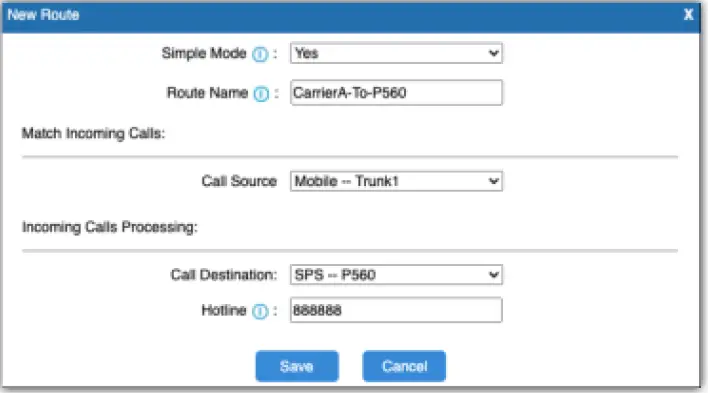 ‘Mobile to IP’ route for carrier B
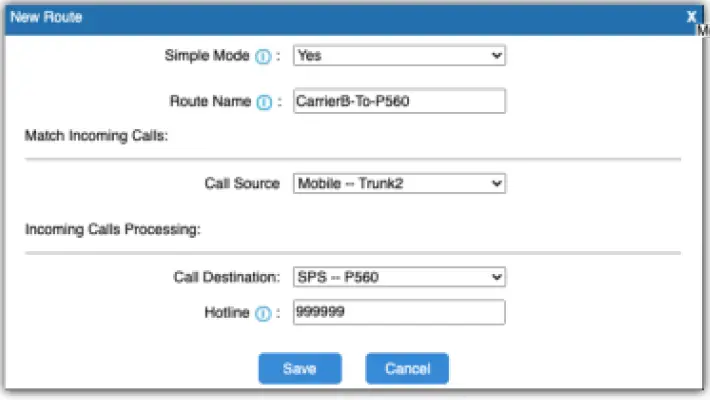 Create two inbound routes on Yeastar IPPBX
Create two inbound routes to distinguish calls from carrier A and carrier B, and route calls to different destinations.
- Log in to the PBX management portal, go to Call Control > Inbound Route, click Add.
- Configure the following settings for the inbound route and leave other settings as default, then click Save and Apply.
The following table shows the required configurations for carrier A and carrier B.
| Setting | Description | For Carrier A | For Carrier B |
| Name | Enter a name to help you identify it. | From-Carrier A | From-Carrier B |
| DID Matching Mode | Select a mode according to the rule of DID numbers. | DID Pattern | DID Pattern |
| Pattern | Enter a DID number to match the incoming calls. Note: Enter the same hotline number that is set on Yeastar TG400. | 888888 | 999999 |
| Trunk | Select the SIP peer trunk that is connected to the Yeastar TG400. | TG400 | TG400 |
| Default Destination | Select a destination for the inbound route. | Extension 2000 | Extension 2001 |
Inbound route for carrier A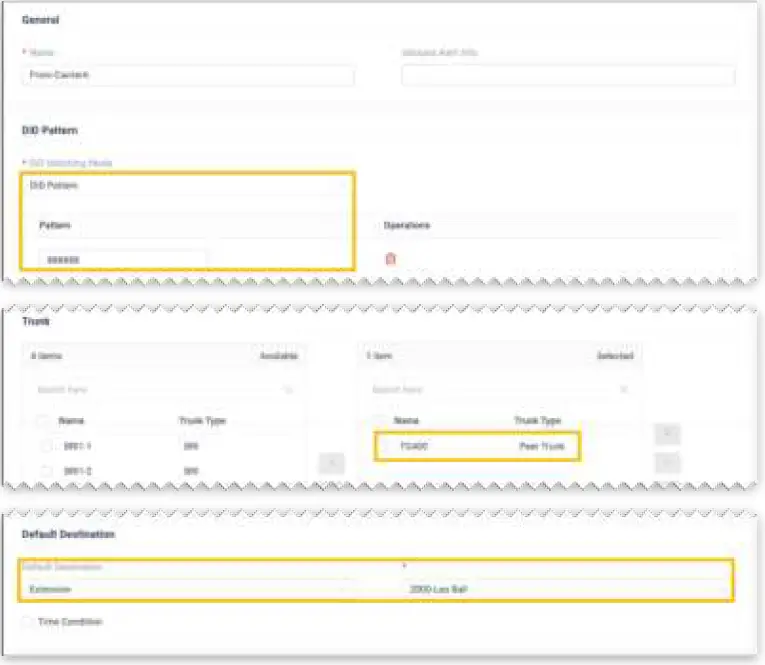
Inbound route for carrier B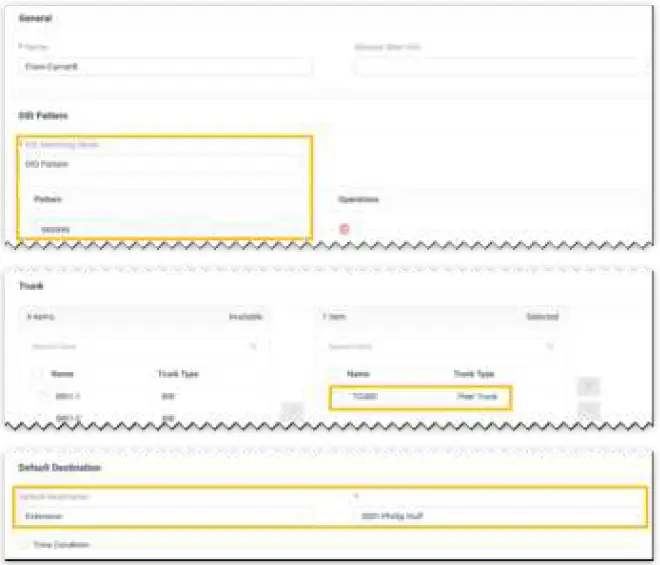 Make test calls to the GSM trunks
- Dial the number of GSM trunk1 (9218273), the call will be routed to extension 2000.
- Dial the number of GSM trunk 2 (1019238), the call will be routed to extension 2001.


