
FOX SPIRITY PGM490 V2 49 Inch LED Curved Monitor
Preface
Every effort has been made to ensure that the information in this document is accurate. However, the manufacturer and the distributor of this product assume no responsibility for any error, omission.
Please preserve this manual for the life of the equipment.
Congratulations on your purchase!
DECLARATION OF CE CONFORMITY MARKING

Product in accordance with the applicable regulations on the European territory, with the requirements EMC 2014/30/EU and LVD 2014/35/EU.
![]() This product is RoHS (Restriction of Hazardous Substances) compliant.
This product is RoHS (Restriction of Hazardous Substances) compliant.
INFORMATION ABOUT RECYCLING  This product bears the selective sorting symbol for waste electrical and electronic equipment (WEEE).
This means that this product must be handled pursuant to European Directive in order to be recycled or dismantled to minimize its impact on the environment.
For further information, please contact your local or regional authorities.
Electronic products not included in the selective sorting process are potentially dangerous fors the environment and human health due to the presence of hazardous substances. The terms HDMI and HDMI High-Definition Multimedia Interface, and the HDMI Logo are trademarks or registered trademarks of HDMI Licensing Administrator, Inc. in the United States and other countries.
SAFETY NOTICE
PRECAUTIONS
- Please read all the instructions carefully before using this product.
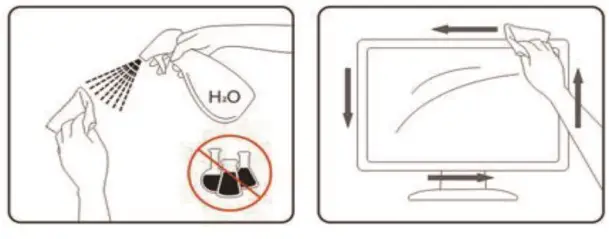
- To reduce any fire or electrical risk, do not spill any liquids into the cabinet or use your monitor near water
- DONOT REMOVE MONITOR BACK COVER.
- There are no user serviceable parts ening or removing covers may expose you to dangerous shock hazards other risks.
- Do not place this product on a sloping or unstable cart, stand or table, as it may fal, causing serious damage to the monitor.
- Do not put anything on top of the monitor I the power supPply Is lost, do not try to repair t.
- Please contact the distributor. Before use, make sure all the cables are well plugged and not damaged. In case of any damage, please contact the distributor.
- Only the type of power source indicated on the nameplate applies to this display.
- In you have any questions on the type of power source you use, please consult the dealer of the display Use an appropriate outlet, complying with the local electrical norms.
- Do not place any heavy objects on the power cord. Damage to the cord may cause shock or tfire.
- Do not use monitor in high temperature, humid, dusty, or oly areas In case of storm or prolonged non-use, unplug the screen to protect against any Overvoitage aamage.
- When disconnecting the power cord of display or power adapter, always remember to Pugntead orpuingne unpiug ne powercord. oite may touch dangerous . ltage points, which can be harmful or fatal or may cause electric shock, fire or equipment tailure.
- Use a power cord that matches the A Voltage or tne pOwer outlet (100 240 V AC), nat nas oeen approvEd, and compes un the saieLy sanaara o your countr .
- Owar snnyThe monitor shold he installed close to a Der otiet hichis asi ower suppy. The monitor shouid De installed ciose to a power outiet, which is easily he accessibl
- Any technical issue, please contact the distributor.
 SPECIAL NOTES ON LCD MONITORS
 SPECIAL NOTES ON LCD MONITORS
The following symptoms are normal with LCD monitor and do not indicate a problem.
- Due to the nature of the fluorescent light, the screen may flicker during initial use. Turn off the Power Switch and then turn it on again to make sure the flicker disappears.
- You may find slightly uneven brightness on the screen depending on the desktop pattern you use.
- Due to the nature of the LCD screen, an afterimage of the previous screen may remain after switching the image, when the same image is displayed for hours. In this case, the screen is recovered slowly by changing the image or turning off the Power Switch for hours.
- If the screen suddenly flashes erratically or the backlighting fails, please contact your dealer. Do not attempt to repair the monitor itself.
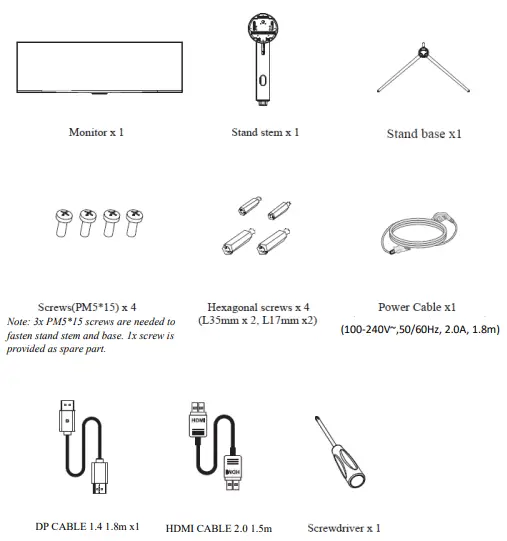
PACKAGE CONTENT
PRODUCT OVERVIEW
MONITOR BUTTON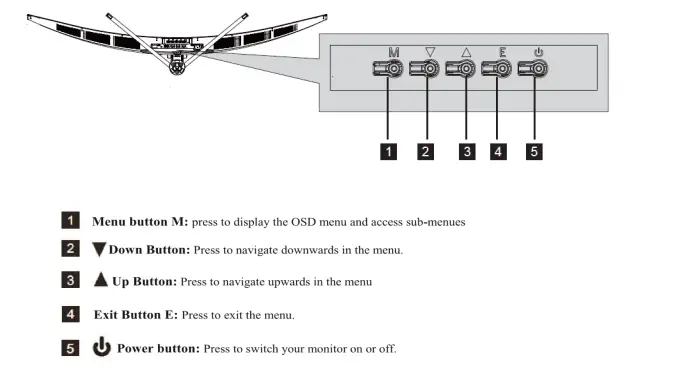
STAND INSTALLATION
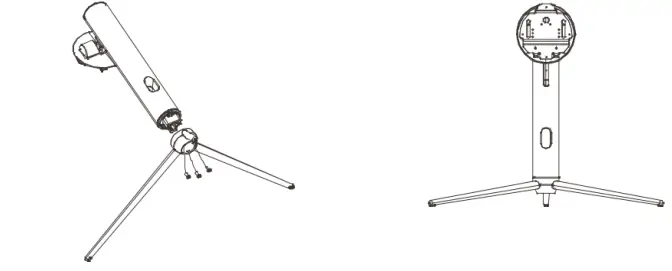
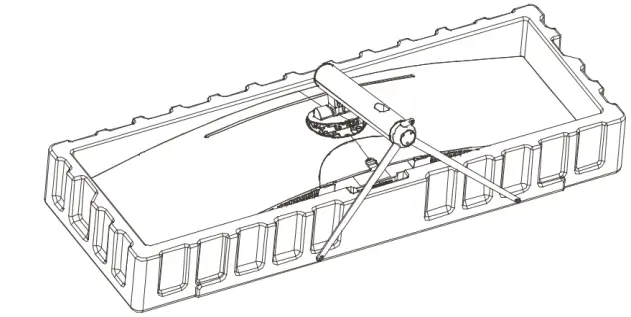
- Take out main parts of accessory bags.

- Use 3x PM5*15 screws to fasten stem and base.

- Place the assembled stand into rotation shaft. Please make sure a tighten assembling, when hearing an audible click from the locking button.

- Use both hands to stand the assembled machine on a flat desktop.
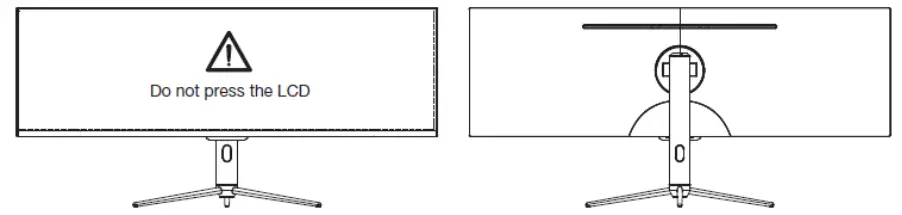 Note: do not directly press and hold the LCD screen with your hand during the whole machine’s erection to prevent the screen from breaking
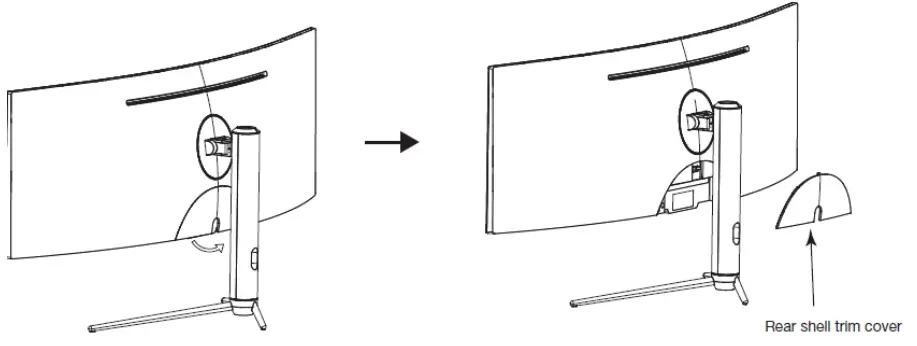
- 6. After the installation is completed, the monitor needs to be connected with wires. As shownon the below picture, follow the direction of the arrow, and then remove the rear shell decorative cover in order to access to the monitor ports.

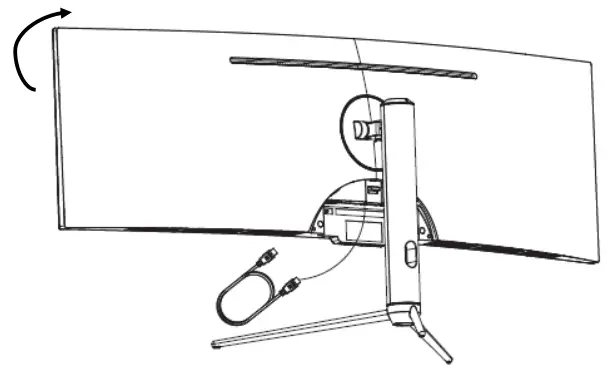
- Hold the display screen, rotate the display screen, and plug in the signal cable when you see the portof the machine sideways.
 Pay attention to holding the machine with both hands to prevent the machine from falling.
 - For a neat management, run the cables through the hole intended for this purpose, from the outside to the inside, before repositioning the rear shell.

 Pay attention to holding the machine with both hands to prevent the machine from falling.
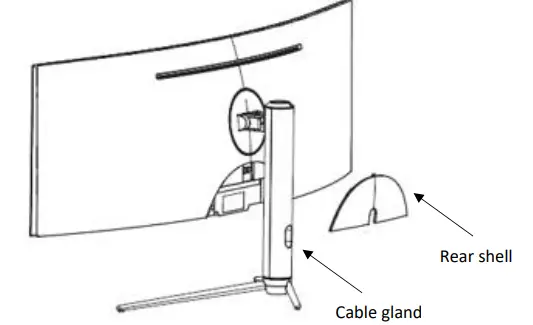
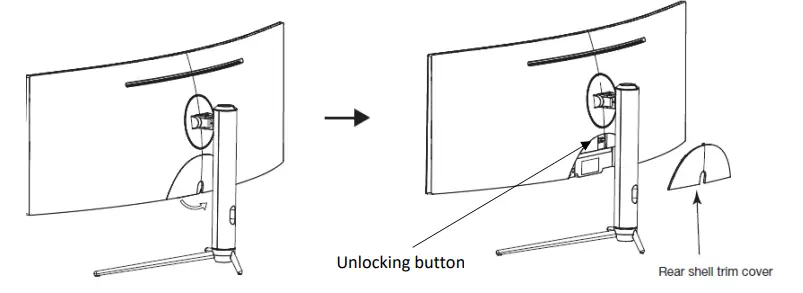
REMOVING THE STAND
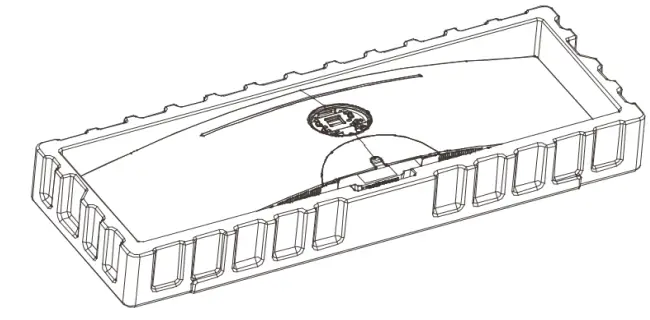
- Remove the rear shell cover
- Press the unlocking button, located under the shell, to unlatch the stand
 Make sure to place your monitor safely on a flat surface or on a table before unlocking the stand.
 Make sure to place your monitor safely on a flat surface or on a table before unlocking the stand.
WALL MOUNTING
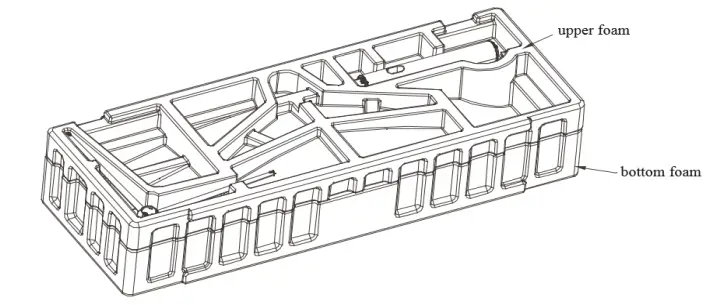
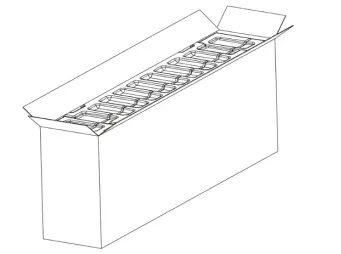
- Open the carton, remove the foam, remove the upper foam.

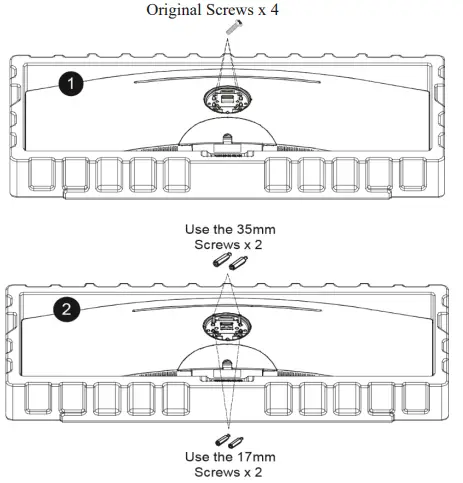
- Remove the original screws x4 ( 1 ) from the opening in the back of the monitor. Follow thedirections received with your mount, stand, or accessory and install the monitor on the wall or fixture as desired. Remember to use the included screws when attaching anything to the back of the monitor. Refer to the image ( 2 ) for correct screw placement.
 a. Only use the screws (35 mm x 2 pcs, 17mm x 2 pcs) provided with this type of installation.
b. Do not discard the original screws as these may be needed for future use. - Your monitor is now ready to be attached to a wall-mounting bracket. To avoid damages,please do not pinch the screen during bracket installation. Do not place or hang any objects on the wall bracket. Do not put the monitor higher than 2m from the ground.

 a. Only use the screws (35 mm x 2 pcs, 17mm x 2 pcs) provided with this type of installation.
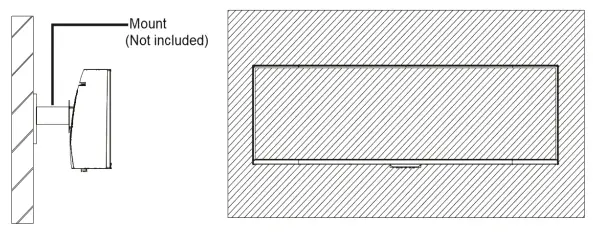
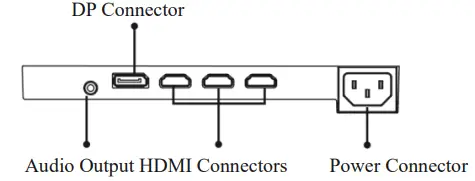
CONNECTIVITY OPTIONS
SUPPLY
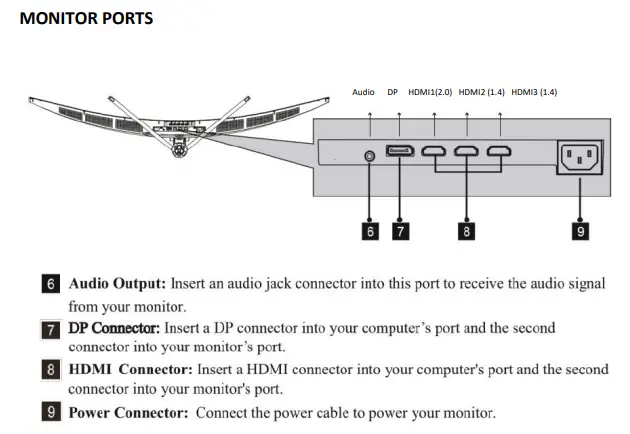
Connect the supplied power adapter to the power cable, connect the power adapter to the dedicated port of the monitor, and then plug the remaining end of the power cable into a wall outlet to power your monitor.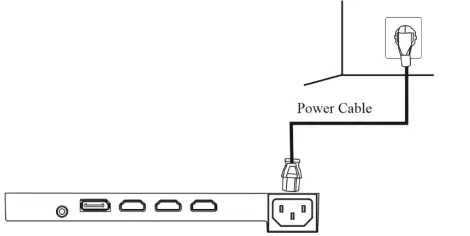
AUDIO OUTPUT
Plug in your earphones to receive audio signals from your monitor. If your earphones are connected to the monitor and audio devices are connected to your computer at the same time, the audio devices will not produce sound.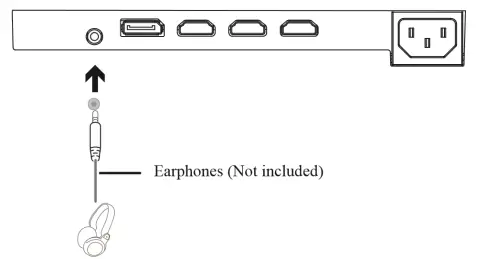
VIDEO OUTPUT
For the monitor to receive HDMI signals from the computer, use the HDMI cable to connect the monitor to the computer.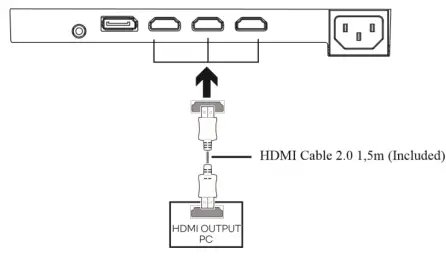 For the monitor to receive DP signals from the computer, use the DP cable to connect the monitor to the computer.
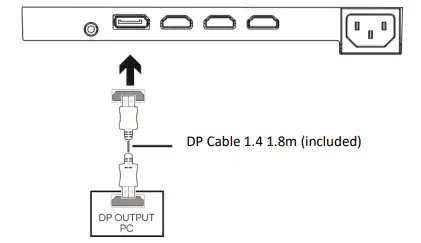
BASIC OPERATION
Insert one end of the DP cable into your PC’s graphics card. A HDMI cable may also be used.
- Connect the other end of the cable to the corresponding connector on your monitor.

- Connect the power cable to your monitor then connect the other end to your power source. It is recommended that you use a surge protector with adequate voltage if a wall outlet cannot be reached directly.
- Locate the power button on the monitor and press it to turn the monitor on
ADAPTATIVE SYNC
The feature itself is off by default. In order to use this feature, please note to set the Adaptive sync function in the OSD menu to ON. You must have hardware with Adaptive sync capability, a DP/HDMI cable, and the latest graphic drivers. To use this feature, connect your computer and monitor with a DP cable. After connecting, you may receive a prompt to enable the feature on your computer. If you do not receive the prompt, you may need to enable the function in your graphics card menu. See your graphics card manufacturer’s documentation for instructions on how to turn on and/or enable Adaptive sync.
INDICATOR LIGHT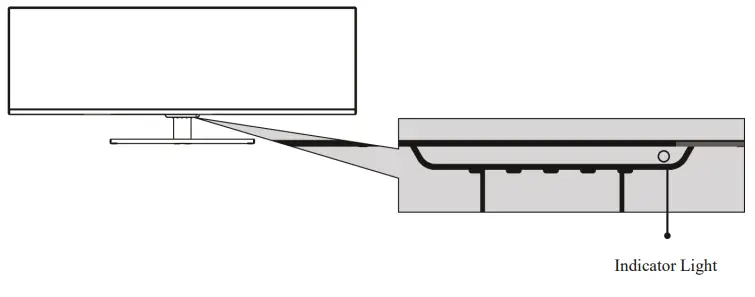
Solid blue light indicates power is on and the monitor is operating normally. Flashing blue light indicates no video source, no horizontal or vertical signal has been detected or voltage is low. Please ensure your computer is on and all video cables are fully inserted and/or connected.
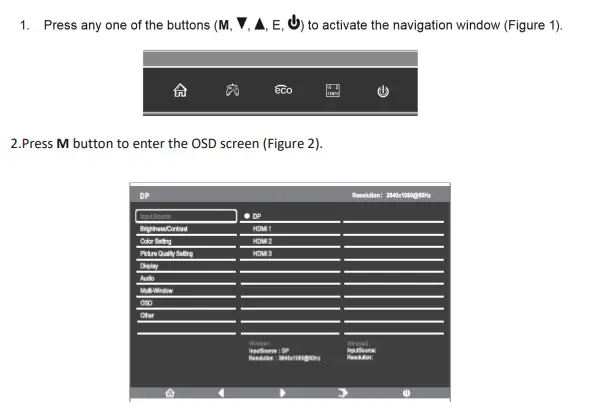
OSD MENU
The On-Screen Display (OSD) Menu may be used to adjust your monitor’s settings and appears on screen after turning on the monitor and pressing the M button.

| Main Menu | Sub-Menu | Options | Description |
| Input Source | HDMI 1 (2.0) HDMI 2 (1.4) HDMI 3 (1.4) | NONE | Switch to HDMI signal input |
| DP | NONE | Switch to DP signal input | |
| Brightness/ Contrast | Brightness | 0~100 | Adjust display brightness |
| Blacklevel | 0~100 | Adjust display blacklevel | |
| Contrast | 0~100 | Adjust display contrast | |
| DCR | On | Turn on DCR function | |
| Off | Turn off DCR function | ||
| Color Setting | Gamma | 1.8 | Set Gamma add-in |
| 2.0 | |||
| 2.2 | |||
| 2.4 | |||
| 2.6 | |||
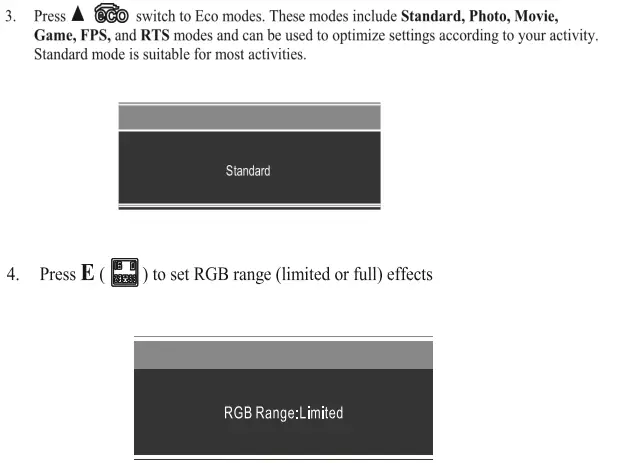
| Picture Mode | Standard, Photo, Movie, Game, FPS, RTS | Set visual mode according to activity | |
| Color Temperature | Warm, Cool, User | Select color temperature | |
| Red | 0~100 | ||
| Green | 0~100 | ||
| Blue | 0~100 | ||
| Low Blue Light | 0~100 | ||
| Hue | 0~100 | Adjust hue levels | |
| Saturation | 0~100 | Adjust saturation levels | |
| Picture Quality Setting | Sharpness | 0~100 | Set display sharpness |
| Response Time | Off, High, Middle, Low | Adjust response time | |
| Noise Reduction | Off, High, Middle, Low | Reduce the interference of image noise caused by signal source interference | |
| Super- Resolution | Off, High, Middle, Low | When the resolution of the display screen is low, this function can be turned on to enhance the image resolution | |
| Dynamic Luminous Control | On, Off | Compensate for gray scale display screen and strengthen the expression of gray scale | |
| Display | Aspect Ratio | Wide Screen, 4:3, 1:1, Auto | Select on-screen aspect ratio |
| Audio | Mute | On, Off | Turn mute mode on/off |
| Volume | 0-100 | Adjust audio volume | |
| Audio Source | HDMI 1 HDMI 2 HDMI 3 DP | Select audio signal input via HDMI or DP | |
| Multi-Window | Multi-Window | Off, PIP Mode, PBP 2Win | Select PIP/PBP modes according to the number of input signals etc. |
| Sub Win2 Input | DP, HDMI1, HDMI2, HDMI3 | Select according to input signal for PIP/ PBP mode |
| PIP Size | Small, Medium, Large | Adjust the PIP/PBP display window size | |
| PIP Position | TopRight, TopLeft, BottomRight, BottomLeft | Adjust the PIP/PBP window position | |
| Swap | NONE | Swap the two-channel signal source of only the PIP/PBP 2 screens function | |
| OSD | Language | English, | Set OSD language |
| 简体中文, 한국어, | |||
| Русский, Español, | |||
| 日本語, | |||
| Français | |||
| OSD H-Position | 0-100 | Adjust the OSD’s horizontal position | |
| OSD V-Position | 0-100 | Adjust the OSD’s vertical position | |
| OSD Transparency | 0-100 | Set the OSD’s overall transparency | |
| OSD Time Out | 5-100 | Set how long the OSD remains open after non-use | |
| OSD Rotation | Normal, 90, 180, 270 | When the user ips the display, this function can also ip the OSD to achieve the best display angle | |
| Other | DP Version | DP 1.1; DP 1.2 | |
| Adaptive Sync | On, Off | Turn the Adaptive Sync function on/off | |
| HDR | On, Off; Auto Detect | Turn the HDR mode on/off | |
| Reset | None |
PIP (Picture in Picture) Input Information
| Mode | Home Screen Input Source | Picture in Picture Additional Input Source | Interchange Window | Picture Mode | |
| DP | HDMI | ||||
| Mode 1 | DP | X | O | O | O |
| Mode 2 | HDMI | O | X | O | O |
PBP (Picture by Picture) Resolution Information
While using this feature and in order to obtain an optimal viewing experience, it is recommended to set both panels to the same resolution.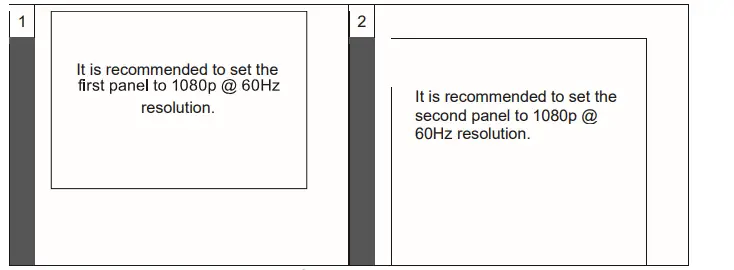
SWITCH TO GAMEPLUS AND ECO MODES 
 TECHNICAL SPECIFICATIONS

 TECHNICAL SPECIFICATIONS
| Fox Spirit 49’’ PGM490 V2 | |||
|
SCREEN | Screen size | 49’’ | |
| Panel | VA | ||
| Curvature | R1800 | ||
| Backlight | None | ||
| Brightness | Typ. 350 cd/m2 | ||
| Contrast | 3000 :1 | ||
| Pixel size | 0.1038(H) x 0.3114(V)mm | ||
| Résolution | DFHD 3840*1080 Max. 3840*1080@144Hz | ||
| Refresh Rate | 144Hz | ||
| Aspect Ratio | 32:9 | ||
| Response Time | 4ms | ||
| View Angle (CR>10) | H:178º,V:178º | ||
| Anti-glare | Yes | ||
| Colors | 16.7M | ||
| Touch screen | No | ||
| Horizontal Frequency | 54KHz-160Khz | ||
| Vertical Frequency | 48 – 144 Hz | ||
|
CONNECTORS | VGA | No | |
| DVI | No | ||
| HDMI | 2x HDMI 1.4 / 1x HDMI 2.0 | ||
| DP | 1x DP 1.2 | ||
| Mini DP | No | ||
| Audio Input | No | ||
| USB 3.0 | No | ||
| Speakers | No | ||
| Audio Output | 1*Jack 3,5mm female | ||
|
POWER | Consumption | Typ: 72W Max: 100W Standby: ≤0.5W | |
| Power Rating | 100-240V ~ 50/60Hz 2,0A | ||
| Power Source | AC in | ||
| Operating temperature | 0 ~ 40 ℃ | ||
| Power Cable | 1,8 m | ||
| Led Indicator | On / Stand-by : Blue | ||
| OPERATING CONDITIONS | Storage temperature | -20 ~60 ℃ | |
| Humidity | 10 ~ 85% RH | ||
|
Physical features | Product Dimensions (with stand, L*D*H) | 1198.54*566.26*286.75mm | |
| Product Dimensions (without stand, L*D*H) | 1198.54*375.62*160.23mm | ||
| Net Weight | 11KG | ||
| Gross Weight | 15.9Kg | ||
| Material | Front cover—ABS+PC Back cover –ABS Arm –AL+ABS+SGCC+SECC | ||
| Tilt | -5°~ 15° | ||
| Adjustable stand | Distance 95mm (±5m) Min. height: 461.26mm(±5) Max. height: 556.26mm(±5) | ||
| VESA | VESA 75x75mm | ||
|
DISPLAY | Langue OSD | OSD format 7 Languages: English, Simplified Chinese, Korean, Russian, Spanish, Japanese, French. | |
| Flicker-Free | Yes | ||
| Anti-Blue light | Yes | ||
| Adaptive Sync | Yes | ||
| HDR 400 Ready | Yes | ||
| ACCESSORIES | HDMI Cable 2.0 | 1,5m | |
| DP Cable 1.4 | 1,8m | ||
Should there be a problem with this device, please contact FOX SPIRIT’s After-Sales department: [email protected]
Processing of the defective pixels according to ISO 9241-307 Classe 1 norm.


