![]()
920i® AC/DC Version
Agricultural Multi-Animal Indicator
Operation Manual
![]()
Technical training seminars are available through Rice Lake Weighing Systems. Course descriptions and dates can be viewed at www.ricelake.com/training or obtained by calling 715-234-9171 and asking for the training department.
![]() Rice Lake continually offers web-based video training on a growing selection of product-related topics at no cost. Visit www.ricelake.com/webinars
Rice Lake continually offers web-based video training on a growing selection of product-related topics at no cost. Visit www.ricelake.com/webinars
Introduction
The 920i AC/DC Indicator can be installed on most Rice Lake Weighing Systems livestock scales. This system is manufactured with top quality components and is engineered using the latest technology to provide operating features and reliability unmatched for years to come. This manual provides operating instructions and configuration information for the 920i AC/DC Indicator.
![]() Manuals and additional resources are available from the Rice Lake Weighing Systems website at www.ricelake.com Warranty information can be found on the website at www.ricelake.com/warranties
Manuals and additional resources are available from the Rice Lake Weighing Systems website at www.ricelake.com Warranty information can be found on the website at www.ricelake.com/warranties
Safety Signal Definitions:![]() Indicates an imminently hazardous situation that, if not avoided, will result in death or serious injury. Includes hazards that are exposed when guards are removed.
Indicates an imminently hazardous situation that, if not avoided, will result in death or serious injury. Includes hazards that are exposed when guards are removed.![]() Indicates a potentially hazardous situation that, if not avoided, could result in serious injury or death. Includes hazards that are exposed when guards are removed.
Indicates a potentially hazardous situation that, if not avoided, could result in serious injury or death. Includes hazards that are exposed when guards are removed.![]() Indicates a potentially hazardous situation that, if not avoided, could result in minor or moderate injury.
Indicates a potentially hazardous situation that, if not avoided, could result in minor or moderate injury.![]() Indicates information about procedures that, if not observed, could result in damage to equipment or corruption to and loss of data.
Indicates information about procedures that, if not observed, could result in damage to equipment or corruption to and loss of data.
General Safety
![]() Do not operate or work on this equipment unless this manual has been read and all instructions are understood. Failure to follow the instructions or heed the warnings could result in injury or death. Contact any Rice Lake Weighing Systems dealer for replacement manuals.
Do not operate or work on this equipment unless this manual has been read and all instructions are understood. Failure to follow the instructions or heed the warnings could result in injury or death. Contact any Rice Lake Weighing Systems dealer for replacement manuals.
![]() Failure to heed could result in serious injury or death.
Failure to heed could result in serious injury or death.
Some procedures described in this manual require work inside the indicator enclosure. These procedures are to be performed by qualified service personnel only.
Do not allow minors (children) or inexperienced persons to operate this unit.
Do not operate without the enclosure completely assembled.
Do not use for purposes other than weight taking.
Do not place fingers into slots or possible pinch points.
Do not use this product if any of the components are cracked.
Do not exceed the rated specification of the unit.
Do not make alterations or modifications to the unit.
Do not remove or obscure warning labels.
Do not submerge.
Before opening the unit, ensure the power cord is disconnected from the outlet.
FCC Compliance
United States
This equipment has been tested and found to comply with the limits for a Class A digital device, pursuant to Part 15 of the FCC Rules. These limits are designed to provide reasonable protection against harmful interference when the equipment is operated in a commercial environment. This equipment generates, uses, and can radiate radio frequency energy and, if not installed and used in accordance with the instruction manual, may cause harmful interference to radio communications. Operation of this equipment in a residential area is likely to cause harmful interference in which case the user will be required to correct the interference at his own expense.
Canada
This digital apparatus does not exceed the Class A limits for radio noise emissions from digital apparatus set out in the Radio Interference Regulations of the Canadian Department of Communications. Le présent appareil numérique n’émet pas de bruits radioélectriques dépassant les limites applicables aux appareils numériques de la Class A prescites dans le Règlement sur le brouillage radioélectrique edicté par le ministère des Communications du Canada.
Front Panel
Front panel keys and annunciators are described in the following sections.
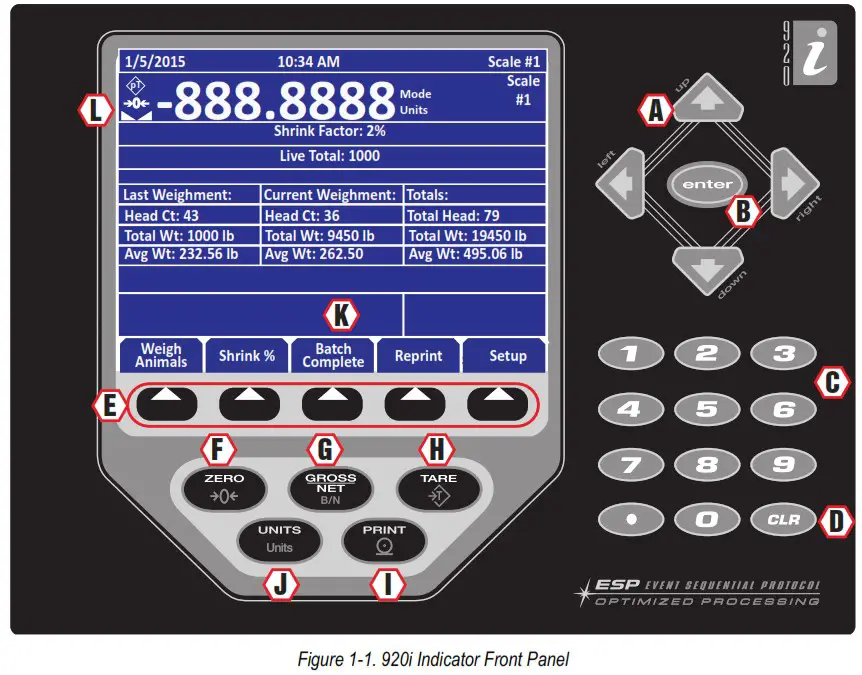
Keypad Functions
| Item No. | Description |
| A | Directional Arrows – Moves cursor to needed area and updates values |
| B | Enter – Saves entered data |
| C | Keypad – Allows input of numbers for head count and shrinkage |
| D | Clear Key – Clears data |
| E | Softkeys – Allows additional functionality (Figure 1-2 on page 4) |
| F | Zero – Sets scale to zero value |
| G | Gross/Net – Toggles between Gross and Net when tare is present |
| H | Tare – Non-functional |
| I | Print – Prints a Gross or Net Format ticket when not group weighing animals; Prints a summary report, if reports are enabled |
| J | Units – Non-functional |
| K | Display Area – Area to view weight and messages |
| L | Tare Annunciator — Used to zero out a known weight |
| Center of Zero Annunciator — Indicates that the scale is zeroed | |
| Standstill Annunciator — Indicates that the load force has settled within the motion window |
Table 1-1. Front Panel Display
Softkeys
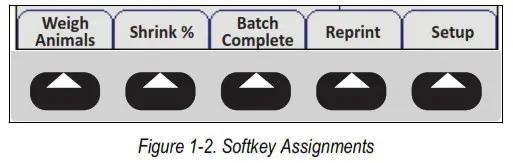
| Softkey | Description |
| Weigh Animals | Press each time a new group of animals is placed on the scale during a batch process |
| Shrink % | Allows input of a shrinkage value when weighing animals |
| Batch Complete | Press to complete the batch and print a summary ticket |
| Reprint | Prints the last stored ticket, until next batch is started |
| Setup | Displays the current pitch and roll angles and is password protected; Allows access to the setup softkeys |
Table 1-2. Softkey Descriptions
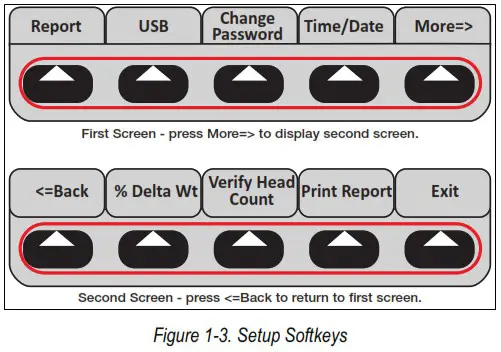
| Softkey | Description |
| Reports | Turns transaction storing and reports ON or OFF; If ON, the batch totals will be stored for each batch in the transaction database; If OFF, batch totals will not be stored; For more information, see Print Report below |
| USB | Allows selection of a USB device, download of database files and adjusting the screen contrast (Section 3.3.2 on page 12) |
| Change Password | Allows the input of password protection; Default is none; When set to nothing no password is requested when Setup is selected |
| Time/Date | Sets the system time and date |
| More=> | Press More to display set 2 of the setup softkeys |
| aBack | Returns display to previous menu |
| % Delta Wt | Set the percent change in the printed weight before the live total starts getting updated again; Example: If 1000 lb is weighed and most of those animals leave the scale and the next batch starts coming on (scale does not go all the way to zero), when it is at 100 lb (default is 90% change in weight) or 1100 lb (either direction) it will start updating that weight again. The live total should show more than the regular total if they’re getting close to weighing capacity (if the scale only holds 20,000 and their last total was 19,500, they will want to only add 500 worth of animals). |
| Verify Head Count | Turns head count verification On/Off |
| Print Report | A summary report can be printed by pressing PRINT, showing the totals since the last time the database was cleared (Figure 2-2 on page 7); After printing, the indicator prompts Clear Transactions? then displays YES and NO softkeys |
| Exit | Returns the display to the main screen |
Table 1-3. Setup Soft Keys
Indicator Settings
Time and Date
The 920i AC/DC Indicator has a built-in time and date clock that automatically adjusts for leap years. The real time clock will run even if power is removed from the indicator. There is a battery inside the indicator that will keep the clock running continuously while there is no power to the indicator.
![]() There is no need to be in calibration mode to change the time and date.
There is no need to be in calibration mode to change the time and date.
Setting Time/Date
Use the following steps to set up the time and date.
- Press the Setup softkey.
- Press the Time/Date softkey.
- Use the directional arrows to enter the current time and date.
- Press the Enter key to return to the setup menu.
- Press the Exit softkey to return to the main menu.
 Press the Cancel softkey to exit without saving any changes.
Operation
This section provides an overview of 920i AC/DC Indicator operation information.![]() A printer is optional, so all references only apply if there is a printer connected to the 920i AC/DC indicator.
A printer is optional, so all references only apply if there is a printer connected to the 920i AC/DC indicator.
Weighing Multiple Animals
- Press the power switch to turn on the indicator.
- Insert a ticket into the printer (optional).
- Press FORWARD on printer to secure the paper.
If paper does not feed into the printer under the print head, make sure the release light is on. If it is not, press RELEASE on the printer. - Press
 to re-zero the scale (if required).
 - Load the animals onto the scale.
- Press
 . Enter Head Count is displayed.
 - Use the keypad to enter the number of animals to be weighed.
- Press
 . The indicator captures a stable gross weight.
 - If Verify Head Count is turned on, Re-key in Head Count displays. Use the keypad to enter the number of animals to be weighed.
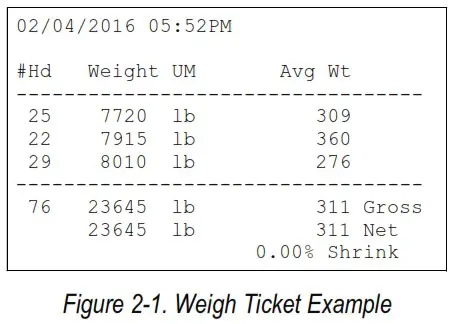
- Press . The head count, total weight and average weight per head displays. A line (ticket) prints out with the animal count, weight, units and average weight to the printer.
Last Weighment Current Weighment Totals Head Ct: 0 Head Ct: 0 Total Head: 0 Gross Wgt: 0 Gross Wgt: 0 Total Wgt: 0 Avg. Wgt: 0 Avg. Wgt: 0 Avg. Wgt: 0 Table 2-1. Weight Display
• Last Weighment Provides information on the previous group of animals that were on the scale.
• Current Weighment Provides information on the number of animals currently on scale, their total weight and the average weight per animal.
• Totals Provides information on the total of all animals weighed in current weigh batch and their average weight. - Unload the scale.
- Repeat Step 4-Step 10 until all animals from the current batch have been weighed.
- Press
 to complete current batch of animals. Summary information is printed on a ticket (optional).
Weigh Ticket Print-Out (Optional)
Press Batch Complete to obtain the Weigh Ticket for the current batch of animals.
Last Ticket Reprint (Optional)
Press ![]() any time prior to starting the next batch to reprint the last weigh ticket.
any time prior to starting the next batch to reprint the last weigh ticket.
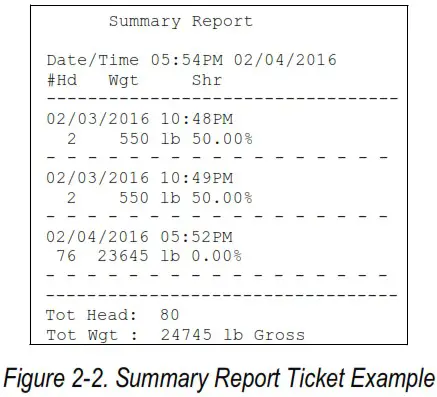
Summary Report Ticket (Optional)
Press ![]() to generate the Summary Report Ticket.
to generate the Summary Report Ticket.
This will printout a summary of all the batches stored in the Report memory, if Report function is enabled in the Setup menu. If enabled, this Report function will append and store the weigh ticket batches in the Report memory. Upon print-out, the operator has the opportunity to clear the report memory.![]() If the reports function is enabled in the Setup menu, the summary information will also be stored to the transaction database where it can be printed or uploaded to a PC.
If the reports function is enabled in the Setup menu, the summary information will also be stored to the transaction database where it can be printed or uploaded to a PC.
Shrink
Press ![]() at any time to change the shrink percentage (0.099.99%) to be subtracted from the total gross weight. This is saved through power cycles. The default is 0.0%.
at any time to change the shrink percentage (0.099.99%) to be subtracted from the total gross weight. This is saved through power cycles. The default is 0.0%.
Weighing a Single Animal
- Press and enter a head count of 1.
- Press to print the summary information of a batch on the weigh ticket.
- Press
 to print a complete summary report of all batches in report memory.
Verify Head Count
Function OFF
If the Verify Head Count function is OFF in the setup menu, the program will operate as normal. It will only prompt the operator once to enter the Head Count prior to printing the weighment value.
Function ON
If the Verify Head Count function is ON in the setup menu, the program will require extra operator verification. It will prompt the operator to re-enter the head count value, immediately after the original Head Count value is entered. If the operator enters a different value, the program will store and print the latest value entered.
Configuration
This section provides an overview of 920i AC/DC Indicator configuration information.
Configuration Mode
The setup switch must be pressed to enter the configuration mode. If the indicator has an NTEP seal, it needs to be cut to access the switch.![]() For continued NTEP certification the indicator must be resealed by an authorized agent.
For continued NTEP certification the indicator must be resealed by an authorized agent.
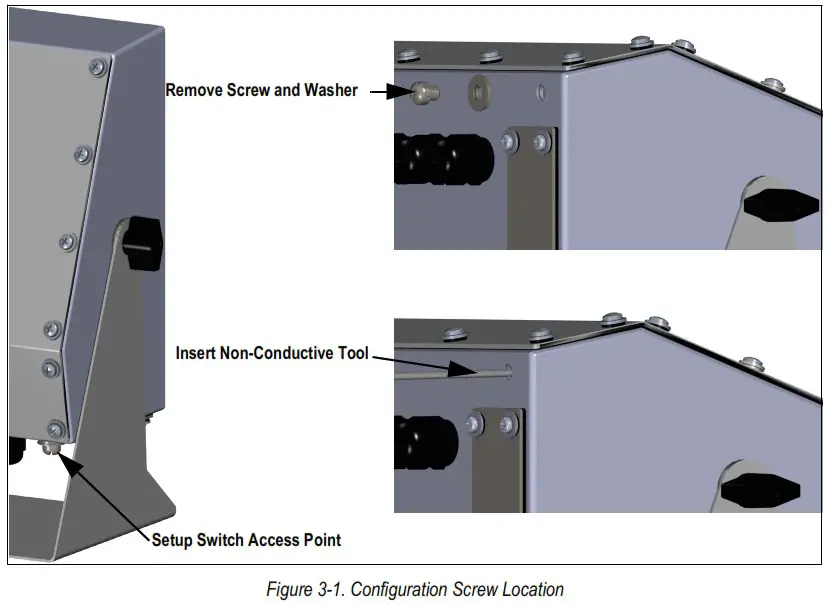
Use the following steps to place the indicator into configuration mode:
- Remove the screw and washer. Retain for re-installation and resealing.
- Insert a non-conductive tool into the hole until it engages the configuration switch. CONFIG displays.
- Set the configuration parameters as desired.
- Reinstall the screw and washer, have it resealed by an authorized agent according to NTEP standards.
Database and Stored Workbooks
| Field | Type | Description |
| TD | TimeDate | Time and date of weighment |
| TotalWgt | Real | Total weight on the scale |
| HeadCnt | Integer | Head count entered |
| AvgWgt | Real | Individual gross weight (total divided by head count) |
| Units | String | Units string (lb, kg, etc) during weighment |
| Shrink | Real | Shrink Factor % entered 0.0-99.99% |
Table 3-1. TRANS Database Table (1000 Records)
| Slot | Type |
| 1 | Single Channel A/D Card |
| 2 | Not Used |
Table 3-2. Option Card Locations
| Slot | Bit | Type | Function |
| 0 | 01-Jun | Off | Not Used |
Table 3-3. Digital I/O
| Port | Type | Description | Setup |
| 1 | INCLIN | Inclinometer Input | 19200,8,N,1 |
| 2 | USB | Flash Drive/Keyboard | N/A |
| 3 | CMD | Not Used | 9600,8,N,2 |
| 4 | CMD | TM295 ticket printer | 9600,8,N,2 |
Table 3-4. Serial Port (PN 129998) for Mobile Scale with Inclinometer
| Port | Type | Description | Setup |
| 1 | CMD | Not Used | 9600,8,N,2 |
| 2 | USB | Flash Drive/Keyboard | N/A |
| 3 | CMD | Not Used | 9600,8,N,2 |
| 4 | CMD | TM295 Ticket Printer | 9600,8,N,2 |
Table 3-5. Serial Port (PN 132302) for Static Scale without Inclinometer
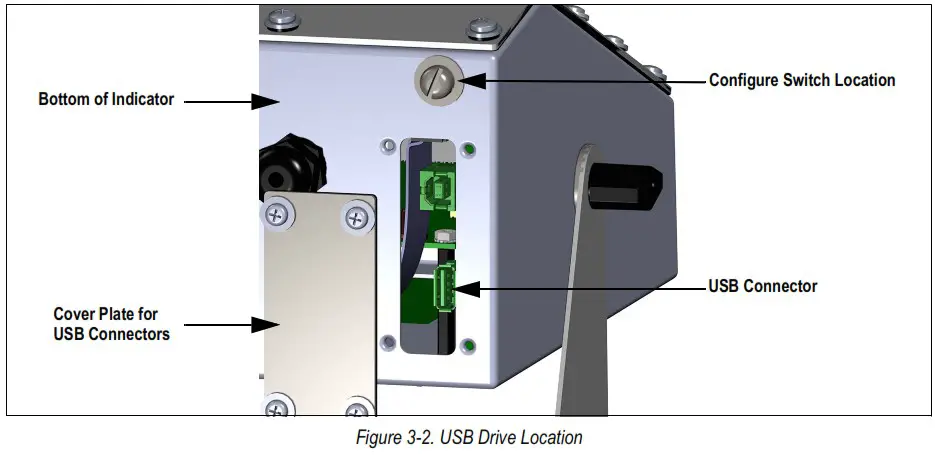
USB Flash Drive
The USB flash drive is located in the bottom of the indicator. There is a plate that needs to be removed to gain access to it.
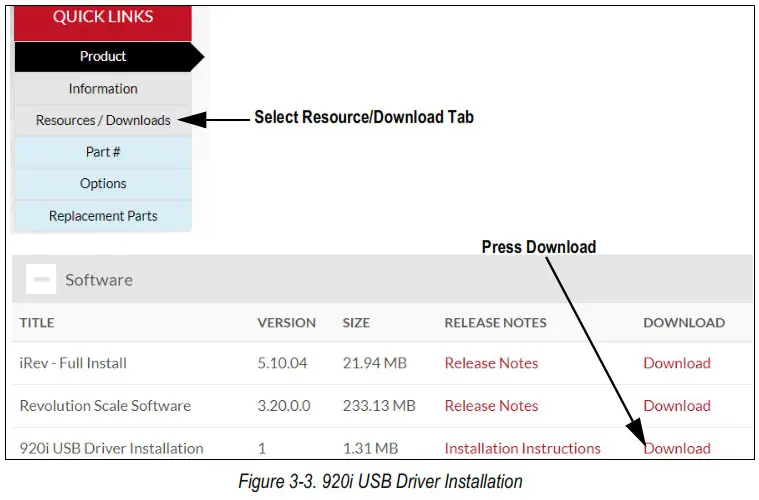
USB Driver Installation
Before connecting the 920i AC/DC Indicator to a PC, the appropriate driver must be installed.
- Open the Rice Lake website at www.ricelake.com
- Navigate to the 920i USB page.
- Select Resources/Downloads tab under Quick Links.
- Expand the Software category.
- Locate the 920i USB Driver Installation entry and press Download.

- Save the zip file to the PC and extract.
- Open the .exe file. The installer automatically detects the version of Windows and installs the appropriate driver.
USB Softkey
Softkeys can be defined to provide additional operator functions for specific applications. If the USB softkey is not displayed, it will need to be enabled. Enabling softkeys is done through the Feature menu.

To enable/disable a USB softkey:
- Navigate to the Feature menu.
- Use the arrow keys to scroll through the softkey selections.
- When USB is displayed, use the Add and Remove softkeys to enable/disable the USB softkey.
Connecting a USB Device
The 920i displays a list of connected USB devices. Devices include the following:
| Device | Description |
| HOSTPC | Used when connecting directly to a PC; it automatically assigns a virtual comm port Check PC settings to determine which port is assigned |
| PRINTER1 | Used if one printer is connected |
| PRINTER2 | Used only if a USB hub is connected, allowing for more than one Type-B connection In this scenario, the lowest printer ID# will be Printer |
| KEYBOARD | Supports USB keyboards |
| DRIVE | Supports USB 2.0 flash drives formatted to the FAT-32 or FAT-16 file system up to 4 G max |
Table 3-6. USB Devices
Use the following to connect a USB device:
- Attach the USB device to the proper USB connector on the indicator. USB connections use Port 2 on the 920i.
- Press the USB softkey. If the USB softkey is not displayed, see Section 1.2.2 on page 4 and Section 3.3.2.
- Select the proper device type and press Enter.
Using USB Hubs
Hubs are necessary if multiple USB devices are desired to be simultaneously connected. To achieve best results, use a self-powered hub and follow the
below instructions when connecting devices:
- Connect all USB devices to the hub.
- With the 920i disconnected from power, connect the hub to the 920i.
- Connect power to the 920i. All USB devices should be recognized on power-up.
Disconnecting a USB Device
Prior to unplugging a connected USB device,
- Press the USB softkey. If the USB softkey is not displayed, see Section 1.2.2 on page 4 and Section 3.3.2.
- Select No Device and press Enter. This also allows a user program to switch devices via APIs.
- The USB device is now safe to disconnect.
Loading Configuration Files and Databases
Certain files may take extended periods of time to load directly from a PC to the 920i. A flash drive is recommended for fast loading times. When using multiple 920i units, it is recommended to create a folder matching each ones unit ID number. When loading configuration files, the unit will load the file contained in a folder matching its UID# (the default UID# is 1). If a folder matching the UID is not found, the unit will load the first file found.
![]() If loading a configuration file from a UID subdirectory, ensure the configuration file does not change the unit ID. Otherwise, a COD file in that subdirectory will not be recognized until the UID is manually reverted to its original number.
If loading a configuration file from a UID subdirectory, ensure the configuration file does not change the unit ID. Otherwise, a COD file in that subdirectory will not be recognized until the UID is manually reverted to its original number.![]() File names are limited to eight characters.
File names are limited to eight characters.
- Using a PC, copy the desired configuration file to the flash drive.
- Insert the flash drive to the 920i’s Type-A USB connector.
- Press the USB softkey.
- Select Drive and press Enter.
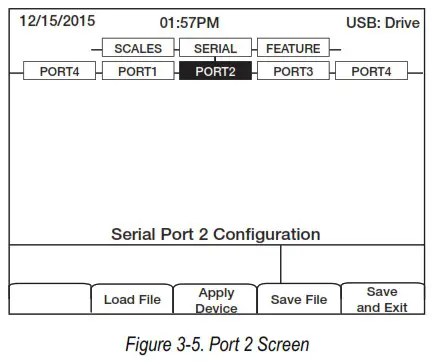
- Place the indicator in setup mode and navigate to the SERIAL » PORT2 menu.

- Press Load File.

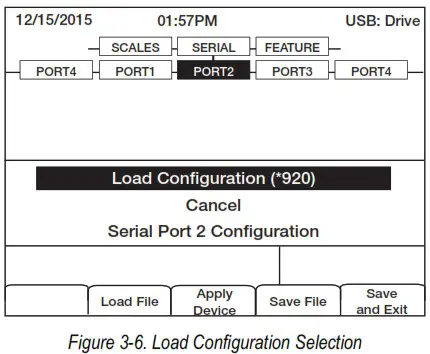
- Select Load Configuration and press Enter.
Loading Database Files
![]() File names are limited to eight characters. If loading a database file, be aware the indicator uses the alias name and a .db file extension when saving database files.
File names are limited to eight characters. If loading a database file, be aware the indicator uses the alias name and a .db file extension when saving database files.
- Using a PC, copy the desired database file to the flash drive.
- Insert the USB flash drive into the 920i’s Type-A USB connector.
- Press the USB softkey.
- Select Drive and press Enter.

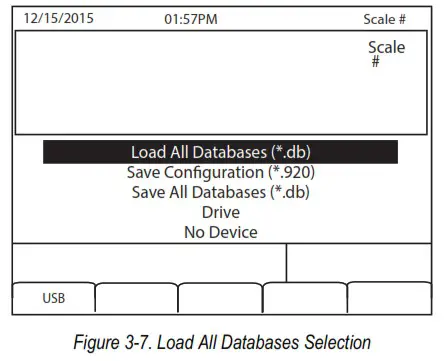
- Select Load All Databases (*.db) and press Enter.
Saving Configuration Files and Databases
Certain files may take extended periods of time to save directly from a PC to the 920i. For fastest save times, using a flash drive is recommended.
![]()
When saving a configuration file, the indicator will attempt to save to a folder matching its UID number (the default UID# is 1). If a folder is not found, the file will be saved to the drives root directory and overwrite any existing files matching its UID# followed by the .920 file extension i.e., 1.920i.
![]() When the 920i AC/DC Indicator saves a database, it will use the alias name and a .db file extension.
When the 920i AC/DC Indicator saves a database, it will use the alias name and a .db file extension.
- Insert the flash drive into the 920i’s Type-A USB port.
- With the indicator in weigh mode, press the USB softkey. If the USB softkey is not displayed, see Section 3.3.2 on page 12 and Section 1.2.2 on page 4.
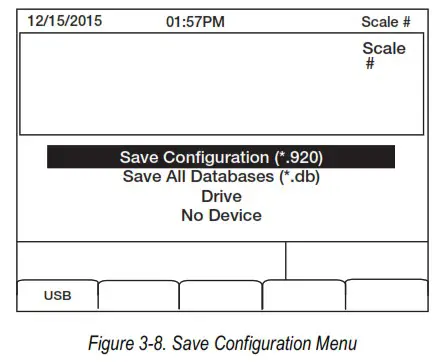
- Select Save Configuration or Save All Databases (*.db) and press Enter.

The CALIBR sub-menu (under the SCALES menu) is used to calibrate the MAS-LC. The zero, span and linear calibration point displays provide a set of softkeys used specifically for calibration procedures.
| Sub-menu Softkeys | Description |
| +/– | Toggle this key to allow entry of negative or positive values |
| Last Zero | This recalls the last established zero value to allow calibration without removing test weights or product from scale |
| Calibrate | This key performs a calibration for the selected point |
| Temp Zero | This key temporarily zeros the displayed weight of a non-empty scale; After a span calibration, the difference between the temp zero and the previously calibrated zero value is used as an offset |
| Millivolts (or Counts) | This key toggles between the display of captured A/D counts and captured millivolts values and allows entry of calibration values in mV or counts |
Table 4-1. Calibration Submenu
Use the following steps to calibrate the 920i using the front panel.
- Place the indicator in setup mode. The display reads Scale Configuration.
- Remove all weight from the scale.
- With the SCALES menu highlighted, press the Down key.
- Select the scale to be calibrated.
- Press Down again in order to highlight the GRADS parameter.
- Press Left to highlight the CALIBR sub-menu.
- Press Down to go to zero calibration (WZERO).
- Ensure the scale is empty, then press down again to show the current WZERO value.
- Press the Calibrate softkey to calibrate zero. When complete, the new A/D count for the zero calibration is displayed.
- Press Enter to save the zero calibration value and go to the next prompt (WVAL).
- With WVAL displayed, press Down to show the stored calibration weight value.
- Use the numeric keypad to enter the actual value of the calibration test weights.
- Press Enter to save the value and go to span calibration (WSPAN).
- Place test weights on the scale.
- Press Down again to show the current WSPAN value.
- Press the Calibrate softkey to calibrate span. When complete, the new A/D count for the span calibration is displayed.
- Press Enter again to save the span calibration value and go to the next prompt (WLIN).
- Press Up to return to the SCALES menu, or press the Save and Exit softkey to exit setup mode.
Appendix
This section provides an overview of additional information for the 920i AC/DC Indicator.
Parts Kit
| Part No. | Description |
| 103610 | Knob, Black 1/4-20 |
| 103988 | Washer, Nylon 0.515 – 0.52 |
| 14626 | Nut, KEP 8-32 NC Hex |
| 14862 | Screw, Mach 8-32 NC x 3/8 |
| 15133 | Washer, Lock NO 8 Type A |
| 15631 | Cable Tie, 3″ Nylon |
| 15665 | Gland, Reducing 1/2 NPT |
| 15887 | Terminal Block, 6 Position |
| 174928 | Label, NOM/NYCE 920i |
| 19538 | Post, Slotted Black Seal |
| 30623 | Screw, Mach 8-32 NC x 7/16 |
| 42149 | Bumper, Rubber Grommet |
| 53075 | Clamp, Ground Cable Shield |
| 70599 | Conn, 6 Pos Screw Terminal |
| 71125 | Conn,3 Pos Screw Terminal |
| 71126 | Conn, 4 Pos Screw Terminal |
| 75062 | Washer Bonded Sealing SST |
| 77180 | Conn, 8 Pos Screw Terminal |
| 94422 | Label, Capacity 0.40 x 5.00 |
Table 5-1. Parts Kit List
Repair Parts
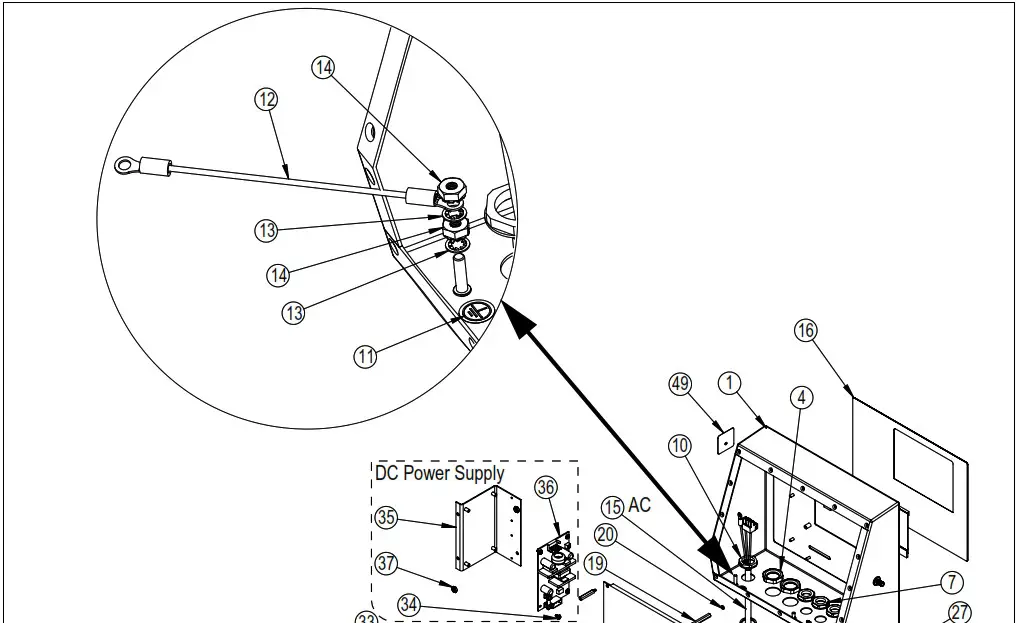
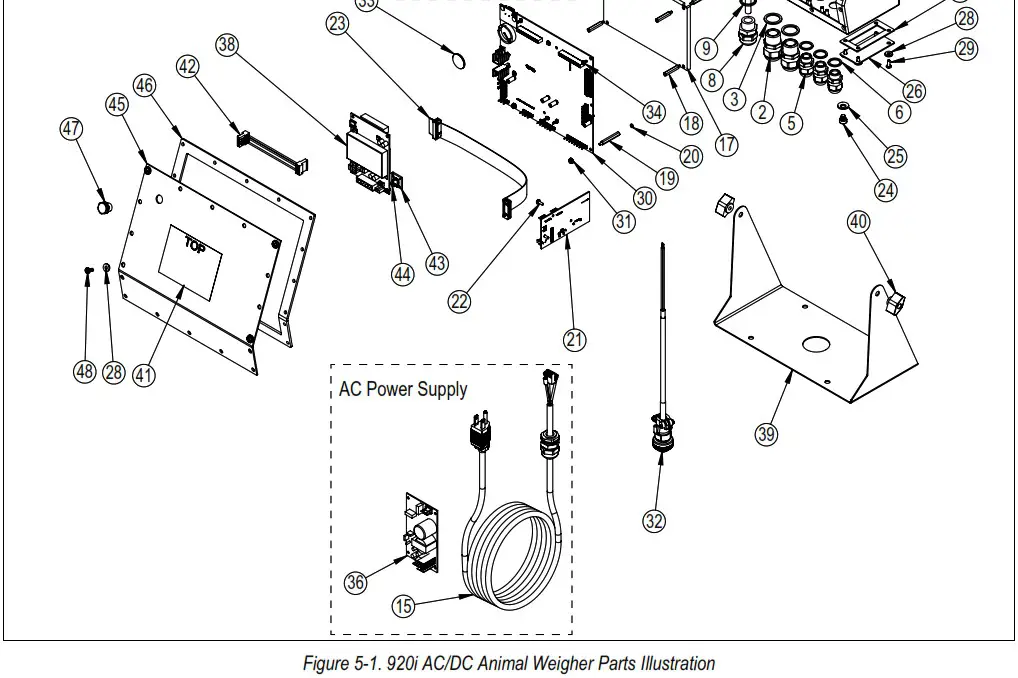
| Item No. | Part No. | Description | Qty. |
| 1 | 67529 | Enclosure, Universal 920i | 1 |
| 2 | 15628 | Cord Grip, 1/2-NPT | 2 |
| 3 | 30376 | Seal Ring, 1/2-NPT Nylon | 4 |
| 4 | 15630 | Lock Nut, 1/2-NPT Plastic | 2 |
| 5 | 15626 | Cord Grip, PG-9 Plastic | 3 |
| 6 | 30375 | Seal Ring, PG-9 Nylon | 3 |
| 7 | 15627 | Lock Nut, PG-9 Plastic | 3 |
| 8 | 68600 | Cord Grip, PG-11 | 1 |
| 9 | 68599 | Seal Ring, PG-11 | 1 |
| 10 | 68601 | Nut, PG11 Black Nylon | 1 |
| 11 | 16892 | Label, Ground Protective Earth Adhesive IEC 60417-5019 | 1 |
| 12 | 45043 | Wire, Ground 4” w/ No.8 Eyelet Connectors | 1 |
| 13 | 15134 | Washer, Lock NO 8 Type A Internal Tooth Steel Zinc Plated | 3 |
| 14 | 14626 | Nut, KEP #8-32 NC Hex Ext. Tooth Lock Washer ST-ZP | 3 |
| 15 | 119562 | Cable, Power DC | 1 |
| 85202 | Power Cord Asy,120 VAC W/PG11 Cord Grip and SL-156 Conn AC | 1 | |
| 16 | 66502 | Overlay, Membrane Switch Panel 920i | 1 |
| 17 | 186276 | Display Board, LED Back-light Transflective, 01/2018 and later | 1 |
| 186464 | Wire Harness, PS Board to LED Back-Light display | 1 | |
| 18 | 67886 | Standoff, Male-Fem 4-40 NC x 1.00 | 4 |
| 19 | 68661 | Standoff, Male-Fem 4-40 NC | 2 |
| 20 | 69898 | Washer, Nylon ID=.112 OD=.206 Thickness=.05 (#4) | 2 |
| 21 | 111109 | Board Assy, 920i Plus USB | 1 |
| 22 | 55708 | Screw, Mach 4-40 NC x 3/8 Phillips Pan Head Internal Tooth Lock Washer SEMS STL-Z | 2 |
| 23 | 68662 | Cable, Ribbon Interface Board to CPU | 1 |
| 24 | 42640 | Screw, Mach 1/4-28 NF x 1/4 Phillips, Drilled Fillister Head, 18-8 SST | 1 |
| 25 | 44676 | Washer, Bonded Sealing SST 1/4 ID x 5/8 OD | 1 |
| 26 | 67530 | Plate, Interface Board 920i | 1 |
| 27 | 67535 | Gasket, Interface Board Access Cover Plate 920i | 1 |
| 28 | 75062 | #8 Bonded Sealing Washer 7/16 OD SST | 8 |
| 29 | 14845 | Screw, Mach 6-32 NC x 3/8” | 4 |
| 30 | 186272 | CPU Board Assembly, LED Back-light, 01/2018 and later | 1 |
| 132302 | Static Multi-Animal Software, must be loaded to CPU board at factory | NA | |
| 31 | 14618 | Nut, KEP 4-40 NC Hex External Tooth Lock Washer | 2 |
| 32 | 131670 | Cable Assy, 4 Pin Male Ag Scale | 1 |
| 33 | 69290 | Battery, 3V Coin Lithium | 1 |
| 34 | 14822 | Screw, Mach 4-40 NC X 1/4 SEMS STL-ZP | 13 |
| 35 | 94392 | Bracket, 25W Power Supply (AC Power Supply Only) | 1 |
| 36 | 132791 | Power Supply, DC/DC +/- 6V 9-36 VDC | 1 |
| 67613 | Power Supply Board, 6V 25W AC | 1 | |
| 37 | 58248 | Lock Nut, #6-32 NC Nylon Insert ZI PLT (AC Power Supply Only) | 2 |
| 38 | 67610 | Card, A/D Single Channel 920i | 1 |
| 39 | 67531 | Stand, Tilt | 1 |
| 42149 | Bumper, Rubber Grommet | 4 | |
| 40 | 103610 | Knob, Black 1/4-20 | 2 |
| 103988 | Washer, Nylon 0.515 – 0.52 | 4 | |
| 41 | 53307 | Label, 4.000 x 2.875 | 1 |
| 42 | 67796 | Wiring Harness, Power Supply Board | 1 |
| 43 | 15650 | Mount, Cable Tie 3/4” | 1 |
| 44 | 15631 | Cable Tie, 3” Nylon | 1 |
| 45 | 68424 | Backplate, Universal Enclosure 920i, 820i | 1 |
| 46 | 67532 | Gasket, Back Plate 920i, 820i | 1 |
| 47 | 88733 | Vent, Breather Sealed Gortex Membrane Black Plastic | 1 |
| 88734 | Nut, Breather Vent | 1 | |
| 48 | 14862 | Screw, Mach 8-32 NCx3/8 Phillips Pan Head | 4 |
| 49 | 53308 | Label,1.25 x 1.25 8000T | 1 |
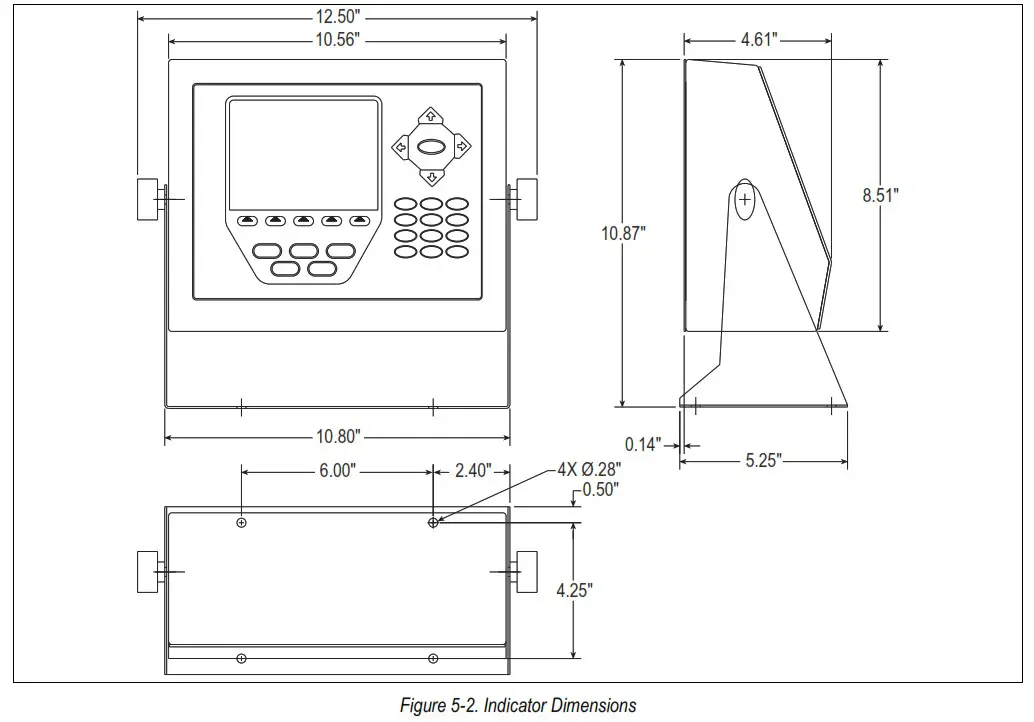
Dimensions
Troubleshooting
| Symptom | Probable Cause | Action |
| The system will not weigh animal or batch complete | The weight reading is not stable enough | It may be too windy to get a stable weight, check the standstill icon on the display area on the indicator; The system can only start when the standstill icon is displayed |
| The weight reading on the indicator is unstable | The circuit board in the control panel may be wet or the junction box for the load cells may have moisture | Dry any areas that are contaminated with moisture; Check for leaks and reseal |
| A load cell cable may be pinched or damaged | Contact Rice Lake Weighing Systems or a qualified dealer for support Cutting the load cell cable will void the warranty; Special repair techniques are required | |
| The scale has a positive error when loading or a negative error when unloading | Mechanical binding problem on the scale | Check for debris around or under the scale; Check each load cell location for foreign material; Check all items that run from on the scale to off the scale; Check all gates or gathering panels for contact |
| The scale has a negative error when loading or a positive error when unloading | Moisture is present somewhere in the electrical system | Dry any areas that are contaminated with moisture; Check for leaks and reseal |
| Dashes in weight display | Over-range or under-range scale condition | Check the scale; For out-of-range conditions in total scale display, check all scale inputs for positive weight values |
| Blue Screen | Possible corrupt core software | Reset or reload software |
| Check LCD contrast control in indicator | ||
| Hangs in 888 display | Corrupt core software | Reset or reload software |
| The scale will not ZERO | Weight on scale larger than the allowable ZERO window | Clean the scale deck of debris, then zero the scale |
| Zero Window parameter set incorrectly |
Table 5-3. Troubleshooting
Specifications
| Power | 100 – 240 VAC, Range 90 – 264 VAC 12-24 VDC, Range 9 – 36 VDC |
| Power Consumption | 340 mA @ 115 VAC (26W) |
| Excitation Voltage | 10 ± VDC, 16 x 350 ohm or 32 x 700 ohm load cells per A/D card |
| Analog Signal | |
| Input Range | -45 mV to +45 mV |
| Sensitivity | 0.3 µV/graduation minimum @ 7.5 Hz 1.0 µV/graduation typical @ 120 Hz 4.0 µV/graduation typical @ 960 Hz |
| A/D Sample Rate | 7.5 to 960 Hz, software selectable |
| Resolution | Internal resolution: 8 million counts Weight display resolution: 9,999,999 |
| System Linearity | ± 0.01% full scale |
| Digital I/O | Six I/O channels on CPU board; optional 24-channel I/O expansion boards available |
| Circuit Protection | RFI, EMI, ESD protection |
| Serial Ports | Four ports on CPU board support up to 115,200 bps; optional dual-channel serial expansion boards available Port 1: Full duplex RS-232 Port 2: USB Type-A and Type-B connectors Port 3: Full duplex RS-232, 20 mA output Port 4: Full duplex RS-232, 2-wire RS-485, 20 mA output |
| Display (W x H) | 4.6 inch x 3.4 inch (116 W x 86 mm H), 320 x 240 pixel VGA Liquid Crystal Display (LCD) module with adjustable contrast |
| Keyboard | 27-key membrane panel, tactile feel |
| Operating Temp | Legal: 14°F to 104°F (-10°C to +40°C) Industrial: 14°F to 122°F (-10°C to +50°C) |
| Warranty | Two-year limited warranty |
Approvals Indicator![]() NTEP
NTEP
CoC Number 01-088
Accuracy Class III/IIILnmax: 10 000
![]()
© Rice Lake Weighing Systems Specifications subject to change without notice.
Rice Lake Weighing Systems is an ISO 9001 registered company.
230 W. Coleman St. · Rice Lake, WI 54868 · USA
U.S. 800-472-6703 · Canada/Mexico 800-321-6703 · International 715-234-9171 · Europe +31 (0)26 472 1319
www.ricelake.com
PN 184718 Rev C
An ISO 9001 registered company © Rice Lake Weighing Systems. All rights reserved.
Rice Lake Weighing Systems® is a registered trademark of Rice Lake Weighing Systems.
All other brand or product names within this publication are trademarks or registered trademarks of their respective companies.
All information contained within this publication is, to the best of our knowledge, complete and accurate at the time of publication. Rice Lake Weighing Systems reserves the right to make changes to the technology, features, specifications and design of the equipment without notice.
The most current version of this publication, software, firmware and all other product updates can be found on our website:
www.ricelake.com


