
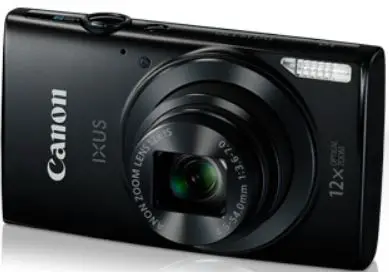
Canon IXUS170 Supported Memory Cars Size Digital Camera
Package Contents
Before use, make sure the following items are included in the package. If anything is missing, contact your camera retailer.
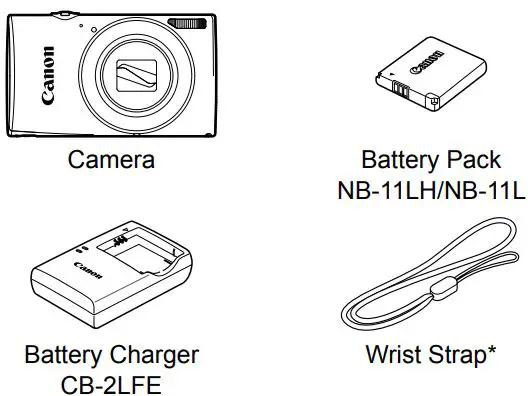
For attachment instructions, refer to the Camera User Guide that can be downloaded from the Canon website.
- Printed matter is also included.
- A memory card is not included.
Compatible Memory Cards
No memory card is included. Purchase one of the following kinds of card as needed. These memory cards can be used, regardless of capacity. For details on the number of shots and recording time per memory card, see “Specifi cations” in the downloadable Camera User Guide.
- SD memory cards*
- SDXC memory cards*
- SDHC memory cards*
- Eye-Fi cards
* Cards conforming to SD standards. However, not all memory cards have been verifi ed to work with the camera.
About Eye-Fi Cards
This product is not guaranteed to support Eye-Fi card functions (including wireless transfer). In case of an issue with an Eye-Fi card, please check with the card manufacturer.
Also note that approval is required to use Eye-Fi cards in many countries or regions. Without approval, use of the card is not permitted. If it is unclear whether the card has been approved for use in the area, please check with the card manufacturer.
Convention in This Guide
This guide uses IXUS 170 illustrations and screenshots for all explanations.
Manuals and Software
You can download manuals and software from the following URL. http://www.canon.com/icpd/
- With a computer connected to the Internet, access the above URL.
- Access the site for your country or region.
- Adobe Reader is required to view the manuals.
- You can also download software from the website. For instructions on downloading and installing the software, refer to the Camera User Guide available for download.
Initial Preparations
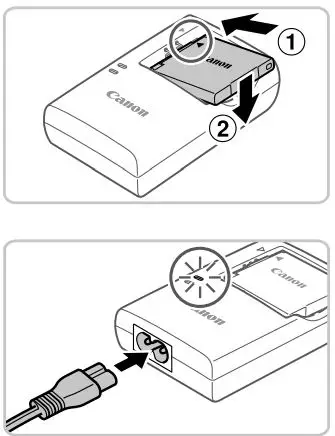
Charging the Battery Pack
- Insert the battery pack.
After aligning the marks on the battery pack and charger, insert the battery pack by pushing it in ( 1) and down (2 ).
 - Charge the battery pack.
- Plug the power cord into the charger, then plug the other end into a power outlet.
- The charging lamp turns orange, and charging begins.
- When charging is finished, the lamp turns green. Remove the battery pack.
- For details on charging time and the number of shots or recording time available with a fully charged battery pack, refer to “Specifi cations” in the downloadable Camera User Guide.

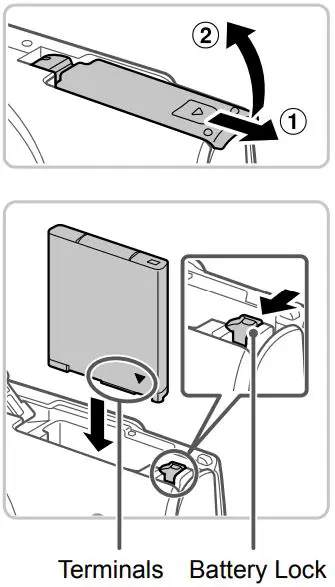
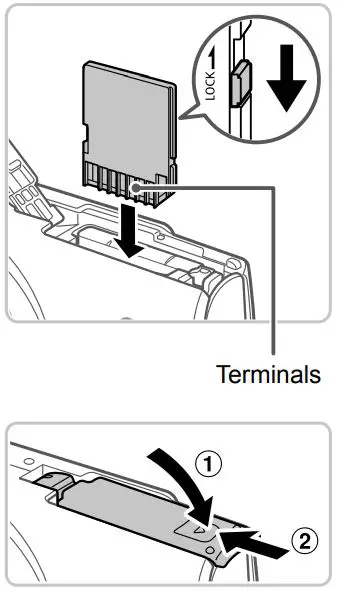
Inserting the Battery Pack and Memory Card
- Open the cover.
Slide the cover (1) and open it (2) - Insert the battery pack.
- While pressing the battery lock in the direction of the arrow, insert the battery pack as shown and push it in until it clicks into the locked position.
- To remove the battery pack, press the battery lock in the direction of the arrow.

- Check the card’s write-protect tab and insert the memory card.
- Recording is not possible on memory cards with a write-protect tab when the tab is in the locked position. Slide the tab to the unlocked position.
- Insert the memory card facing as shown until it clicks into the locked position.
- To remove the memory card, push it in until you feel a click, and then slowly release it.
- Close the cover.
- Lower the cover (1) and hold it down as you slide it, until it clicks into the closed position (2).
- If the cover will not close, make sure you inserted the battery pack facing the right way in step 2.

Setting the Date and Time
- Turn the camera on.
- Press the ON/OFF button.
- The [Date/Time] screen is displayed.
- Set the date and time.
- Press the
 buttons to choose an option.
 - Press the
 buttons to specify the date and time.
 - When finished, press the
 button.
- Press the
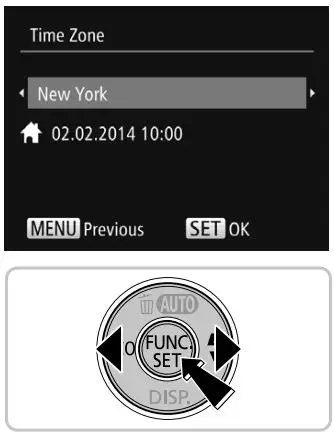
- Set the home time zone.
- Press the buttons to choose your home time zone.
- Press the button when finished. After a confirmation message, the setting screen is no longer displayed.
- To turn off the camera, press the ON/OFF button.

- Press the

Changing the Date and Time
To adjust the date and time once you have set it, do the following.
- Press the
 button.
 - Move the zoom lever to choose the
 tab.
tab. - Press the <o><p> buttons to choose [Date/Time], and then press thebutton.
- 4 Follow step 2 in “Setting the Date and Time” to adjust the settings.
- Press thebutton.
Display Language
Change the display language as needed.
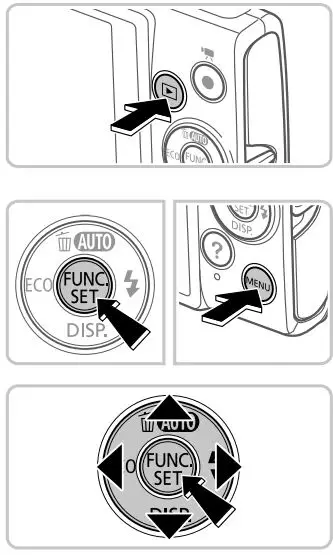
- Enter Playback mode.
Press the button
 - Access the setting screen.
- Press and hold the button, and then press the button.
- Press the buttons to choose a language, and then press the button.

- Press and hold the
Trying the Camera Out
Shooting
For fully automatic selection of the optimal settings for specifi c scenes, simply let the camera determine the subject and shooting conditions.
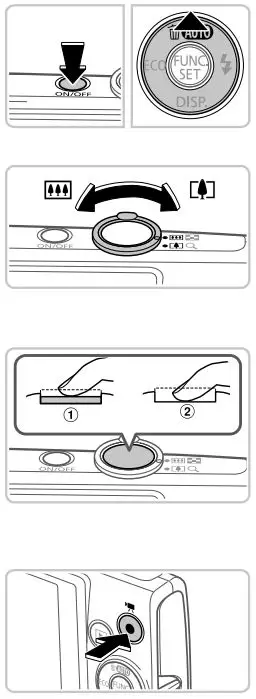
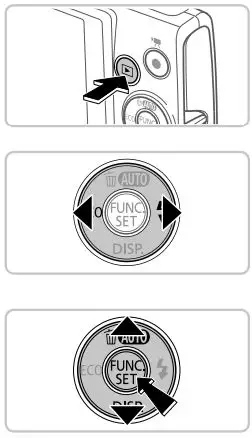
- Turn the camera on and enter [AUTO ] mode.
- Press the ON/OFF button.
- Press the <
 > button several times until [AUTO ] is displayed.
- Compose the shot.
To zoom in and enlarge the subject, move the zoom lever toward (telephoto) as you watch the screen, and to zoom away from the subject, move it toward
 (wide angle).
 - Shoot.
Shooting Still Images
Press the shutter button lightly (1).
The camera beeps twice after focusing, and AF frames are displayed to indicate image areas in focus. Press the shutter button all the way down (2).
Shooting Movies
Press the movie button to start shooting, and press it again to stop.
Viewing
- Enter Playback mode.
Press the button. - Browse through your images.
- To view the previous or next image, press the buttons.
- Movies are identifi ed by a
 icon.
icon.
To play movies, go to step 3.
- To view the previous or next image, press the
- Play movies.
- Press the button, press the buttons to choose
 , and then press the <m> button again.
 - Playback now begins, and after the movie is fi nished, is displayed.
- To adjust the volume, press the buttons.

- Press the
Erasing Images
To erase the image you chose in step 2, do the following. Note that erased images cannot be recovered.
- Press the button.
- After [Erase?] is displayed, press the buttons to choose
[Erase], and then press the button.
Only for European Union and EEA (Norway, Iceland and Liechtenstein)
These symbols indicate that this product is not to be disposed of with your household waste, according to the WEEE Directive (2012/19/EU), the Battery Directive (2006/66/EC) and/or national legislation implementing those Directives. If a chemical symbol is printed beneath the symbol shown above, in accordance with the Battery Directive, this indicates that a heavy metal (Hg = Mercury, Cd = Cadmium, Pb = Lead) is present in this battery or accumulator at a concentration above an applicable threshold specified in the Battery Directive. This product should be handed over to a designated collection point, e.g., on an authorized one-for-one basis when you buy a new similar product or to an authorized collection site for recycling waste electrical and electronic equipment (EEE) and batteries and accumulators. Improper handling of this type of waste could have a possible impact on the environment and human health due to potentially hazardous substances that are generally associated with EEE. Your cooperation in the correct disposal of this product will contribute to the effective usage of natural resources. For more information about the recycling of this product, please contact your local city office, waste authority, approved scheme or your household waste disposal service or visit www.canon-europe.com/weee, or www.canon-ilurope.com/battery.
CAUTION
RISK OF EXPLOSION IF BATTERY IS REPLACED BY AN INCORRECT TYPE.
DISPOSE OF USED BATTERIES ACCORDING TO LOCAL REGULATIONS.
To ensure proper operation of this product, use of genuine Canon accessories is recommended.
- Interface Cable IFC-400PCU
- AV Cable AVC-DC400
Some logos for technical standards the camera has met can be viewed on the screen by
choosing MENU > [TT] tab > [Certification Logo Display].
CANON EUROPA N.V. Bovenkerkerweg 59, 1185 XB Amstelveen, The Netherlands
CANON INC. 30-2, Shimomaruko 3-chome, Ohta-ku, Tokyo 146-8501, Japan
Download PDF: Canon IXUS170 Supported Memory Cars Size Digital Camera User Manual


