kramer KDS AVoIP Switcher Encoder
Check what’s in the box
- KDS-SW2-EN7 2×1 4K AVoIP Switcher Encoder
- 2 Bracket sets
- 1 Quick start guide
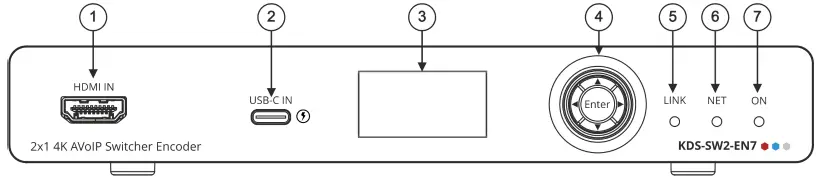
Get to know your KDS-SW2-EN7
| # | Feature | Function |
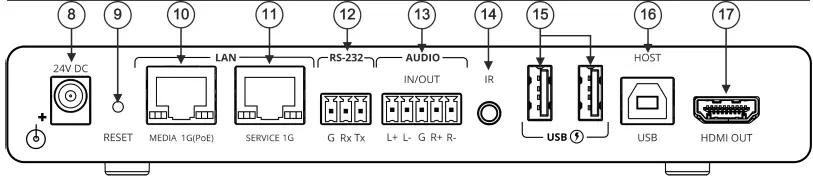
| 8 | 24V/5A DC Connector | Connect to the power adapter (purchased separately). |
| 9 | RESET Recessed Button | Press and hold for 10 seconds to reset the device to its factory default values. All LEDs flash. |
| 10 | LAN MEDIA 1G(PoE) RJ-45 Port | Unicast: connect for streaming either directly to a decoder or via LAN. Multicast: connect to multiple decoders or connect to one decoder to which multiple decoders are daisy-chained via SERVICE (1G) port. |
| # | Feature | Function |
| 11 | LAN SERVICE 1G RJ-45 Port | Used optionally for physical separation between AV and command streams to separate LAN for security and reliability purposes. |
| 12 | RS-232 3-pin Terminal Block Connector | Connect to an RS-232 device to use as a Gateway and bi-directional signal extension (even when no AV signal is extended). |
| 13 | AUDIO IN/OUT 5-pin Terminal Block Connector | Connect to a balanced analog stereo audio source/acceptor. |
| 14 | IR 3.5 Mini Jack | Connect to an IR sensor or emitter for bi-directional signal extension (even when no AV signal is extended). Expected voltage for IR receiver – (3.3V). |
| 15 | USB Type A Charging Ports (1 and 2) | Connect to USB devices, for example, to a speakerphone and webcam. |
| 16 | HOST USB Type B Port | Connect to a USB host. |
| 17 | HDMI OUT Connector | Connect to loop the signal. |
LED Functionality
KDS-SW2-EN7 LEDs function as follows
| LED | Color | Definition |
| LINK LED | Lights Green | A link is established between KDS-SW2-EN7 and the decoder is transmitting A/V signals. |
| Flashes Green | A signal is established, and a problem is detected | |
| NET LED | Off | No IP address is acquired. |
| Lights green | A valid IP address has been acquired. | |
| Flashes Green very fast (for 60sec) | A device identification command is sent (Flag me). | |
| Lights Yellow | Device falls back to default IP address. | |
| Lights Red | Security is blocking IP access. | |
| ON LED | Flashes Red | On fallback address acquiring, device ‘ON’ LED flashes continuously in slow 0.5/10sec cadence |
| Lights Green | When power is on. | |
| Flashes Green Slowly | Device is in standby mode. | |
| Flashes green fast | FW is downloaded in the background. | |
| Flashes Green very fast (for 60sec) | A device identification command is sent (Flag me). | |
| Lights Yellow | Device falls back to default IP address | |
| Lights Red | Security is blocking IP access. | |
| Post reboot, all LEDs light for 3 seconds then return to their normal LED display mode. | ||
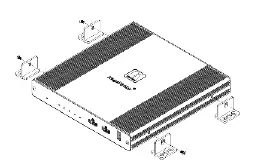
Mount KDS-SW2-EN7
Install KDS-SW2-EN7 using one of the following methods:
- Attach the rubber feet and place the unit on a flat surface.
- Fasten a bracket (included) on each side of the unit and attach it to a flat surface (see www.kramerav.com/downloads/KDS-SW2-EN7).
- Mount the unit in a rack using the recommended rack adapter (see www.kramerav.com/product/KDS-SW2-EN7).
- Ensure that the environment (e.g., maximum ambient temperature & air flow) is compatible for the device.
- Avoid uneven mechanical loading.
- Appropriate consideration of equipment nameplate ratings should be used for avoiding overloading of the circuits.
- Reliable earthing of rack-mounted equipment should be maintained.
- Maximum mounting height for the device is 2 meters.
Connect inputs and outputs
Always switch OFF the power on each device before connecting it to your KDS-SW2-EN7 and KDS-DEC7.
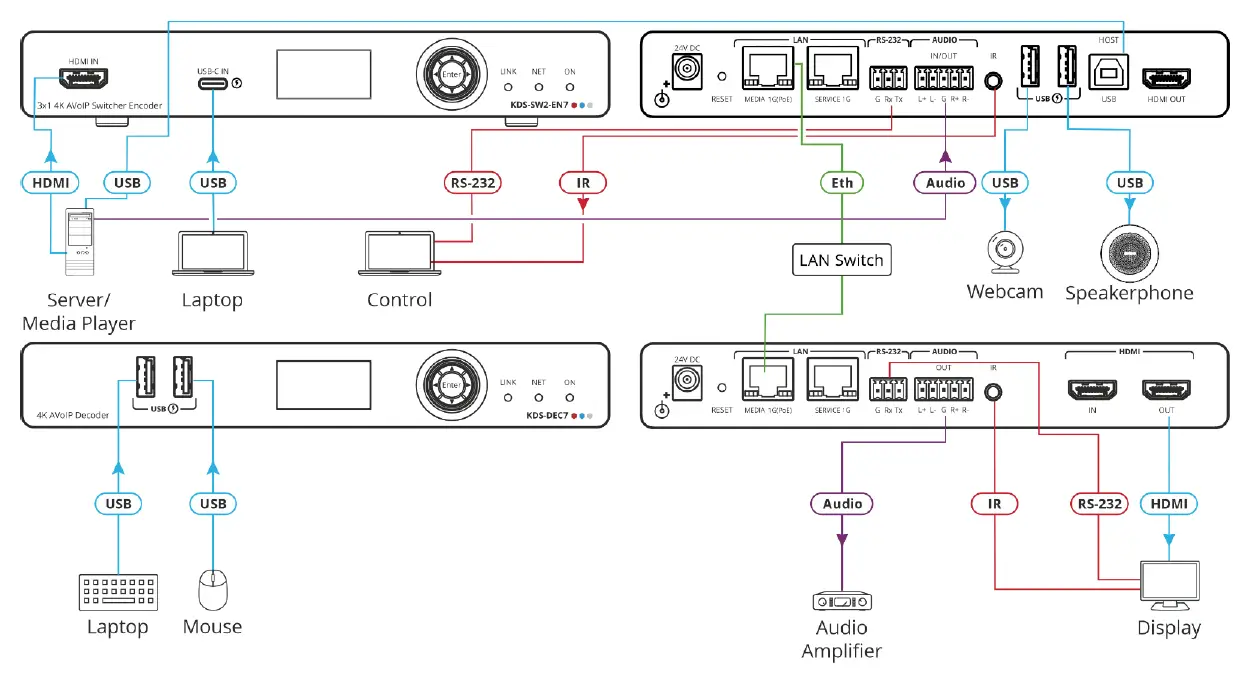
KDS-SW2-EN7 and KDS-DEC7 can stream 4K video, requiring a gigabit Ethernet switch for high quality performance, since the maximum momentary transfer rate can reach 850Mbps. We recommend using AVoIP Ethernet switches that support: Multicast forwarding or filtering, IGMP Snooping, IGMP Querier, IGMP snooping fast leave and Jumbo frame (8000 bytes or larger).
Connecting the audio input/output

To achieve specified extension distances, use the recommended Kramer cables available at www.kramerav.com/product/KDS-SW2-EN7. Using third-party cables may cause damage!
Connect power
By-default, the device uses PoE for powering the device. Optionally, you can separately purchase a power adapter to connect to the product and plug into the mains electricity. Safety Instructions (See www.kramerav.com for updated safety information)
Caution:
For products with relay terminals and GPIO ports, please refer to the permitted rating for an external connection, located next to the terminal or in the User
Manual.
There are no operator serviceable parts inside the unit.
Warning:
- Use only the power cord that is supplied with the unit.
- Disconnect the power and unplug the unit from the wall before installing.
Operate KDS-SW2-EN7
Allocating the IP Address via LCD screen menu
KDS-SW2-EN7 IP default address is 192.168.1.39. By default, DHCP is enabled, and assigns an IP address to the device. If DHCP Server is not available, for example, in case a device is connected directly to the laptop, that device gets the default IP address. If this IP addresses is already in use, the system searches for a random unique IP in the range of 192.168.X.Y. the allocated IP address can be identified using the LCD screen menu.
To allocate the IP address via LCD screen Menu:
- Connect the device to the 24V DC power adapter and connect the adapter to the mains electricity. The ON LED lights green, and the LINK LED flashes (indicating that no streaming activity is detected).
- Use the Navigation button to view the assigned IP address on the LCD screen:
- DEV STATUS > LAN1 Status
- DEV STATUS > LAN2 Status (if the Service port connected as well).
Setting Channel Number
Each encoder requires a unique channel number, and the connected decoders should be tuned to that encoder channel. You can set the channel number via the LCD screen menu or the embedded web pages.
To set the channel number for KDS-SW2-EN7 via LCD screen menu:
- Connect the device to the 24V DC power adapter and connect the adapter to the mains electricity. The ON LED lights green, and the LINK LED flashes (indicating that no streaming activity is detected).
- In the LCD screen menu, go to DEV SETTINGS > CH DEFINE.
- Change channel number using arrow buttons and set a unique channel number.
- Press Enter to save your selection.
To set the channel number via web pages:
- Connect the KDS-SW2-EN7 Ethernet port to the network and power the device.
- Access the embedded web pages.
- In the Main page:
- For KDS-SW2-EN7:
- Go to AV Routing page.
- Select Channel ID and define the channel ID number


