
![]()

USER MANUAL
HD PAN/TILT SECURITY CAMERA
ACCESSORY HOME+ ALARM SYSTEM
Home is not a place, it’s a feeling
AS90CA
Introduction
Please take the time to read this manual before you start installing and assembling the security camera. The camera is equipped with a speaker and microphone. You can communicate via the app on your smartphone with the persons within the hearing range of the camera. The camera has 6 IR LEDs for excellent night vision. With the pan/tilt/zoom function, you can remotely scan the room where the camera is placed.
Package Contents
- The security camera (1) is supplied with:
- Adapter DC 5V/1A with 1.4 m cable (2)
- Network cable 1 m, do not use during installation (3)
- Handy mounting bracket + mounting template (4)
- Screws and plugs (5)

Installation Android
The camera installation must be carried out WITHOUT network cable.
After installation and if needed for a more stable connection, you can connect the camera with a network cable to your router/modem
- Connect the adapter to the camera and a wall outlet, do not connect the network cable.
- Wait for about 1 minute for the camera to perform a self-test, the camera will start running.
- Open the app and tap “Add accessories” (1).
- Scan the QR Code on the bottom of the camera (2).
- Connect your smartphone to the camera’s network, tap the blue bar (3).
- When prompted, enter the camera’s default password: 01234567.
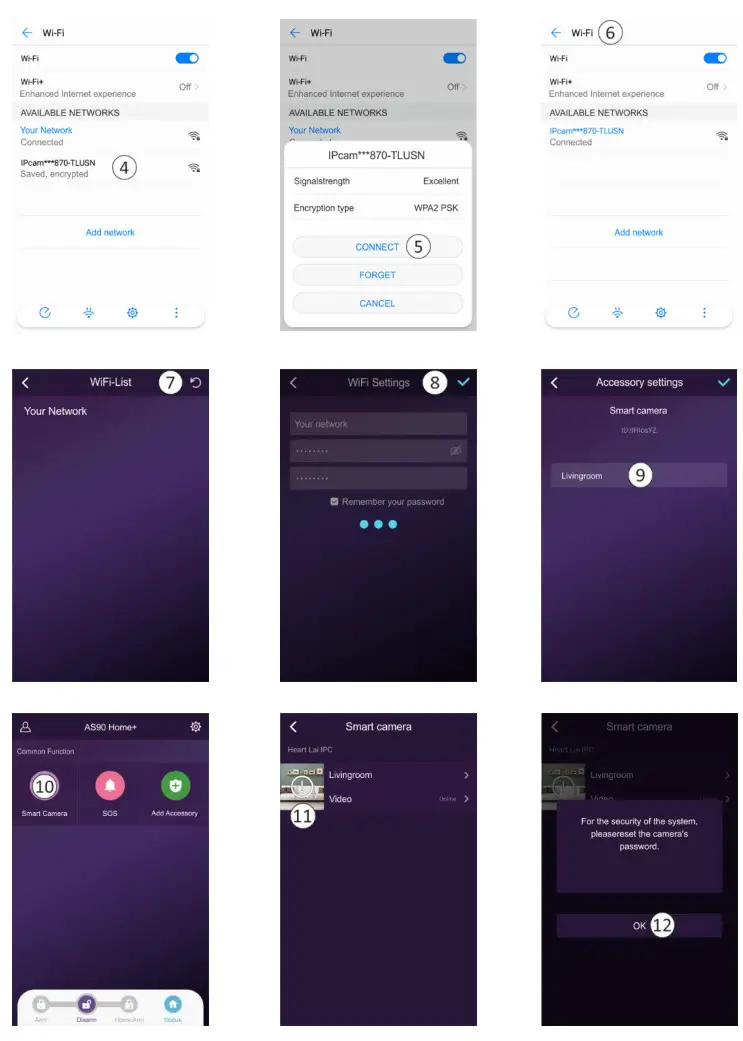
- The camera’s network IPcam***870-TLUSN (4) will now be visible in the WiFi list, tap it (Installation with Android tablet see page 5).
- Your smartphone is paired with the camera (5) (Installation with Android tablet see page 5).
- The camera is now not connected to the internet, only to your smartphone.
- Return to the WiFi list (6) (Installation with Android tablet see page 5).
- Choose your own network, refresh (7) if the network is not yet visible.
- Once your own network has been set up, press the blue “V” (8) to confirm.
- You can now give the camera a (location) name (9), click the blue “V” to agree.
- Now tap the Smart Camera icon (10).
- The camera will come online, tap the circle with the exclamation mark (11).
- You will now be asked to change the password “admin” (12).
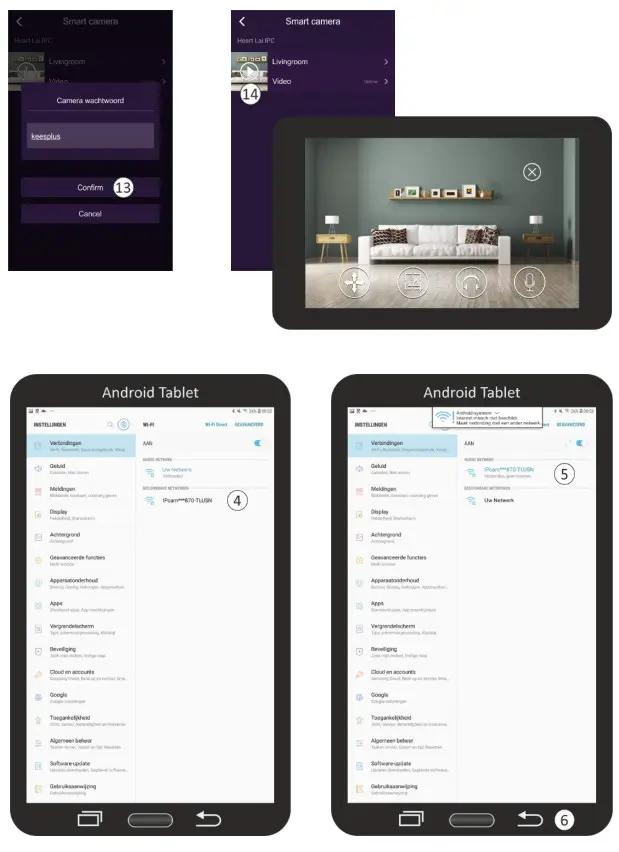
- Change the password and confirm (13), the camera is now successfully connected (14).
ADVICE: In case of an unstable network, you can connect a network cable to the camera and your router/modem after installation. 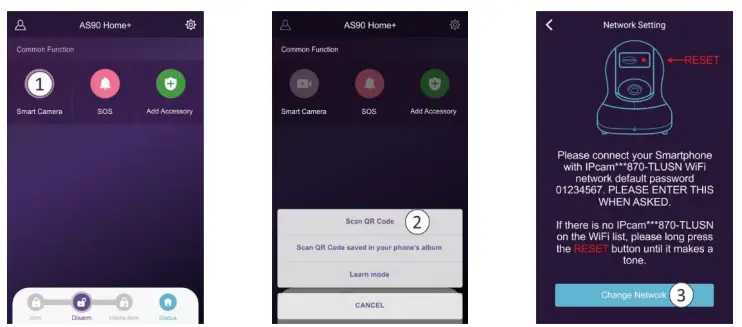
Explanation icons
| In this menu, you can point and zoom (4x) the camera. | |
| Tap to take a photo. | |
| Tap to listen. | |
| Press and hold to talk. |
Deleting a connection
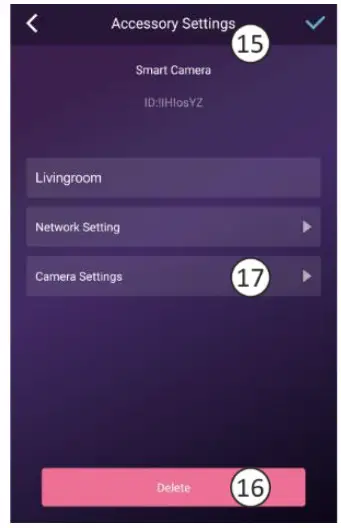
The link can be removed by tapping on the location name “Living Room” in the “Smart Camera” screen (14). You will then enter the “Accessory Settings” screen (15) and remove the link by tapping “Delete” (16).
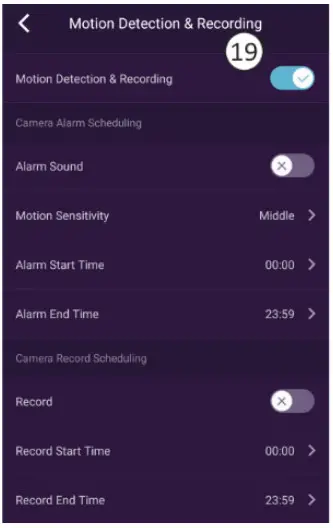
Motion detection and recording

A micro SD card of up to 128GB can be inserted. All recordings registered by the motion detection are stored on it. The recording lasts 15 seconds. Tap “Camera settings” (17) and then “Motion detection and recording” (18) to make settings (19).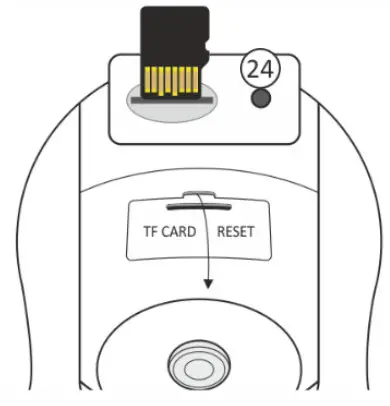
For retrieval of recordings, it is important that the camera is set equal to the time on your phone, select this option (20), and agree. Format the SD card before using it (21).
Playback recordings
When you start playback, recordings are retrieved from the SD card, please note that this may take a while. The camera always overwrites the oldest recordings. If you need to save recordings, you can copy the contents of the SD card to your PC or laptop. Recordings are recorded in (22) HD (high definition) by default. HD switched off is SD (standard definition).
Horizontal/vertical rotation
These functions (23) allow you to correct the Image in the app horizontally and vertically.
Reset
- This returns the camera to its factory settings. No network cable should be connected and a previous connection must be removed, see chapter 4 Removing a connection.
- Use the tip of a pencil/ballpoint pen or a paperclip to poke the hole (24) and hold it down for around 10 seconds. You will hear a beep and the camera will perform a self-test (pan/tilt function).
- Some time may pass before all data is deleted. Remove the mains adapter from the camera and wait for around 1 minute before reinserting it. Wait until the camera has completed the self-test and then reset the camera again.
Frequently asked questions
The camera is connected to the Internet but I cannot connect it to the app.
- The Installation must be carried out without a network cable.
- Make sure you have used the correct QR code during the pairing section.
- Make sure you are using 2.4GHz Wi-Fi, the camera cannot support 5GHz yet.
- The camera only supports IPV4. DHCP Server/Services must be enabled on the router setting.
- If you are using a firewall, all ports from 10000 to 65535 of the camera’s IP address must be allowed to go in/out in the firewall rule. We recommend that you allow the camera for all data. I cannot save the screenshots.
- The app needs to access your phone’s album to save the screenshots. You may need to approve the authorization. If you Incorrectly click the ‘No’ option during authorization, you may need to enable it in the system menu.
I am unable to pair the camera with an iOS smartphone. - Please try the installation with an Android smartphone/tablet. After installation, the camera will automatically be available for your 105 devices.
There is a lot of delays, during the Pan/Tilt function the image moves jerkily forward. - If you have an unstable network, you can connect a network cable to the camera and your router/modem after installation.
The camera regularly emits an audio signal. - This may indicate a restored WiFi signal. Make a permanent connection with a network cable to your router/modem.
Specifications
Camera
| Image sensor | 1/2.7″ 2MP CMOS |
| Effective pixels | 1920(H)x1080(V) |
| WDR (contrast) | Digital WDR |
| Noise Reduction | 3D DNR |
| Light sensor | (IR-Cut) Auto (ICR) / Colour / Black & White |
| IR distance | 9 meters (30 ft) |
| Supported SD Card (excl.) | Max. 128 GB |
Lens
| Focal length | 4 mm |
| Aperture | F2.1 |
| Focus | Fixed |
| Angle of View | 90° |
Audio
| Intercom | 2-way |
| Encoding | G711/G726 |
| Interface | Microphone Enclosed |
Video
| Encoding | H.264 Ma in/Baseline profile |
| Resolution | 1080P (1920X1080) 720P (1280×720) |
| Video Bitrates | 32Kbps ~ 8Mbps |
| Video Frame Rate | 15fps@1080P |
Netwerk
Algemeen
| Wireless distance | up to 50m (unobstructed) |
| Power supply | DC 5V/1A |
| Power Consumption | <5W |
| Operating temperature | -10°C~+60°C,10%~90% RH |
| Dimensions | 177 x 141 x 117mm |
| Weight | 650 gram |
DoC
– I, ELRO Europe, hereby declare that the radio equipment type AS90CA conforms to Directive 2014/53/EU. The full text of the EU Declaration of Conformity can be found at the following internet address: www.euro.EU/compliance”
– Frequency: 2.4GHz-2.4835GHz
– Maximum transmitting power: 19dBm
Symbols
![]() Recycling and Disposal: The WEEE symbol means that this product and batteries must be disposed of separately from household waste. When this product reaches the end of its life, take it to a designated waste collection point nearby to ensure safe disposal or recycling. Protect the environment and public health, handle natural resources responsibly!
Recycling and Disposal: The WEEE symbol means that this product and batteries must be disposed of separately from household waste. When this product reaches the end of its life, take it to a designated waste collection point nearby to ensure safe disposal or recycling. Protect the environment and public health, handle natural resources responsibly!![]() Read the manual before use and keep it in a safe place for future use and maintenance.
Read the manual before use and keep it in a safe place for future use and maintenance.![]() Warranty visit www.elro.eu
Warranty visit www.elro.eu![]() ELRO Europe | www.elro.eu
ELRO Europe | www.elro.eu
Postbus 9607 – Box E800
1006 GC Amsterdam – The Netherlands ![]()


